Advertisement
Quick Links
www.eurotronic.org
The new programmable
energy-saving radiator thermostat
Set up your heating and
saving times manually
or use the comfortable
USB memory stick!
Available as accessory!
3 – Inserting / replacing batteries
press
When
opening
the
battery compartment,
please
proceed
as
shown in the illustrati-
on. The compartment
is difficult to open and
therefore not acces-
sible to children.
Attention:
Never recharge batteries, danger of explosion! Do
not short-circuit batteries! Do not disassemble bat-
teries. Keep them away from children. Immediately
call the doctor if a battery is swallowed. If needed
clean the battery and the contacts before using
them. Dispose empty batteries directly because of
a higher danger of leakage! Keep batteries away
from extreme warming - danger of leakage! Avoid
contact with skin, eyes and mucosa. When getting
in touch with battery acid instantly irrigate the af-
fected parts with clear water and call the doctor.
Use only batteries of the same kind. Do not apply
used and new batteries together. Dispose the bat-
teries if you will not use the thermostat for a longer
period. Don't use accumulators! Ensure that
the polarity is correct!
Please read the user manual before you place the
thermostat. Keep the documents for later questi-
ons and provide them if you pass the thermostat on
to other persons.
Scope of delivery
1 SPARmatic Zero radiator thermostat
1 user manual
3 adapters
Application as directed
By purchasing the SPARmatic Zero radiator ther-
mostat you own a programmable radiator thermo-
stat which can be used for temperature regulation
in enclosed rooms. It fits to all common thermostat
valves (possibly with an adapter) and can contribu-
te to a reduction of heating energy.
Please use the thermostat only for this purpose.
You can programme all your SPAR-
matic Zeros easily, quickly and com-
fortably by PC with our USB memory
stick for programming!
Fittings are available at
www.eurotronic.org
4 – Setting date and time
After inserting the battery, SPARmatic Zero automa-
tically requests entry of date and time.
Set the year with the buttons
and
.
Confirm with the button
.
PROG
Set the month with the buttons
and
.
Confirm with the button
.
PROG
Set the day with the buttons
and
.
Confirm with the button
.
PROG
Set the hour with the buttons
and
.
Confirm with the button
.
PROG
Set the minute with the buttons
and
.
Confirm with the button
. – That's it.
PROG
The motor will move to the ON position to facilitate
installation. The instruction
is shown on the dis-
play (only for the first installation).
Changing date and time
SPARmatic Zero automatically switches from day-
light saving time to winter time. Nevertheless, if you
want to correct time and date in running operation:
Press the button
for 2 seconds. Then adjust as
PROG
described above.
1 – Function SPARmatic Zero
SPARmatic Zero has 2 control times:
comfort temperature (factory setting 21°C)
economy temperature (factory setting 16°C)
In automatic mode SPARmatic Zero changes bet-
ween these two temperatures according to the time
programme that has been set:
heating time: heating to comfort temperature
economy time: reduction to economy temperature
example for 2 heating times:
saving
saving
saving
heating
heating
7 am
9 am
6 pm
10 pm
Heating and economy times are specified via the
adjustable time programme. It is possible to set 8
switch points (4 heating and 4 economy times) per
day at the most. SPARmatic Zero has the following
factory preset:
1st heating time starts at 07:00
1st economy time starts at 22:00
5 – Installation
Select an adapter if necessary:
Adapters are required for some valve types. Pri-
or to mounting, select the appropriate adapter as
shown in the adapter table. If you require an adap-
ter: Push the adapter onto the valve and turn it until
it noticeably clicks into place. If the adapter is fitted
with a screw, tighten the adapter with the screw.
Adapter table
Heimeier, Junkers Landys+Gyr,
no adapter
MNG, Honeywell, Braukmann
required
thread-measure dimension of M 30x1,5
Danfoss RAV (accompanying pin must
be plugged on the valve tapped)
+accompanying
pin, only for RAV!
Danfoss RA
Danfoss RAVL
Additional adapter types are listed at:
www.eurotronic.org
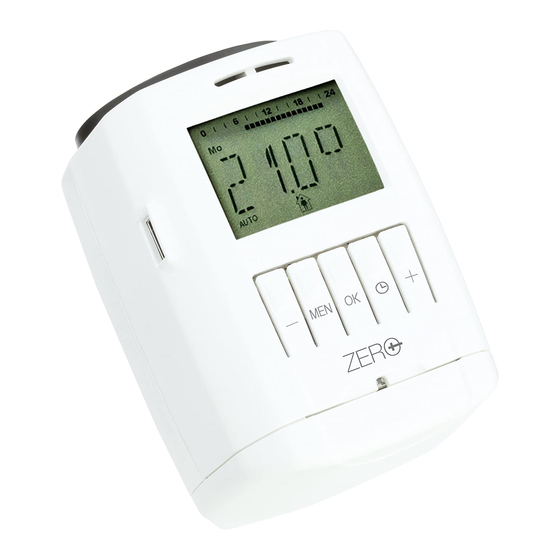
2 – Display and control elements
1
2.1 / 2.2 / 2.3
3
4
5
6
7
1
heating or economy time in hours
2.1 comfort temperature
2.2 economy temperature
2.3 window function
3
mode AUTO, MANU, PROG or
AUTO
4
button
– change between AUTO-
MANU
and MANU-mode
5
button
– set comfort and economy
temperature
6
button
– set the time programme
PROG
7
button
or
– adjust temperature and time
SPARmatic Zero can be easily mounted on all
common valve bodies. It can be installed without
grime and water spots, because the heating water
circuit is not interrupted.
Loosen the fastening of the old thermostat head,
pull the thermostat head off of the valve. The inst-
ruction
is shown on the display. Since SPAR-
matic Zero has already moved into the ON position
while date and time were programmed it can be
quickly and easily mounted without any trouble.
Screw the union nut until the device is firmly fixed
on the valve body. For possible later installations
move the valve to ON with the button
. This faci-
litates the installation.
Advertisement

Subscribe to Our Youtube Channel
Related Manuals for Eurotronic SPARmatic ZERO


Summary of Contents for Eurotronic SPARmatic ZERO
- Page 1 You can programme all your SPAR- switch points (4 heating and 4 economy times) per matic Zeros easily, quickly and com- temperature day at the most. SPARmatic Zero has the following fortably by PC with our USB memory factory preset: button –...
- Page 2 Child lock Set the beginning of the 2nd economy time with the button > 2 seconds until adaptation begins. You can lock SPARmatic Zero to protect the device Window function buttons . Confirm with the button PROG from unauthorized activation. To do this press the If you open a window and consequently the tem- 7 –...
Need help?
Do you have a question about the SPARmatic ZERO and is the answer not in the manual?
Questions and answers