Advertisement
Quick Links
www.eurotronic.org
programmable energy-saving
radiator thermostat
User manual and Guarantee
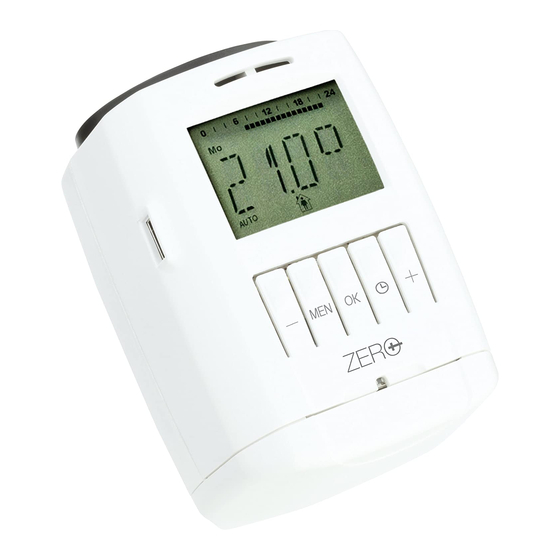
Display and control elements
1
Heating times
2
Child lock active
0
6
12
18
24
3
Battery low
Mo
Di
Mi
Do
Fr
Sa
So
:
4.a Travel function
active
AUTO
MANU
4.b Comfort tempe -
rature active
4.c Economy tempe -
rature active
4.d Window/freeze
protection function
active
5. AUTO or MANU mode active
6.a Button
– leads to the main menu
MENU
(starting from regular display); within the
menu one keypress leads to the previous level
6.b Button
– confi rmation of setting
OK
6.c Button
– timer function
7
Button
and
By the way...
Do you already know about PROGmatic? – You can
programme SPARmatic Zero by hand or you can use
our convenient programming stick to copy your per-
sonally specifi ed heating and economy times onto all
your EUROtronic energy-saving radiator thermostats
at your home which have a programming port in a
matter of seconds.
PROGmatic is available
from specialised stores
and at: www.eurotronic.org
2
Set up menu
By pressing
you will arrive at the set up menu.
MENU
Please choose one of the items with the Button
1
or
. With
you can select one menu item and
OK
2
with the Button
or
they can be adjusted. The
3
button
confi rms the setting. The button
OK
4
leads to the previous level.
5
6
to select the mode
AUTO = automatic mode
7
MANU = manual mode
setting of time programme
setting of comfort and
economy temperature
setting of date and time
window function
reset of the device to factory preset
starting of a new adaptation
to adjust the valve
travel function
installation function
adaptation of temperature
to the room situation
standby function
5
6
Index
4 – Scope of delivery, application as directed
5 – Display and control elements
6 – Set up menu
7 – Inserting / replacing batteries
8 – Setting date and time
9 – Installation
10 – Dismounting
11 – Adaptation
12 – Basic operating modes
13 – Setting heating and economy times
14 – Setting comfort and economy temperature
15 – Manual operation
15 – Additional setting possibilities
19 – Cleaning and used devices
20 – Adapter
21 – Help
22 – Declaration of Conformity and Guarantee
Inserting / replacing batteries
In order to open the battery
compartment please
push at the marked
positions to
remove
MENU
the cover.
Then insert the
batteries as shown
in the illustration.
Do not use accumulators!
Ensure that the polarity is correct!
Attention:
Never recharge batteries, danger of explosion! Do
not short-circuit batteries! Do not disassemble bat-
teries! Take low batteries out of the device immedi-
ately. Keep batteries away from extreme warming
– danger of leakage! Do not apply used and new
batteries together. If needed, clean the battery and
the contacts before using them. Keep the batteries
away from children. When getting in touch with bat-
tery acid instantly irrigate the affected parts with
clear water and call a doctor.
Please read the user manual before you place the
thermostat. Keep the documents for later questi-
ons and provide them if you pass the thermostat
on to other persons.
Scope of delivery
1 SPARmatic Zero
energy saving radiator thermostat
1 User manual
1 Connector
3 Adapters
Application as directed
By purchasing the SPARmatic Zero energy- saving
radiator thermostat you own a programmable radi-
ator thermostat which can be used for temperature
regulations in enclosed rooms and therefore, it can
contribute to the reduction of heating energy. – Ple-
ase use the thermostat only for this purpose.
The EUROtronic programming port is intended
ONLY for our EUROtronic programming stick.
Never connect other devices with the program-
ming port!
4
3
Setting date and time
After inserting the batteries for the fi rst time the date
will fl ash on the display. Now, date and time can be set.
Set date with the Button
or
.
Confi rm with
.
OK
Set month with the Button
or
.
Confi rm with
.
OK
Set day with theButton
or
.
Confi rm with
.
OK
Set hour with the Button
or
.
Confi rm with
.
OK
Set minute with the Button
or
.
Confi rm with
– That´s it.
OK
On the display
will be shown. Now, the mo-
tor will completely move to the installation position
in order to make the installation easier. As soon as
SPARmatic Zero is ready for installation
shown on the display.
You can also set date and time via the menu item
later on. But in case of that, SPARmatic Zero
does not move to the installation position.
➔ In case of replacing batteries, the stored time
programme will remain active. You should
check the specifi ed time to ensure that.
7
8
will be
Advertisement

Subscribe to Our Youtube Channel
Related Manuals for Eurotronic SPARmatic Zero


Summary of Contents for Eurotronic SPARmatic Zero
- Page 1 Do you already know about PROGmatic? – You can regulations in enclosed rooms and therefore, it can programme SPARmatic Zero by hand or you can use 13 – Setting heating and economy times contribute to the reduction of heating energy. – Ple- our convenient programming stick to copy your per- 14 –...
-
Page 2: Manual Operation
If the perceived temperature signifi cantly differs obtained with an economy temperature which With SPARmatic Zero it is possible to set 4 heating is about 5 ˚C below the comfort temperature. from the set thermostat temperature a temperature ➔... -
Page 3: Declaration Of Conformity
Cleaning from unauthorized activation. display will be activated again. (by removing the Help To clean the SPARmatic Zero use only a dry or Press the buttons at the same time battery, standby mode will be reseted). Increases lightly wet cloth. Avoid chemical solvent – it can...
Need help?
Do you have a question about the SPARmatic Zero and is the answer not in the manual?
Questions and answers