Table of Contents
Advertisement
Quick Links
Wingspan: 29.5 in [745mm]
2
Wing Area: 300 sq in [19dm
]
Weight: 20 – 24 oz [567 – 680g]
Wing Loading: 10 – 12 oz/sq ft [31 – 37g/dm
Length: 23.5 in [600mm]
Required (not included):
Radio: 4-channel with four micro servos
™
™
Motor: ElectriFly
Rimfi re
28-30-950 brushless
ESC: ElectriFly SS-25
Battery: 11.1V 1250mAh LiPo
Great Planes
®
Model Manufacturing Co. guarantees this kit to be free from defects in both material and workmanship at the date of purchase.
This warranty does not cover any component parts damaged by use or modifi cation. In no case shall Great Planes' liability exceed the
original cost of the purchased kit. Further, Great Planes reserves the right to change or modify this warranty without notice.
In that Great Planes has no control over the fi nal assembly or material used for fi nal assembly, no liability shall be assumed nor accepted
for any damage resulting from the use by the user of the fi nal user-assembled product. By the act of using the user-assembled product,
the user accepts all resulting liability.
If the buyer is not prepared to accept the liability associated with the use of this product, the buyer is advised to return this kit
immediately in new and unused condition to the place of purchase.
To make a warranty claim send the defective part or item to Hobby Services at the address below:
Include a letter stating your name, return shipping address, as much contact information as possible (daytime telephone number, fax
number, e-mail address), a detailed description of the problem and a photocopy of the purchase receipt. Upon receipt of the package
the problem will be evaluated as quickly as possible.
READ THROUGH THIS MANUAL BEFORE
STARTING CONSTRUCTION. IT CONTAINS
IMPORTANT INSTRUCTIONS AND WARNINGS
CONCERNING THE ASSEMBLY AND USE OF
THIS MODEL.
Entire Contents © Copyright 2007
INSTRUCTION MANUAL
2
]
WARRANTY
Hobby Services
3002 N. Apollo Dr., Suite 1
Champaign, IL 61822 USA
Champaign, Illinois
(217) 398-8970, Ext 5
airsupport@greatplanes.com
GPMZ1142 for GPMA1142 V1.0
™
Advertisement
Table of Contents

Related Manuals for GREAT PLANES fokker DR-1


Summary of Contents for GREAT PLANES fokker DR-1
- Page 1 Further, Great Planes reserves the right to change or modify this warranty without notice. In that Great Planes has no control over the fi nal assembly or material used for fi nal assembly, no liability shall be assumed nor accepted for any damage resulting from the use by the user of the fi...
-
Page 2: Table Of Contents
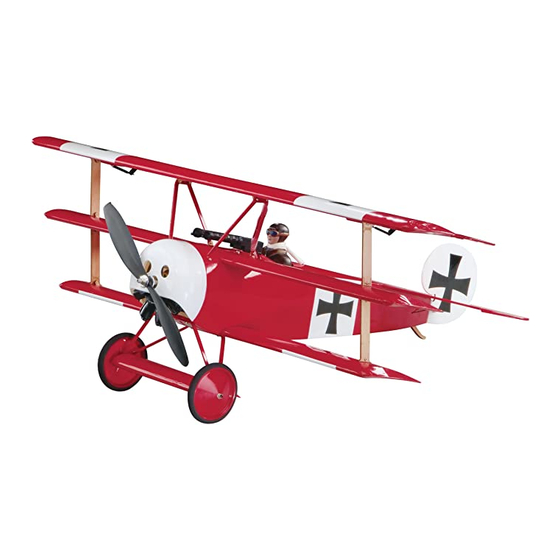
“Red Baron”! Hardware & Accessories ..........3 Adhesives & Building Supplies ........3 The Fokker DR-1 is to this day, nearly a century after the Optional Supplies & Tools ..........4 record-setting exploits of the “Red Baron,” one of the most IMPORTANT BUILDING NOTES ........ -
Page 3: Safety Precautions
BATTERY CHARGER OPTIONS & OTHERS..FOLLOW THESE IMPORTANT SAFETY PRECAUTIONS The Great Planes Fokker DR-1 EP ARF is designed for use with LiPo (Lithium-Polymer) batteries only. All LiPo batteries require a charger specifi cally designed for charging LiPo batteries. The 1. Your Fokker DR-1 EP ARF should not be considered a toy,... -
Page 4: Optional Supplies & Tools
ORDERING REPLACEMENT PARTS Optional Supplies & Tools Replacement parts for the Great Planes Fokker DR-1 EP ARF Here is a list of optional tools mentioned in the manual that are available using the order numbers in the Replacement will help you build the Fokker DR-1 EP ARF. -
Page 5: Kit Inspection
If any parts are missing or are not of acceptable quality, or if you need assistance with assembly, contact Product Support. When reporting defective or missing parts, use the part names exactly as they are written in the Kit Contents list. Great Planes Product Support: 3002 N Apollo Drive, Suite 1 Champaign, IL 61822 Telephone: (217) 398-8970, ext. -
Page 6: Preparations
PREPARATIONS ASSEMBLE THE WING ❏ 1. If you have not done so already, carefully remove the Install the Ailerons major parts of the kit from the box (wing, fuselage (fuse), tail parts, etc.) and inspect them for damage. If any parts are damaged or missing, contact Product Support at the address or telephone number listed on page 5. -
Page 7: Assemble The Fuse
ASSEMBLE THE FUSE Mount the Bottom Wing ❏ 2. Mark the center of the TE of the stab. Place the stab onto the stab saddle. ❏ 1. Locate two of the 3mm x 24mm [1/8" x 15/16"] dowel rods and insert them into the bottom wing as shown, so that only about 9mm [11/32"] sticks out. -
Page 8: Radio Installation
❏ 6. Use a fi ne-point felt-tip pen to mark the outline of the fuse onto the bottom of the stab. ❏ 7. Remove the stab from the fuse. Use a sharp #11 hobby knife or the “Expert Tip” that follows to cut the covering from the stab just inside the lines you marked. -
Page 9: Install The Linkages
Install the Linkages ❏ 2. Attach the RimFire motor to the back of the plywood motor mount with three 3mm x 6mm [1/8" x 15/64"] machine screws. Apply a drop of threadlocker on the threads of the machine screws. Insert each of three 3mm x 30mm [1/8" x 1-3/16"] machine screws through a 3mm [1/8"] washer, the outer holes of the motor mount, another 3mm [1/8"] washer, a 17mm [21/32"] tube, and another 3mm [1/8"] washer as shown... - Page 10 arms. Insert a screw-lock pushrod connector in the hole of each servo arm approximately 9mm [11/32"] from the center of the servo. Secure the screw-lock pushrod connector to the servo arm with a nylon retainer. ❏ 2. Position the servos on the servo rails, aligning them with the pushrod wires.
-
Page 11: Finish The Model
❏ 10. Secure each aileron servo hatch to the wing with four ❏ 2mm x 6mm [5/64" x 15/64"] self-tapping washer head screws. 14. Run the Y-harness receiver plug from the top wing through the slot on the top of the fuse and plug it into the appropriate receiver channel. -
Page 12: Install The Top Wing
❏ ❏ 3. Locate the ABS wing fairing. Trim the front and back as 3. Grab the two strut mounts that you marked “B” and needed for a good fi t. Use medium CA to secure it in place insert them into the pockets on top of the middle wing as as shown. -
Page 13: Install The Sub-Wing & Landing Gear
❏ 2. Secure the sub-wing to the landing gear with two 2mm x ❏ 6. Study the above drawing carefully. It shows the direction 6mm [5/64" x 15/64"] self-tapping screws as shown. Remove and placement of the remaining 8 strut mounts and the four the screws and harden the holes with thin CA. -
Page 14: Install The Machine Gun & Dummy Engine
Install the Machine Gun & Dummy Engine ❏ 2. Slide the prop shaft and collet onto the motor shaft. The collet has a tapered hole through it. ❏ 1. Remove a 13mm x 13mm [1/2" x 1/2"] square of covering from the top of the fuse in front of the cockpit and use CA to attach the machine gun mount. -
Page 15: Assemble The Pilot Figure
(STANDARD MODE 2) ❏ 4-CHANNEL 4-CHANNEL TRANSMITTER TRANSMITTER 2. Sand each half using 150- or 220-grit sandpaper and a ELEVATOR MOVES UP RUDDER MOVES RIGHT Great Planes Easy-Touch ™ bar sander. 4-CHANNEL 4-CHANNEL TRANSMITTER TRANSMITTER RIGHT AILERON MOVES UP FULL THROTTLE LEFT AILERON MOVES DOWN ❏... -
Page 16: Set The Control Throws
5/8" [16mm] right 1" [25mm] left 5/8" [16mm] left ❏ 2. If you are balancing the Fokker DR-1 EP ARF on the AILERONS: 3/8" [10mm] up 1/4" [6.4mm] up Great Planes CG Machine, you will fi nd that the angle of 3/8"... -
Page 17: Balance The Model Laterally
™ We use a Top Flite Precision Magnetic Prop Balancer (TOPQ5700) in the workshop and keep a Great Planes Always use a charger designed to charge LiPo batteries for Fingertip Prop Balancer (GPMQ5000) in our fl ight box. -
Page 18: Ama Safety Code (Excerpts)
Never leave the LiPo battery unattended while charging. If the 9) Under no circumstances may a pilot or other person battery becomes more than just warm, discontinue charging. touch a powered model in fl ight; nor should any part of the model other than the landing gear, intentionally touch the ground, except while landing. -
Page 19: Flying
FLYING Flight The Fokker DR-1 EP ARF is a great-fl ying model that fl ies For reassurance and to keep an eye on other traffi c, it is a smoothly and predictably. The Fokker DR-1 EP ARF does good idea to have an assistant on the fl ight line with you. Tell... - Page 20 Every maneuver should be deliberate, not impulsive. For example, if you’re going to do a ElectriFly S.E. 5a WWI Park Flyer EP ARF by Great Planes loop, check your altitude, mind the wind direction (anticipating On your next trip to the park or fl...
Need help?
Do you have a question about the fokker DR-1 and is the answer not in the manual?
Questions and answers