Advertisement
Table of Contents
Advertisement
Table of Contents

Related Manuals for BIANCHI VENDING BVM 333


Summary of Contents for BIANCHI VENDING BVM 333
- Page 1 Downloaded from CoffeeMachineManual.com Manuals...
-
Page 2: Information To The Users
INFORMATION TO THE USERS Under art. 13, Legislative Decree 25 July 2005, no.151 “Implementation of Directives 2002/95/EC and 2003/108/EC, regarding the reduction of use of hazardous substances in electrical and electronic equipment as well as waste disposal”. The barred waste container symbol on the equipment means that the product, at the end of its service life, must be disposed of separately from the other types of waste. - Page 3 • Do not touch the hot surfaces; use the controls and handles that have been specifi cally designed for this purpose. Thank you for choosing this Bianchi Vending product and for placing • Disconnect the coffee-maker when it is not in use and before clean- ing.
-
Page 4: Safety Standards
2 PRECAUTION 4 SAFETY STANDARDS • Remove all the used elements to protect the product during trans- In the event of an emergency port, as well as all material used for promotions, such as plastic Unplug the coffee-maker immediately. bags, cardboard, stickers, the digital screen protection, etc. on both The coffee-maker must be used only: the outside and inside of the coffee-maker. - Page 5 5 PARTS Hazards • Do not aim the steam jet or hot water directly at anyone, since there is a risk of burns. • Do not place any objects inside the coffee-maker under any circum- Switch stances (electrical hazard). • Do not touch the coffee-maker if your hands are wet. Do not unplug the coffee-maker by pulling on the power cable Responsibilities •...
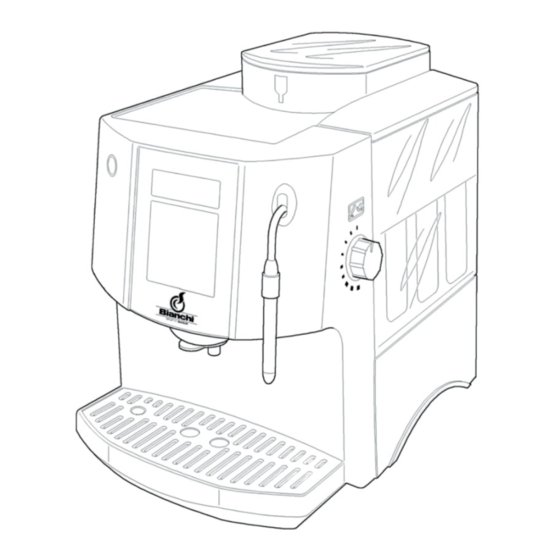
- Page 6 Coffee bean tank cover Grind level adjustment Coffee bean compartment Ground coffee tank/sugar cube Water tank cover compartment Cup-warmer Water tank Standby switch Information screen Steam regulator Steam nozzle Touchscreen Height-adjustable coffee outlet Handles Tray water level indicator Removable drip tray Downloaded from CoffeeMachineManual.com Manuals...
-
Page 7: Touch Screen
6 ACCESSORIES 7 BREWING UNIT, THE HEART OF THE COFFEE-MAKER For your convenience, all the accessories are in a box with the instruc- tions handbook: This super-automatic coffee-maker has a 1. Ground coffee dispensing spoon. Capacity 8 g, approx. professional unit manufactured and develo- 2. -
Page 8: Installation
9 INSTALLATION 6. The fi rst time you use the coffee-maker, its internal circuits need to be fi lled with water. The steam jet/hot water regulator icon appears on If you fi nd coffee grounds, it is because the coffee-maker has been the LCD screen to indicate that the circuit needs to be fi... -
Page 9: Programming Your Coffeemaker
15. The coffee-maker will indicate when it is ready with a beep and a Important! If you grind the coffee too fi nely (grinding level regulator hand will be displayed on the screen. full to the left), the coffee will brew very slowly. N.B. - Page 10 B) Adjusting the amount of coffee Espresso coffee Large coffee Before dispensing the coffee, choose the amount of coffee you want to make, depending on whether you want a strong or weak coffee. 1 coffee cup If you want a weak coffee, press the button: If you want a strong coffee, press the selector: 2 coffee cups 12 OBTAINING THE COFFEE...
- Page 11 5. Next, the coffee-maker performs a preliminary infusion of the ground 2. Use the dispensing spoon to calculate the amount of ground coffee. coffee. The coffee is injected with hot water, which is distributed IMPORTANT! The maximum amount is one fl at spoonful of coffee (8 evenly around the coffee.
-
Page 12: Hot Water
13 HOT WATER 14 STEAM 1. Check that the coffee-maker is ready. 1. Check that the coffee-maker is ready. 2. Place the glass or cup under the steam noz- 2. Place a glass or jug under the steam nozzle. zle. 3. - Page 13 7. Press the ‘steam’ or ESCAPE button to turn off the steam. The frame 5. Open the steam nozzle, turning the steam regulator. surrounding the steam will disappear. 8. The coffee-maker automatically stabilises the temperature inside the system. This automatic process takes approximately 25 seconds, during which water is expelled through the coffee outlet.
-
Page 14: Lime Scale Removal
PROGRAMMING YOUR COFFEE-MAKER. 7. Prepare the lime scale removal solution as indicated on the sachet containing the removal agent supplied by Bianchi Vending. Pour the IMPORTANT!! DO NOT USE VINEGAR OR ANY OTHER LIME content into the water tank and add water up to the lime scale re- SCALE REMOVAL AGENT NOT SUPPLIED BY BIANCHI VENDING moval mark on the tank. -
Page 15: Cleaning And Maintenance
a) To confi rm the lime scale removal process, press the ‘P’ button. 12. Once the lime scale removal process has fi nished, the system must be rinsed to make sure that all remains of the removal agent are re- moved. -
Page 16: Brewing Unit
4. Remove the drip tray and empty it. Wash it with water. 2. Remove the grounds compartment. 5. Remove the grounds compartment (used coffee) and empty it. Wash it with water. 6. Unscrew the steam nozzle together with the outlet and clean all the parts. If it is blocked, clean the air inlet hole of the steam nozzle with a needle to optimise the steam function. - Page 17 6. Remove the unit. 10. Move the unit lever to the right. 7. Wash the unit under the tap with plenty of hot water. 11. Screw up the top of the unit. 8. Wait until the unit is completely dry. 12.
- Page 18 14. Close the side cover. 2) Before turning off and to prevent the coffee outlet from being blocked with coffee remains, the coffee-maker expels a little water and cleans the coffee outlet. This function has been designed to save you from having to carry out this cleaning process manually.
- Page 19 A) ADJUSTING THE AMOUNT OF WATER FOR AN ESPRESSO COFFEE Press the Sequence Message on screen. button 1. The coffee-maker is ready. 2. Press the ‘P’ button to enter the programming menu. 3. The fi rst programme is for adjusting the amount of water per cup. You can programme the amount for each type of coffee you can obtain.
- Page 20 B) ADJUSTING THE AMOUNT OF WATER FOR A LARGE COFFEE Press the Sequence Message on screen. button 1. The coffee-maker is ready. 2. Press the ‘P’ button to enter the programming menu. 3. The fi rst programme is for adjusting the amount of water per cup. You can programme the amount for each type of coffee you can obtain.
- Page 21 C) ADJUSTING THE AMOUNT OF WATER FOR 2 ESPRESSOS Press the Sequence Message on screen. button 1. The coffee-maker is ready. 2. Press the ‘P’ button to enter the programming menu. . 3. The fi rst programme is for adjusting the amount of water per cup. You can programme the amount for each type of coffee you can obtain.
- Page 22 D) ADJUSTING THE AMOUNT OF WATER FOR 2 LARGE COFFEES Press the Sequence Message on screen. button 1. The coffee-maker is ready 2. Press the ‘P’ button to enter the programming menu 3. The fi rst programme is for adjusting the amount of water per cup. You can programme the amount for each type of coffee you can obtain.
-
Page 23: Energy Saving
E) ENERGY SAVING Press the Sequence Message on screen. button 1. The coffee-maker is ready. 2. Press the ‘P’ button to enter the programming menu. 3. Press the ‘>’ button until the ‘auto-off’ symbol appears on the screen. > 4. To programme this function, press ‘P’. 5. -
Page 24: Water Hardness
F) WATER HARDNESS The hardness of the tap water varies with each region and you should test the hardness of the water you are going to use in your coffee-maker. Once the coffee-maker has been programmed with the hardness of the water, it will indicate when the lime scale should be removed from the system. First of all, test the water hardness. - Page 25 G) DIGITAL SCREEN CONTRAST Press the Sequence Message on screen button 1. The coffee-maker is ready. 2. Press the ‘P’ button to enter the menu. 3. Press the ‘>’ icon until the ‘contrast’ icon is displayed. > 4. To programme the screen contrast, press ‘P’. 5.
-
Page 26: Segnali Acustici
H) SEGNALI ACUSTICI Press the Sequence Message on screen button 1. The coffee-maker is ready. 2. Press the ‘P’ button to enter the programming menu. 3. Press the ‘>’ icon until the ‘beep’ icon is displayed. > 4. To enter the beeps programme, press ‘P’. 5. - Page 27 19 MESSAGES Function Icon on display Comment The coffee-maker needs to fi ll its internal circuits with water. Before tran- sporting the coffee-maker, the circuits are emptied to prevent the forming Fill the system with water. of bacteria and must then be refi lled. To fi ll the system, use the steam regulator..
- Page 28 Function Icon on display Comment SELECT COFFEE/LIME SCALE REMOVAL. The coffee-maker will conti- Lime scale removal nue to make coffee but indicate that the lime scale needs to be removed from the machine. EMPTY THE DRIP TRAY AND FILL THE WATER TANK WITH CLEAN Cleaning the tray at the WATER.
-
Page 29: Troubleshooting
20 TROUBLESHOOTING PROBLEM CAUSE SOLUTION Press the switch, position ‘I’ (on). The coffee-maker does not come The coffee-maker is not connected to the Check the cable and the plug. mains If it still does not come on, take the coffee-maker to an authorised technical service centre. - Page 30 PROBLEM CAUSE SOLUTION Part of the ground coffee may have been Use the brush included with the accessories to make the coffee left in the inlet drop or use the back of the dispensing spoon. Clean the blocked pipe with a needle. No steam or hot water is obtai- The steam nozzle is blocked.
- Page 31 Downloaded from CoffeeMachineManual.com Manuals...
- Page 32 Downloaded from CoffeeMachineManual.com Manuals...
Need help?
Do you have a question about the BVM 333 and is the answer not in the manual?
Questions and answers