Advertisement
Table of Contents
- 1 Instructions for Use
- 2 Table of Contents
- 3 Intended Use
- 4 Indications for Use
- 5 Important Information - Read before Use
- 6 System Parts
- 7 Ascope 3 System Usage
- 8 Cleaning and Disinfection of Aview
- 9 Technical Product Specifications
- 10 Connecting Accessories
- 11 How to Operate Aview
- 12 Trouble Shooting
- 13 Appendix 1: Electromagnetic Compatibility
- 14 Appendix 2. Standards Applied
- 15 Appendix 3. Warranty and Replacement Program
- Download this manual
Advertisement
Table of Contents

Related Manuals for Ambu aScope 3 5.0/2.2


Summary of Contents for Ambu aScope 3 5.0/2.2
-
Page 1: Instructions For Use
Instructions for use Ambu® aScope™ 3 5.0/2.2 & aScope™ 3 Slim 3.8/1.2 Ambu® aView™ For use by trained clinicians/physicians only. For in-hospital use. - Page 2 In der Hub 5 D-61231 Bad Nauheim China Tel.: +49 6032 92500 Fax: +49 800 ambude Ambu Complex Building, No. C, 5th floor www.ambu.de Xiang Yu F.T.Z. Xiamen 361006 China Tel.: +86 592 602 5212 Fax: +86 592 602 5390 Ambu Ltd.
- Page 3 English Lietuviškai Directions for use ..........4-30 Naudojimo instrukcijos .
-
Page 4: Table Of Contents
Contents Page 1. Important information – read before use ....................5 2. -
Page 5: Intended Use
Endoscopic accessories designed for a minimum working channel width up to 1,2 mm can be used with the aScope 3 Slim 3.8/1.2 .Endoscopic accessories designed for a minimum working channel width1 up to 2.0 mm can be used with the aScope 3 5.0/2.2. -
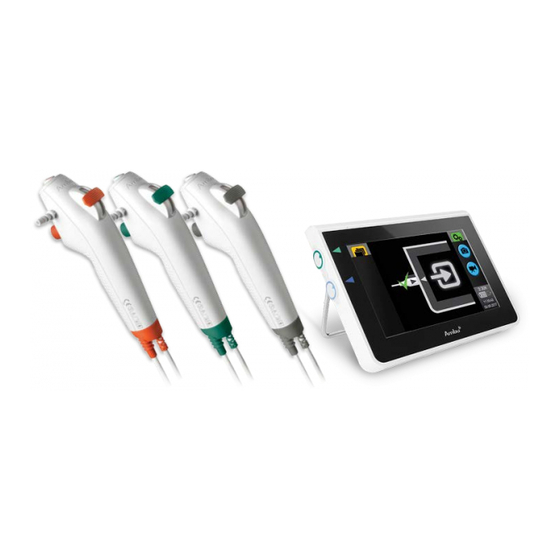
Page 6: System Parts
Ambu is not responsible for any damage to the system or patient resulting from incorrect use. 2. System Parts CAUTION The aScope 3 system consists of the parts described in section 2. They may only be replaced by Ambu authorized parts. Failure to comply with this may reduce safety and efficiency. 2.1. System Parts... - Page 7 The aScope 3 system consists of the aScope 3 and the aView. To avoid risk of cross-contamination the aScope 3 is a sterile single use device. The aView is reusable. There are 2 different variants of the aScope 3: aScope 3 5.0/2.2 and aScope 3 Slim 3.8/1.2 Product Name Differentiation aScope 3 5.0/2.2...
- Page 8 aView The aView displays the video image from the aScope 3. During start up, aView powers up and configures the aScope 3. If the aView battery icon on the screen changes from fully charged to low battery (red battery) within 30 minutes, aView must be replaced. Monitor Casing ON/OFF button Push button for power...
- Page 9 Symbols for the aView Indication Lights up when visualization device is connected. The icon colour will match the colour of the interface used. Max. Min. Fully charged battery battery battery still The icon remains white until one block is left, after which it turns red. status of status of connected...
- Page 10 Lot Number, Batch Code Serial Number Warning Consult Instruction for use Year of Manufacture, followed by YYYY...
-
Page 11: Ascope 3 System Usage
Do not use the aScope 3 system if it is damaged in any way or if any part of the functional check described below fails. CAUTION The aScope 3 system consists of the parts described in section 2. They may only be replaced by Ambu authorised parts. Failure to comply with this may reduce safety and efficiency. - Page 12 Preparation of aScope 3 1. Carefully slide the bending control lever forwards and backwards in each direction until it stops. Confirm that the bending section functions smoothly and correctly. 2. Slide the bending lever slowly to its neutral position. Confirm that the bending section returns smoothly to a neutral position. 3.
- Page 13 Insertion of the aScope 3 CAUTION When inserting the aScope 3 orally, it is recommended to use a mouthpiece to protect the aScope 3 from being damaged. Lubricate the insertion cord with a medical grade lubricant to ensure the lowest possible friction when the aScope 3 is inserted into the patient. If the camera image of the aScope 3 becomes unclear the tip can be cleaned by gently rubbing the tip against the mucosal wall or remove the aScope 3 and clean the tip with a piece of sterile gauze or a hospital disinfection wipe.
-
Page 14: Cleaning And Disinfection Of Aview
Withdrawal of the aScope 3 WARNING While withdrawing the aScope 3, the distal tip must be in a neutral and non-deflected position. Do not operate the bending lever, as this may result in injury to the patient and/or damage to the aScope 3. When withdrawing the aScope 3, make sure that the control lever is in the neutral position. -
Page 15: Technical Product Specifications
4.2. Disinfection 1. Wipe the surfaces of aView for approximately 15 minutes using a piece of sterile gauze moistened with the alcohol mixture indicated below (approxi- mately once every 2 minutes). Follow safety procedures for the handling of isopropyl. The gauze should be moist and not dripping since liquid can affect the electronics inside the aView. - Page 16 Storage and transportation Temperature 10 ~ 40°C (50 ~ 104°F) 10 ~ 40°C (50 ~ 104°F) Relative humidity 30 ~ 85% 30 ~ 85% Atmospheric pressure 80 ~ 109 kPa 80 ~ 109 kPa Sterilisation Method of sterilisation 3 Please be aware that the bending angle can be affected if the insertion cord is not kept straight 4 There is no guarantee that accessories selected solely using this minimum instrument channel width will be compatible in combination.
-
Page 17: Connecting Accessories
6. Connecting accessories CAUTION The aScope 3 system consists of the parts described in section 2. They may only be replaced by Ambu authorized parts. Failure to comply with this may reduce safety and efficiency. The aView is not intended to be repaired. If defect the aView shall be discarded. -
Page 18: How To Operate Aview
11:55:30PM SIMPLE MODE starts automatically once the aView User Interface is loaded. - Live image from a plugged in Ambu Visualization Devices is available. Further functions available are battery status, brightness/contrast control and possibility of displaying device usage time for the connected device. - Page 19 Blue tab for Live Image ADVANCED MODE starts in the blue Live Image tab - Live image from a plugged in Ambu Visualization Devices is available. Further functions available are recording, zooming in live image, battery status, status of microphone, brightness/contrast con- trol and possibility of displaying device usage time for the connected device.
- Page 20 - aView is now in STARTUP IMAGE MODE. - A live image will appear within 1-2 seconds if a Ambu Visualization Device is connected or a blue screen will appear. - After about one minute, aView will be ready in Simple Mode.
- Page 21 (Accessible from SIMPLE MODE Visualization Device is connected. and ADVANCED MODE indicator bar) How to take a SNAPSHOT Keep the Ambu Visualization device as still as possible when taking a snapshot to prevent blurring of the picture. Press to take snapshot.
- Page 22 How to locate recorded files Press the yellow File Management tab to access the file structure. and folders (For file placement see section ‘Placement of files’) (Accessible from ADVANCED MODE Press a folder once to select. – File Management tab - The folder icon will appear open when selected Press...
- Page 23 How to rename a file or folder Press the file or folder to select - The folder icon will appear open when selected - File is highlighted when selected Press to rename the folder or file. - Foldername/filename and keyboard appears - Use the backspace to delete old foldername/filename and enter the new one - Confirm name by pressing (Assumption: The folder, snapshot or video...
- Page 24 NOTE: (Assumption: The ADMIN account is logged in) User files and accounts will remain after update. Only use software upgrade files supplied by Ambu. If the ADMIN is not logged in the is not accessible. How to RESET to factory defaults Connect the power adapter before running the command to do a reset to defaults.
- Page 25 How to DELETE all user data Connect the power adapter before running the command to delete all user data. Press to enter software settings Press to delete all user data NAME NAME - Press to confirm deletion of all data - Press to cancel deletion Accessible in ADVANCED MODE...
-
Page 26: Trouble Shooting
8. Trouble Shooting If problems occur with the system, please use this trouble-shooting guide to identify the cause and correct the error. WARNING Do not use the aScope 3 system if it is damaged in any way. No live image on the left side of the screen but User Interface is present on the display Cause Action aScope 3 not connected to aView... - Page 27 Absent or reduced suction capability. Cause Action Channel blocked Clean the working channel using a cleaning brush or flush the working channel with sterile saline using a syringe. Do not operate the suction valve when instilling fluids. Suction pump is not turned on or not connected Turn the pump on and check the suction line connection.
-
Page 28: Appendix 1: Electromagnetic Compatibility
Electronic equipment may affect the normal function of the aScope 3 system. WARNING The aScope 3 system consists of the parts described in section 2. They may only be replaced by Ambu authorised parts. Failure to comply with this may reduce safety and efficiency. - Page 29 Conducted Radio Frequency 3Vrms 0.15 – 80MHz, 3Vrms, 80% Portable and mobile RF communications equipment Disturbance Test – CS. 150kHz to 80MHz AM, 2Hz shall be used no closer to any part of the aScope 3 IEC/EN 61000-4-6 system, including its cables, than the recommended separation distance calculated from the equipment of the frequency of the transmitter.
-
Page 30: Appendix 2. Standards Applied
In doing so we cannot accept the cost of transportation or risk of shipment. There is no warranty on the Ambu aScope 3. A defective aView must be handled exclusively by persons authorised by Ambu A/S. During our inspection of the aView you will receive an identical replacement of the aView.
Need help?
Do you have a question about the aScope 3 5.0/2.2 and is the answer not in the manual?
Questions and answers