Table of Contents
Advertisement
Advertisement
Table of Contents

Subscribe to Our Youtube Channel
Related Manuals for Excel X-power 10


Summary of Contents for Excel X-power 10
-
Page 1: User Manual
User Manual Excel X-power 10 Read instructions before use... -
Page 2: Table Of Contents
CONTENTS Introduction X-power 10 power wheelchair Safety and comfort Master socket Assembling Adjustment – footrest height Adjustment – armrest height Adjustment – joy stick box Controls and indicators Let’s get moving Driving, steering and braking Shutdown Manual propel Fixing for permanent use... -
Page 3: Introduction X-Power 10 Power Wheelchair
INTRODUCTION TO X-POWER 10 POWER WHEELCHAIR Welcome aboard your brand new Excel X-power 10 power wheelchair and thank you for choosing our product. This newest model is designed with all specific practical user wishes and desires in mind. It combine a solid construction and modern high- tech electronics with safety and performance. -
Page 4: Safety And Comfort
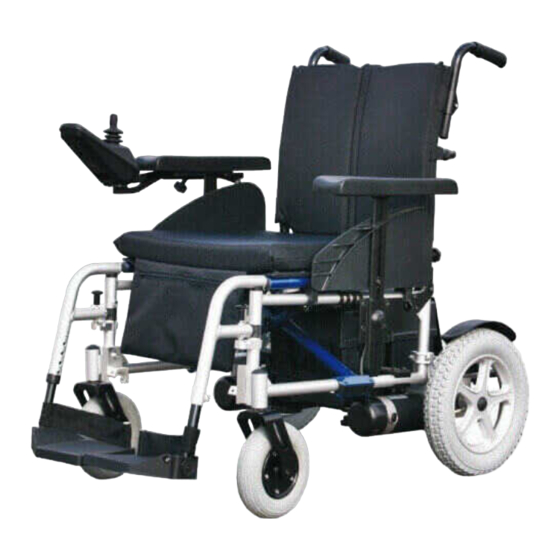
Picture 1 1. Armrests, detachable 2. Removable armrest 3. Height adjustable armrests 4. Joystick 5. Parking brake 6. Controller 7. Removable anti-tippers 8. Master socket 9. Drive motor 10. Adjustable foot rests SAFETY AND COMFORT Of course you want to get into your new powerchair and try it out. You don’t want to be bored with long winded lectures, but there are a few basic details and rules you must know and understand, so that you are safe and comfortable, indoors and outdoors. -
Page 5: Master Socket
Master socket Picture 2 MASTER SOCKET This master socket is the ‘ignition key’ of your powerchair. It connects to a plug on the rear face of the electronic controller on the side of the vehicle. The powerchair will not operatie without it. As we go along we will explain when and how to use it. -
Page 6: Adjustment - Footrest Height
Picture 4 Picture 5 Picture 6 ADJUSTMENT OF FOOTREST HEIGHT CAUTION: never stand onto the footrests when transferring in or out of the wheelchair. Ensure that both parking brakes are applied. Fold the footrests upward and enter the powerchair from the front. When you are seated, fold the footrest plates back... -
Page 7: Adjustment - Armrest Height
down to the normal position. The height of the footrests can adjusted individually as follows: Picture 7 1. Using the allenkey provided, loosen the bolt (picture 7) on the footrest outer tube and slide the footrest inner tube up or down as required. 2. -
Page 8: Adjustment - Joy Stick Box
ADJUSTMENT OF JOYSTICK Picture 9 Once seated and satisfied that the footrests are correctly adjusted, check to see that the controller is in a convenient position so that you can reach it easily and safely. To adjust the controller forward or rearward, loosen star knob (picture 9) and retighten after adjustment. -
Page 9: Let's Get Moving
Move the joystick to the left or right and you will turn accordingly. The X-power 10 is is very responsive and manoeuvrable. It can turn within its own length (360 degrees). You should avoid making abrupt turns and jerky steering while you are moving at a brisk speed. -
Page 10: Shutdown
The X-power 10 has a climbing power that enables you to overcome gradients up to 25%. Caution! On loose ground (sand, gravel, grass etc.) the maximum gradient should not exceed 20%. -
Page 11: Manual Propel
MANUAL PROPEL Picture 12 If the powerchair is to be pushed by hand, proceed as follows: from behind the vehicle, turn the two uncoupling levers (picture 12) of the electric motors outward to the side, so they are pointing toward the rear wheels. Warning: 1. -
Page 12: Fixing For Permanent Use
Read the next section carefully. BATTERIES The X-power 10 has two 12 Volt, 31Ah motive power batteries which are accomodated in two battery boxes under the seat at the rear of the powerchair. -
Page 13: Charge Batteries
BATTERY CHARGING The batteries of your X-power 10 are different from ordinary car batteries. Only use the charger specifically designed for the motive power type batteries installed. 1. Always insert the charger output plug into the charging socket on the front face of the controller. -
Page 14: Instructions To Remove Footrests
FOOTREST REMOVAL INSTRUCTONS Picture 15 1. Push the spring loaded steel lever (picture 15) inward 2. Swing the footrest assembly slightly outward and lift the complete footrest assembly clear of the main frame 3. Installation is in reversed order of removal procedure SIDEPLATE / ARMREST REMOVAL INSTRUCTIONS Picture 16 1. -
Page 15: Instructions To Remove Backrest
BACKREST REMOVAL INSTRUCTIONS Picture 17 1. Remove the two screws and nut from the bottom of the backrest (picture 17) and pull the backrest upward out of the frame 2. Installation is in reversed order of removal procedure WHEELS REMOVAL AND ASSEMBLING INSTRUCTIONS Rear wheel: 1. -
Page 16: Fill Tires
TIRE INFLATION Picture 18 1. Take out the connection adaptor from the air pump (picture 18) 2. Insert the adaptor to the pump 3. Start to inflate the tire to your desired (30~60 psi) pressure FOLDING THE POWERCHAIR Picture 19 The powerchair can be folded to a neat and compact size within minutes. -
Page 17: General Specifications
GENERAL SPECIFICATION DATA Batteries 2 x 12 Volt 31 Ah, maintenance free, sealed gel Speed 0 – 6,5 km/h Range Approximately 25 km on level ground with 91 kg occupant Climbing performance Up to 25% (1 in 4) on form dry ground. - Page 18 ANTI-TIPPERS Anti-tippers are standard with the X-power 10. Replacements for these parts are available through your authorized dealer. Anti-tipper prevent the powerchair from tipping backwards. PARTS Special high strength fasteners are used on the powerchair. Replacements for these parts should be ordered through an authorized dealer.
- Page 19 CONTROLLER The electronic controller is normally installed on the right side of the powerchair, below the armrest / side panel. On the rear face of the controller are two connectors; the lower one is for the master socket from the two motors and the batteries, the upper one is for the cable loom form the joystick box.
-
Page 20: Problems And Solutions
PROBLEMS AND SOLUTIONS Nature of fault Problem Action 1. Powerchair does not a. Main plug not inserted a. Connect plug properly drive, and lamp does not b. ON / OFF push button b. Push the ON / OFF work in OFF position button c. - Page 21 www.vanosmedical.com...
Need help?
Do you have a question about the X-power 10 and is the answer not in the manual?
Questions and answers