
Related Manuals for Excel G-Lite


Summary of Contents for Excel G-Lite
- Page 1 Technical Manual Excel G-Lite Read instructions before use Version 1.0 - See www.vanosmedical.nl/eng for latest manuals...
- Page 2 You have just purchased a Van Os Medical Ltd wheelchair and we want to thank you for the confidence in our EXCEL® products. The EXCEL® wheelchair is a quality product. It is adjustable in many different ways and it can also be easily upgraded.
-
Page 3: Table Of Contents
Technical manual G-Lite Contents IDENTIFICATION GENERAL OVERVIEW OF YOUR WHEELCHAIR REMOVING / REPLACING FRONT CASTORS REMOVING FRONT CASTOR REPLACING FRONT CASTOR REMOVING / REPLACING FRONT FORK REMOVING FRONT FORK REPLACING FRONT FORK ADJUSTING BRAKES 12” TRANSIT VERSION ADJUSTING BACKREST PIN... -
Page 4: Identification
This number indicates which model of wheelchair you have, again this is always required when making technical calls. 5. Model name The model name of your wheelchair starts with the brand name Excel. The brand name Excel is followed by an additional model description that forms the model name of your wheelchair. -
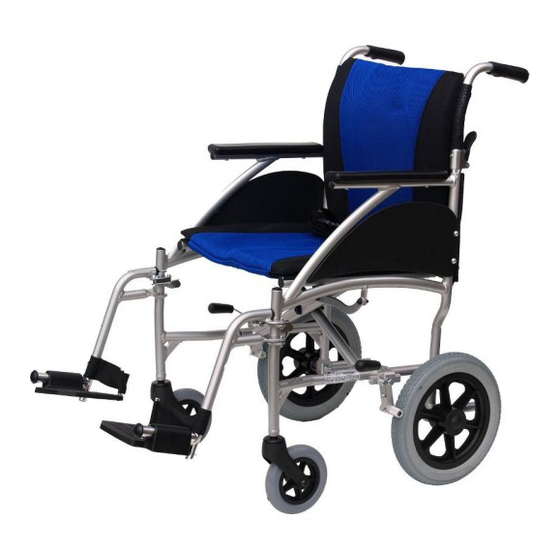
Page 5: General Overview Of Your Wheelchair
Technical manual G-Lite 2. General overview of your wheelchair 2.1 Components of the wheelchair Padded backrest Foot plate Push handle Foot Rest Swing Arm Side Panel Seat Brake Handle Heel Strap Rear wheel Arm Rest Identification label Velcro Pocket Front castor... - Page 6 Technical manual G-Lite 3. Removing / replacing the front castors You will require 1 x 6mm Allen key, 1 x ½“wrench. Removing front castors With the castors in the correct position (i.e. the position they would be in with the chair moving forward).
- Page 7 Technical manual G-Lite Whilst supporting the weight of the chair, remove the bolt from the wheel (see figure 5) Figure 5 You can now remove the castor from the castor housing. Support the weight of the chair and slide the castor away...
- Page 8 Technical manual G-Lite Replacing front castor You will require 1 x 6mm Allen key, 1 x ½“wrench. Support the weight of the chair and move the castor into place. Next align the hole of castor with the holes in the front fork.
- Page 9 Technical manual G-Lite Figure 11 Once you have the nut on the end of the bolt, place the wrench on the nut and the Allen key into the bolt (see figure 12) Figure 12 Whilst holding the Allen key (Bolt) in place start to turn the wrench (Nut) in a clockwise direction (see figure 13) Figure 13 Keep turning the nut until it is tight against the black fork.
- Page 10 Technical manual G-Lite 4. Removing front fork, You will require 1 x 4mm Allen key, 1 x ½“wrench. Firstly you will need to fully remove the front castor refer to section 3 for details of how to do this. Once the front castor is removed locate the small Allen headed bolt just above the front fork. Loosen this bolt by turning in an anticlockwise direction.
- Page 11 Technical manual G-Lite Whilst turning the bolt, you will notice the front fork and bolt move away from the from of the chair (see figures 17 and 18) Figure 17 Figure 18 Keep turning the bolt until you can remove the entire front fork / bolt from the frame (see figure 19)
-
Page 12: Replacing Front Fork
Technical manual G-Lite Replacing front fork, Arrange the different parts on the front fork / bolt (figures 20 and 21). Insert the bolt into the frame of the wheelchair making sure all parts from the fork stay on the bolt (see figure 22) - Page 13 Technical manual G-Lite 5. Adjusting the brakes (Transit 12” model) You will require 1 x5mm Allen key. There are two different ways of adjusting the brakes. These are: - Method 1: coarse adjustment Method 2: precise adjustment Method 1 Coarse adjustment: Firstly locate the two mounting bolts on the brake that need to be loosened.
- Page 14 Technical manual G-Lite Once the brake is loose enough, slide it along the frame therefore increasing or decreasing the distance between brake pad and wheel (see figure 27), the ideal distance apart is 1cm. Figure 27 When happy with its location, hold the brake in place, and begin to turn the bolts in a clockwise motion. Keep turning until the bolt will not turn anymore they need to be tight in order to stop the brake moving.
- Page 15 Technical manual G-Lite As with the course adjustment, the distance between the brake pad and wheel will want to be 1cm. Also make sure that the brake pad is correctly in line with the wheel. You can check this by looking vertically down at the wheel...
-
Page 16: Adjusting Backrest Pin
Technical manual G-Lite 6. Adjusting backrest pin You will require 1 x4mm Allen key. The pin which clips into the backrest tube can be adjusted to be more or less prominent. There are two ways that you can adjust the pin. One is to fold down the backrest giving you access to the pin. (See... - Page 17 Technical manual G-Lite Turn Pin Moves Anitclockwise Turn Pin Moves clockwise inwards The pin is set correct when around 2mm is still showing protruding out of the handle when in an upright position, i.e. clipped into place. © 2009 VAN OS MEDICAL International customers please contact: Tel.
-
Page 18: Removing Plastic Side Panel
Technical manual G-Lite 7. Removing Plastic side panel You will require, 1 x Screwdriver There are 4 screws that need to be removed in order to remove the side panel, two of which are located on the outside of the chair (see figure 33). - Page 19 Technical manual G-Lite 8. Removing seat belt In order to remove the seat belt you will need to remove two screws, (one for each end of the belt) See figure 37 below for where to find the first screw. Figure 37...
- Page 20 Technical manual G-Lite Replacing the seatbelt Firstly place the screw through the hole on the backrest. Then align the end of the screw with the hole of the seat belt (see figure 40) Figure 40 With the seatbelt aligned push the screw through the seatbelt, and into the hole in the frame. With the belt / screw in place begin to turn the screw in a clockwise direction.
-
Page 21: Warranty
This warranty is only granted to you as the consumer. It is not intended to be used commercially (like hiring or institutional use). The warranty is limited to defects to materials and possible hidden shortages. VAN OS MEDICAL guarantees the following components on your EXCEL® wheelchair: COMPONENT... - Page 22 Technical manual G-Lite Replaced or repaired parts fall under the same warranty conditions as the original wheelchair. Worn parts are normally not guaranteed, unless these parts are worn as a direct result of an original manufacturer defect. These parts are for example upholstery, tyres, inner tubes and similar kinds of parts.
-
Page 23: Service And Maintenance
Technical manual G-Lite 10. SERVICE AND MAINTENANCE 10.1 General maintenance instructions Your wheelchair needs periodical maintenance. This is necessary for a long lifetime and an optimal user’s comfort of your wheelchair. A badly maintained wheelchair will give more technical problems, turn less flexible and fall out the warranty terms. -
Page 24: Van Os Medical
Technical manual G-Lite 10.2 Service checklist For optimal life your wheelchair should be periodically maintained by an authorised dealer. Service Schedule Service interval: ........ Service number Wheels: for example margin, wear bearings, adjust quick-release Tyres Hand rims: for example wear and burrs... - Page 25 www.vanosmedical.com...
Need help?
Do you have a question about the G-Lite and is the answer not in the manual?
Questions and answers