Table of Contents
Advertisement
Quick Links
Advertisement
Table of Contents

Subscribe to Our Youtube Channel
Related Manuals for Citronic MP-X10


Summary of Contents for Citronic MP-X10
- Page 1 OWNERS MANUAL Version 1.0...
-
Page 2: Safety Information
Safety information Read these instructions. Keep these instructions. Heed all warnings. Follow all instructions. Do not use this item near moisture. Clean only with dry cloth. Do not block any of the ventilation openings. Install in accordance with the manufacture’s instructions. Do not install near any heat sources such as radiators, stoves or other items (including amplifiers) that produce heat. -
Page 3: Main Features
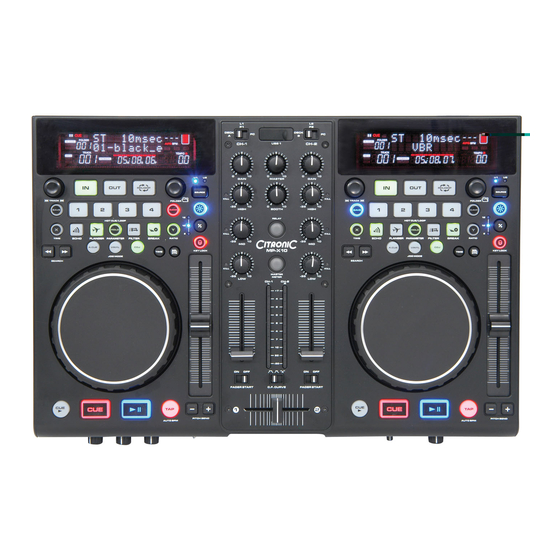
CITRONIC MP-X10 Main features: 1 x USB front and 1 x USB rear inputs which can be read by both players simultaneously 2 x Large VFD displays which can be viewed from wide angles Plays MP3 files from either USB on the front or rear ports on either side of the player... - Page 4 Setup Before making or changing the connections, switch off the power and disconnect the power cord from the AV outlet. We recommend to use high quality shielded audio cables when connecting input/output devices as it makes a huge difference in sound reproduction quality. Do not use excessively long cables.
- Page 5 General Functions and Controls – Top panel VFD DISPLAY – This high quality VFD display indicates all the functions, as they are occurring. The display icons are explained in the VFD display section (page 12) SEAMLESS LOOP: a. IN – Pressing the IN button sets a CUE POINT without music interruption. This button is also used to set the starting point of a SEAMLESS LOOP.
- Page 6 SAVE button for 2 seconds. The SAVE button LED will flash to confirm it has saved. c. RECALL MEMORY – The MP-X10 can store 4 programmed CUE point or LOOPS per track on the USB device (The memory points on the USB are depending on available memory space).
-
Page 7: Jog Wheel
JOG WHEEL a. The JOG WHEEL will act as a frame search control when the track in PAUSE or CUE mode, allowing you to set a starting point or CUE point. b. The JOG WHEEL also works as a pitch bend during playback. Turning the side of the JOG WHEEL (in any JOG MODE) and turning clockwise will increase the pitch percentage up to 100%, and turning the wheel counterclockwise will decrease the pitch percentage down to -100%. - Page 8 EFFECTS AND HOLD a. EFFECTS - The below buttons add effects to the music. The volume and length of the effects can be controlled by a combination of the PARAMETER BUTTONS and JOG WHEEL. i. ECHO – This button is used to add an ECHO effect your output signal. ii.
- Page 9 General Functions and Controls – Front Panel MIC 1 JACK – This jack socket is used to connect a microphone to the mixer. Connect your microphone via 6.3mm jack. The volume output level for microphone will be controlled by its own respective VOLUME control. MIC LEVEL CONTROL –...
- Page 10 General Functions and Controls – Mixer Panel USB PORT 1 - This is the USB port where you insert your USB 2.0 mass storage device (up to 32Gb) MASTER VOLUME CONTROL – This rotary knob is used to control the master output level (volume).
- Page 11 USB 2 PORT – This is the USB port where you insert your USB mass storage device for playing MP3 files. USB MIDI PORT – Use the provided USB cable to connect the Citronic MP-X10 to a PC or Laptop computer by a USB 2.0 connection. The computer will detect it straight away as an external sound card (No need to install any drivers).
- Page 12 LINE/PHONO SELECTOR SWITCH – These switches are used to change the voltage line levels of there respected LINE/PHONO RCA inputs jacks. When connecting turntables that do not have a built-in pre-amp to these jacks be sure the corresponding switch is in the PHONO”...
- Page 13 TIME METER - These indicators will detail the current minutes, seconds, and frames. The meter will display either the elapse, total, or remaining time of a track or the entire disc. The display time will depend on the selected time function. The selected time function will be displayed above the TIME METER as total remaining, remaining track time or elapsed track name.
-
Page 14: Internal Menu
Internal Menu Hold down the FOLDER knob for 2 seconds to enter the internal menu, and turn FOLDER knob to search through the different menu. Turn the TRACK knob or JOG WHEEL to change the submenus Save and exit internal menu, turn the FOLDER knob to F. Exit & Save and press the TRACK knob. The display indicates “Saving”... -
Page 15: Data Management
Data Management DATABASE BUILDER: Database management software for the MP-X10 scans your USB device and writes contents files making it easy for you to search by Title, Artist, Album or Genre. Installation: Refer to the following figures for installing database management software on your computer. - Page 16 STEP 3: Click Install STEP 4: Processing STEP 5: Click finish Page 16 of 26...
-
Page 17: Playlist Operation
Turn the Track knob to select “Normal/ Title/ Artist/ Album/ Genre” and press the TRACK knob to confirm the selection The MP-X10 will then read the data files created and display your tracks in the order you desire Page 17 of 26... -
Page 18: Specification
Specification: GENERAL SECTION PRODUCT: MP-X10 Dual USB MP3 Player + Digital Mixer POWER SOURCE: AC 100-240V, 60/50Hz POWER CONSUMPTION: 21 WATTS DIMENSIONS: 420mm (W) X 298.8mm (D) X 89mm (H) WEIGHT: 4.42kg INPUT/OUTPUT IMPEDANCE & SENSITIVITY: (EQ FLAT, MAXIMUM GAIN, LOAD=100K ) a. - Page 19 Cont. TONE, EQ MIC: -14 +/-3dB AT 100Hz -12 +/-3dB AT 10 KHz CHANNEL: 10 +/-2dB, BELOW -30dB AT 70Hz 10 +/-2dB, BELOW -30dB AT 1 KHz 10 +/-2dB, BELOW -30dB AT 13 KHz CHANNEL BALANCE Within 2dB TALKOVER: -20dB +/- 2dB USB HOST PLAYER: (SIGNAL FORMAT: MP3, 128KBPS) a.
-
Page 20: Midi Map
MIDI MAP FUNCTION FUNCTION SHIFT FUNCTION SHIFT CODE SHIFT ACTION FUNCTION Type CODE (Hold TAP) CODE (DECK B) NOTE (Hold TAP) (CENTER DECK) NOTE (Hold (DECK A) TAP) 44/56 44/66 : O N 00H : O FF SW/ENC 05/17 05/27 40/55 40/65 O N 00H... - Page 21 : O N 00H : O FF ECHO SW/LED 0F/0F 0F/0F : O N 00H : O FF FLANGER SW/LED 10/10 10/10 O N 00H O FF : : HOLD SW/LED 11/11 11/11 O N 00H O FF : : FILTER SW/LED 12/12...
- Page 22 : O N 00H : O FF : O N 00H : O FF PITCH Pitch Silder VR/CENTER PITCH BEND/28 BEND/28 VR:00~7F GAIN 12/24/29/ 51/63/68 61/63/68 VR:00~7F VR/SW/CENTER/LE HIGH 22/24/29/24 13/25/2A/ 52/64/69 62/64/69 VR:00~7F VR/SW/CENTER/LE 23/25/2A/25 14/26/2B/ 53/65/6A 63/65/6A VR:00~7F VR/SW/CENTER/LE 24/26/2B/26 VR:00~7F...
- Page 23 : O N 00H : O FF Fader Start ON(L) : O N 00H : O FF Fader Start OFF(L) O N 00H O FF : : Fader Start ON(R) O N 00H O FF : : Fader Start OFF(R) O N 00H O FF :...
- Page 24 CC-ABSOLUTE (VR, LEVEL METER LED) TYPE Control Change messages are sent with status 0xBn, where n is the channel, for the specified CC controller. Thus the controller MIDI ID is indicated with the channel along with the CC number. The value from 0x00 to 0x7F, directly related to the location of the controller. LEVEL METER LEDS *...
- Page 25 Page 25 of 26...
- Page 26 FOR MORE INFORMATION ON CITRONIC PRODUCTS VISIT WWW.CITRONIC.COM Copyright protected by Citronic UK...
Need help?
Do you have a question about the MP-X10 and is the answer not in the manual?
Questions and answers