Table of Contents
Advertisement
SETUP
Power On/Off
Turn power on
Press and release the power button on the inside of
the headset housing, shown in Figure 1. A voice
message in the earpiece will say "Headset #" and the
power light on the opposite side of the earpiece will go
on. See Figure 2.
Turn power off
Press and hold the power button for approximately 3 seconds. A voice message in the earpiece
will say "Headset off," and the power light on the opposite side of the earpiece will go off.
Configure Headset
Start with power OFF and press any of the following button combinations
while turning the power ON. After pressing the power button, immediately
release both buttons. Each of these settings has an associated voice
prompt. Listen to the voice prompt to confirm the setting.
Hands Free (HF) on/off mode
Press and hold ISO and the UP arrow ▲ while you press the power
button to turn the headset on in the HF mode. The headset will
remain in the HF mode, even if it is turned off and on again, until
you turn off the HF mode. To turn off the HF mode, with the power
off, press and hold ISO and the DOWN arrow ▼ while you press
the power button to turn the headset on.
ISO Lockout mode
To set the Headset with the ISO feature locked out, press and hold the IC1 button while you
press and release the power button to turn the headset on. You will hear "Power on, Headset #,
Version #, ISO off" in your Headset earpiece. When set up for the ISO Lockout mode, the ISO
button will operate the same as the IC1 button, in either hands-free or PTT communication. To
reset the ISO feature for normal ISO button communication, with the power off, press and hold
the ISO and IC1 buttons while you press and release the power button. You will hear "Power
on, Headset #, Version #, ISO on" in your Headset earpiece.
Lights-off operation
To prevent the power and transmit lights from coming on during headset operation, press and
hold the IC2 button while you press the power button to turn the headset on. To return the
lights to their normal functions, turn the power off and on again without pressing the IC2 button.
HM ELECTRONICS, INC.
OPERATING INSTRUCTIONS
14110 Stowe Drive, Poway, CA 92064 USA • Phone: 1-800-848-4468 Fax: (858) 552-0172
WH200
Wireless Headset
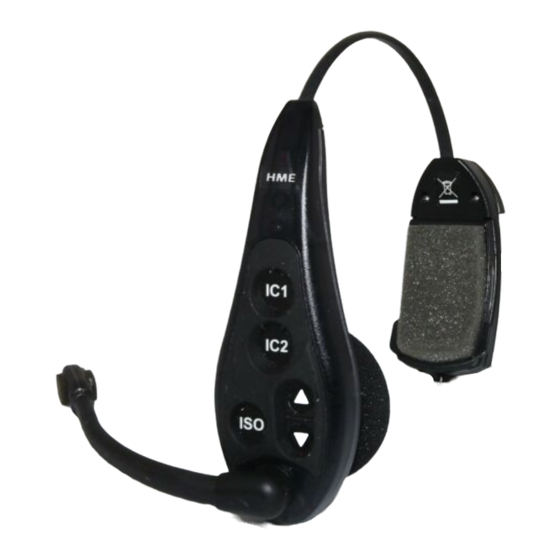
Power
button
Figure 1. Headset power button
Figure 2. Headset buttons
Power
light
Transmit
light
and lights
HME# 400G578
Rev A
3/31/08
Advertisement
Table of Contents

Related Manuals for HME WH200


Summary of Contents for HME WH200
-
Page 1: Wireless Headset
WH200 Wireless Headset OPERATING INSTRUCTIONS SETUP Power On/Off Power button Turn power on Press and release the power button on the inside of the headset housing, shown in Figure 1. A voice message in the earpiece will say “Headset #” and the power light on the opposite side of the earpiece will go on. -
Page 2: Register Headset
Register Headset Each WH200 Headset must be registered for use with a specific DX100 or DX200 base station. The base station thereby recognizes all headsets registered to it when their power is on, and will be able to tell the difference between them and other electronic equipment operating on similar frequencies, or other DX family Beltpacs. -
Page 3: Operation
Attach the Headset Band to the Headset (Optional) Locate the white, elastic headset band enclosed with the WH200. Stretch the large loop at one end of the band over the headset earpiece as shown at #1 in Figure 4. Stretch the small hole in the opposite end of the headset band over the “button”... -
Page 4: Routine Operation
NOTE: If you are using a DX200 Wireless Intercom and the ISO+ on the base station is on, when you press the ISO button on your WH200 headset, you will transmit to any wired intercom connected to AUX OUT on the base station. -
Page 5: Changing Batteries
Changing Batteries Battery-release When a battery is becoming weak, a voice in latch the earpiece will say “Change battery.” When this happens, remove the battery from the headset by carefully sliding the battery- release latch shown in Figure 8. Pull up on the end of the battery near the battery-release latch and lift the battery out. -
Page 6: Waste Electrical And Electronic Equipment (Weee)
The term “IC:” before the certification/registration number only signifies that the Industry Canada technical specifications were met. Hereby, HM Electronics, Inc. declares that the WH200 is in compliance with the essential requirements and other relevant provisions of R&TTE Directive 1999/5/EC.
Need help?
Do you have a question about the WH200 and is the answer not in the manual?
Questions and answers