Table of Contents
Advertisement
Advertisement
Table of Contents

Related Manuals for Swissvoice L7


Summary of Contents for Swissvoice L7
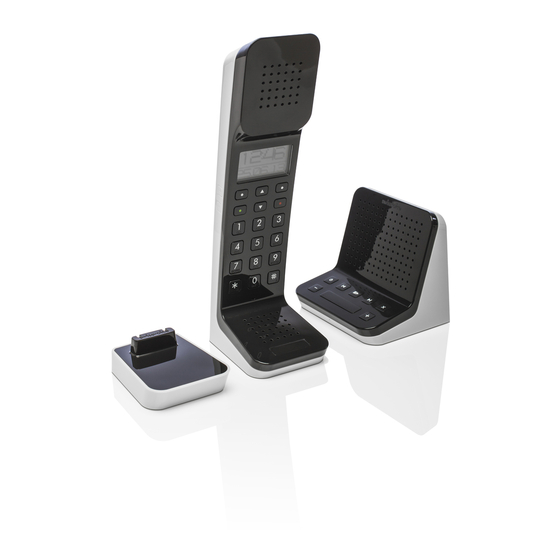
- Page 1 cordless telephone with answering machine...
-
Page 2: Safety Precautions
Rechargeable batteries ➭ Use only the approved rechargeable Li-Ion battery cell (Swissvoice C0487 or 043048, 3.7V, 550mAh, 2.04Wh) supplied with your L7. Using other rechargeable batteries or non-rechargeable batteries/primary cells can be dangerous and cause malfunctions in or damage to the telephone. -
Page 3: Welcome To Swissvoice
1 x rechargeable Li Ion battery cell • 2 x Power adaptors for the base and the charging bay • Telephone line cord If you have purchased a L7 multiple pack you will also have the following additional items: • Cordless handset & charger •... -
Page 5: Table Of Contents
1. Getting started ............7 2. Getting to know your phone ........ 10 3. Using the phone ........... 13 Switch the handset on / off............... 13 Make Calls / Preparatory dialling ............. 13 Adjust the earpiece volume.............. 13 Secrecy .................... 13 Intercom and Push-To-Talk .............. - Page 6 Record personal outgoing messages ..........24 Play or delete your personal outgoing message ......24 Set the answer mode ...............25 Record a memo ................25 Call screening...................25 Message playback................25 9.10 Delete all old messages ..............25 9.11 Answering machine settings.............26 9.12 Remote access.................26 9.13 Change the remote access PIN............27 10.
-
Page 7: Getting Started
Getting started Location Place your L7 base within 2 meters of the mains power socket and 1.8 meters from the telephone wall socket. The socket-outlet shall be installed near the equipment and shall be easily accessible. Make sure that it is at least 1 meter away from other electrical appliances to avoid interference. -
Page 8: Connecting The Charger
HANDSET display shows and handset number (e.g. 2) to indicate that it is registered to the base. IMPORTANT Warning! Use only the approved rechargeable Li-Ion battery cell (Swissvoice C0487 or 043048, 3.7V, 550mAh, 2.04Wh) supplied with your L7. - Page 9 If you do not have a Caller ID service, you can set the date and time manually (see chapter “Settings, Set the date and time”). Your L7 is now ready for use. All talk and standby times are approximate and depend on features selected and...
-
Page 10: Getting To Know Your Phone
Getting to know your phone Overview of your handset PQRS WXYZ Earpiece Display Redial list / Scroll up / Pause In standby mode, press to open the redial list Scroll up through lists and menus Press and hold to enter a pause (P) when pre-dialling or storing numbers Menu / OK / Mute / Left softkey In standby mode, press to open the Menu Press to select menu options and to confirm a displayed option... -
Page 11: Navigating The Menu
16. Push-to-Talk Intercom Press and hold to broadcast to all units Navigating the menu Your L7 has an easy to use menu structure. When the handset is in standby: 1. Press softkey Menu. The main menu is opened 2. Then use... -
Page 12: Handset Lcd Display
Handset LCD Display Steady when the handset is registered and within range of the base. Flashes when handset is out of range or searching for the base. Displays when ECO mode is on, Zero Emission mode is off, the icon should be antenna + E. -
Page 13: Using The Phone
Using the phone NOTE - Your handset automatically times the duration of every external call, the call timer will display on the screen. When the call ends, the total duration of your talk time is shown for 5 seconds. 3.1 Switch the handset on / off Press and hold the End Call key to switch the handset on or off. -
Page 14: Intercom And Push-To-Talk
5. Press the End Call key to end the call. 3.5.5 Push-To-Talk – Internal broadcasting voice This Push-To-Talk feature allows you to broadcasts to the base and every L7 handset. Using PTT is a one way communication. Message cannot be heard from non L7 handsets. -
Page 15: Hands-Free Speakerphone
1. Press and hold PTT key. Wait 2 seconds while units connect (tone will play). 2. Begin speaking. Release PTT key to finish the broadcast. 3.6 Hands-free speakerphone Hands-free lets you talk to your caller without holding the handset. It also enables other people in the room to listen to the conversation. -
Page 16: Answer/End Calls Hands-Free
PTT key 4.4.4 Push-To-Talk – Internal broadcasting voice message This Push-To-Talk feature allows you to broadcast from the base to every L7 handset. Using PTT is a one way communication. Message cannot be heard from non L7 handsets. -
Page 17: Edit The Contact List Using The Softkey Names
Contact entry. then to - If the L7 is connected to a switchboard, you may need to enter a pause in a number. A pause is normally stored after the switchboard access code (e.g. 9). Press and hold to insert a pause, the display shows P. -
Page 18: Calls List
Delete Entry – Delete the selected entry from the Contact list. Fast Call – Key X Store a Fast Call number: scroll where the entry will be stored, press Select. Assign Select is highlighted press Clear Entry Select confirm. Delete a Fast Call number: select and press confirm. -
Page 19: Settings
Set the volume level for the handset earpiece (8 levels). - Handset name If you are using more than one handset with the L7 base, you can give each handset a personal name to easily distinguish between the handsets. A name can be up to 10 characters long. -
Page 20: Base Settings
When the key beep function is turned to on, you hear a beep with each key press. - PBX access Code If the L7 is connected to a switchboard, you may need to enter an access code in the dialling sequence to be able to connect to the outside line. -
Page 21: Additional Handsets
NOTE - Note your new PIN code and keep it somewhere safe. - Master Reset You can restore the L7 to its default (original) settings. Resetting the L7 will not affect the phonebook or Calls list, and all handsets registered to the base will be retained. -
Page 22: Select A Base
Answering machine The L7 has a recording capacity of 25 minutes. Each message can be up to 3 minutes long. You can operate your answering machine from the base, the handset and remotely, from another phone. -
Page 23: Overview Of The Base
9.1 Overview of the base A. LED – Indicates when the answering machine is on or off, and when you have new messages (LED is blinking) B. Answering machine On / Off – Switches the answering machine on / off Press and hold to enter the outgoing message selection mode. -
Page 24: Switch The Answering Machine On/Off
Press hear the highlighted message. 9.4 Record personal outgoing messages The L7 comes with 2 pre-recorded outgoing messages in different languages. You can record personal outgoing messages (up to 3 minutes long). You can select 2 operating modes: Answer &... -
Page 25: Set The Answer Mode
9.6 Set the answer mode See chapter “Answering machine settings” 9.7 Record a memo You can record a memo which is stored on your answering machine and played back like a normal message. 1. Press Menu, the display shows Answer Machine, press Select. -
Page 26: Answering Machine Settings
Remote operation can only be performed after having switched on the function (see chapter “Answering machine settings”) 1. Call your L7. When you hear the announcement, press *. 2. Enter your 4 digit remote access PIN (default setting = 0000). You hear a confirmation beep. -
Page 27: Change The Remote Access Pin
NOTE - If you enter an incorrect PIN code you hear two error beeps. Try again. If it is still incorrect you hear a single error beep and the L7 hangs up. 9.13 Change the remote access PIN The default remote access PIN is 0000. -
Page 28: General Information
PIN will default back to 0000. Cannot register a handset to the base • You can register up to a maximum of 8 handsets to a L7 base. You must de-register a handset in order to register a new one. -
Page 29: Disposing Of The Rechargeable Battery
(usually supplied by the provider) may not forward the functions to connected telephones or may forward them in a non-analog format. If this happens, please check the L7 on an analog fixed line and/or contact your Internet/cable telephony provider. Care Your telephone is a sophisticated product in terms of design and construction, and should therefore be handled with care. -
Page 30: Approval And Conformity
The declaration of conformity may be viewed at: www.swissvoice.net. The CE symbol confirms the conformity of the telephone with the... - Page 32 © Swissvoice SA 2013 All rights as well as delivery possibilities and technical changes reserved. 20407112en_ba_a0 SV 20407112...
Need help?
Do you have a question about the L7 and is the answer not in the manual?
Questions and answers