Table of Contents
Advertisement
Quick Links
Advertisement
Table of Contents

Related Manuals for Mottura Xmode M 2.0


Summary of Contents for Mottura Xmode M 2.0
- Page 1 POWERED ELECTRONIC LOCK INSTALLATION INSTRUCTIONS M 2.0 RECHARGEABLE...
-
Page 2: Table Of Contents
4.1 - EXTERNAL PERIPHERAL VOLTAGE-FREE CONTACT - INTERNAL BOARD VERSION 4.2 - EXTERNAL PERIPHERAL VOLTAGE-FREE CONTACT - EXTERNAL BOARD VERSION 4.3 - EXTERNAL PERIPHERAL MOTTURA REMOTE CONTROL - INTERNAL BOARD VERSION 4.4 - EXTERNAL PERIPHERAL MOTTURA REMOTE CONTROL - EXTERNAL BOARD VERSION 5 - CONNECTING THE POWER SUPPLY .............. -
Page 3: General Instructions
1.1 - WARRANTY TERMS This product has been inspected by Mottura Serrature di Sicurezza S.p.A. and is guaranteed to be free of all manufacturing defects for the time specified by current Italian law, starting on the date of purchase indicated on the sales receipt. -
Page 4: Installation
(bars/switchlocks) or on the key when turning. These problems could impair correct electronic operation of the lock and cause permanent malfunction. Mottura Serrature di Sicurezza S.p.A. declines all liability if this procedure is not performed and, in such case, all warranties on the product will lapse. -
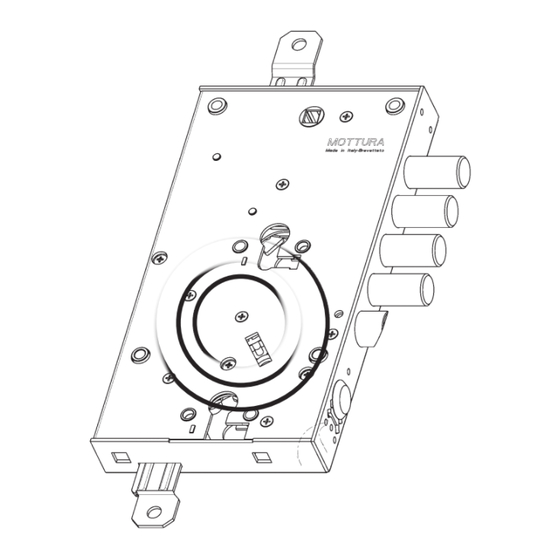
Page 5: Drilling Diagram And Dimensions
CASSETTE VERSION Fig.2 2.2 - CYLINDER FIXING For proper functioning of the lock, we recommend installation of a MOTTURA Defender® CHAMPIONS® double or half Europrofile cylinder (according to application) (DO NOT use cylinders with knobs). For better protec- tion of the cylinder from the outer side of the door, we recommend the use of MOT- 99.066... -
Page 6: Escutcheons
3 - ESCUTCHEONS 3.1 - INTERNAL BOARD VERSION The escutcheon is designed for installation on the door panel in a position near the two other user work zones (handle and cylinder escutcheon). When installing, use the drilling diagram shown below and remember that the connection cable is 1000 mm long. For installation other than as indicated, check that the cable length allows for such installation without hinder movement of the bars or limiter;... -
Page 7: External Board Version
3.2 - EXTERNAL BOARD VERSION Connections for version with board external to the lock. O-RING O-RING Ø40 Ø40 N°2 Ø2 N°2 Ø2 KEYBOARD VERSION DISPLAY VERSION (ART. 99.685) (ART. 99.688) Cable 99.698 Cable 99.700 Cable 99.698 Cable 99.699 Protect the cables against tampering. -
Page 8: Connecting Remote Control Devices
4 - CONNECTING REMOTE CONTROL DEVICES 4.1 - EXTERNAL PERIPHERAL VOLTAGE-FREE CONTACT – INTERNAL BOARD VERSION You can operate the lock with a “Normally Open” button or with a device fit with a “Normally Open” voltage-free contact (not supplied) to be connected to the lock by means of cable 99.701 (not supplied). -
Page 9: External Peripheral Mottura Remote Control - Internal Board Version
4.3 - EXTERNAL PERIPHERAL MOTTURA REMOTE CONTROL (99.684) INTERNAL BOARD VERSION You can remotely operate and control the lock with the “REMOTE CONTROL” device (code 99.684 – available on request), to be connected to the lock by means of cable 99.702 (not supplied). Thanks to this device (which transmits an encrypted signal to the lock), any attempt to short-circuit the connection cable will have no effect. -
Page 10: Connecting The Power Supply
5 - CONNECTING THE POWER SUPPLY The XMODE lock offers a number of options based on the type of power supply and electronic board chosen for the system. TYPE OF ELECTRONIC BOARD: - Internal (board inside lock) - External (board is in a black plastic box outside the lock) POWER SUPPLY SYSTEM (with dedicated optional accessories): - Non-rechargeable alkaline batteries - Mains... - Page 11 BATTERY PACK WIRING 99.703 Wired tube battery pack battery pack wire 99.704 Wired cassette battery pack Fig. A WIRING MAINS POWERED 99.683 AC/DC Adapter (see chapter 7) 230VAC 12VDC Grommet 99.144 cable 99.697 Fig. B...
- Page 12 WIRING MAINS POWERED + BATTERIES 99.703 Wired tube battery pack battery pack wire 99.704 Wired cassette battery pack 99.683 AC/DC Adapter (see chapter 7) cable 99.697 230VAC 12VDC Grommet 99.144 Fig. C 99285GB- XMODE – INSTALLER MANUAL - REV. 01...
- Page 13 WIRING MAINS POWERED + RECHARGEABLE BATTERIES 99.703 Wired tube battery pack battery pack wire 99.704 Wired cassette battery pack cable 99.712 99.711 Battery charger cable 99.697 99.683 AC/DC Adapter (see chapter 7) 230VAC 12VDC Grommet 99.144 Fig. D...
- Page 14 BATTERY PACK WIRING EXTERNAL BOARD 99.703 Wired tube battery pack battery pack wire cable 99.700 99.704 Wired cassette battery pack Fig. E WIRING MAINS POWERED EXTERNAL BOARD 99.683 cable AC/DC Adapter (see chapter 7) 99.697 cable 99.700 230VAC 12VDC Grommet 99.144 Fig.
- Page 15 WIRING MAINS POWERED + BATTERIES EXTERNAL BOARD 99.703 battery pack wire Wired tube battery pack 99.704 Wired cassette battery pack cable 99.700 99.683 AC/DC Adapter (see chapter 7) cable 99.697 230VAC 12VDC Grommet 99.144 Fig. G...
- Page 16 WIRING MAINS POWERED + RECHARGEABLE BATTERIES EXTERNAL BOARD 99.703 Wired tube battery pack battery pack wire cable 99.712 99.704 Wired cassette battery pack cable 99.700 99.711 Battery charger cable 99.697 99.683 AC/DC Adapter (see chapter 7) 230VAC 12VDC Grommet 99.144 Fig.
-
Page 17: Electrical Wiring
6 - ELECTRICAL WIRING 6.1 - ELECTRIC WIRING - INTERNAL BOARD VERSION RIGHT-HAND OPENING(RH) the left-hand opening version (LH) is specular FOR SPECIFIC WIRINGS SEE PARAGRAPHS 3,4,5,6 N.B. The diagram represents a full installation where the bat- Internal External teries only serve in the event of Escutcheon Escutcheon a blackout. -
Page 18: Electric Wiring - External Board Version
6.2 - ELECTRIC WIRING - EXTERNAL BOARD VERSION LEFT-HAND OPENING (LH) the right-hand opening EXTERNAL version (RH) is specular PERIPHERAL Board holder FOR SPECIFIC WIRINGS Voltage-free External SEE PARAGRAPHS 3,4,5,6 contact Escutcheon N.B. The diagram represents a N.B. Escutcheons vary depending full installation where the bat- on the selected configuration teries only serve in the event of... -
Page 19: Ac/Dc Adapter Connection
OUTPUT: Connect the lock power supply cable (code 99.697) to the 12 VDC output terminals, taking care to respect polarity (red to positive (+), black to negative (-)) to prevent permanent damage to the system. Double output terminals are provided ONLY to power any other Mottura devices. Using these terminals for any other purpose may permanently damage the system. -
Page 20: Technical Data
Blend PC/ABS self-extinguishing UL94-V0 OUTPUT VOLTAGE 12 VDC non-stabilized IMPULSE ABSORPTION ( 5 sec. max) FUSE DELAYED ACTION T 3.15 A (5 x 20) mm TERMINAL BOARD RATED SECTION OF CABLES 0.5mm (AWG20) to 2 mm (AWG12) www.mottura.it SAFEGUARDING YOUR SECURITY...
Need help?
Do you have a question about the Xmode M 2.0 and is the answer not in the manual?
Questions and answers