Table of Contents
Advertisement
Available languages
Available languages
Quick Links
INSTALLATION INSTRUCTIONS
HB0031
MODELS RMIP33
RMIP45
AND
!
INTENDED FOR DOMESTIC COOKING ONLY
!
READ AND SAVE THESE INSTRUCTIONS
INSTALLER: LEAVE THIS MANUAL WITH HOMEOWNER.
HOMEOWNER: USE AND CARE INFORMATION ON PAGES 11, 12 AND 13.
Broan-NuTone LLC, 926 West State Street, Hartford, WI 53027 (1-800-637-1453)
NuTone Inc., 4820 Red Bank Road, Cincinnati, OH 45227 (1-800-543-8687)
Broan-NuTone Canada Inc., 1140 Tristar Drive, Mississauga, ON L5T 1H9 (1-888-882-7626)
V05861 rev. D
Advertisement
Table of Contents

Related Manuals for Rangemaster RMIP45


Summary of Contents for Rangemaster RMIP45
- Page 1 INSTALLATION INSTRUCTIONS HB0031 MODELS RMIP33 RMIP45 INTENDED FOR DOMESTIC COOKING ONLY READ AND SAVE THESE INSTRUCTIONS INSTALLER: LEAVE THIS MANUAL WITH HOMEOWNER. HOMEOWNER: USE AND CARE INFORMATION ON PAGES 11, 12 AND 13. Broan-NuTone LLC, 926 West State Street, Hartford, WI 53027 (1-800-637-1453) NuTone Inc., 4820 Red Bank Road, Cincinnati, OH 45227 (1-800-543-8687)
- Page 2 To reduce the risk of fire and electrical shock, the Rangemaster Models RMIP33 and RMIP45 must be installed with blower models P5, P8, 331H, 332H, 335 or 336 only. Other blowers cannot be substituted.
- Page 3 RMIP33 RMIP45 INSERT SYSTEM Model 335 (1200 cfm) Model 647 Model 634 or 644 Model 643 or 336 (1500 cfm) (7” Rd wall cap) (roof cap) (8” Rd wall cap) exterior blower Model 331H (600 cfm) or 332H (900 cfm) exterior blower 8”...
-
Page 4: Select Blower Option And Install Ductwork
1. SELECT BLOWER OPTION AND INSTALL DUCTWORK Either an interior or exterior blower may be used with this insert. The insert model RMIP33 or RMIP45 must be installed with blower models P5, P8, 331H, 332H, 335 or 336 only. Other blowers cannot be substituted. -
Page 5: Custom Hood Preparation
11 9/16” up from the insert base. The on center distance between the 2 studs is 30 1/4” for the RMIP33 insert model and 42 1/4” for the RMIP45 insert model. The mounting holes for the rear stud support are located 1 1/2”... - Page 6 NOMINAL WIDTH RML3336 RMIP33 36’’ RML3342 RMIP33 42’’ RML4548 RMIP45 48’’ RML4560 RMIP45 60’’ HA0022A 7. INSTALL THE RMIPWC REMOTE CONTROL (OPTIONAL) The electrical connection for the remote control is located in front of the insert. Perform this connection before the insert installation.
- Page 7 10. REMOVE THE KNOCK-OUT OPENING (INTERIOR BLOWER) Remove the knockout on rough-in plate. See picture below. CAUTION When using P5 blower, remove the 10’’ wide knockout (smaller part). If using P8 blower, remove the knockout corresponding to the ducting installed (10’’ or 14’’ adapter/damper). HD0077 Removing vertical knockout opening on rough-in plate 11.
- Page 8 13. CONNECT WIRING (INTERIOR & EXTERIOR BLOWER) WARNING Risk of electrical shock. Electrical wiring must be done by qualified personnel in accordance with all applicable codes and standards. Before connecting wires, switch power off at service panel and lock service disconnecting means to prevent power from being switched on accidentally. Position insert below the installed custom hood.
- Page 9 16. DUCTING CONNECTION (INTERIOR & EXTERIOR BLOWER) A. When there is access to the top of the hood, connect ductwork and seal connections with duct tape after Step 17 Install the insert. B. When there is no access to the top of the hood, carefully pull down the metal duct through the custom hood base hole.
- Page 10 18. INSTALL THE BLOWER (INTERIOR BLOWER) (CONT’D) Install (4) #8 x 3/8’’ screws into the location as shown in the pictures below (single blower or dual blower). Do not tighten screws down fully, leave a 1/8” gap. Hang blower unit onto blower plate (screws through the large part of the keyhole).
-
Page 11: Light Bulbs
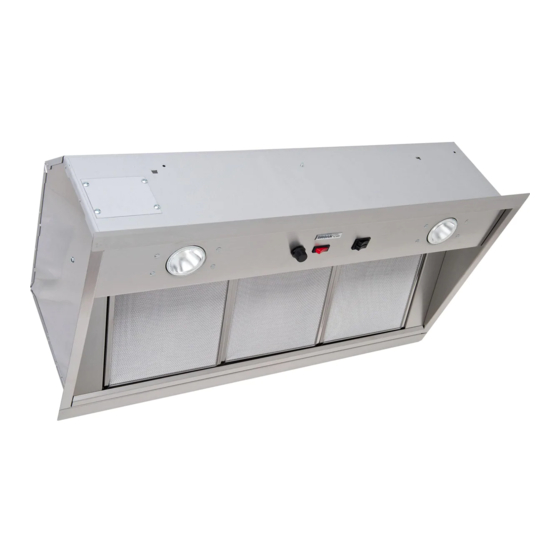
KIT # INSERT MODEL RBFIP33 RMIP33 RBFIP45 RMIP45 HD0011 BAFFLE FILTER (TYPICAL) 21. USE AND CARE Grease filters and impeller(s). The grease filters, impeller(s) and grease rail should be cleaned frequently. Use a warm detergent solution. - Page 12 21. USE AND CARE (CONT’D) Don’t: - Do not use any steel or stainless steel wool or any other scrapers to remove stubborn dirt. - Do not use any harsh or abrasive cleansers. - Do not allow dirt to accumulate. - Do not let plaster dust or any other construction residues reach the hood.
-
Page 13: Wiring Diagram
22. OPERATION (CONT’D) RMIPWC REMOTE CONTROL (OPTIONAL) An optional remote control is also available to operate your hood insert. For installation details, see installation instructions included with the RMIPWC remote control. NOTE: When the RMIPWC remote control is connected to the insert, the control switches on the insert are no longer operational. -
Page 14: Service Parts
Broan-NuTone LLC, 926 West State Street, Hartford, WI 53027 (1-800-637-1453) NuTone Inc., 4820 Red Bank Road, Cincinnati, OH 45227 (1-800-543-8687) Broan-NuTone Canada Inc., 1140 Tristar Drive, Mississauga, ON L5T 1H9 (1-888-882-7626) SERVICE PARTS RMIP33 and RMIP45 MODELS PART MODEL DESCRIPTION... - Page 15 SERVICE PARTS SINGLE BLOWER/ROUGH-IN (Model P5) HL0021 PART NUMBER DESCRIPTION V13296 ADAPTER AND DAMPER 3 1/4’’ x 10’’ V03500 AIR DEFLECTOR V12997 SINGLE BLOWER ROUGH-IN PLATE ASSEMBLY V03577 FOAM 1/2” X 1/2” X 12” V02160 CAPACITOR 15MFD V01869 MACHINE SCREW #6-32 X 1/4” V01857 WIRE COVER V01582...
- Page 16 SERVICE PARTS DUAL BLOWER/ROUGH-IN (Model P8) HL0022 PART NUMBER DESCRIPTION V14971 ADAPTER AND DAMPER 3 1/4 ‘’ x 14’’ V13296 ADAPTER AND DAMPER 3 1/4 ‘’ x 10’’ V03500 AIR DEFLECTOR V14975 DUAL BLOWER ROUGH-IN PLATE ASSEMBLY V03577 FOAM 1/2” X 1/2” X 12” V01582 LOCK NUT #6-32 V02160...
- Page 17 GUIDE D’INSTALLATION HB0031 MODÈLES RMIP33 RMIP45 CONÇUS POUR LA CUISSON DOMESTIQUE SEULEMENT LIRE ET CONSERVER CES INSTRUCTIONS INSTALLATEUR : LAISSER CE GUIDE AU PROPRIÉTAIRE. PROPRIÉTAIRE : INSTRUCTIONS D’UTILISATION ET D’ENTRETIEN EN PAGES 27 À 29. Broan-NuTone LLC, 926 West State Street, Hartford, WI 53027 (1-800-637-1453) NuTone Inc., 4820 Red Bank Road, Cincinnati, OH 45227 (1-800-543-8687)
- Page 18 à Afin de réduire les risques d’incendie et d’électrocution, la dimension de la surface chauffante. les modèles Rangemaster RMIP33 et RMIP45 doivent être installés uniquement avec un des ventilateurs suivants : P5, P8, 331H, 332H, 335 ou 336 (vendus séparément).
- Page 19 Déviateur d’air (fourni avec les ventilateurs P5 et P8) Revêtement d’armoire (optionnel) MODULE DE HOTTE RML3336, RML3342, ENCASTRABLE RML4548 ou RML4560 RMIP33 OU RMIP45 Copntrôle mural Modèle 332KR RMIPWC Plaque ventilateur extérieur Plaque ventilateur (optionnel) Utiliser avec tous les ventilateurs fournie avec extérieurs : 331H, 332H, 335, 336...
- Page 20 - Plaque ventilateur modèle 332KR (requise pour tous les modèles de ventilateur extérieur) - Ampoules halogènes (120V, 50W, PAR 20) (2 pour le modèle RMIP33, 3 pour le modèle RMIP45) - Revêtement d’armoire modèle RML3336, RML3342, RML4548 ou RML4560 (optionnel) - Filtres à...
- Page 21 11 9/16” de la base de celui-ci. La distance centre-centre entre les 2 supports est de 30 1/4” pour le module de modèle RMIP33 et de 42 1/4” pour le module de modèle RMIP45. Les trous d’assemblage du support arrière sont à 1 1/2” 1 1/2”...
- Page 22 RML3336 RMIP33 36’’ RML3342 RMIP33 42’’ HA0022F RML4548 RMIP45 48’’ RML4560 RMIP45 60’’ 7. INSTALLER LE CONTRÔLE MURAL RMIPWC (OPTIONNEL) Le branchement électrique du contrôle mural optionnel se fait à l’avant du module. Effectuer ce branchement avant l’installation du module.
- Page 23 10. ENLEVER L’OUVERTURE PRÉAMORCÉE (VENTILATEUR INTÉRIEUR) Enlever l’ouverture préamorcée sur la plaque ventilateur. Voir la photo ci-dessous. ATTENTION Si un moteur P5 est installé, enlever l’ouverture préamorcée de 10’’ de large (la plus petite). Si un moteur P8 est installé, retirer l’ouverture préamorcée de largeur correspondante aux conduits (adaptateur 10’’...
- Page 24 13. BRANCHEMENTS ÉLECTRIQUES (VENT. INTERIEUR ET EXTÉRIEUR) AVERTISSEMENT Risque de chocs électriques. Le raccordement électrique doit être effectué par du personnel qualifié conforméments aux codes et standards. Avant d’effectuer le branchement, coupez l’alimentation électrique au panneau de service et verrouillez-le pour éviter une mise en marche accidentelle. Placer le module sous son armoire.
- Page 25 16. RACCORDEMENT DES CONDUITS (VENTILATEUR INT. ET EXT.) A. Si l’accès au dessus de l’armoire demeure ouvert, aller au point 17 Installer le module , puis raccorder les conduits et sceller les joints à l’aide de ruban adhésif en toile. B.
- Page 26 18. INSTALLER LE VENTILATEUR (VENTILATEUR INTERIEUR) (SUITE) Installer 4 vis #8 x 3/8’’ aux endroits indiqués sur les photos ci-dessous (ventilateur simple ou double) en laissant un espace d’environ 1/8’’. Accrocher ensuite le ventilateur à la plaque ventilateur (passer les têtes de vis à...
-
Page 27: Installer Les Filtres
à chicane. ENSEMBLE NO MODÈLE DE MODULE RBFIP33 RMIP33 RBFIP45 RMIP45 HD0011 FILTRE À CHICANE (TYPIQUE) 21. ENTRETIEN Filtres et roue(s) de ventilateur. Les filtres, la gouttière et la ou les roue(s) de ventilateur doivent être fréquemment nettoyés. Utiliser de l’eau chaude additionnée de détergent. - Page 28 21. ENTRETIEN (SUITE) À ne pas faire : - N’utiliser aucune laine d’acier ou d’acier inoxydable ou tout autre grattoir pour enlever la saleté tenace. - N’utiliser aucune poudre nettoyante abrasive ou rugueuse. - Ne pas laisser la saleté s’accumuler. - Ne pas laisser la poussière de plâtre ou tout autre résidu de construction/rénovation atteindre la hotte.
- Page 29 22. FONCTIONNEMENT (SUITE) CONTRÔLE MURAL RMIPWC (OPTIONEL) Il existe un contrôle mural optionnel pour le fonctionnement du module. Pour tous détails d’installation, voir les installations d’instruction qui accompagnent le contrôle RMIPWC. NOTE : Lorsque le contrôle RMIPWC est branché au module, les commandes du module ne fonctionnent plus.
- Page 30 Broan-NuTone LLC, 926 West State Street, Hartford, WI 53027 (1-800-637-1453) NuTone Inc., 4820 Red Bank Road, Cincinnati, OH 45227 (1-800-543-8687) Broan-NuTone Canada Inc., 1140 Tristar Drive, Mississauga, ON L5T 1H9 (1-888-882-7626) PIÈCES DE REMPLACEMENT MODÈLES RMIP33 et RMIP45 PART MODEL DESCRIPTION...
- Page 31 PIÈCES DE REMPLACEMENT PLAQUE ET VENTILATEUR SIMPLE (Modèle P5) HL0021 NO. DE LA DESCRIPTION QTÉ REF. PIÈCE V13296 ADAPTATEUR ET VOLET 3 1/4’’ x 10’’ V03500 DÉFLECTEUR D’AIR V12997 PLAQUE VENTILATEUR SIMPLE ASSEMBLÉE V03577 MOUSSE 1/2” X 1/2” X 12” V02160 CONDENSATEUR 15MFD V01869...
- Page 32 PIÈCES DE REMPLACEMENT PLAQUE ET VENTILATEUR DOUBLE (Modèle P8) HL0022 NO. DE LA DESCRIPTION QTÉ RÉF. PIÈCE V14971 ADAPTATEUR ET VOLET 3 1/4’’ x 14’’ V13296 ADAPTATEUR ET VOLET 3 1/4’’ x 10’’ V03500 DÉFLECTEUR D’AIR V14975 PLAQUE VENTILATEUR DOUBLE ASSEMBLÉE V03577 MOUSSE 1/2”...
- Page 33 Para reducir el riesgo de incendio y descarga eléctrica, la placa. los modelos Rangemaster RMIP33 y RMIP45 deben ser instalados con ventilador modelo: P5, P8, 331H, 332H, 335 ó 336 (vendidos separadamente) solamente. Otros ventiladores no pueden reemplazar a este ventiladores.
- Page 34 Utilice cacerolas de tamaño apropiado. Emplee cocina por ejemplo. siempre un recipiente adecuado para el tamaño de Los modelos RMIP33 y RMIP45 deben ser installados la placa. con ventilador modelo: P5, P8, 331H, 332H, 335 ó 336 (vendidos separadamente) solamente. Otros ventiladores no pueden reemplazar a este ventiladores.
- Page 35 3 1/4” x 10” (incluye con ventiladores P5 y P8) Deflertor de aire (incluye con ventiladores P5 y P8) Revestimiento protector de la DISPOSITIVO campana (optional) RMIP33 Ó RMIP45 RML3336, RML3342, RML4548 ó RML4560 Control remoto RMIPWC Modelo 332KR (Optional) Bandeja de conexión...
- Page 36 Este dispositivo funciona tanto con un ventilador exterior como interior. El modelo de dispositivo RMIP33 ó RMIP45 debe ser instalado unicamente con ventilador modelo P5, P8, 331H, 332H, 335 ó 336 (vendidos separadamentes). Otros ventiladores no pueden reemplazar a este ventiladores.
- Page 37 30 1/4" en el caso del modelo de dispositivo RMIP33 y 42 1/4" en el caso del modelo de dispositivo RMIP45. Los ojos por los tornillos de montaje del del saliente 1 1/2”...
- Page 38 DISPOSITIVO CAMPANA EXTRACTORA RML3336 RMIP33 36’’ RML3342 RMIP33 42’’ RML4548 RMIP45 48’’ HA0022E RML4560 RMIP45 60’’ 7. INSTALACIÓN DEL CONTROL REMOTO RMIPWC (OPCIONAL) La conexión eléctrica del control remoto se encuentra delante del dispositivo. Realice esta conexión antes de instalar el dispositivo. Para obtener los detalles de instalación, consulte las instrucciones de instalación...
- Page 39 10. ROMPA LA ABERTURA (VENTILADOR INTERIOR) En la placa del ventilador, rompa la abertura de salida de aire. Ver la foto de abajo. PRECAUCIÓN Cuando utilice el ventilador P5, retire la pieza desmontable de 10’’ de anchura (pieza más pequeña). Si utiliza un ventilador P8, retire la pieza desmontable correspondiente al conducto instalado (adaptador/rejilla de 10’’ó...
- Page 40 13. CONEXIÓN ELÉCTRICA (VENTILADOR NTERIOR Y EXTERIOR) ADVERTENCIA Peligro de choque eléctrico. La instalación eléctrica debe ser hecha por personal calificado de acuerdo con todos los códigos aplicables y normas. Antes de efectuar el empalme, cortar la alimentación eléctrica del interruptor y cerrar con securidad para prevenir una alimentación accidental. Coloque el dispositivo debajo de la campana extractora instalada.
- Page 41 16. CONEXIÓN DEL CONDUCTO (VENTILADOR INTERIOR Y EXTERIOR) A. Si existe un acceso por la parte superior de la campana, conecte el conducto y selle las juntas con cinta aislante tras la etapa 17 Instalación del dispositivo. B. Si no existe ningún acceso por la parte superior de la campana, presione con cuidado con el conducto de metal en el orificio de la base de la campana extractora.
- Page 42 18. INSTALACIÓN DEL VENTILADOR (INTERIOR) (CONTINUACIÓN) Instale 4 tornillos #8 x 3/8’’ en el lugar que indica la foto de abajo (ventilador simple o doble) dejando un espacio de mas o menos 1/8’’. Enganche en seguida el ventilador a la bandeja de conexión (pase las cabezas de los tornillos a través de la parte grande del hoyo).
-
Page 43: Instale Los Filtros
EQUIPO NÚMERO MODELO DE DISPOSITIVO RBFIP33 RMIP33 RBFIP45 RMIP45 HD0011 FILTRO DEFLECTOR (TÍPICO) 21. MANTENIMIENTO Filtros y la(s) rueda(s) del ventilador. Los filtros, canal y la(s) rueda(s) del ventilador deben ser frecuentemente limpiadas. Use agua tibia y una solu- ción de detergente. - Page 44 21. MANTENIMIENTO (CONTINUACIÓN) Lo que no debe hacer: - No utilice ninguna lana de acero o de acero inoxidable o todo otro raspador para quitar la suciedad tenaz. - No utilice ningún limpiador en polvo abrasivo o riguroso. - No deje la suciedad acumularse. - No deje el polvo de yeso o todo otro residuo de construcción que caiga en la campana, cúbrala durante el trabajo para asegurarse que en ningún caso el polvo se pegue a la superficie del acero.
- Page 45 22. FUNCIONAMIENTO (CONTINUACIÓN) CONTROL REMOTO RMIPWC (OPCIONAL) Para manejar el dispositivo también puede utilizarse un control remoto opcional. Para conocer los detalles de la instalación, consulte las instrucciones de instalación que viene con el control remoto WCPI. NOTA: Cuando el control remoto RMIPWC está conectado al dispositivo, los interruptores de control del dispositivo no funcionan.
- Page 46 Broan-NuTone LLC, 926 West State Street, Hartford, WI 53027 (1-800-637-1453) NuTone Inc., 4820 Red Bank Road, Cincinnati, OH 45227 (1-800-543-8687) Broan-NuTone Canada Inc., 1140 Tristar Drive, Mississauga, ON L5T 1H9 (1-888-882-7626) REPUESTOS MODELOS RMIP33 y RMIP45 PART MODEL DESCRIPTION NUMBER...
- Page 47 REPUESTOS PLACA Y VENTILADOR SIMPLE (Modelo P5) HL0021 REF. DESCRIPCIÓN PIEZA V13296 ADAPTADOR & COMPUERTA 3 1/4 ‘’ x 10’’ V03500 DEFLECTOR DE AIRE V12997 MONTAJE DE PLACA DE VENTILADOR SIMPLE V03577 ESPUMA 1/2” X 1/2” X 12” V02160 CONDENSADOR 15MFD V01869 TORNILLO MECÁNICO #6-32 X 1/4”...
- Page 48 REPUESTOS PLACA Y VENTILADOR DOBLE (Modelo P8) HL0022 REF. DESCRIPCIÓN CTD. PIEZA V14971 ADAPTADOR & COMPUERTA 3 1/4’’ x 14’’ V13296 ADAPTADOR & COMPUERTA 3 1/4’’ x 10’’ V03500 DEFLECTOR DE AIRE V14975 MONTAJE DE PLACA DE VENTILADOR DOBLE V03577 ESPUMA 1/2”...
Need help?
Do you have a question about the RMIP45 and is the answer not in the manual?
Questions and answers