Table of Contents
Advertisement
Available languages
Available languages
Broan-NuTone LLC. 926 West State Street, Hartford, WI 53027
NuTone, Inc., 4820 Red Bank Road, Cincinnati, OH 45227
Broan-NuTone Canada, Inc.1140 Tristar Drive, Mississauga, Ontario, L5T 1H9
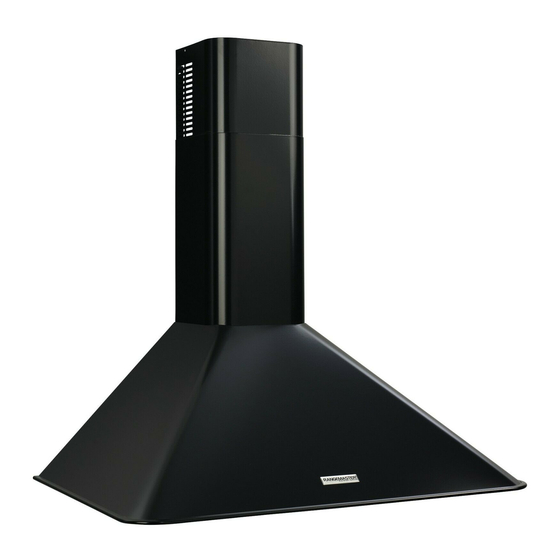
RM50000
Series
ENGLISH......................................2
FRANÇAIS...................................8
ESPAÑOL..................................14
Advertisement
Table of Contents

Related Manuals for Rangemaster RM50000 Series


Summary of Contents for Rangemaster RM50000 Series
- Page 1 RM50000 Series ENGLISH........2 FRANÇAIS........8 ESPAÑOL........14 Broan-NuTone LLC. 926 West State Street, Hartford, WI 53027 NuTone, Inc., 4820 Red Bank Road, Cincinnati, OH 45227 Broan-NuTone Canada, Inc.1140 Tristar Drive, Mississauga, Ontario, L5T 1H9...
- Page 2 READ AND SAVE THESE INSTRUCTIONS WARNING WARNING SUITABLE FOR USE IN HOUSEHOLD TO REDUCE THE RISK OF INJURY TO PER- COOKING AREA. SONS IN THE EVENT OF A RANGE TOP GREASE FIRE, OBSERVE THE FOLLOWING:* TO REDUCE THE RISK OF FIRE, ELECTRICAL 1.
-
Page 3: Install Backsplash
INSTALL BACKSPLASH (OPTIONAL) ROOF CAP If optional backsplash is used, attach it to the 6” ROUND finished wall. Secure hood mounting bracket DUCT to the backsplash and omit wall framing described below. DECORATIVE INSTALL THE DUCTWORK WALL FLUE HOOD NOTE: To reduce the risk of fire, use only 6”... -
Page 4: Connect Ductwork
WIRING Note: This range hood must be properly grounded. The unit should be installed by a qualified electrician in accordance with all applicable national and local electrical codes. GROUNDING INSTRUCTIONS This appliance must be grounded. In the event of an electrical short circuit, grounding reduces the risk of electric shock by providing an escape wire for the electric current. - Page 5 Ducted Configuration 1. Use 6" round metal duct to connect the duct collar on the hood to the ductwork above. 2. Use duct tape to make all joints secure DECORATIVE and air tight. FLUE 3. Insert the decorative flues setting them on the hood.
-
Page 6: Maintenance
DUCTFREE FILTER INSTALLATION 1. Ductfree filter kit (B08999634) is included. 2. Position the filters over the blower. 3. Rotate to lock filters in place. DUCTFREE FIL TERS MAINTENANCE Proper maintenance of the Range Hood will assure proper performance of the unit. Grease Filter The grease filter should be cleaned fre- quently. -
Page 7: Operation
OPERATION BLOWER LIGHT SWITCH SWITCH Controls PILOT The hood is operated using the slide controls LAMP under the bottom of the hood. The light switch turns the lamps on and off. The blower switch :makes it possible to select the motor operating speed. Position 0: motor off. - Page 8 LISEZ ET CONSERVEZ CES INSTRUCTIONS AVERTISSEMENTS AVERTISSEMENTS POUR REDUIRE LES RISQUES DE DOMMAGES AUX PEUT ÊTRE UTILISÉ DANS LES ZONES CUISSON DES PERSONNES AU CAS OÙ VOTRE CUISI-NIERE CUISINES FAMILIALES. PRENDRAIT FEU, OBSERVEZ LES INSTRUCTIONS SUIVANTES:* POUR REDUIRE LES RISQUES D’INCENDIE, DE 1.
-
Page 9: Installation Du Systeme D'evacuation
INSTALLATION DU PANNEAU COUVERCLE DU POSTERIEUR TOIT (OPTIONNEL) Si vous avez choisi d’utiliser le panneau TUYAU ROND DE 6” (15cm) postérieur, accrochez-le au mur. Fixez les étriers d’assemblage au panneau mais n’assemblez pas le cadre allant contre le mur qui est décrit C O N D U I T COU- plus bas. -
Page 10: Installation Electrique
régler verticalement. 3. Fixez votre hotte avec des vis d’assemblage de securité. Utilisez des chevilles pour mur à sec, qui vous sont fournies, si vous ne trouvez pas les vis-pivot ou le cadre. INSTALLATION ELECTRIQUE Remarque: Ce modèle de hotte doit être relié... - Page 11 Modèle avec tuyau d’évacuation 1. Reliez le collier d’évacuation qui se trouve sur votre hotte au système de conduction qui se trouve au-dessus au moyen d’un tuyau rond en métal de 6” (15cm). 2. Utilisez un ruban pour tuyauterie afin de CONDUIT rendre toutes les jonctions sures et DÉCORATIF...
-
Page 12: Entretien
ASSEMBLAGE DES FILTRES (MODELE RECYCLANT L’AIR) 1. L’ensemble filtres version recyclage (B08999634) est fourni. 2. Placez les filtres au-dessus du ventilateur. Grâce à un mouvement rotatif, fixez les filtres à leur place. FILTRES POUR MODELES RECYCLANT L’AIR ENTRETIEN Un bon entretien de votre hotte garantira une excellente performance. -
Page 13: Garantie
FONCTIONNEMENT INTERRUPTEUR DU INTERRUPTEUR VENTILATEUR DE LA Commandes LUMIÈRE VOYANT La hotte peut être manœuvrée à l’aide des LUMINEUX curseurs situés sous la partie inférieure de la hotte. L’interrupteur de la lumière allume et éteint les lampes. L’interrupteur du ventilateur permet de sélectionner la vitesse de marche du moteur. - Page 14 LEA Y CONSERVE ESTAS INSTRUCCIONES ADVERTENCIA ADVERTENCIA PARA EVITAR EL RIESGO DE DAÑOS A INDICADO PARA EL USO EN COCINAS PERSONAS EN CASO DE FUEGO POR ALTO DOMÉSTICAS. NÍVEL DE GRASA, TENGA EN CUENTA LO SIGUIENTE:* PARA EVITAR EL RIESGO DE INCENDIO, 1.
- Page 15 INSTALACION DEL SALPICADERO UBIERTA DEL (OPCIONAL) TUBO DE 6” TEJADO (15cm) Si se usa un modelo con salpicadero, sujete primero éste a la pared. Asegure los tornillos de DIÁMETRO montaje de la campana al salpicadero y prescinda de la estructura de montaje en la pared abajo descrita.
-
Page 16: Instalacion Electrica
cocción. 2. Los tornillos para la regulación de la altura permiten un ajuste en vertical. 3. Sujete la campana con tornillos para montaje adicionales. Use escarpias si no dispone de tacos o de la estructura de soporte en madera. INSTALACION ELECTRICA Nota: Este tipo de campana tiene que ser conectada a tierra cuidadosamente. - Page 17 Configuración con tubo 1. Use un tubo de metal de 6” (15cm) de diámetro para unir el collar de descarga que se encuentra encima de la campana al tubo de extracción situado arriba. TUBO 2. Use cinta para ajustar todas las junturas y DECORATIVO que quede hermético.
-
Page 18: Mantenimiento
INSTALACION DOS FILTROS (CONFIGURACION SIN TUBO) 1. El juego de filtros de ricambio de aire (B08999634) es adjunto. 2. Instale los filtros sobre el aspirador. 3. Gire los filtros para ajustarlos en su sitio. FILTROS MANTENIMIENTO Un mantenimiento adecuado de la campana asegura el funcionamiento correcto del aparato. - Page 19 FUNCIONAMIENTO INTERRUPTOR INTERRUPTOR DEL ASPIRADOR DA LUZ Mandos PILOTO La campana se controla mediante los mandos corrrederos situados en la parte inferior de la misma. El interruptor da luz enciende y apaga las lámparas. El interruptor del aspirador: regula la velocidad de trabajo del motor.
-
Page 20: Service Parts
SERVICE PARTS RM50000 SERIES RANGE HOOD KEY NO. PART NO. DESCRIPTION B08087292 Grease Filter B02300233 Motor Capacitor BE3244974 Electrical Box Support B02300264 Lamp Bulb B02300280 Lampholder B03200618 Light Diffuser BW0000019 Blower B02310177 Motor B03295000 Blower Wheel B03202007 Rubber Washer B03295018... - Page 21 LISTE PIECES DE RECHANGE RM50000 SERIES RANGE HOOD PART N. DESCRIPTION B08087292 Filtre anti-graisse B02300233 Condensateur BE3244974 Support boite installation electrique B02300264 Lampe B02300280 Douille B03200618 Plafonnier BW0000019 Convoyer B02310177 Moteur B03295000 Turbine B03202007 Pare chocs B03295018 Réduction B02300248 Cable alimentation...
-
Page 22: Lista De Piezas De Recambio
LISTA DE PIEZAS DE RECAMBIO RM50000 SERIES RANGE HOOD CÓD. N. PIEZA N. DESCRIPCIÓN B08087292 Filtro antigrasa B02300233 Condensador BE3244974 Soporte de la caja de instalación eléctrica B02300264 Lámpara B02300280 Soporte de la lámpara B03200618 Tapa de la lámpara BW0000019... - Page 23 SERVICE PARTS - LISTE PIECES DE RECHANGE - LISTA DE PIEZAS DE RECAMBIO RM50000 SERIES RANGE HOOD...
- Page 24 04306792/2...
Need help?
Do you have a question about the RM50000 Series and is the answer not in the manual?
Questions and answers