Velux KLR 200 User Manual
Control pad
Hide thumbs
Also See for KLR 200:
- Quick manual (135 pages) ,
- User manual (116 pages) ,
- Quick start manual (28 pages)
Table of Contents
Advertisement
VELUX INTEGRA
®
KLR 200
Version no.: 001.xxx.xxx.xxx
Congratulations on your new VELUX INTEGRA
product!
®
Thank you for buying this VELUX INTEGRA
product.
®
The control pad has been produced and tested in accordance with the newest
methods and strictest requirements and will help you to get the most out of all
your VELUX products.
DIREcTIoNs foR UsE foR VELUX INTEGRA
KLR 200. ©2012 VELUX GRoUp
®
VAs 453305-2012-08
® VELUX, ThE VELUX LoGo, INTEGRA, io-homecontrol AND ThE io-homecontrol LoGo ARE REGIsTERED TRADEmARKs
Advertisement
Table of Contents

Subscribe to Our Youtube Channel
Related Manuals for Velux KLR 200


Summary of Contents for Velux KLR 200
- Page 1 Version no.: 001.xxx.xxx.xxx Congratulations on your new VELUX INTEGRA product! ® Thank you for buying this VELUX INTEGRA product. ® The control pad has been produced and tested in accordance with the newest methods and strictest requirements and will help you to get the most out of all your VELUX products.
-
Page 2: Table Of Contents
VELUX INTEGRA ® KLR 200 Contents Important information Control pad Control pad functions Operation Basic operation operation of windows operation of sunscreening products operation of lights operation of on/off switch products operation of other types of io-homecontrol products ® product position... - Page 3 Adding products to the control pad Adding a control 40-82 - Adding a control to your system already operated with a VELUX INTEGRA control pad KLR 200 40-52 ® - Adding a VELUX INTEGRA control pad KLR 200 to your system already operated with another control 53-67 ®...
-
Page 4: Important Information
VELUX INTEGRA ® KLR 200 Important information Read instructions carefully before installation. please keep instructions for future reference and hand them over to any new user. Safety Product • The control pad has been designed for use with genuine • T he control pad is intended for operation by persons with the relative experience and knowledge or by persons who VELUX products. -
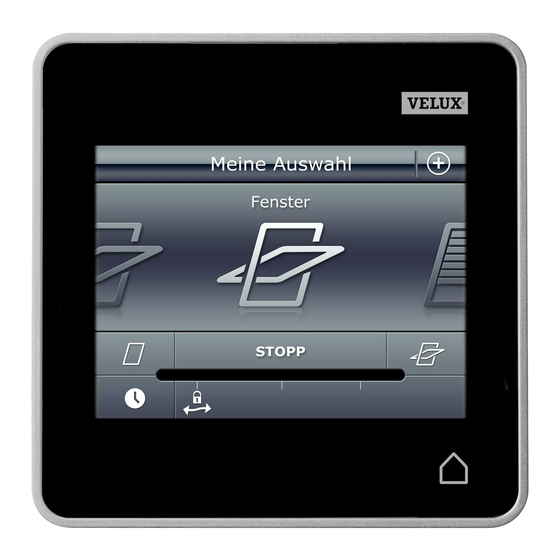
Page 5: Control Pad
VELUX INTEGRA ® KLR 200 Control pad Control pad functions shows product Light gauge location Access to programs and settings Running program Low battery stops running products. shows the position of the product navigator. product shown in the display shows operable product... -
Page 6: Operation
VELUX INTEGRA ® KLR 200 Operation Basic operation You can operate all products by tapping icons/buttons or by drag- ging the slider and tapping the bar in the display. The product to be operated is shown in the middle of the display. -
Page 7: Operation Of Sunscreening Products
VELUX INTEGRA ® KLR 200 Operation Basic operation Operation of sunscreening products Roller shutters / Awnings blinds / Blinds Run up stop Run down Drag the slider or tap the bar to set the position of the sun- screening product. The position from 0-100 is shown in the bottom right corner. -
Page 8: Operation Of Lights
VELUX INTEGRA ® KLR 200 Operation Basic operation Operation of lights Turn off stop Turn on Drag the slider or tap the bar to set the intensity of the light. The position from 0-100 is shown in the bottom right corner. -
Page 9: Programs Using Programs
VELUX INTEGRA ® KLR 200 Operation Programs - Using programs A program can help you get a smarter home. It can see to it that your house is ventilated regularly, that internal temperatures are kept down during the day when necessary, and that the heat loss is reduced at night. -
Page 10: Velux Programs
VELUX INTEGRA ® KLR 200 Operation Programs - VELUX programs Using a program The program “Ventilation" makes it easy to open and close your windows. The example shows how to use it. Tap "programs". Tap "Ventilation". Tap "start". Tap "No". -
Page 11: Editing A Program
VELUX INTEGRA ® KLR 200 Operation Programs - VELUX programs Editing a program You can change the settings in a program to make it suit you better. The example shows how to change the settings in the program "Ventilation", into opening just one window and increasing its open- ing for ventilation purposes. - Page 12 VELUX INTEGRA ® KLR 200 Operation Programs - VELUX programs Tap "Alle vinduer". Remove ticks at the windows not to be closed (1). Tryk på (2). to finish. If you use a program often, you can place it in the product naviga- tor to have direct access to it, see the section Adding a program to the product navigator.
-
Page 13: Adding A Program To The Product Navigator
VELUX INTEGRA ® KLR 200 Operation Programs - VELUX programs Adding a program to the product navigator You can place a program in the product navigator to make it easier to activate. Note: only programs running once when activated can be added to the product navigator, see the section Using programs. -
Page 14: Own Programs
VELUX INTEGRA ® KLR 200 Operation Programs - Own programs Creating a program If the VELUX programs do not cover your requirements, you can make your own program. You may for instance need to ventilate a room before dark every day. - Page 15 VELUX INTEGRA ® KLR 200 Operation Programs - Own programs Tap "Start 00:00". Roll the wheel to set the time to open the windows (1). Tap "oK" (2). Tap "Repeat: All days". scroll down the display and remove tick at the days not to be part of the program (1).
- Page 16 VELUX INTEGRA ® KLR 200 Operation Programs - Own programs Roll the wheel to set the time to Tap "Repeat: All days". close the windows (1). Tap "oK" (2). scroll down the display and remove tick at the days not to be part of the program (1).
-
Page 17: Editing A Program
VELUX INTEGRA ® KLR 200 Operation Programs - Own programs Editing a program You can change the settings in a program to make it suit you better. The example shows how to change the settings so that Window 3 is no longer part of the program "Night cooling". - Page 18 VELUX INTEGRA ® KLR 200 Operation Programs - Own programs Tap "All windows". Remove tick at the window not to be closed (1). (2). to finish. VELUX 18...
-
Page 19: Adding A Program To The Product Navigator
VELUX INTEGRA ® KLR 200 Operation Programs - Own programs Adding a program to the product navigator You can place a program in the product navigator to make it easier for you to activate it. Note: only programs running once when activated can be added to the product navigator, see the section Using programs. -
Page 20: Renaming A Program
VELUX INTEGRA ® KLR 200 Operation Programs - Own programs Renaming a program You can rename of your own programs. In the example, the name of the program "After cooking" is changed into "fresh air". Tap "After cooking". Tap "Edit". -
Page 21: Silent Mode Operation
VELUX INTEGRA ® KLR 200 Operation Programs - Own programs Silent mode operation some products have been set to silent mode operation when they are activated by programs running according to a schedule, see also Use of programs. This may for instance be convenient if the products are activated automatically at night. -
Page 22: Smart Operation
VELUX INTEGRA ® KLR 200 Operation Smart operation Finding products It may be difficult to tell the products from each other in the prod- uct navigator. Therefore, you can identify the product of interest if you are not sure whether you have identified the right one. When this is important to know in order to carry on, you are offered the function "find product". -
Page 23: Renaming Products
VELUX INTEGRA ® KLR 200 Operation Smart operation Renaming products You can change the names of products to make it easier to find and operate them. The example shows how to change the names of Window 4 and Window 5 into Left and Right respectively. -
Page 24: Groups
VELUX INTEGRA ® KLR 200 Operation Smart operation - Groups Creating a group If you have several products of the same type, you can operate them simultaneously by grouping them. for instance, you can open and close all windows facing south or all windows in a room at the tap on a button. -
Page 25: Editing A Group
VELUX INTEGRA ® KLR 200 Operation Smart operation - Groups Editing a group You can change the contents of a group by adding or removing products. The example shows how to add Window 4 and Window 5 to the group "Group 1", already consisting of Window 2 and Window 3. -
Page 26: Renaming A Group
VELUX INTEGRA ® KLR 200 Operation Smart operation - Groups Renaming a group You can change the name of a group. The example shows how to change the name "Group 1" into "south windows". Tap "Groups". Tap . Tap "Rename group". -
Page 27: Deleting A Group
VELUX INTEGRA ® KLR 200 Operation Smart operation - Groups Deleting a group You can delete a group if it is not relevant anymore. The example shows how to delete the group "south windows". Note: only the group is deleted. You can still operate the products individually via the product navigator. -
Page 28: Rooms
VELUX INTEGRA ® KLR 200 Operation Smart operation - Rooms Creating a room You can create rooms corresponding the actual rooms in your home, and put your VELUX products in them. This makes it easier to find and operate the right products. -
Page 29: Editing A Room
VELUX INTEGRA ® KLR 200 Operation Smart operation - Rooms Editing a room You can change the contents of a room by adding or removing products. The example shows how to add Roller shutter 2 and Roller shutter 1 to the room "Bedroom", already consisting of Window 4 and Window 5. -
Page 30: Renaming A Room
VELUX INTEGRA ® KLR 200 Operation Smart operation - Rooms Renaming a room You can change the name of a room. The example shows how to change the name "Bedroom" into "child’s room". Tap "Rooms". Tap "choose new name". Tap "Bedroom" (1). (2). scroll down the display to find a select "child’s room" (1). -
Page 31: Deleting A Room
VELUX INTEGRA ® KLR 200 Operation Smart operation - Rooms Deleting a room You can delete a room if it is not relevant anymore. The example shows how to delete the room "child’s room". Note: only the room is deleted. You can still operate the products individually via the product navigator. -
Page 32: Favourites
VELUX INTEGRA ® KLR 200 Operation Smart operation - Favourites Editing order of products in the product navigator If you use some products, groups or programs more often than others, it may be convenient to show them in another order in the product navigator. -
Page 33: Editing Favourites
VELUX INTEGRA ® KLR 200 Operation Smart operation - Favourites Editing favourites When activating the function "favourites" the product navigator only shows the products, groups and/or programs you use most often. You can at any time choose to see all your products, groups and/or programs again. -
Page 34: Operation Without Using The Control Pad
VELUX INTEGRA ® KLR 200 Operation Operation without using the control pad Manual operation of centre-pivot windows You can open and close your centre-pivot window manually. If the window is already open, you must close it fully with the control pad first. -
Page 35: Closing Centre-Pivot Windows In Case Of Power Failure Or Discharged Battery
VELUX INTEGRA ® KLR 200 Operation Operation without using the control pad Closing centre-pivot windows in case of power failure or dis- charged battery In case of power failure, you can close your centre-pivot window man- ually by disengaging the chain on the ventilation flap of the window. -
Page 36: Closing Windows If The Control Pad Has Been Mislaid
VELUX INTEGRA ® KLR 200 Operation Operation without using the control pad Closing windows if the control pad has been mislaid If your control pad has been mislaid, you can close your window by pressing a button on the window operator. see below on how to close your window without using the control pad, depending on window type. -
Page 37: Setting Up
VELUX INTEGRA ® KLR 200 Setting up Start-up of a new VELUX system Initial set-up Before you can operate you VELUX products, they must be regis- tered in the control pad. Remove the battery lid by pressing the release button with a screwdriver as illus- trated (1), (2). Insert batteries (type AA/LR6) (3). -
Page 38: If The Initial Set-Up Fails
VELUX INTEGRA ® KLR 200 Setting up Start-up of a new VELUX system If the initial set-up fails If the control pad cannot find some of the products, you can make the products ready for registration by manually resetting them to their initial factory settings. -
Page 39: Extension Of Your Velux System
VELUX INTEGRA ® KLR 200 Setting up Extension of your VELUX system Adding products to the control panel You can operate up to 200 products, for instance electric windows, roller shutters and blinds, by registering them in your control pad. -
Page 40: Adding A Control
KLR 200 ® To operate your VELUX products with additional controls, the con- tents of the control pad KLR 200 already in use can be copied to other controls. Note: If you have edited the standard programs or made your own programs, these are not copied to the additional control. - Page 41 Adding a VELUX INTEGRA control pad KLR 200 to your sys- ® tem already operated with a control pad KLR 200 The instructions below show how to copy the contents of control pad KLR 200 to another control pad. The control to send a copy is called The control to receive a copy is called , which is to send a copy.
- Page 42 VELUX INTEGRA ® KLR 200 Setting up Extension of your VELUX system - Adding a control You now have 2 minutes to execute items 5-10 with control which is to receive a copy. Remove the battery lid by pressing the release button with a screwdriver as illus- trated (1), (2).
- Page 43 KLR 200 The instructions below show how to copy the contents of control pad KLR 200 to the controller. see also the instructions for the controller. The control to send a copy is called The control to receive a copy is called , which is to receive a copy.
- Page 44 VELUX INTEGRA ® KLR 200 Setting up Extension of your VELUX system - Adding a control prepare sensors and register them in the controller. Note: You have 10 minutes to execute items 4-8. Prepare sensors for registration: Register sensors in the auto sEt-uP...
- Page 45 VELUX INTEGRA ® KLR 200 Setting up Extension of your VELUX system - Adding a control You now have two minutes to execute items 13-14. "Register" in the control- auto sEt-uP ler to start registration. Prepare products for registration and...
- Page 46 KLR 200 The instructions below show how to copy the contents of control pad KLR 200 to the remote control without display. see also the instructions for the remote control. The control to send a copy is called The control to receive a copy is called , which is to send a copy.
- Page 47 KLR 200 The instructions below show how to copy the contents of control pad KLR 200 to the control switch. see also the instructions for the control switch. The control to send a copy is called The control to receive a copy is called , which is to send a copy.
- Page 48 KLR 200 The instructions below show how to copy the contents of control pad KLR 200 to the interface fitted into a wall switch/socket of another make. see also the instructions for the interface.
- Page 49 ® already operated with a control pad KLR 200 The instructions below show how to copy the contents of control pad KLR 200 to the interface. see also the instructions for the interface. The control to send copy is called...
- Page 50 VELUX INTEGRA ® KLR 200 Setting up Extension of your VELUX system - Adding a control You now have two minutes to execute items 5 and 6. press to highlight a B c D E F g "Register products". systEm sEttings press "Enter"...
- Page 51 VELUX INTEGRA control pad KLR 200 ® The instructions below show how to copy the contents of control pad KLR 200 to other types of io-homecontrol controls. see also ® the instructions for the control in question.
- Page 52 VELUX INTEGRA ® KLR 200 Setting up Extension of your VELUX system - Adding a control Two-way controls first execute items 1-4 with control , which is to send a copy. Tap "New product". Tap "copy control pad". You now have two minutes to execute item 5 with control which is to receive a copy.
-
Page 53: Adding A Velux Integra Control Pad Klr 200 To Your System Already Operated With Another Control
KLR 200 Setting up Extension of your VELUX system - Adding a control Adding a VELUX INTEGRA control pad KLR 200 to your system ® already operated with another control To operate your VELUX products with additional controls, the con- tents of the control already in use can be copied to your new control pad KLR 200. - Page 54 KLR 100 The instructions below show how to copy the contents from the remote control already in use to the control pad KLR 200. see also the instructions for the remote control. The control to send a copy is called The control to receive a copy is called , which is to send a copy.
- Page 55 VELUX INTEGRA ® KLR 200 Setting up Extension of your VELUX system - Adding a control You now have two minutes to execute items 4-8 with control which is to receive a copy. Remove the battery lid by pressing the release button with a screwdriver as illus- trated (1), (2).
- Page 56 KRX 100 The instructions below show how to copy the contents from the controller already in use to the control pad KLR 200. see also the instructions for the controller. The control to send a copy is called...
- Page 57 VELUX INTEGRA ® KLR 200 Setting up Extension of your VELUX system - Adding a control You now have two minutes to execute items 4-8 with control which is to receive a copy. Remove the battery lid by pressing the release button with a screwdriver as illus- trated (1), (2).
- Page 58 The instructions below show how to copy the contents from the remote control without display already in use to the control pad KLR 200. see also the instructions for the remote control. The control to send a copy is called...
- Page 59 VELUX INTEGRA ® KLR 200 Setting up Extension of your VELUX system - Adding a control The control pad shows that it follow the instructions in the has found the products. display and tap when you Note: Tap "search again" if are ready.
- Page 60 KLI 110 The instructions below show how to copy the contents from the control switch already in use to the control pad KLR 200. see also the instructions for the control switch. The control to send a copy is called...
- Page 61 VELUX INTEGRA ® KLR 200 Setting up Extension of your VELUX system - Adding a control The control pad shows that it follow the instructions in the has found the products. display and tap when you Note: Tap "search again" if are ready.
- Page 62 The instructions below show how to copy the contents from the interface already in use to the control pad KLR 200. see also the instructions for the interface. The control to send a copy is called The control to receive a copy is called , which is to send a copy.
- Page 63 VELUX INTEGRA ® KLR 200 Setting up Extension of your VELUX system - Adding a control The control pad shows that it follow the instructions in the has found the products. display and tap when you Note: Tap "search again" if are ready.
- Page 64 KLF 100 The instructions below show how to copy the contents from the interface already in use to the control pad KLR 200. see also the instructions for the interface. The control to send a copy is called The control to receive a copy is called , which is to send a copy.
- Page 65 VELUX INTEGRA ® KLR 200 Setting up Extension of your VELUX system - Adding a control Tap "Receive copy". Tap "oK". to finish. press "Back" to finish. a B c D E F g systEm sEttings Select products Security key Copy system...
- Page 66 ® control The instructions below show how to copy the contents from the control already in use to the control pad KLR 200. see also the instructions for the control or the section Joint operation of io-homecontrol products (generic configuration).
- Page 67 VELUX INTEGRA ® KLR 200 Opsætning Udvidelse af dit VELUX system - Tilføj betjeningsenhed You now have two minutes to execute items 2-7 with control which is to receive a copy. Remove the battery lid by pressing the release button with a screwdriver as illus- trated (1), (2).
-
Page 68: Making Controls Already In Use Operate Each Other's Products
To do this, you must register all products already registered in each separate control in both controls. To find the control with which VELUX INTEGRA control pad ® KLR 200 is to be merged, please see the page references below. VELUX INTEGRA VELUX INTEGRA ® ®... - Page 69 Making two or more VELUX INTEGRA control pads KLR 200 ® operate each other’s products The instructions below show how to make a control pad KLR 200 also operate the products registered in another control pad KLR 200. They are called control and control respectively.
- Page 70 VELUX INTEGRA ® KLR 200 Setting up Extension of your VELUX system - Adding a control Now execute items 11-15 with control Tap "New product". Tap "Add new products". when the control pad has found the products (1). You can now operate the new products.
- Page 71 KLR 200 and a remote ® control KLR 100 operate each other’s products The instructions below show how to make a control pad KLR 200 also operate the products registered in a remote control. They are called control and control respectively.
- Page 72 VELUX INTEGRA ® KLR 200 Setting up Extension of your VELUX system - Adding a control Now execute items 9-13 with control Tap "New product". Tap "Add new products". press "Back" to finish. when the control pad sEcuRity kEy has found the products (1).
- Page 73 KLR 200 and ® a controller KRX 100 operate each other’s products The instructions below show how to make a control pad KLR 200 also operate the products registered in a controller. They are called control and control respectively.
- Page 74 VELUX INTEGRA ® KLR 200 Setting up Extension of your VELUX system - Adding a control Now execute items 9-13 with control Tap "New product". Tap "Add new products". "Back" to finish. when the control pad sEcuRity kEy has found the products (1).
- Page 75 VELUX INTEGRA remote control without display operate ® each other’s products The instructions below show how to make a control pad KLR 200 also operate the products registered in a remote control without display. They are called control and control respectively.
- Page 76 KLR 200 and a control ® switch KLI 110 operate each other’s products The instructions below show how to make a control pad KLR 200 also operate the products registered in a control switch. They are called control and control respectively.
- Page 77 ® interface KLF 050 fitted into a wall switch/socket of another make operate each other’s products The instructions below show how to make a control pad KLR 200 also operate the products registered in an interface. They are called control and control , respectively.
- Page 78 KLR 200 and an inter- ® face KLF 100 operate each other’s products The instructions below show how to make a control pad KLR 200 also operate the products registered in an interface. They are called control and control respectively.
- Page 79 VELUX INTEGRA ® KLR 200 Setting up Extension of your VELUX system - Adding a control Now execute items 7-11 with control Tap "New product". Tap "Add new products". when the control pad press "Back" to finish. a B c D E F g has found the products (1).
- Page 80 ® type of io-homecontrol control operate each other’s products ® The instructions below show how to make a control pad KLR 200 also operate the products registered in another type of io-homecontrol control. They are called control and control ®...
- Page 81 VELUX INTEGRA ® KLR 200 Setting up Extension of your VELUX system - Adding a control Two-way controls first execute items 1-4 with control Tap "New product". Tap "copy control pad". You now have two minutes to execute item 5 with control...
- Page 82 VELUX INTEGRA ® KLR 200 Setting up Extension of your VELUX system - Adding a control Now execute items 6-10 with control Tap "New product". Tap "Add new products". when the control pad has found the products (1). You can now operate the new products.
-
Page 83: Deleting Products In The Control Pad
VELUX INTEGRA ® KLR 200 Setting up Extension of your VELUX system Deleting products in the control pad You can delete products from the control pad if you do not want to be able to operate them with the control pad anymore. -
Page 84: Joint Operation Of Io-Homecontrol Products (Generic Configuration)
® systems and how to create a new security key. Under the lid on the back of the control pad KLR 200, a key button can be activated by pressing it with a pointed object. Depending on whether you want to receive, send or create a new security key, you must press this key button for a certain period of time. -
Page 85: Sending The Security Key To Another Io-Homecontrol Control
Note: The mode can be interrupted by pressing the key button once more. If the diode on your control pad KLR 200 now stays green for about 2 seconds and then goes out, the transmission has suc- ceeded. -
Page 86: Receiving The Security Key Of Another Io-Homecontrol Control
(max 2 seconds) until the diode starts flashing Note: The mode can be interrupted by pressing the key button once more. If the diode on your control pad KLR 200 now stays green for about 2 seconds and then goes out, the transmission has suc- ceeded. -
Page 87: Settings
VELUX INTEGRA ® KLR 200 Setting up Settings Time and date You can set time and date the first time you use the control pad or at any time after. Note: You cannot use programs until you have set time and date. -
Page 88: Time And Date
VELUX INTEGRA ® KLR 200 Setting up Settings Setting date The example shows how to set date. Tap "settings". Tap "Time and date". set date Tap "set date". Roll the wheel, ie swipe a finger over the display in the direc- tions of the arrows to choose day, month and year (1). -
Page 89: Language
VELUX INTEGRA ® KLR 200 Setting up Settings Language You must choose a language the first time the control pad is put into operation. The chosen language can be changed at any time. The example shows how to change language. -
Page 90: Resetting The Control Pad
VELUX INTEGRA ® KLR 200 Setting up Resetting the control pad The control pad can be reset to its initial factory settings if you want to delete all registered products and personal settings and start afresh. Note: If you have one control pad only, all products must be reset before you can register them in the control pad again, see the sec- tion If the initial set-up fails. -
Page 91: Security
VELUX INTEGRA ® KLR 200 Setting up Security Password To ensure that your settings cannot be changed by anyone except yourself, access to the settings of the control pad can be limited by means of a password. The example shows how to lock the settings by means of a pass- word. -
Page 92: Changing The Security Key
To find the control that operates the same system as your control pad KLR 200 and needs a change of security key, please see the page references below. VELUX INTEGRA VELUX INTEGRA ®... - Page 93 Changing the security key in systems with one or more VELUX INTEGRA control pads KLR 200 ® The two control pads KLR 200 are called control and control respectively. It does not matter which control pad is called first execute items 1-6 with control Tap "settings".
- Page 94 VELUX INTEGRA ® KLR 200 Setting up Security - Changing the security key Tap "security". Tap "Receive security key". Tap "oK". The security key is now identical in both controls. If you have additional controls, you must execute item 6 with...
- Page 95 Changing the security key in systems with one or more VELUX INTEGRA control pads KLR 200 and remote controls KLR 100 ® control pad KLR 200 and remote control KLR 100 are called con- trol and control respectively. first execute items 1-6 with control Tap "settings".
- Page 96 VELUX INTEGRA ® KLR 200 Setting up Security - Changing the security key You now have two minutes to execute items 7-10 with control press "menu". press to highlight "system mEnu House settings". user settings press “Enter" to confirm no. 1 system settings your choice.
- Page 97 Changing the security key in systems with one or more VELUX INTEGRA control pads KLR 200 and ® controllers KRX 100 control pad KLR 200 and controller KRX 100 are called control and control respectively. first execute items 1-6 with control Tap "settings".
- Page 98 VELUX INTEGRA ® KLR 200 Setting up Security - Changing the security key You now have two minutes to execute items 7-10 with control press "menu". press to highlight mEnu House "system settings". user settings press “Enter" to con- no. 1 system settings firm your choice.
- Page 99 Changing the security key in systems with one or more VELUX INTEGRA control pads KLR 200 and interfaces KLF 100 ® control pad KLR 200 and interface KLf 100 are called control and control respectively. first execute items 1-6 with control Tap "settings".
- Page 100 VELUX INTEGRA ® KLR 200 Opsætning Security - Changing the security key You now have two minutes to execute items 7-8 with control follow the instructions for the press to highlight a B c D E F g a B c D E F g interface until the section where "Receive".
- Page 101 Changing the security key in systems with one or more VELUX INTEGRA control pads KLR 200 and other types ® of io-homecontrol controls ® control pad KLR 200 and the other type of io-homecontrol ® control are called and control respectively. first execute items 1-6 with control Tap "settings".
- Page 102 VELUX INTEGRA ® KLR 200 Setting up Security - Changing the security key You now have two minutes to execute item 7 with control see instructions for control You may also refer to section Joint operation of io-homecontrol ® products (generic configuration).
-
Page 103: Installation
VELUX INTEGRA ® KLR 200 Installation Fitting the control pad to the wall You can secure the control pad directly to the wall without using the holder supplied . The control pad will be almost flush with the wall and you will always know where it is. -
Page 104: Repositioning The Rain Sensor In Case Of Retrofitting
VELUX INTEGRA ® KLR 200 Installation Repositioning the rain sensor in case of retrofitting Retrofitting a roller shutter or an awning blind onto an elec- trically operated centre-pivot window If you want to retrofit an electric roller shutter or awning blind... -
Page 105: Declaration Of Conformity
VELUX INTEGRA ® KLR 200 Declaration of Conformity In accordance with the Council Directive 2006/95/EC We herewith declare that the VELUX INTEGRA products The above-mentioned VELUX INTEGRA roof windows, flat ® ® roof window, electrical conversion kits and solar conversion • roof windows GGL (----21) og GGU (----21), kit - when the kit is installed on a VELUX roof window - are to • roof windows GGL Solar (----30) og GGU Solar (----30),...
Need help?
Do you have a question about the KLR 200 and is the answer not in the manual?
Questions and answers
Bonjour, nous avons une commande à distance velux KLR 200. Après changement des piles l'écran reste figé sur l'image représentant le nom velux. Nous avons essayé de reseter comme indiqué dans le manuel mais sans succès. Notre première question devons nous remplacer la commande à distance. Seconde question nous voudrions aussi faire un entretien. Avez vous quelqu'un dans notre région qui pourrait nous aider. Merci à vous nous habitons en Belgique plus précisément sur Hermée Oupeye.
There is only one product that asks for the security key'the rest is operating normally. How to reset the only one?
Our velux klr 200 does not work. I have reset the remote, but it cannot “find” any products. Can you help?