Table of Contents
Advertisement
Quick Links
Advertisement
Chapters
Table of Contents

Subscribe to Our Youtube Channel
Related Manuals for UTStarcom CDM7075


Summary of Contents for UTStarcom CDM7075
-
Page 2: Table Of Contents
TABLE OF CONTENTS CHAPTER 1. BEFORE USING YOUR PHONE PACKAGE INCLUDES .....................6 HANDSET DESCRIPTION ..................7 BATTERY USAGE ....................11 BATTERY HANDLING INFORMATION ..............14 DO’s............................14 DON’Ts..........................14 CHAPTER 2. BASIC OPERATION TURNING THE PHONE ON / OFF ................16 ACCESSING THE MENU ..................17 MENU SUMMARY ....................18 BASIC FUNCTIONS....................20 MAKING A CALL .........................20 ANSWERING CALLS ......................21... - Page 3 TABLE OF CONTENTS 911 USING ANY AVAILABLE SYSTEM .................27 CHAPTER 3. MEMORY FUNCTION STORING A PHONE NUMBER ................30 ENTERING LETTERS, NUMBERS & SYMBOLS............31 STANDARD INPUT MODE ....................32 T9WORD INPUT MODE .......................33 NUMERIC MODE.........................34 SYMBOL MODE........................34 MAKING A CALL THROUGH THE CONTACT LIST ..........35 ONE-TOUCH/TWO-TOUCH DIALING..................35 CHAPTER 4.
- Page 4 TABLE OF CONTENTS PHONE INFO ........................76 VR SETTINGS........................78 CHAPTER 5. TOOLS TOOLS........................82 VOICE COMMAND......................82 CALENDAR..........................84 ALARM CLOCK........................86 WORLD CLOCK ........................87 NOTEPAD..........................88 CALCULATOR........................89 STOPWATCH........................90 VOICE MEMO ........................91 CHAPTER 6. GET IT NOW GET IT NOW ......................94 GET TUNES & TONES ......................94 GET PIX &...
- Page 5 TABLE OF CONTENTS VOICEMAIL ........................111 EMAIL ..........................112 IM .............................112 CHAT..........................112 ERASE ALL ........................113 SETTINGS..........................114 CHAPTER 8. MOBILE WEB STARTING INTERNET BROWSER................120 LAUNCHING MOBILE WEB 2.0..................120 BROWSER MENU....................121 BROWSER MENU ......................121 CHAPTER 9. SAFETY INFORMATION SAFETY ......................126 SAFETY INFORMATION FOR WIRELESS HANDHELD PHONES ...........126 SAFETY INFORMATION FOR FCC RF EXPOSURE ...............130 SAR INFORMATION ......................131 FDA CONSUMER UPDATE....................133...
-
Page 6: Chapter 1. Before Using Your Phone
CHAPTER 1 BEFORE USING YOUR PHONE CHAPTER 1 BEFORE USING YOUR PHONE This chapter provides important information about using your phone including: PACKAGE INCLUDES HANDSET DESCRIPTION BATTERY USAGE BATTERY HANDLING INFORMATION... -
Page 7: Package Includes
PACKAGE INCLUDES This package should include all items pictured below. If any are missing or different, immediately contact the retailer where you purchased the phone. Handset Handset AC Charger Standard Battery Handstrap... -
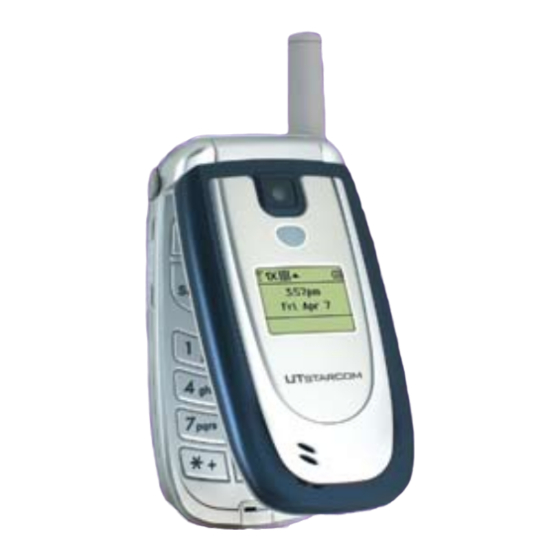
Page 8: Handset Description
HANDSET DESCRIPTION Your CDM7075VW weighs 3.5 ounces. The dimensions are 3.5"x1.9"x8.6". Camera Lens Flash NAVIGATION KEY Left Soft Key Right Soft Key SEND Key END/POWER Key CLR/ Speakerphone Key Microphone Antenna Ear-jack Volume Keys Camera Key... -
Page 9: The Function Keys
HANDSET DESCRIPTION (THE FUNCTION KEYS) NAVIGATION KEY In Idle Mode Press for Web Browser, for Shortcut (default program is Calendar), for Get It Now and for Get Tunes & Tones. Within A Menu Use to scroll through menu options, or to select a function displayed on the screen. -
Page 10: Display Indicators
HANDSET DESCRIPTION (DISPLAY INDICATORS) This display appears when you are not on a call or using the menu. You must be in Idle Mode display to dial a phone number. Display Indicators Display various icons. Text & Graphic area Soft Key Indicators Shows the functions currently assigned to each soft key and displays some icons. -
Page 11: Vibrate Only
HANDSET DESCRIPTION (DISPLAY INDICATORS) GPS Icon Indicates the Location Service of your phone is disabled/enabled. Indicates your phone is in TTY mode. Alarm Only Phone will alert you with an alarm tone when call is received. Alarm Appears when either a calendar or an alarm is set. Vibrate Only Phone will vibrate to notify you of an incoming call. -
Page 12: Battery Usage
BATTERY USAGE (BATTERY INSTALLATION) Place the battery (label side up) on the back of the phone so the metal contacts match up on the battery and in the battery cavity. Push the battery down into the battery cavity until it locks into place. -
Page 13: Battery Removal
BATTERY USAGE (BATTERY REMOVAL) Push down the release latch button, then slide the battery cover off the phone. Lift the battery up and out of the battery cavity from the top of the battery. Note If the battery is not correctly placed in the compartment, the handset will not turn on and/or the battery may detach during use. -
Page 14: Battery Charging
BATTERY USAGE (BATTERY CHARGING) POWER CONNECTION Plug the AC Charger into a standard outlet. Plug the other end of the AC Charger into the bottom of your phone. The battery must be installed onto the phone. • When you charge the battery with the phone power off, you Hot Key will see a charging status screen. -
Page 15: Battery Handling Information
BATTERY HANDLING INFORMATION DO’s Only use the battery and charger approved by the manufacturer. Only use the battery for its original purpose. Try to keep batteries in a temperature between 41ºF (5ºC ) and 95ºF (35ºC). If the battery is stored in temperatures above or below the recommended range, give it time to warm up or cool down before using. -
Page 16: Chapter 2. Basic Operation
CHAPTER 2 BASIC OPERATION CHAPTER 2 BASIC OPERATION This chapter addresses and explains the basic features of your phone including: TURNING THE PHONE ON / OFF ACCESSING THE MENU MENU SUMMARY BASIC FUNCTIONS DURING A CALL MAKING AN EMERGENCY CALL... -
Page 17: Turning The Phone On / Off
TURNING THE PHONE ON / OFF TURNING THE PHONE ON Press and hold until your “Power On” logo appears and the tone sounds. • If “Password” appears on the display enter your 4-digit password Note to unlock your phone. • The default password is the last 4 digit of your phone number. TURNING THE PHONE OFF Press and hold until your “Power Off”... -
Page 18: Accessing The Menu
ACCESSING THE MENU Your phone can be customized via the menu. Each function can be accessed by scrolling with the NAVIGATION KEY or by pressing the number that corresponds with the menu item. To access the menu from Idle Mode, press [MENU]. -
Page 19: Menu Summary
MENU SUMMARY GET IT NOW 2. Received 3. Dialed 1. Get Tunes & Tones 4. All 2. Get PIX & FLIX 5. View Timers 2.1. Get New PIX 2.2. My PIX SETTINGS & TOOLS 2.3. PIX Place 2.4. Take PIX 1. - Page 20 MENU SUMMARY 3. Display Settings 5.6. Restrict Calls 5.7. Data Settings 3.1. Banner 5.7.1. Select Port 3.1.1. Personal 5.7.2. Port Speed 3.1.2. ERI Banner 5.8. DTMF Tones 3.2. Backlight 5.9. Ringer ID 3.2.1. Display 5.10. Picture ID 3.2.2. Keypad 6. Memory 3.3.
-
Page 21: Basic Functions
BASIC FUNCTIONS MAKING A CALL Enter a phone number. To modify the phone number you have entered : Note • To erase one digit at a time press • To erase the entire number, press and hold Press • If “CALL FAILED” appears on the display or the line is busy, Note press •... -
Page 22: Answering Calls
BASIC FUNCTIONS ANSWERING CALLS When your phone rings or vibrates, press to answer the incoming call. (Depending on your phone’s settings, you may also answer incoming calls by opening the phone or by pressing any digit key.) To ignore incoming calls, press [IGNORE]. -
Page 23: Wait/Pause Feature
BASIC FUNCTIONS WAIT/PAUSE FEATURE Pauses are used for automated systems (i.e., voice mail, calling cards). Insert a pause after a phone number then enter another group of numbers. The second set of numbers is dialed automatically after the pause. This feature is useful for dialing into systems that require a code. To insert a wait/pause, enter a phone number then press [OPTIONS]. -
Page 24: Caller Id Function
BASIC FUNCTIONS CALLER ID FUNCTION Identifies caller by displaying their phone number. If the caller’s name and number are already stored in your phone book, their name will appear. This is a system dependent feature. Please contact your service provider for details. CALL WAITING FUNCTION Notifies you of an incoming call when you are already on a call by sounding a beep tone and displaying the caller’s phone number. -
Page 25: Adjusting Volume
BASIC FUNCTIONS ADJUSTING VOLUME Adjusts the volume of the ringer, key beep and earpiece. Press [MENU], then press 2 times for the “Settings & Tools” menu. Press “Sound Settings” then select one of the following options: Master Volume : Controls the ringer volume. Keypad Volume : Controls the keypad volume. -
Page 26: During A Call
DURING A CALL MUTE (UNMUTE) The caller cannot hear you or any sounds from your side but you can still hear them. Press [MUTE]. • To deactivate, press [UNMUTE]. • The phone will automatically unmute in Emergency Call or Callback mode. -
Page 27: Location
DURING A CALL LOCATION Enables the network to locate your current location through Global Positioning System (GPS). Press [OPTIONS], press... -
Page 28: Making An Emergency Call
MAKING AN EMERGENCY CALL The 911 feature puts the phone in the Emergency Call Mode when you dial the preprogrammed emergency number, 911. It also operates in the lock mode and out of the service area. 911 IN LOCK MODE The 911 call service is available even in the lock mode. - Page 29 MEMO...
-
Page 30: Chapter 3. Memory Function
CHAPTER 3 MEMORY FUNCTION CHAPTER 3 MEMORY FUNCTION This chapter addresses memory functions including: STORING A PHONE NUMBER ENTERING LETTERS, NUMBERS & SYMBOLS MAKING A CALL THROUGH THE CONTACT LIST... -
Page 31: Storing A Phone Number
STORING A PHONE NUMBER The phone book stores up to 500 entries. Enter phone number then press [SAVE]. Press for "Create New" or for "Update Existing". If "Create New" is selected, the phone number will appear above a list. Press to choose the type of number you are adding. -
Page 32: Entering Letters, Numbers & Symbols
ENTERING LETTERS, NUMBERS & SYMBOLS The input mode will automatically be activated when it is necessary to enter letters and numbers. As shown below, There are 4 available modes: Standard mode (Abc), T9 Mode (T9Word), Numeric mode (123) and Symbol mode (Symbols). The input mode indicator appears on the lower left of the display when letters and numbers are entered. -
Page 33: Standard Input Mode
ENTERING LETTERS, NUMBERS & SYMBOLS STANDARD INPUT MODE Use the digit keys to enter letters, numbers and characters. Enter letters using the keypad, To change the input mode, press [Abc]. To enter a space, press The cursor will automatically move to the next column. Repeat until letters are entered. -
Page 34: T9Word Input Mode
ENTERING LETTERS, NUMBERS & SYMBOLS T9WORD INPUT MODE T9 mode incorporates a built-in-dictionary to determine a word based on the entered characters. A word can be entered more quickly by pressing each key once per character. Select the T9Word mode by pressing [Abc]. -
Page 35: Numeric Mode
ENTERING LETTERS, NUMBERS & SYMBOLS NUMERIC MODE Allows you to enter numbers. Press [Abc] and scroll to “123 (Numeric mode)”. To enter a number, press a digit key. SYMBOL MODE Allows you to enter symbols. Press [Abc] and scroll to “Symbols (Symbol mode)”. Select the symbol you want to enter with the NAVIGATION KEY, then press Use the NAVIGATION KEY to scroll through the different symbols... -
Page 36: Making A Call Through The Contact List
MAKING A CALL THROUGH THE CONTACT LIST ONE-TOUCH/TWO-TOUCH DIALING Ideal for frequently dialed numbers, this feature allows entries in your contact list to be dialed via the keypad with only one or two key presses. One Touch Dial needs to be set to On. (Please see page 71.) ONE-TOUCH DIALING 2-9 : Press and hold the corresponding memory number for more than 1 second. -
Page 37: The Contact List
MAKING A CALL THROUGH THE CONTACT LIST #BAL/Balance : #BAL is a VZW Customer Service VRU number (Free call) that provides customers information on their Verizon Wireless billing balance. When a customer calls #BAL/#225 from their mobile phone, once connected (3 seconds or less), the user will have the option to - Stay on the line - the VRU system will read balance information in detail, along with some explanation to the user. -
Page 38: Chapter 4. Menu Function
CHAPTER 4 MENU FUNCTION CHAPTER 4 MENU FUNCTION This chapter addresses accessing the menu and using its functions and features to customize your phone. CONTACTS RECENT CALLS SETTINGS... -
Page 39: Contacts
CONTACTS Stores up to 500 entries, each of which can be assigned to a group. Entries can be retrieved by name or group. NEW CONTACT Adds a new entry. Press [MENU], then press "New Contact". Fill in the fields as they are selected. Press to select a field. -
Page 40: Contact List
CONTACTS CONTACT LIST Retrieves an entry by name and calls the primary number by simply pressing You can review all the entries stored in your contacts list or quickly find an entry by entering a name or its character string. Press [MENU], then press “Contact List”. -
Page 41: Groups
CONTACTS GROUPS Allows you to classify phone entries into groups. Existing groups include No Group, Family, Friends, Work. A maximum of 30 groups is allowed. Allows the user to add group up to 10 phone number or E-mail1, E mail2. You can add, change, and erase Group. ADD NEW GROUP Press [MENU], then press... - Page 42 CONTACTS CHANGE GROUP NAME Press [MENU], then press “Groups”. Select an existing group name with the NAVIGATION KEY. The only group name that cannot be changed is No Group. Press [OPTIONS], then scroll to “Rename”, press Input a new group name. Press [SAVE] to save the setting.
- Page 43 CONTACTS SEND PIX MSG. GROUP Press [MENU], then press “Groups”. Select an existing group name that has phone numbers saved to it. Press [OPTIONS], then scroll to “Send PIX Msg”, press The list of numbers is shown. You can add or delete numbers. Press Input your message.
-
Page 44: Speed Dials
CONTACTS SPEED DIALS In idle mode, calls can be placed to numbers stored in speed dial by pressing & holding the location number on the key pad. For a 2-digit location number, press the first number, then press and hold the second number. -
Page 45: Recent Calls
RECENT CALLS MISSED Displays information about the 90 most recently missed calls. Place a call to a missed call number by simply pressing Press [MENU], then press once for the "Recent Calls" menu. Press "Missed". If the number is already stored in your contact list, only the name appears. -
Page 46: Received
RECENT CALLS RECEIVED Displays information about the 90 most recently answered calls. Place a call to a received call by simply pressing Press [MENU], then press once for the "Recent Calls" menu. Press "Received". If the number is already stored in your contact list, only the name appears. -
Page 47: Dialed
RECENT CALLS DIALED Displays information about the 30 most recently dialed numbers. Place a call to a dialed call by simply pressing Press [MENU], then press once for the "Recent Calls" menu. Press "Dialed". If the number is already stored in your contact list, only the name appears. -
Page 48: All
RECENT CALLS Displays information about the most recent received, dialed and missed calls. Press [MENU], then press once for the "Recent Calls" menu. Press "All". If the number is already stored in your contact list, only the name appears. If the number is not stored, the number appears. -
Page 49: View Timers
RECENT CALLS VIEW TIMERS Checks the usage time and manages your calls within the limit you set. The 7 timers include (Last Call, All Calls, Received Calls, Dialed Calls, Roaming Calls, Last Reset, Lifetime Calls): Press [MENU], then press once for the "Recent Calls" menu. -
Page 50: Settings
SETTINGS Customizes your phone and optimizes performance through a variety of settings. SOUND SETTINGS MASTER VOLUME Controls the Ringer volume. Press [MENU], then press 2 times for the "Settings & Tools" menu. Press "Sound Settings", then "Master Volume". Select one of the following options by pressing •... - Page 51 SETTINGS...
-
Page 52: Call Ringtone
SETTINGS CALL SOUND To select a ringer type for incoming calls: Call Ringtone Press [MENU], then press 2 times for the "Settings & Tools" menu. Press "Sound Settings", then "Call Sound", and then press "Call Ringtone". Press to select Get New or you desired ringer type. •... -
Page 53: Alert Sound
SETTINGS ALERT SOUND When selected, this setting allows you to select the alert type for TXT and voicemail messages. TXT Message Press [MENU], then press 2 times for the "Settings & Tools" menu. Press "Sound Settings", then "Alert Sound", and then press "TXT Message". -
Page 54: Keypad Volume
SETTINGS Voicemail Msg Press [MENU], then press 2 times for the "Settings & Tools" menu. Press "Sound Settings", then "Alert Sound", and then press "Voicemail Msg". Select “Tone”, “Vibrate” or “Reminder” with the NAVIGATION KEY. • Tone : Select Get New or select your desired ringer type. •... -
Page 55: Earpiece Volume
SETTINGS EARPIECE VOLUME To adjust earpiece volume: Press [MENU], then press 2 times for the "Settings & Tools" menu. Press "Sound Settings", then "Earpiece Volume". Select one of the following options by pressing • Low, Medium Low, Medium, Medium High, High Press [SET] to save the setting. -
Page 56: Minute Beep
SETTINGS Minute Beep Sounds an alert every minute during a call. Press [MENU], then press 2 times for the "Settings & Tools" menu. Press "Sound Settings", then "Service Alerts", and then press "Minute Beep". Select “On” or “Off” then press to save the setting. -
Page 57: Power Off
SETTINGS POWER ON/OFF Power On Allows you to activate/deactivate the power on tones. Press [MENU], then press 2 times for the "Settings & Tools" menu. Press "Sound Settings", then "Power On/Off", and then press "Power On". Select “On” or “Off” then press to save the setting. -
Page 58: Alarm Sound
SETTINGS ALARM SOUND To select a ringer type for your alarm. Tone Press [MENU], then press 2 times for the "Settings & Tools" menu. Press "Sound Settings", then "Alarm Sound", and then press "Tone". Pressing to select Get New or your desired ringer type. •... -
Page 59: Display Settings
SETTINGS DISPLAY SETTINGS Allows you to customize the display. BANNER To input a personal/ERI banner greeting: Personal Phone’s screen in standby to idle. Press [MENU], then press 2 times for the "Settings & Tools" menu. Press "Display Settings", then "Banner", and then press "Personal". - Page 60 SETTINGS BACKLIGHT Backlights the display and keypad for easy viewing in dark places. Display Press [MENU], then press 2 times for the "Settings & Tools" menu. Press "Display Settings", then "Backlight", and then press "Display". Select one of the following options: •...
- Page 61 SETTINGS CONTRAST To adjust the display contrast: Press [MENU], then press 2 times for the "Settings & Tools" menu. Press "Display Settings", then "Contrast". Select one of the following options: • Level 0 • Level 1 • Level 2 • Level 3 •...
-
Page 62: Display Themes
SETTINGS SCREENSAVER Press [MENU], then press 2 times for the "Settings & Tools" menu. Press "Display Settings", then "Screensaver". Select “On” or “Off”. If "On" is selected, choose one of the pre-installed images. Press [VIEW] to view the image full screen. Press to save the image as your screensaver. -
Page 63: Clock Format
SETTINGS FONTS Press [MENU], then press 2 times for the "Settings & Tools" menu. Press "Display Settings", then "Fonts". Select “Normal” or “Large” then press to save the setting. CLOCK FORMAT To change the clock’s appearance in idle mode. Press [MENU], then press 2 times for the "Settings &... -
Page 64: Phone Settings
SETTINGS PHONE SETTINGS STANDALONE MODE Allows you to turn off the wireless connectivity of your phone ( for airline travel and other areas where posted). You can still use non-network functions, like calendar or games. Press [MENU], then press 2 times for the "Settings & Tools"... - Page 65 SETTINGS LANGUAGE Selects the language in which letters are displayed on the screen. Press [MENU], then press 2 times for the "Settings & Tools" menu. Press "Phone Settings", then "Language". Select “English” or “Spanish”. Press to save the language setting. LOCATION To set the location function: Press...
-
Page 66: Lock Mode
SETTINGS SECURITY Prevents unauthorized use of your phone. The following settings can be restricted: Common Code Press [MENU], then press 2 times for the "Settings & Tools" menu. Press "Phone Settings", then "Security". Enter your password, then press • The default password is the last 4 digit of your phone number. Press “Common Code”. -
Page 67: Edit Code
SETTINGS Select "Device" to lock/unlock your phone. Device options are Lock, Unlock, and On Power Up. When the phone is locked, will appear in the top row of the display. Select "Location" to lock/unlock the ability to set the location mode for your phone. -
Page 68: Restrict Calls
SETTINGS Restrict Calls Press [MENU], then press 2 times for the "Settings & Tools" menu. Press "Phone Settings", then "Security". Enter your password, then press • The default password is the last 4 digit of your phone number. Press “Restrict Calls”. Select “Code Enabled”... -
Page 69: Reset Default
SETTINGS Reset Default Resets phone to default settings. Press [MENU], then press 2 times for the "Settings & Tools" menu. Press "Phone Settings", then "Security". Enter your password, then press • The default password is the last 4 digit of your phone number. Press “Reset Default”. -
Page 70: Nam Selection
SETTINGS NAM SELECTION Enables Auto NAM (Number Assignment Modules) or manually selects a NAM. Auto NAM Automatically switches phone to proper NAM when you have multiple NAM registrations. Press [MENU], then press 2 times for the "Settings & Tools" menu. Press "Phone Settings", then "Nam Selection". -
Page 71: Call Settings
SETTINGS CALL SETTINGS ANSWER OPTIONS To select an answer mode: Press [MENU], then press 2 times for the "Settings &. Tools" menu. Press "Call Settings", then "Answer Options". Select one of the following options: • Flip Open : Answers an incoming call by simply opening the phone. •... -
Page 72: Tty Mode
SETTINGS TTY MODE Your phone is able to operate with a TTY (Teletypewriter) device in digital modes. This feature is system dependent and may not be available in all areas. Press [MENU], then press 2 times for the "Settings & Tools"... -
Page 73: Incoming Calls
SETTINGS VOICE PRIVACY Enhances voice privacy and avoids tapping during a call. Press [MENU], then press 2 times for the "Settings & Tools" menu. Press "Call Settings", then "Voice Privacy". Select “On” or “Off” then press to save the setting. RESTRICT CALLS Incoming Calls Press... -
Page 74: Outgoing Calls
SETTINGS Outgoing Calls Press [MENU], then press 2 times for the "Settings & Tools" menu. Press "Call Settings", then "Restrict Calls". Enter your password and press Press "Outgoing Calls". Select one of the following options: • Allow All • Contacts Only •... -
Page 75: Port Speed
SETTINGS Port Speed Choose the select data port speed for the usage of your phone. Press [MENU], then press 2 times for the "Settings & Tools" menu. Press "Call Settings", then "Data Setting", and then press "Port Speed". Select one of the following options: •... -
Page 76: Memory
SETTINGS PICTURE ID Press [MENU], then press 2 times for the "Settings & Tools" menu. Press "Call Settings", then “Picture ID”. Select “On” or “Off” then press to save the setting. MEMORY MEMORY USAGE To display total or available memory usage. Press [MENU], then press 2 times for the "Settings &... -
Page 77: Phone Info
SETTINGS MY SOUNDS To display “My Sounds” memory usage. Press [MENU], then press 2 times for the "Settings & Tools" menu.press "Memory" then "My Sounds". The "My Sounds" total used and available memory will be displayed. To return to the previous page, press PHONE INFO Displays the information of your phone: MY NUMBER... -
Page 78: Sw Version
SETTINGS SW VERSION Displays the Software/PRL/ERI version: Press [MENU], then press 2 times for the "Settings & Tools" menu. Press "Phone Info", then "SW Version". The S/W (software), PRL and ERI information is displayed. To return to the previous page, press ICON GLOSSARY Displays the Indicator icons used in your phone. -
Page 79: Vr Settings
SETTINGS VR SETTINGS CHOICE LIST The “Choice List” setting option will allow you to choose if the Command System prompts you with a list of potential matches.“On” will always present you with a best match list of names or numbers. When multiple matches are found, the system will prompt you to choose from a list of matches. -
Page 80: Call Alert
SETTINGS PROMPTS The prompts settings, “Mode”, “Timeout’, and “Speed” settings will allow you to set how you are notified by the voice command system, the duration in which you can respond, and how fast the System will play the prompts to you, when in Prompts or Readout mode. Press [MENU], then press 2 times for the "Settings &... - Page 81 MEMO...
-
Page 82: Chapter 5. Tools
CHAPTER 5 TOOLS CHAPTER 5 TOOLS This section shows you how to use these features to turn your phone into a time management planner that helps you keep up with your contacts, schedules, and commitments. -
Page 83: Tools
TOOLS VOICE COMMAND Voice Activated Dialing allows you to dial numbers, lookup contact information, and open applications using your voice. In Idle Mode, press to access the Voice Command menu. You will hear "Please say a command". You can also access this menu by pressing [MENU], then Note 2 times for the "Settings &... - Page 84 TOOLS CALLING USING VOICE ACTIVATED DIALING To call a number saved in your contact list, press You will hear and see “Please Say a Command”. After the beep, say “Call”. You will hear and see “Please say a Name”. After the beep, say the name of contact. You will hear “Did you say [name] [phone number]”...
-
Page 85: Calendar
TOOLS CALENDAR Sets an event and reminds you of that event. ADD NEW CALENDAR Press [MENU], then press 2 times for the "Settings & Tools" menu. Press "Tools", then "Calendar". If you did not assign a new shortcut program, press to access Note Calendar. - Page 86 TOOLS VIEW CALENDAR EVENTS Press [MENU], then press 2 times for the "Settings & Tools" menu. Press "Tools", then "Calendar". Scroll to a date in the calendar and press [LIST] to view the event for that day. Press [VIEW] for more detailed information about the event. Press [OPTIONS] to erase 1 event or all events in the calendar.
-
Page 87: Alarm Clock
TOOLS ALARM CLOCK Press [MENU], then press 2 times for the "Settings & Tools" menu. Press "Tools", then "Alarm Clock". Select Alarm 1, 2 or 3 to set a new alarm, then press . To edit an existing alarm, select the alarm name, then press [EDIT]. -
Page 88: World Clock
TOOLS WORLD CLOCK Press [MENU], then press 2 times for the "Settings & Tools" menu. Press "Tools", then "World Clock". Select a city by pressing [CITIES]. The world map appears with the city, its date and time. Use the NAVIGATION KEY to select another city. If you press [DST], then all DST supporting cities DST turn Note... -
Page 89: Notepad
TOOLS NOTEPAD Your phone includes an internal notepad that can be used to compose and store reminders and notes. ADD NEW MEMO To compose a memo (there is an 80-letter limit): Press [MENU], then press 2 times for the "Settings & Tools"... -
Page 90: Calculator
TOOLS CALCULATOR To access the calculator: Press [MENU], then press 2 times for the "Settings & Tools" menu. Press "Tools", then "Calculator". Enter the number using your keypad and perform one of the following functions: • Press for Multiplication (x). •... -
Page 91: Stopwatch
TOOLS STOPWATCH Simultaneously times up to ten different events. To operate the stop watch: Press [MENU], then press 2 times for the "Settings & Tools" menu. Press "Tools", then “Stopwatch”. To measure a time period: • To start, press [START]. •... -
Page 92: Voice Memo
TOOLS VOICE MEMO Voice Memo allows you to record a reminder message that can be up to 60 seconds. To record a memo: Press [MENU], then press 2 times for the "Settings & Tools" menu. Press "Tools", then “Voice Memo”. To record a voice memo, select “1. - Page 93 MEMO...
-
Page 94: Chapter 6. Get It Now
CHAPTER 6 GET IT NOW CHAPTER 6 GET IT NOW This section explains the features and options of your Phone’s built-in camera. -
Page 95: Get It Now
GET IT NOW GET TUNES & TONES GET NEW RINGTONES Press for "Get Tunes & Tones". Then press "Get New Ringtones". If you have not downloaded any ringtones or ringtone applications previously, press “Get New App.”. The Get It Now browser will launch. - Page 96 GET IT NOW MY RINGTONES Press for "Get Tunes & Tones". Then press "My Ringtones". To play downloaded tunes or tones: Select the tunes or tones you want to play and then press [PLAY]. To erase downloaded tunes or tones: Select the tunes or tones you want to erase and then press [OPTIONS] and select “Erase”...
-
Page 97: Record New
GET IT NOW MY SOUNDS Press for "Get Tunes & Tones". Then press "My Sounds". To play downloaded sounds, select the sound you want to play, then press [PLAY]. To erase downloaded sounds, select the sound you want to erase, then press [OPTIONS]. -
Page 98: Get Pix & Flix
GET IT NOW GET PIX & FLIX GET NEW PIX Press for the "Get It Now" menu. Press “Get PIX & FLIX”, then press "Get New PIX". Use your NAVIGATION KEY to select a provider’s browser, press Select the desired application from the application list and then press to download it. - Page 99 GET IT NOW MY PIX In Review Mode you can view all the pictures you have taken, store selected images in your phone, send pictures to the Online Album, delete images and access additional picture options. Press for the "Get It Now" menu. Press “Get PIX &...
-
Page 100: Pix Place
GET IT NOW PIX PLACE Press for the "Get It Now" menu. Press “Get PIX & FLIX”, then "PIX Place". Connect “Mobile Web” launches and connects you to “PIX Place”. -
Page 101: Take Pix
GET IT NOW TAKE PIX Press Side Camera Key. Point the camera lens at your subject. You can check the picture framing through the main display screen. Press side camera key or press [TAKE] to take the picture. • To view captured images, press [MY PIX]. -
Page 102: Get Fun & Games
GET IT NOW GET FUN & GAMES DOWNLOADING NEW FUN & GAMES Press for the "Get It Now" menu. Press “Get Fun & Games”, and then select “Get New App.”. (Get It Now will launch and take you to the download menu.) Use your NAVIGATION KEY to select a provider’s browser, press... -
Page 103: Get Going
GET IT NOW GET GOING CONNECTING GET GOING Press for the "Get It Now" menu. Press “Get Going”, and then select “Get New App.”. GET EXTRAS CONNECTING GET EXTRAS Press for the "Get It Now" menu. Press “Get Extras”, and then select “Get New App.”. -
Page 104: Chapter 7. Messaging
CHAPTER 7 MESSAGING CHAPTER 7 MESSAGING This chapter address Voicemail, TXT and PIX message. -
Page 105: Messaging
MESSAGING NEW TXT MSG To send a new TXT message: Press [MESSAGE], then press “New Msg”. Under “TO”, input the phone number. Then press By pressing [ADD], you can choose from the following: • Contacts : Search the phone number which is stored in thecontacts list. •... - Page 106 MESSAGING • Font Size : Select “Normal”, “Large” or “Small”. • Font Style : Select “Normal”, “Bold”, “ltalic”, “Underlined” or “Strikethrough”. To send the TXT Message, press [SEND].
-
Page 107: New Pix Msg
MESSAGING NEW PIX MSG To send a new PIX message: Press [MESSAGE], then press “New PIX Msg”. Under “TO”, input the phone number. Then press By pressing [ADD], you can choose from the following: • Contacts : Search the phone number which is stored in thecontacts list. •... - Page 108 MESSAGING • Font Size : Select “Normal”, “Large” or “Small”. • Font Style : Select “Normal”, “Bold”, “ltalic”, “Underlined” or “Strikethrough”. To send the TXT Message, press [SEND].
-
Page 109: Inbox
MESSAGING INBOX The Inbox manages received TXT/PIX/Web Alert messages. To access: Press [MESSAGE], thenpress “Inbox”. Select a message, then press [OPEN]. The message is displayed. To delete a message, press [ERASE], then select “Yes” or “No”, then press By pressing [OPTIONS], you can choose from the following: •... -
Page 110: Sent
MESSAGING SENT Manages sent TXT/PIX messages waiting to be sent. Press [MESSAGE], then press “Sent”. Select a message, then press [OPEN]. The message is displayed. To delete a message, press [ERASE], then select “Yes” or “No”, then press Resend a message, then press [RESEND]. -
Page 111: Drafts
MESSAGING DRAFTS Draft Folder contains any draft messages or saved messages. If message composition is interrupted by a voice call or other interrupting event, the text of the current composition is automatically saved in the drafts folder. Press [MESSAGE], press “Drafts”. -
Page 112: Voicemail
MESSAGING VOICEMAIL Displays the number of voice mails and accesses them by pressing Press [MESSAGE], press “Voicemail”. FIRST TIME USER Dial *86 then press [SEND]. At the recording, press To set up your account follow the voice tutorial. EXISTING USER Dial *86 then press At the recording, enter your 4 digit password, then press To listen to new messages, press... -
Page 113: Email
MESSAGING EMAIL Press [MESSAGE], press “Email”. Launch “Mobile Web”. GET NEW Press [MESSAGE], press “IM” and then select “Get New” with Navigation Key. Launch “Get It Now”. MOBILE IM Press [MESSAGE], press “IM” and then select “Mobile IM” with Navigation Key. Connect “Mobile IM”. -
Page 114: Erase All
MESSAGING ERASE ALL Press [MESSAGE], then press [OPTIONS]. To erase all the inbox messages, press [ERASE INBOX]. To erase all the drafts messages, press [ERASE DRAFTS]. To erase the sent messages, press [ERASE SENT]. To erase all messages, press [ERASE All]. Select “Yes”, then press... -
Page 115: Settings
MESSAGING SETTINGS Manages messaging features through various features. ALL MSG Auto.save Press [MESSAGE], then press [SETTINGS] then press “All Msg”. Press [AUTO.SAVE]. Select “On”, “Off” or “Prompt”. • On : All sent messages saved in the Sent box. • Off : All sent messages not saved in the Sent box. •... - Page 116 MESSAGING Quick.text To edit the Quick Text message you have saved: Press [MESSAGE], then press [SETTINGS] then press “All Msg”. Press [QUICK TEXT]. Select a message from the list. To add a new Quick Text message, press [NEW]. To edit the Quick Text message you have selected, press [EDIT], then enter text, press To erase the saved Quick Text message, press...
-
Page 117: Entry Mode
MESSAGING Entry mode Sets an Entry Mode as a default. For example, if T9 Mode is the default, its icon will appear. Press [MESSAGE], then press [SETTINGS] then press “All Msg”. Press [ENTRY MODE]. Select “T9Word”, “ABC”, “Abc”, “123”, “Symbols”. Press to save it. -
Page 118: Auto View
MESSAGING Signature Create a signature that can be automatically inserted at the end of a message. Press [MESSAGE], then press [SETTINGS] then press “All Msg”. Press [SIGNATURE]. To activate Signature function, put the cursor on Insert Signature then select “Custom” by using up or down direction keys. - Page 119 MESSAGING Block/Unblock Press [MESSAGE], then press [SETTINGS] then press “TXT Msg”. Press [BLOCK/UNBLOCK]. Select “Block”, “Unblock” or “List”. • Block: Enter the address to block. • Unblock: Enter the address to remove from block. • List: Display the blocked. Press to save it.
-
Page 120: Chapter 8. Mobile Web
CHAPTER 8 MOBILE WEB CHAPTER 8 MOBILE WEB This chapter addresses Internet services and web browsing. For more detailed information contact your service provider. STARTING INTERNET BROWSER BROWSER MENU... -
Page 121: Starting Internet Browser
STARTING INTERNET BROWSER LAUNCHING MOBILE WEB 2.0 Now you can access news, sports, weather, and e-mail from your phone. Mobile Web 2.0 keeps you updated by providing access to up-to-date information such as news, sports, weather and stock quotes when you subscribe to Internet service with your service provider. -
Page 122: Browser Menu
BROWSER MENU BROWSER MENU The browser menu lists the actions necessary to operate the browser. press , then press [MENU]. VZW HOME When the “VzW Home” item is selected from the Browser Menu, the phone displays the homepage. To display the homepage, press BACK When the “Back”... -
Page 123: Clear Memory
BROWSER MENU HISTORY The history list is available from the Browser Menu and the user may delete all items from the history. To select “History”, press ADDRESS Selecting the “Address” item from the Browser Menu displays the URL of the current page. To select “Address”, press CLEAR MEMORY The user may clear cache, history, cookies and auto fill from the memory. - Page 124 BROWSER MENU 5. Key Press Timeout: When the “Key Press Timeout” item is selected from the Settings menu, the browser allows the user to set the key press timeout as fast, medium or slow. Medium is 1.5 seconds, slow 2 seconds and fast is 1 second.
- Page 125 BROWSER MENU EXIT When the “Exit” item is selected from the Browser Menu, the user exits out of the browser and is returned to the phone idle mode. To exit browser, press...
-
Page 126: Chapter 9. Safety Information
CHAPTER 9 SAFETY INFORMATION CHAPTER 9 SAFETY INFORMATION Read this information before using your handheld portable Cellular Telephone. SAFETY WARRANTY... -
Page 127: Safety
SAFETY SAFETY INFORMATION FOR WIRELESS HANDHELD PHONES Read This Information Before Using Your Handheld Portable Cellular Telephone DRIVING SAFETY Talking on the phone while driving is extremely dangerous and is illegal in some states. Remember, safety comes first. Check the laws and regulations on the use of phones in the areas where you drive. -
Page 128: Electronic Devices
SAFETY ELECTRONIC DEVICES Your wireless handheld portable telephone is a low power radio transmitter and receiver. When it is ON, it receives and also sends out radio frequency (RF) signals. Most modern electronic equipment is shielded from RF energy. However, certain electronic equipment may not be shielded against the RF signals from your wireless phone. -
Page 129: Hearing Aids
SAFETY HEARING AIDS Some digital wireless phones may interfere with some hearing aids. In the event of such interference, you may want to consult your service provider (or call the customer service line to discuss alternatives). For phones complying with the ANSI HAC standard, use NOTE: FCC-approved language. - Page 130 SAFETY AIRCRAFT FCC regulations prohibit using your phone while in the air. Turn your phone OFF before boarding an aircraft. Always request and obtain prior consent and approval of an authorized airline representative before using your phone aboard an aircraft. Always follow the instructions of the airline representative whenever using your phone aboard an aircraft, to prevent any possible interference with airborne electronic equipment.
-
Page 131: Safety Information For Fcc Rf Exposure
SAFETY SAFETY INFORMATION FOR FCC RF EXPOSURE Warning! Read this information before using your phone. In August 1996 the Federal Communications Commission (FCC) of the United States with its action in Report and Order FCC 96-326 adopted an updated safety standard for human exposure to radio frequency electromagnetic energy emitted by FCC regulated transmitters. -
Page 132: Sar Information
SAFETY SAR INFORMATION THIS MODEL PHONE MEETS THE GOVERNMENT’S REQUIREMENTS FOR EXPOSURE TO RADIO WAVES. Your wireless phone is a radio transmitter and receiver. It is designed and manufactured not to exceed the emission limits for exposure to radiofrequency (RF) energy set by the Federal Communications Commission of the U.S. - Page 133 SAR information on this model phone is on file with the FCC and can be found under the Display Grant section of http://www.fcc.gov/oet/fccid after searching on O6Y-CDM7075. Additional information on Specific Absorption Rates (SAR) can be found on the Cellular Telecommunications & Internet Association (CTIA) web-site at http://www.phonefacts.net.
-
Page 134: Fda Consumer Update
SAFETY FDA CONSUMER UPDATE U.S. Food and Drug Administration Cell Phone Facts Consumer Information on Wireless Phones 1. What kinds of phones are the subject of this update? The term “wireless phone” refers here to handheld wireless phones with built-in antennas, often called “cell,” “mobile,” or “PCS” phones. These types of wireless phones can expose the user to measurable radiofrequency energy (RF) because of the short distance between the phone and the user’s head. - Page 135 SAFETY have not been confirmed by additional research. In some cases, other researchers have had difficulty in reproducing those studies, or in determining the reasons for inconsistent results. 3 . What is FDA's role concerning the safety of wireless phones? Under the law, FDA does not review the safety of radiation-emitting consumer products such as wireless phones before they can be sold, as it does with new drugs or medical devices.
- Page 136 SAFETY • National Institute for Occupational Safety and Health • Environmental Protection Agency • Federal Communications Commission • Occupational Safety and Health Administration • National Telecommunications and Information Administration The National Institutes of Health participates in some interagency working group activities, as well. FDA shares regulatory responsibilities for wireless phones with the Federal Communications Commission (FCC).
- Page 137 SAFETY had been genetically engineered or treated with cancer-causing chemicals so as to be pre-disposed to develop cancer in the absence of RF exposure. Other studies exposed the animals to RF for up to 22 hours per day. These conditions are not similar to the conditions under which people use wireless phones, so we don’t know with certainty what the results of such studies mean for human health.
- Page 138 SAFETY difficulties in measuring actual RF exposure during day-to-day use of wireless phones. Many factors affect this measurement, such as the angle at which the phone is held, or which model of phone is used. 6. What is FDA doing to find out more about the possible health effects of wireless phone RF? FDA is working with the U.S.
- Page 139 SAFETY 7. What steps can I take to reduce my exposure to radiofrequency energy from my wireless phone? If there is a risk from these products--and at this point we do not know that there is--it is probably very small. But if you are concerned about avoiding even potential risks, you can take a few simple steps to minimize your exposure to radiofrequency energy (RF).
- Page 140 SAFETY containing such a recommendation in December 2000. They noted that no evidence exists that using a wireless phone causes brain tumors or other ill effects. Their recommendation to limit wireless phone use by children was strictly precautionary; it was not based on scientific evidence that any health hazard exists.
- Page 141 SAFETY so-called "shields" may interfere with proper operation of the phone. The phone may be forced to boost its power to compensate, leading to an increase in RF absorption. In February 2002, the Federal trade Commission (FTC) charged two companies that sold devices that claimed to protect wireless phone users from radiation with making false and unsubstantiated claims.
- Page 142 SAFETY FDA continues to monitor the use of wireless phones for possible interactions with other medical devices. Should harmful interference be found to occur, FDA will conduct testing to assess the interference and work to resolve the problem. Updated July 29, 2003 For more information, please visit the FDA website at http://www.fda.gov/cellphones.
-
Page 143: Emergency Calls
Generally, the rules require that carriers identify an E911 caller’s location within 50 meters of the actual location for 67 percent of calls and within 150 meters of the actual location for 95 percent of calls. CDM7075’s ALI Capability... - Page 144 SAFETY The CDM7075 is an ALI-capable phone equipped with a GPS (Global Positioning System) receiver supporting a satellite-based GPS ALI- capable network to comply with the FCC’s ALI requirements. The network compliance with the above FCC requirements is dependent on: (a) the use of digital technology by the wireless network; (b) GPS satellite signals being able to reach the handset (such transmissions do not always work indoors, for example) ;...
-
Page 145: Compliance With Other Fcc Regulations
SAFETY COMPLIANCE WITH OTHER FCC REGULATIONS OPERATING PROCEDURES Never violate any of the following Rules and Regulations of the FCC when using your Cellular Phone. Such violations are punishable by fine, imprisonment or both. • Never use obscene, indecent, or profane language. •... -
Page 146: General Safety
• DO NOT use unauthorized accessories. • DO NOT disassemble the phone or its accessories. If service or repair is required, return unit to an authorized UTStarcom cellular service center. If unit is disassembled, the risk of electric shock or fire may... -
Page 147: Antenna
SAFETY ANTENNA ANTENNA SAFETY Use only the supplied or an approved replacement antenna. Unauthorized antennas, modifications, or attachments could impair call quality, damage the phone, or result in violation of FCC regulations. Please contact your local dealer for replacement antenna. Do not use the phone with a damaged antenna. -
Page 148: Battery
SAFETY BATTERY BATTERY SAFETY Your device uses a removable and rechargeable lithium ion battery. Please contact customer service for assistance should you need a replacement battery. • Only use the battery and charger approved by the manufacturer. • Only use the battery for its original purpose. •... - Page 149 SAFETY DON’Ts • Don’t attempt to disassemble the battery – it is a sealed unit with no serviceable parts. • Don’t expose the battery terminals to any other metal object (e.g., by carrying it in your pocket or purse with other metallic objects such as coins, clips and pens).
-
Page 150: Charger
SAFETY CHARGER CHARGER SAFETY The charger designed by UTStarcom for this unit requires the use of a standard 120 V AC power source for its operation. • Never attempt to disassemble or repair a charger. • Never use a charger if it has a damaged or worn power cord or plug. - Page 151 SAFETY Handling the cord on this product or cords associated with accessories sold with this product, will expose you to lead, a chemical known to the State of California to cause birth defects or other reproductive harm. Wash hands after handling. Always disconnect the charger from the power source when it is not in use.
-
Page 152: Fcc Hearing-Aid Compatibility (Hac) Regulations For Wireless Devices
SAFETY FCC HEARING-AID COMPATIBILITY (HAC) REGULATIONS FOR WIRELESS DEVICES On July 10, 2003, the U.S. Federal Communications Commission (FCC) Report and Order in WT Docket 01-309 modified the exception of wireless phones under the Hearing Aid Compatibility Act of 1988 (HAC Act) to require digital wireless phones be compatible with hearing-aids. - Page 153 SAFETY M-Ratings: Phones rated M3 or M4 meet FCC requirements and are likely to generate less interference to hearing devices than phones that are not labeled. M4 is the better/higher of the two ratings. Hearing devices may also be rated. Your hearing device manufacturer or hearing health professional may help you find this rating.
- Page 154 SAFETY For information about hearing aids and digital wireless phone: • FCC Hearing Aid Compatibility and Volume Control http://www.fcc.gov/cgb/dro/hearing.html • GallaudetUniversity,RERC http://tap.gallaudet.edu/DigWireless.KS/DigWireless.htm • Self Help for Hard of Hearing People Inc. [SHHH] www.hearingloss.org/hat/TipsWirelessPhones.htm • The Hearing Aid Compatibility FCC Order http://hraunfoss.fcc.gov/edocs_public/attachmatch/ FCC-03-168A1.pdf...
-
Page 155: Games
SAFETY GAMES SEIZURES/BLACKOUTS Warning A very small percentage of individuals may experience epileptic seizures when exposed to certain light patterns or flashing lights. Exposure to certain patterns or backgrounds on a computer screen, or while playing video games, may induce an epileptic seizure in these individuals. Certain conditions may induce previously undetected epileptic symptoms even in persons who have no history of prior seizures or epilepsy. -
Page 156: Camera
SAFETY Repetitive Motion Injuries When you play games on your phone, you may experience occasional discomfort in your hands, arms, shoulders, neck, or other parts of your body. Follow these instructions to avoid problems such as tendonitis, carpal tunnel syndrome, or other musculoskeletal disorders: •... -
Page 157: Recycle Your Cell Phone
For a list of carrier members and collection sites, visit the cellular industry’s recycling website www.recyclewirelessphones.com. To mail in your old wireless device to UTStarcom Personal Communications for recycling purposes, simply package your old wireless device and any accessories (including discharged batteries) in... -
Page 158: Warranty
12 MONTH LIMITED WARRANTY UTStarcom Personal Communications (the Company) warrants to the original retail purchaser of this UTStarcom handheld portable cellular telephone, that should this product or any part thereof during normal consumer usage and conditions, be proven defective in material or... - Page 159 When sending your wireless device to UTStarcom Personal Communications for repair or service, please note that any personal data or software stored on the device may be inadvertently erased or altered.
- Page 160 WARRANTY In addition, for reference to an authorized Warranty station in your area, you may telephone in the United States (800) 229-1235, and in Canada (800) 465-9672 (in Ontario call 416-695-3060). THE EXTENT OF THE COMPANY’S LIABILITY UNDER THIS WARRANTY IS LIMITED TO THE REPAIR OR REPLACEMENT PROVIDED ABOVE AND, IN NO EVENT, SHALL THE COMPANY’S LAIBILITY EXCEED THE PURCHASE PRICE PAID BY PURCHASER FOR THE PRODUCT.
- Page 161 WARRANTY IN USA: UTStarcom Personal Communications 555 Wireless Blvd. Hauppauge, NY 11788 (800) 229-1235 IN CANADA: UTStarcom Canada Company 5535 Eglinton Avenue West Suite# 234 Toronto, ON M9C 5K5 (800) 465-9675...
- Page 162 MEMO...
Need help?
Do you have a question about the CDM7075 and is the answer not in the manual?
Questions and answers