Table of Contents
Advertisement
Quick Links
Table of Contents
Getting Started . . . . . . . . . . . . . . . . . . . . . . . . . . . . . . . . . . . . . . .4
Setting Up Your Voicemail . . . . . . . . . . . . . . . . . . . . . . . . . . . . . .4
Safety Precautions . . . . . . . . . . . . . . . . . . . . . . . . . . . . . . . . . . . .5
Front View of Your Phone . . . . . . . . . . . . . . . . . . . . . . . . . . . . . .8
Viewing the Display Screen . . . . . . . . . . . . . . . . . . . . . . . . . . .10
Turning Your Phone On and Off . . . . . . . . . . . . . . . . . . . . . . . .12
Using Your Phone's Battery and Charger . . . . . . . . . . . . . . .12
Displaying Your Phone Number . . . . . . . . . . . . . . . . . . . . . . .15
Making and Answering Calls . . . . . . . . . . . . . . . . . . . . . . . . . .15
Entering Text . . . . . . . . . . . . . . . . . . . . . . . . . . . . . . . . . . . . . . . .24
Sounds Settings . . . . . . . . . . . . . . . . . . . . . . . . . . . . . . . . . . . . .26
Display Settings . . . . . . . . . . . . . . . . . . . . . . . . . . . . . . . . . . . . . .30
Location Settings . . . . . . . . . . . . . . . . . . . . . . . . . . . . . . . . . . . .33
Others Phone Setup Options . . . . . . . . . . . . . . . . . . . . . . . . . .34
TTY Use . . . . . . . . . . . . . . . . . . . . . . . . . . . . . . . . . . . . . . . . . . . . .36
Phone Info . . . . . . . . . . . . . . . . . . . . . . . . . . . . . . . . . . . . . . . . . . .37
My Menu . . . . . . . . . . . . . . . . . . . . . . . . . . . . . . . . . . . . . . . . . . . .38
Accessing the Security Menu . . . . . . . . . . . . . . . . . . . . . . . . .39
Erasing the Phone Book . . . . . . . . . . . . . . . . . . . . . . . . . . . . . .42
Resetting Your Phone . . . . . . . . . . . . . . . . . . . . . . . . . . . . . . . .42
Understanding Roaming . . . . . . . . . . . . . . . . . . . . . . . . . . . . . .43
Setting Your Phone's Roam Mode . . . . . . . . . . . . . . . . . . . . .45
Controlling Roaming Charges Using Call Guard . . . . . . . .46
Menu Navigation . . . . . . . . . . . . . . . . . . . . . . . . . . . . . . . . . . . . .47
Menu Structure . . . . . . . . . . . . . . . . . . . . . . . . . . . . . . . . . . . . . .47
Viewing the Menus . . . . . . . . . . . . . . . . . . . . . . . . . . . . . . . . . . .48
1
Advertisement
Table of Contents

Related Manuals for UTStarcom CDM7000


Summary of Contents for UTStarcom CDM7000
-
Page 1: Table Of Contents
Table of Contents Getting Started ........4 Setting Up Your Voicemail . - Page 2 Viewing History ........49 Adding a New Phone Book Entry .
- Page 3 Caring for the Battery ....... . .89 Using Your Phone With a Hearing Aid Device ...90 Acknowledging Special Precautions and the FCC Notice91 Phone Guide Proprietary Notice .
-
Page 4: Getting Started
Getting Started Unlocking Your Phone To unlock your phone, follow these easy steps: Press and hold Press Menu ( Select Settings ( Select Security ( Enter your lock code to display the Security menu. Select Lock Phone ( Press your navigation key to select Off. Press Select ( Tip: If you can’t recall your lock code, try using the last four digits of... -
Page 5: Safety Precautions
Note: If you are concerned about unauthorized access to your voicemail account, it is recommended that you enable your voicemail pass code. Safety Precautions Handling the Phone, Battery and Charger Only use the battery and charger specified for the phone. Failure to do so can result in damage to the phone, electric shock or fire. - Page 6 Keep all storage media (magnetic cards, floppy disks, credit cards, etc.) away from the phone. Close contact can erase or damage the storage media. Keep all sharp metal objects (pins, nails, hairpins etc.) away from the phone handset. The handset earpiece contains a strong magnet that can attract and hold metal objects.
- Page 7 An unsuitable power source can result in damage to the charger, electric shock or fire. Do not use the charger if the power supply cord or plug is damaged or frayed (exposed or broken wires, etc). This can result in the risk of fire or electric shock. Do not short circuit the charger connector jack.
-
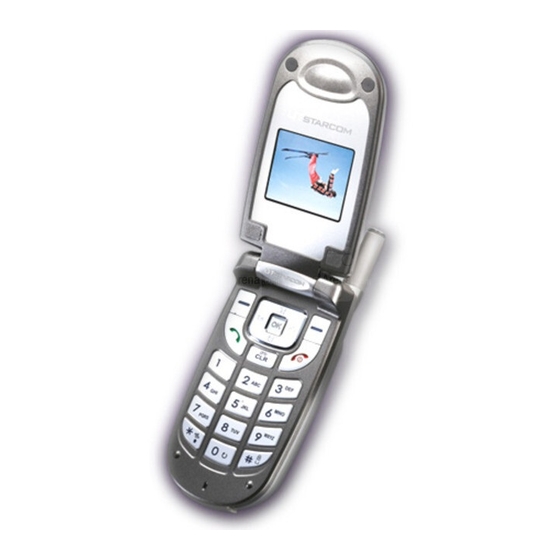
Page 8: Front View Of Your Phone
Front View of Your Phone 1. Headset Jack 2. Indicator Light 3. Signal Strength Indicator 4. Softkey Buttons 5. Volume Control 6. Talk 7. Back (Clear) 8. Charger or Accessory Jack 15. Earpiece 14. Battery Strength Indicator 13. Display Screen 12. -
Page 9: Key Functions
Key Functions Headset Jack allows you to plug in an optional headset for convenient, hands-free conversations. Indicator Light illuminates when you have an incoming call or new message. LED Off battery not attached to phone and Charging completed and Battery problem. The battery temperature is abnormal. LED On battery is charging. -
Page 10: Viewing The Display Screen
Press Up to activate Voice Activated Dialing (VAD). Also used as an upper arrow key. Press to activate and deactivate speakerphone during call. Press Down to directly access Quick Search for Phone Book entries. Also used as a down arrow key. Press Right to enter “My Menu”. - Page 11 current signal strength: the more lines, the stronger the signal. phone cannot receive a signal from the system. call is in progress. E911 only. location service is on. vibration alert mode on. silence alert mode on. appears when either an event or an alarm is set. phone is roaming (out of service area).
-
Page 12: Turning Your Phone On And Off
Turning Your Phone On and Off To turn your phone on: Press and hold Once your phone is on, it may display “Searching for Service,” which indicates that your phone is searching for a signal. When your phone finds a signal, it automatically enters standby mode –... -
Page 13: Installing The Battery
drained. The battery provides up to 3.5 hours of continuous digital talk time (up to 1.5 hours in analog). When the battery reaches 5% of its capacity, the battery icon blinks. When there are approximately two minutes of talk time left, the phone sounds an audible alert and then powers down. - Page 14 Note: If the battery is not correctly placed in the compartment, the phone will not turn on and/or the battery may detach during use. Removing the Battery Pull down the release latch, lift up the battery cover and remove the battery from the phone. Charging the Battery Your phone’s LiIon battery is rechargeable and should be charged as soon as possible so you can begin using your...
-
Page 15: Displaying Your Phone Number
battery, you can recharge the battery before it becomes completely run down. Displaying Your Phone Number To display your phone number: Press Menu ( Settings ( ). (Your phone number and other information about your phone and account will be displayed.) Making and Answering Calls Making Calls Placing a call from your wireless phone is as easy as making... -
Page 16: Dialing Options
Dialing Options When you enter numbers in standby mode, you will see a variety of dialing options appear as softkeys on the phone’s display screen. To initiate an option, press the corresponding softkey button. Speed Dial: Enter a number (1-500) to display the entry contained in the speed dial location you entered (if applicable). -
Page 17: Missed Call Notification
The indicator light flashes. The backlight illuminates. The screen displays an incoming call message. If the incoming call is from a number stored in your Phone Book, the phone book entry’s name is displayed. The caller’s phone number may also be displayed, if available. Answering a Roam Call With Call Guard Enabled Call Guard is an option that helps you manage your roaming charges when making or receiving calls while... -
Page 18: Calling Emergency Numbers
Calling Emergency Numbers This feature allows you to place an emergency call even if your phone is in “Phone Lock” or “Restrict” mode when you dial the preprogrammed emergency number, 911, #911, or *911. It also operates in out-of-service areas. The phone maintains the emergency mode until you press after disconnecting an emergency call. -
Page 19: Saving A Phone Number
The End-of-Call options are not displayed for calls identified as No ID or Restricted. Saving a Phone Number Your CDM7000 can store up to five phone numbers in each of 500 Phone Book entries. Each entry’s name can contain 16 characters. Your phone automatically sorts the Phone Book entries alphabetically. -
Page 20: Finding A Phone Number
edit mode.To change the input mode, press Press the navigation key up or down to select the desired input method and language (Symbols, 123, Abc, T9, Language) then press Select ( After entering the name, press enter information into the other fields: e-mail, group, speed dial, ringer, voice dial. -
Page 21: Abbreviated Dialing
Note: You can have multiple pauses in a phone number and combine 2-second and hard pauses. To dial or save phone numbers with pauses: Enter the phone number. Press Option ( 2sec. Pause and press Select ( are displayed as a “P” and 2sec. Pauses as a “T”.) Enter additional numbers. -
Page 22: Plus Key Dialing
Making an Abbreviated Dial Call To make a call: Enter the last four or five digits of the prefix phone number. If you set up a five-digit prefix for commonly used phone numbers, enter a five-digit number. If you set up a six-digit prefix for commonly used phone numbers, enter a four-digit number. -
Page 23: Using Speed Dialing
Using Speed Dialing You can store up to 500 numbers in your phone’s speed dial memory to make contacting friends and family fast and easy. With this feature, you can dial Speed Dial entries using one key press for locations 1-9, two key presses for locations 10-99, or three key presses for locations 100-500. -
Page 24: Entering Text
prompted to enter text (for example, when adding a Phone Book entry or when using SMS Text Messaging). To change the character input mode: When you display a screen where you can enter text, press the right softkey to change the character input mode. Select one of the following options: Symbols ( 123 (... -
Page 25: Entering Characters By Tapping The Keypad
If the word you want does not display after you have entered all the letters, press selections. To accept a word and insert a space, press Entering Characters by Tapping the Keypad To enter characters by tapping the keypad: Select the Abc mode. Press the corresponding keys repeatedly until the desired letter appears (for example, to enter the word “Bill,”... -
Page 26: Sounds Settings
Entering Numbers and Symbols To enter numbers: Select the 123 mode and press the appropriate key. To enter symbols: Select the Symbols mode. To enter a symbol, press the appropriate key indicated on the display. Pre-set Messages Your phone can store pre-set (canned) messages for use with text messaging . - Page 27 Your phone provides a variety of ringer options that allow you to customize your ring and volume settings. These options allow you to identify incoming calls by the ring. Press Menu ( Select Settings ( Select Sounds ( Select Ringer Type ( Press the navigation key right or left to select Other Ringer or Classic Ringer.
-
Page 28: Minute Beep
Ringer Vol : High+Vib, Level 5~Level 1, Vibrate, Ringer Off, Silence All. Earpiece Vol : Level 5~Level 1. Key Volume : Level 5~Level 1, Off. Press Select ( Note: If the ringer vol is set to “Ringer off” or “Silence all” the silence icon will appear except when the phone is in vibrate mode. -
Page 29: Roam Alert
Select Connect Tone ( Select On or Off and press Select ( Fade Tone When this function is active, the phone will play a tone when the phone loses a signal during a call. Press Menu ( Select Settings ( Select Sounds ( Select Alerts ( Select Fade Tone (... -
Page 30: Display Settings
Press Menu ( Select Settings ( Select Sounds ( Select Tone Length ( Select Normal or Long and press Select ( Normal : Send DTMF in 150msec Long : Send DTMF when digit key is released. (Max. 2 secs.) Power Sound Press Menu ( Select Settings ( Select Sounds (... - Page 31 Press Select ( Graphics Your new phone offers options for what you see on the display screen while powering on or off and when in standby mode. To change the Animations: Press Menu ( Select Settings ( Select Display ( Select Graphics ( Select Animations ( Press your navigation key to select one of the options.
- Page 32 Press Select ( To change the Greeting: Press Menu ( Select Settings ( Select Display ( Select Graphics ( Select Greeting ( To edit the Greeting text, press and hold delete all characters, then enter your new greeting and press Option ( Press one of the options.
-
Page 33: Location Settings
Select Clock ( Press your navigation key right or left to select one of the options. Digital Analog Press Select ( Note: If the wallpaper is set to “Calendar”, the “Clock” option will be inaccessible; “Not Supported at the Calendar” will appear when this option is selected. -
Page 34: Others Phone Setup Options
To enable your phone’s Location feature: Press Menu ( Select Settings ( Select Location ( displays.) Read the disclaimer and press OK ( Select Location On or E911 Only and press Select When the Location feature is on, your phone’s standby screen will display the off, the icon will display. -
Page 35: Auto Answer
Press Select ( Auto Answer You may set your phone to automatically pick up incoming calls. To set Auto-Answer mode: Press Menu ( Select Settings ( Select Others ( Select Auto Answer ( Press your navigation key to select one of the options. On : Incoming call is answered automatically in 10 seconds Off : Incoming call is not answered... -
Page 36: Tty Use
TTY Use ATTY (also known as a TDD or Text Telephone) is a telecommunications device that allows people who are deaf, hard of hearing, or who have speech or language disabilities, to communicate by telephone. Your phone is compatible with select TTY devices. Please check with the manufacturer of your TTY device to ensure that it supports digital wireless transmission. -
Page 37: Phone Info
industry and PSAP community are currently working to resolve this. TTY Mode In addition to the method described on the previous page, you may set your TTY mode using the Settings menu. Press Menu ( Select Settings ( Select Others ( Select TTY Mode ( Read the disclaimer and press OK ( Select Disable or Enable and press Select (... -
Page 38: My Menu
Select Phone Info ( Select Help( To return to the previous page, press Back ( Version This option displays information about your phone's software and PRL (preferred roaming list) versions. Press Menu ( Select Settings ( Select Phone Info ( Select Version ( software version, PRL ID and PRI CHECKSUM will display.) -
Page 39: Accessing The Security Menu
My Menu Set To access My Menu, press the navigation key right. Press your navigation key left or right to highlight the desired position, then press Set ( Select the desired menu option. Press Select ( to set the parameters for the menu option. To complete the setting, press Save ( My Menu Change or Delete To access My Menu, press the navigation key right. -
Page 40: Lock Phone
Lock Phone When your phone is locked, you can only receive incoming calls or make calls to 911 or special numbers. To lock your phone: Press Menu ( Select Settings ( Select Security ( Enter your lock code to display the Security menu. Select Lock Phone ( Press your navigation key to select one of the options. -
Page 41: Privacy Lock
Privacy Lock To lock individual functions: Press Menu ( Select Settings ( Select Security ( Enter your lock code to display the Security menu. Select Privacy Lock ( Press your navigation key to select one of the options. Call History Contacts Messaging My Menu... -
Page 42: Erasing The Phone Book
To activate or deactivate this function, press checkmark indicates the function has been activated. Press Save ( Memory 10~ : If you select this call restrict option, you will not be able to use speed dialing for contacts entries or to access your contacts list. -
Page 43: Understanding Roaming
Enter your lock code to display the Security menu. Select Reset ( If you are certain that you would like to restore all of the factory settings, select Yes and press Select ( Understanding Roaming Recognizing the Roaming Icon on the Display Screen Your phone’s display screen always lets you know when you’re off the network available to you. -
Page 44: Roaming On Analog Networks
Roaming on Analog Networks When you roam on analog networks, you will experience a similar quality provided by other analog carriers today. Although some features may be unavailable, you can still make and receive calls and access voicemail. If you are accustomed to network service, you may notice some of the following differences when using analog service: You are more likely to experience static, cross-talk,... -
Page 45: Setting Your Phone's Roam Mode
Enter your pass code at the prompt and follow the voice prompts. When you return to the network available to you, voicemail notification will resume as normal. Setting Your Phone’s Roam Mode Your wireless phone allows you to control your roaming capabilities. -
Page 46: Controlling Roaming Charges Using Call Guard
Controlling Roaming Charges Using Call Guard Your phone has two ways of alerting you when you are roaming off the network available to you: the onscreen roaming icon and Call Guard. Call Guard makes it easy to manage your roaming charges by requiring an extra step before you can place or answer a roaming call. -
Page 47: Menu Navigation
Menu Navigation The navigation key on your wireless phone allows you to scroll through menus quickly and easily. The scroll bar at the right of the menu keeps track of your position in the menu at all times. To navigate through a menu, simply press the navigation key up or down. -
Page 48: Viewing The Menus
To return to standby mode: Press Viewing the Menus Menu Diagram The following list outlines your phone’s menu structure. 1. Call History 1. Recent Calls 2. Outgoing Calls 3. Incoming Calls 4. Missed Calls 5. Clear Calls 2. Contacts 1. Find 2. -
Page 49: Viewing History
7. Stop Watch 8. Calculator 9. Convert Unit 5. Settings 1. Sounds 2. Display 3. Location 4. Roaming 5. Security 6. Others 7. Phone Info 6. Games 1. Eggman2 2. Jungle Boy Viewing History You’ll find the Call History feature very helpful. It is a list of the last 20 phone numbers (or Phone Book entries) for calls you placed, accepted, or missed. -
Page 50: Recent Calls
Select Recent Calls, Outgoing Calls, Incoming Calls or Missed Calls . To call an entry in the list, highlight it then press Shortcut: From standby mode, press History list. Recent Calls Displays information about the 60 most recent calls. You can save a highlighted number from your Call History list or place a call to that number by simply pressing Press Menu (... -
Page 51: Incoming Calls
Select Call History ( Select Outgoing Calls ( most recently dialed numbers. If the number is already stored in your Phone Book, only the name appears. If the number is not stored, only the phone number appears. Highlight a record then press Del ( record or press Note: - After 20 dialed calls, the oldest call will automatically be... -
Page 52: Adding A New Phone Book Entry
Select Call History ( Select Missed Calls ( To see a list of the 20 most recently missed calls. If the number is already stored in your Phone Book, only the name appears. If the number is not stored, only the phone number appears. Highlight a record then press Del ( record or press information. - Page 53 Select Contacts ( Select Add New Entry ( The next available Phone Book location will be displayed. Scroll down to each field to enter the information. To edit the selected item press information, then press Note: - Maximum number of input addresses: 500 - Maximum length of entry names: 16 characters - Maximum digits allowed in a phone number: 32 digits - Maximum length of email addresses: 48 characters...
-
Page 54: Finding Phone Book Entries
Finding Phone Book Entries There are several ways to display your Phone Book entries. Entries can be retrieved by Quick Search, Srch by Name, Srch by #, Srch by Index, and Srch by E-mail. Follow the steps outlined in the sections below to display entries from the Phone Book menu. -
Page 55: Edit Group
Select a record, then press Del ( record or press To search Phone Book data via index number: Press Menu ( Select Contacts ( Select Find ( Select Srch by Index ( Enter an index number and press Press Del ( view detailed information. -
Page 56: Special #'S
Select Contacts ( Select Edit Group ( Select an action and perform the indicated steps: To add a new group, scroll to Empty, press Select ( select a group ring. To edit a group name, scroll to the group and press To remove a group, scroll to the group and press Del ( Special #’s... -
Page 57: Phonebook Match
Select from the following: Enable : Abbrev. Dial is enabled When the popup window appears, enter the 5 or 6 digit prefix you wish to use for abbreviated dialing (for example, area code and prefix) and press OK ( Disable : Abbrev. Dial is disabled. Press Select ( Phonebook Match Phonebook Match allows you to enable the phone to... -
Page 58: Schedule
To edit an existing alarm, press Edit ( instructions for setting up a new alarm. To delete the alarm, press Del ( Note: The phone displays the date and time based on the information from the digital CDMAnetwork. Therefore, the date and time will not be displayed while the phone is out of the service area or operates in the analog mode after the phone is turned on. -
Page 59: Search Schedule
To display your phone's Schedule: Press Menu ( Select Tools ( Select Schedule ( To display the list of all scheduled items, press List ). To display the list of events for the selected date, press Search Schedule Press Menu ( Press to delete it or press Edit ( Adding an Event to the Schedule... -
Page 60: Countdown
Countdown Press Menu ( Select Tools ( Select Countdown ( Choose Empty and press to change the date. In the countdown text field, enter the name of the countdown. Press Save ( Delete Countdown Press Menu ( Select Tools ( Select Countdown ( Choose the countdown. -
Page 61: World Time
View Memo Press Menu ( Select Tools ( Select Memo ( Select the desired memo and press View ( To edit the memo, press Edit ( Delete Memo Press Menu ( Select Tools ( Select Memo ( Select the desired memo, then press Del ( “Delete Current Memo?”... -
Page 62: Stop Watch
Dual Time Display When selected, Dual Time will replace the greeting text on your phone. The selected city’s name and time will scroll across your display from right to left. Press Menu ( Select Tools ( Select World Time ( To display the selected city &... -
Page 63: Convert Unit
To access the calculator: Press Menu ( Select Tools ( Select Calculator ( Press the number keys to input numbers, press the answer. EXAMPLE: To calculate 128 X 32 =: Enter Enter Enter Enter Tip: Press to insert a decimal point. To change a number's value from positive to negative, press Convert Unit To access the conversion tool:... -
Page 64: Screen Call
Speed To change the unit type (for example: m, cm…), press the navigation key. Enter the digit(s) to be calculated. To clear the digits, press Screen Call Answering Machine allows you to hear the recording of a call and to choose to accept or reject a call. Set Auto Answer Press Menu ( Select Tools (... -
Page 65: Voice Memo
Select Voice ( Select Screen Call ( Select Listening ( Select the desired recording and press Listen ( to listen. Voice Memo To play recorded voice memos and record new voice memos: Press Menu ( Select Tools ( Select Voice ( Select Voice Memo ( To record a voice memo, select “Empty”... -
Page 66: Voice Dial
Tip: You can also record a message (by holding standby mode or during a call. Note: The sum of all voice memo, answering machine, and answering machine greeting recordings is limited to a total of four minutes. Voice Dial To list all voice dial linked Phone Book recordings: Press Menu ( Select Tools ( Select Voice (... -
Page 67: Jungle Boy
Select Games ( Select Eggman2 ( Games Menu START HELP Game Control Key Up ( Down ( Right ( Left ( Renew ( Sel. Stage ( Pause ( Jungle Boy Press Menu ( Select Games ( Select Jungle Boy ( Games Menu START EASY/NORMAL/HARD : Select the desired difficulty. -
Page 68: Using Voicemail
Using Voicemail Setting Up Your Voicemail All unanswered calls to your phone are automatically transferred to your voicemail, even if your phone is in use or turned off. Therefore, you will want to set up your voicemail and personal greeting as soon as your phone is activated. To set up your voicemail: Press and hold Follow the system prompts to:... -
Page 69: New Voicemail Message Alerts
New Voicemail Message Alerts When you receive a new voice message, your phone alerts you and prompts you to call your voicemail. To call your voicemail: Press and hold To display your Missed Log: Press Detail ( Important: When you are roaming off the network available to you, you may not receive notification of new voicemail messages. -
Page 70: Access Messages
Select Messaging ( Select Voicemail ( Select Call Voicemail ( Note: You are charged for airtime minutes when you are accessing your voicemail from your wireless phone. Using a Phone Other Than Your Wireless Phone to Access Messages Dial your wireless phone number. When your voicemail answers, press Enter your pass code. - Page 71 Using Expert Mode Using the Expert Mode setting for your personal voicemail box helps you navigate through the voicemail system more quickly by shortening the voice prompts you hear at each level. To turn Expert Mode on or off: Press and hold voicemail box contains any new or saved messages, press to access the main voicemail menu.)
- Page 72 Press call is complete, you’re returned to the voicemail main menu.) Voicemail-to-Voicemail Message Record and send a voice message to other voicemail users. From the main voicemail menu, press a message. Follow the voice prompts to enter the phone number. Follow the voice prompts to record and send your voice message.
-
Page 73: Clearing The Message Icon
Extended Absence Greeting When your phone is turned off or you are off the network available to you for an extended period, this greeting can be played instead of your normal personal greeting. From the main voicemail menu, press Personal Options. Press Press Clearing the Message Icon... - Page 74 Listen Envelope Information Reply Advance 8 Seconds Replay Rewind Forward Message Erase Callback Save Options Send a Message Personal Options Notification Options Phone Notification Numeric Paging Return to Personal Options Menu Administrative Options Skip Pass code Autoplay Message Date & Time On/Off Change Pass code Group Distribution List Return to Personal Options Menu...
-
Page 75: Using Sms Text Messaging
Using SMS Text Messaging With SMS Text Messaging, you can use a person’s wireless phone number to send instant text messages from your wireless phone to their messaging-ready phone – and they can send messages to you. When you receive a new message, it will automatically display on your phone’s screen. - Page 76 Inbox To review the received messages: Press Menu ( Select Messaging ( Select Inbox ( TIP: New message. New Urgent message. Read Locked message. Read message. Press the navigation key up or down to select a message. To display the message, press To use a message option, press 1.
- Page 77 Select Messaging ( Select Outbox ( TIP: Failed message. Failed locked message. Sent message. Sent locked message. Delivered message. Delivered locked message. Press the navigation key up or down to select a message. To display the message, press To use a message option, press 1.
-
Page 78: Alert Type
Press the navigation key up or down to select a message. To display the message, press To use a message option, press 1. Edit : Select to edit the message. 2. Call : Select to call the phone number from the message. - Page 79 Ringer : Use ringer and LED. Vibrate : Use vibrate and LED. LED Only : Use LED only. Select the receive alert method then press Select ( Reminder If you have not read new incoming messages, the phone will alert using the selected option. Press Menu ( Select Messaging ( Select Settings (...
- Page 80 No : Show warning message to user and automatically reject when memory is full. Select the memory management method then press Priority To set the priority for outgoing messages: Press Menu ( Select Messaging ( Select Settings ( Select Priority ( Normal : Normal messages.
- Page 81 Callback # You can select whether or not to include a callback number when you send your messages. Press Menu ( Select Messaging ( Select Settings ( Select Callback # ( None : Do not send a callback #. MDN : Set with Own Phone #. Other : Set an alternate callback #.
- Page 82 4. Add : To add new message, select this option. Delete All To delete Messages (except for Locked Messages): Press Menu ( Select Messaging ( Select Settings ( Select Delete All ( Enter Lock Code. Select the desired option, then press ) to confirm.
-
Page 83: Using Caller Id
Select the entry mode, then press ) to confirm. Signature To select your signature for outgoing messages: Press Menu ( Select Messaging ( Select Settings ( Select Signature ( Select the signature setting method, then press or Select ( Note: If you select On, enter a signature using your keypad, then press Using Caller ID... -
Page 84: Responding To Call Waiting
Responding to Call Waiting When you’re on a call, Call Waiting alerts you of incoming calls by sounding two beeps. Your phone’s screen informs you that another call is coming in and displays the caller’s phone number (if it is available and you are in digital mode). To respond to an incoming call while you’re on a call: Press answers the second call.) -
Page 85: Using Call Forwarding
initiated the call and are the first to hang up, all three callers are disconnected. Note: Call Waiting and Three-Way Calling are not available while roaming off the network available to you. Using Call Forwarding Call Forwarding lets you forward all your incoming calls to another phone number –... -
Page 86: Understanding The Power Save Feature
Understanding the Power Save Feature If your phone is unable to find a signal after 15 minutes of searching, a Power Save feature is automatically activated. If your phone is active, it periodically rechecks service availability; you can also check it yourself by pressing any key. -
Page 87: Maintaining Safe Use Of And Access To Your Phone
Don’t use the phone if the antenna is damaged. Speak directly into the mouthpiece. Avoid exposing your phone and accessories to rain or liquid spills. If your phone does get wet, immediately turn the power off and remove the battery. Note: For the best care of your phone, only authorized personnel should service your phone and accessories. -
Page 88: Turning Off Your Phone Before Flying
vehicles. Check with the manufacturer or their representative to determine if these systems are adequately shielded from external RF signals. Also check with the manufacturer regarding any equipment that has been added to your vehicle. Consult the manufacturer of any personal medical devices, such as pacemakers and hearing aids, to determine if they are adequately shielded from external RF signals. -
Page 89: Caring For The Battery
Note: Never transport or store flammable gas, liquid or explosives in the compartment of your vehicle that contains your phone or accessories. Restricting Children’s Access to Your Phone Your phone is not a toy. Do not allow children to play with it as they could hurt themselves and others, damage the phone or make calls that increase your invoice. -
Page 90: Using Your Phone With A Hearing Aid Device
Trying the phone with your hearing device is the best way to evaluate it for your personal needs. Should you experience interference when using your CDM7000 with your hearing device, it is suggested that you promptly return the phone. It is further suggested that you experiment with multiple phones (even those not labeled with an M3 or M4) while in the retail store to find the one that works best with your hearing device. -
Page 91: Acknowledging Special Precautions And The Fcc Notice
Hearing devices may also be measured for immunity to this type of interference. Your hearing aid device manufacturer or hearing health professional may help you find results for your hearing device. The more immune your hearing aid is, the less likely you are to experience interference noise from wireless phones. -
Page 92: Fcc Radiofrequency Emission
PCS mode (Part 24): Head: 1.06 W/kg; Body-worn: 0.412 W/kg FCC Radiofrequency Emission This phone meets the FCC Radiofrequency Emission Guidelines. FCC ID number: More information on the phone's SAR can be found from the following FCC Website: http://www.fcc.gov/oet/fccid. O6YUTS-C2000 CDM7000 are:... -
Page 93: Phone Guide Proprietary Notice
Phone Guide Proprietary Notice CDMA Technology is licensed by QUALCOMM Incorporated under one or more of the following patents: 4,901,307 5,109,390 5,267,262 5,416,797 5,506,865 5,544,196 5,657,420 5,101,501 5,267,261 5,414,796 5,504,773 5,535,239 5,600,754 5,778,338 5,228,054 5,337,338 5,710,784 5,056,109 5,568,483 5,659,569 5,490,165 5,511,073 T9 Text Input is licensed by Tegic Communications and is covered by U.S. -
Page 94: Warranty Statement
Manufacturer’s Warranty 12 MONTH LIMITED WARRANTY UTStarcom Personal Communications (the Company) warrants to the original retail purchaser of this Audiovox handheld portable cellular telephone, that should this product or any part thereof during normal consumer usage and conditions, be proven defective in material or workmanship that results in product failure within the first twelve (12) month period from the date of purchase, such defect(s) will be repaired or replaced (with new or rebuilt parts) at the... - Page 95 (f) Product damaged from external causes such as fire, flooding, dirt, sand, weather conditions, battery leakage, blown fuse, theft or improper usage of any electrical source. The Company disclaims liability for removal or reinstallation of the product, for geographic coverage, for inadequate signal reception by the antenna or for communications range or operation of the cellular system as a whole.
- Page 96 LAIBILITY EXCEED THE PURCHASE PRICE PAID BY PURCHASER FOR THE PRODUCT. ANY IMPLIED WARRANTIES, INCLUDING ANY IMPLIED WARRANTY OF MERCHANTABILITY OR FITNESS FOR A PARTICULAR PURPOSE, SHALL BE LIMITED TO THE DURATION OF THIS WRITTEN WARRANTY. ANY ACTION FOR BREACH OF ANY WARRANTY MUST BE BROUGHT WITHIN A PERIOD OF 18 MONTHS FROM DATE OF ORIGINAL PURCHASE.
Need help?
Do you have a question about the CDM7000 and is the answer not in the manual?
Questions and answers