Table of Contents
Advertisement
Quick Links
BEDIENUNGSANLEITUNG
USER MANUAL
MODE D'EMPLOI
MANUAL DEL USUARIO
TMH-155
Moving-Head
©
Für weiteren Gebrauch aufbewahren!
Copyright
Keep this manual for future needs!
Nachdruck verboten!
Gardez ce mode d'emploi pour des
Reproduction prohibited!
utilisations ultérieures!
Réproduction interdit!
Guarde este manual para posteriores usos.
Prohibida toda reproducción.
Advertisement
Table of Contents

Related Manuals for EuroLite TMH-155 Moving-Head


Summary of Contents for EuroLite TMH-155 Moving-Head
-
Page 1: Manual Del Usuario
BEDIENUNGSANLEITUNG USER MANUAL MODE D'EMPLOI MANUAL DEL USUARIO TMH-155 Moving-Head © Für weiteren Gebrauch aufbewahren! Copyright Keep this manual for future needs! Nachdruck verboten! Gardez ce mode d’emploi pour des Reproduction prohibited! utilisations ultérieures! Réproduction interdit! Guarde este manual para posteriores usos. Prohibida toda reproducción. -
Page 2: Table Of Contents
MULTI-LANGUAGE-INSTRUCTIONS Inhaltsverzeichnis Table of contents Sommaire Contenido EINFÜHRUNG..............................4 SICHERHEITSHINWEISE..........................4 BESTIMMUNGSGEMÄßE VERWENDUNG..................... 5 GERÄTEBESCHREIBUNG ..........................6 Features ................................. 6 Geräteübersicht.............................. 7 INSTALLATION ..............................8 Lampeninstallation/Lampenwechsel ......................8 Lampenjustierung............................9 Projektormontage............................9 Anschluss an den DMX-512 Controller / Verbindung Projektor - Projektor ..........12 Anschluss ans Netz............................ - Page 3 You can find the latest update of this user manual in the Internet under: Vous pouvez trouvez la dernière version de ce mode d'emploi dans l'Internet sous: Vd. puede encontrar la versión más reciente de este manual en el Internet bajo: www.eurolite.de 3/58 51786410X84NXS_V_1_2.DOC...
-
Page 4: Introduction
- pass this manual on to every further owner or user of the product - include every supplementay update with the original manual INTRODUCTION Thank you for having chosen a EUROLITE TMH-155. You will see you have acquired a powerful and versatile device. Unpack your TMH-155. -
Page 5: Operating Determinations
If the device has been exposed to drastic temperature fluctuation (e.g. after transportation), do not switch it on immediately. The arising condensation water might damage your device. Leave the device switched off until it has reached room temperature. This device falls under protection-class I. The power plug must only be plugged into a protection class I outlet. -
Page 6: Description Of The Device
• 7 rotating metal gobos plus open • Manual focus • Strobe-effect with 1-13 flashes per second • Exact positioning within 360° Pan and 250° Tilt • 5 DMX-channels • 4-digit LED display for starting address • For bright 150 W discharge lamp • Suitable EUROLITE controllers: DMX Operator 20/58... -
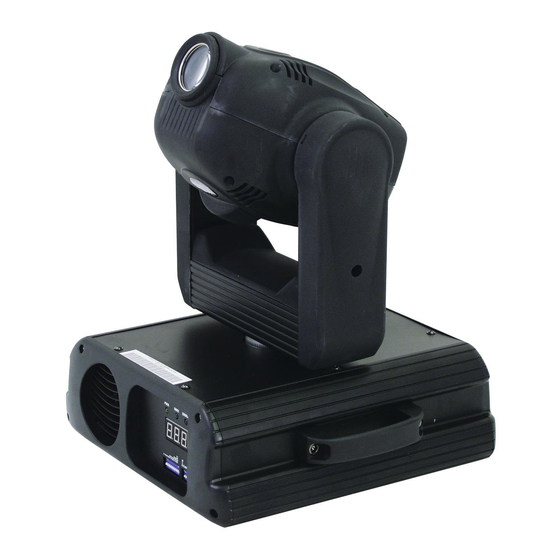
Page 7: Overview
Overview (1) Projector head (2) Objective-lens (3) Yoke (4) Base (5) Carrying handle (6) Power switch (7) Power supply (8) Fuseholder (9) Ventilation fan (10) DMX-In socket (11) DMX-Out socket (12) Display (13) DIP-switches (14) Function-DIP-switches 21/58 51786410X84NXS_V_1_2.DOC... -
Page 8: Installation
INSTALLATION Installing/Replacing the lamp DANGER TO LIFE! Only install the lamp with the device switched off! Unplug from mains before! For the installation, you need one HTI 90 V/150 W GY-9.5 lamp. The lamp must only be changed when wearing appropriate protective clothing (protection glasses, protection gloves, helmet with sight, leather apron). -
Page 9: Lamp Adjustment
Lamp adjustment The lampholder is aligned at the factory. Due to differences between lamps, fine adjustment may improve light performance. Strike the lamp, open the shutter and the iris, set the dimmer intensity onto 100 % and focus the light on a flat surface (wall). - Page 10 If the projector shall be lowered from the ceiling or high joists, professional trussing systems have to be used. The projector must never be fixed swinging freely in the room. Caution: Projectors may cause severe injuries when crashing down! If you have doubts concerning the safety of a possible installation, do NOT install the projector! Before rigging make sure that the installation area can hold a minimum point load of 10 times the projector's weight.
-
Page 11: 51786410X84Nxs_V_1_2.Doc
25/58 51786410X84NXS_V_1_2.DOC... -
Page 12: Dmx-512 Connection / Connection Between Fixtures
(1) Omega-holders (2) Clamp (3) Quick-lock fastener Screw one clamp each via a M12 screw and nut onto the Omega-holders. Insert the quick-lock fasteners of the first Omega-holder into the respective holes on the bottom of the device. Tighten the quick-lock fasteners fully clockwise. Install the second Omega-holder. DMX-512 connection / connection between fixtures The wires must not come into contact with each other, otherwise the fixtures will not work at all, or will not work properly. -
Page 13: Connection With The Mains
Connection with the mains Connect the device to the mains with the enclosed power supply cable. The occupation of the connection-cables is as follows: Cable International Brown Live Blue Neutral Yellow/Green Earth The earth has to be connected! If the device will be directly connected with the local power supply network, a disconnection switch with a minimum opening of 3 mm at every pole has to be included in the permanent electrical installation. -
Page 14: Dmx-Protocol
Controlling: After having addressed all TMH-155, you may now start operating these via your lighting controller. Note: After switching on, the TMH-155 will automatically detect whether DMX 512 data is received or not. If the data is received, the the display will show "A001" with actually set address and the DMX-LED is lit. If there is no data received at the DMX-input, the DMX-LED is off. -
Page 15: Special Settings
Control channel 6 - Shutter, Dimmer DMX-value Feature 0-39 Shutter closed 40-128 Dimmer control (shutter open) 129-139 No function (shutter open) 140-243 Strobo effect with increasing speed (max. 13 flashes/second) 244-255 No function (shutter open) Special settings Via the Function-DIP-switches, you can adjust different modes and settings: CLEANING AND MAINTENANCE The operator has to make sure that safety-relating and machine-technical installations are inspected by an expert after every four years in the course of an acceptance test. -
Page 16: Replacing The Fuse
No. 91201396 OSRAM HTI 150W 90V/150W GY9,5 750h 6900K No. 91201327 OSRAM HTI 152W 95V/150W GY9,5 2000h 5000K No. 91201329 Recommended controllers: EUROLITE DMX Operator No. 70064520 Wizard-512 DMX-Software + Interface No. 51860101 Wizard-1024 DMX-Software + Interface No. 51860110 Please note: Every information is subject to change without prior notice. 31.07.2003 ©...
Need help?
Do you have a question about the TMH-155 Moving-Head and is the answer not in the manual?
Questions and answers