AVer HVC - series User Manual
Hvc series
Hide thumbs
Also See for HVC - series:
- User manual (74 pages) ,
- Quick installation manual (10 pages) ,
- Quick installation manual (10 pages)
Table of Contents
Advertisement
Advertisement
Table of Contents

Related Manuals for AVer HVC - series


Summary of Contents for AVer HVC - series
- Page 1 User’s Man ual...
-
Page 2: Table Of Contents
ENGLISH Introduction ............................1 Package Contents ..........................1 Get Familiar with the AVer HVC ......................2 Main System ............................ 2 MIC..............................3 Camera ............................3 Remote Control ..........................4 *Available in HVC330/310 model onlyMaking the Connections ............5 Making the Connections ......................... 6 Connecting a Monitor ........................ - Page 3 To Save and Send the System Log: ..................47 Managing the AVeComm System Using the WebTool ..............48 To Access AVer HVC using the Internet Browser: ................. 48 To use the Cam. Control in WebTool ..................... 49 To Add, Edit and Delete Phonebook using WebTool: ..............49 To Download Phonebook Entries in WebTool: ................
- Page 4 To Call Using Call History: ......................60 To End MCU Call: ........................61 Record Video ............................. 61 To Playback the Recorded Video on AVer HVC ............... 61 To Playback the Recorded Video Using AVer VCplayer ............62 To Convert the File Using VCplayer..................64 To Convert Files Using MultiConversion ...................
-
Page 6: Introduction
You can hook up AVer HVC with HDMI monitor which gives you high definition video quality. By using a USB flash drive, you can save capture still image and record video, and review it anytime on AVer HVC or on PC with the bundled AVer VC player and share it with your meeting attendees. -
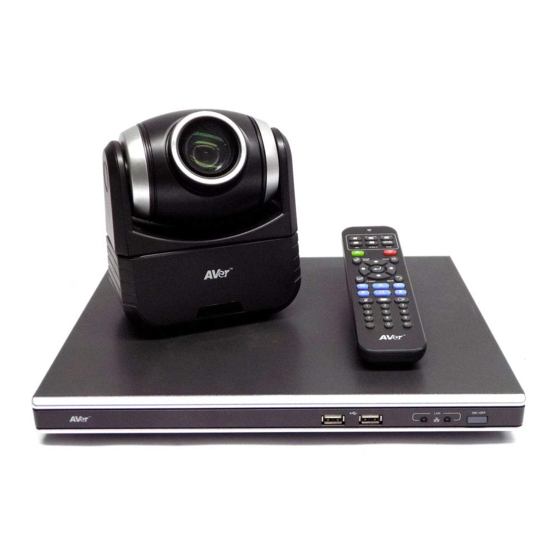
Page 7: Get Familiar With The Aver Hvc
Function (1) LAN Use an RJ-45 Ethernet cable and connect it to RJ-45 Ethernet port. Make sure to connect AVer HVC to an IP-based network. (2) RS-232 Connect it to a device with RS-232 interface. This allows you to integrate AVer HVC with the central system device. -
Page 8: Mic
ENGLISH Name Function (9) AUDIO IN Receive the audio signal from the audio device thru RCA left and right audio connection. (10) VIDEO IN Receive the video signal from a media device thru S-Video/RCA video connection. (11) CAMERA IN Receive the image from the camera to the main system. (12) DC 19V Connect the power adapter into this port. -
Page 9: Remote Control
Remote Control The remote control requires two (2) “AAA” size batteries (supplied), make sure batteries are installed properly before using. Aim the remote control to the AVer HVC camera infrared sensor to operate the unit. * Available in AVer HVC330/310 model only. -
Page 10: Available In Hvc330/310 Model Onlymaking The Connections
ENGLISH Name Function (12) Input Switch the input source between HVC camera, S-Video, Video and VGA. (21) (22) (20) (13) Far/Near Select to control either near site or far site (23) (19) camera. The cam ctrl icon will appear on (18) (1 ) (17) -
Page 11: Making The Connections
Locate the VGA/HDMI input port of the graphics display device and connect it to VGA OUT/HDMI OUT port of AVer HVC. Both VGA OUT and HDMI OUT can be used at the same time. This allows you to switch to Dual mode which splits the screen and displays the video conference signal on one screen and present signal on the other screen. -
Page 12: Connecting The Mic
HVC. Then connect the other end of the MIC cable with the blue tag to MIC OUT port. Press the button on top of AVer HVC Mic to turn on/off the mic. Use an RJ-45 Ethernet cable and connect it from the LAN port of AVer HVC to RJ-45 wall jack or Ethernet hub. -
Page 13: Connecting A Computer
S-VIDEO IN, or VIDEO IN and Audio IN port of AVer HVC. Make sure NTSC/PAL switch setting is set to proper TV system. -
Page 14: Connecting To A Central System Via Rs-232
Camera The AVer HVC camera design can be panned (Ø +- 100 deg range), tilted (Ø +- 25 deg range) and zoomed (7X) with the use of the ▲, ▼, ◄ and ►, and Zoom +/- buttons on the remote control. -
Page 15: Installing L-Bracket (Optional)
2. Remove the adhesive cover and place the L- bracket on the LCD monitor. 3. Place the HVC camera on top of the L-bracket. Positioning the MIC The microphone best reception range is within 3m. AVer (single microphone) AVer MIC1 MIC1... -
Page 16: Running The Aver Hvc
ENGLISH Upon running the AVer HVC for the first time or the system is being reset, the system will instantly direct you to Quick Start menu. See Quick Start. Navigating the Menus and Settings 1. In the Home menu, press ► and ◄ on the remote to toggle between the 5 selections. -
Page 17: Home Menu Screen
There are 5 selections on the Home menu screen: Cam. Control, Dial, Phonebook, Call History, and Setting. Upon running the AVer HVC, the Home menu screen will be displayed. Simply use the ► and ◄ buttons to move between selections and press to make a selection. -
Page 18: Dial
ENGLISH Dial The Dial allows you to make a call by entering the IP address and set the call quality setting. To Make a Call Using Dial 1. Select Dial and press . The on-screen numeric pad will appear. To set the Call Quality, use ▲, ▼, ◄ and ► buttons to move the selection box to the Call Quality drop- down list and press to select the value. -
Page 19: To Add Group
ENGLISH To Add Group 1. Select Phonebook and press 2. Select Group and press In grouping the contacts, you can easily categorize the contacts into a specific group such as client, vendor, company, branch, and etc. 3. Select New Group and press 4. -
Page 20: To Edit Group
ENGLISH 5. The new group name will be saved and displayed in the Group list. To Edit Group 1. Select Phonebook and press 2. Select Group and press 3. Select the name you want to modify in the Group list. 4. -
Page 21: To Delete Group
ENGLISH 5. Use the ▲, ▼, ◄ and ► buttons to move the selection in the on-screen keyboard and press make a selection. Select and press to save the revised group name. 6. The revised group name will be saved and displayed in the Group list. - Page 22 ENGLISH 3. Select the name you want to remove in the Group list. 4. Select Delete Group and press 5. Select “Yes” to remove the selected group name and “No” to cancel group name deletion. 6. The selected group name will no longer appear in the group list when deleted.
-
Page 23: To Add Phonebook Entries
ENGLISH To Add Phonebook Entries 1. Select Phonebook and press 2. Select New Site and press 3. Select the Group Name. 4. Select Site Name box and press... - Page 24 ENGLISH 5. Use the ▲, ▼, ◄ and ► buttons to move the selection in the on-screen keyboard and press make a selection. Select and press when you are done to save the new site name. 6. Select the IP address box and press 7.
-
Page 25: To Edit Phonebook Entries
ENGLISH 9. Select Save to store the newly added site contact and Cancel to undo adding contact. To Edit Phonebook Entries 1. Select Phonebook and press 2. Select the contact you want to modify. 3. Select Edit Site and press... -
Page 26: To Delete Phonebook Entries
ENGLISH 4. In the Phonebook > Edit Site, you may change the Group name, Site Name, IP Address, and Call Quality. 5. After making the changes, select Save to apply the new changes or Cancel to undo the changes and return to Phonebook menu. 6. -
Page 27: Call History
ENGLISH 3. Select Delete Site and press 4. Select “Yes” to remove the selected contact and “No” to cancel contact deletion. 5. The selected contact will no longer appear in the group-site list when deleted. Call History The Call History allows you to check the incoming and outgoing calls and to make a call by selecting in the Call History list. -
Page 28: To Make A Call In Call History
ENGLISH 2. In the Call History, it will show the IP address or the Site name, Date and Time of call and Call status. Refer to the table below to check the call status. Call Status Answered Failed To Make a Call in Call History 1. -
Page 29: Setting
Setting In the Setting menu, allows you to modify system setting, check the system info, test the system before using AVer HVC and watch the recorded file. Administrator The Administrator allows you to set password to prevent unauthorized user to change the... - Page 30 ENGLISH 3. Select Enable Admin and press enable/disable authorization in changing the system setting; select Enable Web Admin to enable/disable using the WebTool function; and select Enable VCLink/ScreenShare to enable/disable using WiFi phone as a remote and computer to share PC screen. 4.
-
Page 31: Quick Start
ENGLISH Quick Start The Quick Start is the easiest way for you to set up the system if you are using AVer HVC for the first time. To Setup the AVer HVC 1. In the Home menu, click Setting and select System Settings >... -
Page 32: To Setup The Language
ENGLISH To Setup the Language 1. Select Language and press 2. Use the ▲ and ▼buttons and select from the language you prefer. 3. Press to change the system into the selected language. To Setup the System Name 1. Select System Name and press 2. -
Page 33: Lan Configuration
ENGLISH LAN configuration 1. Select LAN Configuration and press 2. In Obtain IP Address selection, select the type of IP and press DHCP – configures the system to automatically obtain IP address from the DHCP server. Static IP – configures the system to use the ... -
Page 34: To Setup The Network
Max. Transmitting/Receiving Bandwidth - allows you to specify the maximum bandwidth of the outbound and inbound calls. AVer HVC system supports up to 4Mb. Auto Call Quality - enables you to select default outbound/inbound bandwidth. This setting will be used when Auto is selected in the Call Quality setting. -
Page 35: General Setting
ENGLISH General Setting In General Setting, you can enable/disable Far Control of Near Camera to allow the far site to control your Camera, select the system language, enable/disable Auto Power-off mode to switch in standby mode when not in use for 2 hours, change the display setting, set the system to automatically answer/reject the incoming call, and setup the system date and time. -
Page 36: To Setup The Language In General Setting
ENGLISH 4. Select Far Control of Near Camera. Enable to let the far site control your camera. To Setup the Language in General Setting 1. Select Setting and press 2. Select System Setting > General Setting and press 3. Select Language and press to show the language list. -
Page 37: To Set The Auto Turn Off Timer
ENGLISH To Set the Auto Turn Off Timer 1. Select Setting and press 2. Select System Settings > General Setting and press 3. Select the Auto Power-off Mode drop-down box and press . Then select the time of idle mode before the system automatically turns off or OFF to disable this feature. - Page 38 ENGLISH 2. Select System Setting > General Setting and press 3. Select Monitor and press 4. Select Monitor Aspect Ratio drop-down box and press . Choose the appropriate aspect ratio of the display device you using. If you want the system to automatically detect the right setting, choose Auto.
-
Page 39: Call Setting
ENGLISH 6. Select Screen Saver drop-down box and press . Then select the time for the system to automatically switch to standby mode or OFF to disable this feature. Press to make a selection. The screen will turn black when the system is in standby mode. -
Page 40: To Setup The Session Initiation Protocol (Sip)
ENGLISH 3. Select Auto Answer and press . In the Auto Answer menu, select OFF to turn off Auto Answer, ON to answer the call automatically, and Do Not Disturb to automatically reject incoming calls. If you are already in a meeting, even if the Auto Answer is turned on, you need to manually accept the next call. -
Page 41: To Enable/Disable Advanced Encryption Standard
ENGLISH 4. Set the SIP Port. Change this value only if you use specific setting in your network system. The default SIP port setting is 5060. 5. Select the Preferred Protocol and choose which type you want the system to use as your first priority. -
Page 42: Network
ENGLISH Network Network allows you to setup the network bandwidth, auto call quality, gatekeeper and firewall setting. the Gatekeeper 1. Select Setting > System Settings > Network and press 2. Select Gatekeeper and press... -
Page 43: To Set The Firewall
ENGLISH 3. The Gatekeeper in AVer HVC serves the purpose of translating services from E.164 IDs to IP addresses in an H.323 network. Select the following to setup the Gatekeeper. H.323 name: gatekeeper will use this name to identify your system. -
Page 44: To Enable/Disable Quality Of Service
Enable H.460 Firewall Traversal: The gatekeeper must support this feature and register to dedicate gatekeeper for the system. NAT Configuration: AVer HVC supports NAT system that use internal IP address to communicate with other devices outside the LAN. -
Page 45: Video /Audio
ENGLISH Video /Audio In Video Audio setting, you can enable/disable keypad tone, set the MIC gain level, select the preferred video and audio codec. To Enable/Disable Keypad Tone 1. Select Setting > System Settings > Video/Audio and press 2. Select Keypad Tone check box and press This will enable/disable to hear the tone sound when you are dialing the number using the remote control. - Page 46 ENGLISH 2. Select Camera and press 3. Select White Balance drop-down box and press . Then select the type of mode you prefer and press 4. Select Exposure drop-down box and press Then select the exposure level you prefer and press 5.
-
Page 47: To Set The Mic Gain Level And Mic Input Source
3. Select Mic Gain Level and press . Select from the mic gain level up to 9. AVer HVC allows you to adjust mic gain level for the proper MIC volume and this will help to get better reception on MIC. -
Page 48: To Specify The Video/Audio Codec
2. Select Video/Audio Codecs and press to specify the codec you want to support. AVer HVC support H.323 standard coding algorithm, each codec has unique properties and performs best given a certain set of circumstances. For Video : H.264, H.263+, H.263, H.261 For Voice : G.728, G.722.1C, G.722.1, G.722, G.711... -
Page 49: Reset System
You can set the camera preset point on or before the call session. To Set the Camera Preset Point: 1. Run the AVer HVC, the Home menu will appear. Select Cam Ctrl to adjust the visual angle of the camera. -
Page 50: Testing The Network
ENGLISH This feature tests the network ability between local and far site. It also includes the audio and video acknowledge. To Test the Network: 1. In the Home menu, click Setting. 2. Select Test > Network Test. 3. Select OK to continue and Cancel to stop this operation. -
Page 51: To Test The Video And Audio
ENGLISH 4. Wait until it finishes the network test. The check mark will appear if the network test is successful. If it fails, save the report in a USB flash drive and contact our technical support. To Test the Video and Audio: 1. -
Page 52: To Save And Send The System Log
ENGLISH To Save and Send the System Log: For some unknown instances, you encounter something and unsure of how to troubleshoot the unit, sending us the saved system log data could help us analyze the problem and provide the answer you need. Insert the USB Flash drive into the USB Port of the HVC System. -
Page 53: Managing The Avecomm System Using The Webtool
ENGLISH The WebTool allows you to access AVer HVC system from the remote site by using the internet browser. You can view the camera and control screen interface and remote control; access the Phonebook to add, edit and delete entries; view and download the call history and add the call in phonebook entry;... -
Page 54: To Use The Cam. Control In Webtool
2. In Phonebook page, you can work on the phonebook entry by clicking the New Site, Edit Site, Delete Site and New Group. You can also download the phonebook entries and upload it to another AVer HVC unit. The saved file can be edited using the MS Excel. -
Page 55: To Download Phonebook Entries In Webtool
ENGLISH 1. Click Download Phonebook. 2. You will be prompt to open, save or cancel the operation. Click Save. 3. Locate on where you want to save the file. Click Save. 4. You will be prompt to open the file or close the message box when the download is compete. -
Page 56: To Edit And Save The Downloaded Phonebook Entries
ENGLISH 1. Locate and open the file using MS Excel and select As an XML list. Click OK. 2. Click ok to create a schema based on the XML source data. 3. You may now edit the file. 4. Make sure to save the file as XML Data to be able to upload the file back to the system. -
Page 57: To Upload Phonebook Entries In Webtool
ENGLISH 1. Click Browse… and locate the phonebook entries xml file you wish to upload. 2. Select the xml file and click Open. 3. Click Send. 4. Click OK to replace the existing phonebook in the system with the new one. 5. -
Page 58: To Download Call History In Webtool
ENGLISH 1. Click Call History in WebTool page. 2. Click Download History. 3. You will be prompt to open, save or cancel the operation. Click Save. 4. Locate on where you want to save the file. Click Save. -
Page 59: To Add Phonebook Entry From The Call History List
ENGLISH 5. You will be prompt to open the file or close the message box when the download is compete. 1. Select in the call history list and enable the check box you want to add in the phonebook entry. 2. -
Page 60: To Update The System
ENGLISH 1. Go to our website and download the latest firmware update/service note file. Then Click Setting > System Update. 2. Click Browse and locate the file on where you save the firmware update/service note file. Click Send to proceed the system update and Cancel to stop this operation. - Page 61 ENGLISH 3. Click Download Settings. 4. You will be prompt to open or save the file. Click Save. 5. Click Save. 6. You will be prompt to open or close the message box. Click Close.
-
Page 62: To Restore The System Setting
ENGLISH 1. Click Browse…. 2. Locate the system setting file and click Open. 3. Click Restore Setting. 4. You will be prompt that the system setting upload is successful. Click OK. 5. On your HVC screen, you will be prompt that the system setting is updated via internet. -
Page 63: Using The Aver Hvc
ENGLISH Once when you are done setting up the system, you may start to make a call. HVC supports Multipoint Control Unit (MCU) which allows you to have up to 4-party video conference call. You can make a call in 3 ways. Selecting the site contact in the Phonebook list, Dial the IP address, or select in the Call History list. -
Page 64: To Call Using Dial
ENGLISH 3. The call will be connected. To Call Using Dial: 1. Select Dial and press 2. Use the numeric button on the remote to dial and press to make a call. The speed setting in Auto Call Quality will be used when Auto is selected. -
Page 65: To Call Using Call History
ENGLISH To Call Using Call History: 1. Select Call History and press 2. Select the site you want to call in the call history and press 3. The call will be connected. 4. If the call failed, it’s either the IP address is incorrect, the far site is set to Do not disturb mode or the far site hang up the call. -
Page 66: To End Mcu Call
AVer HVC requires a USB flash drive to record the meeting. The recorded video will be saved in *vc format. You may record video with/without having to be in video conference call. -
Page 67: To Playback The Recorded Video Using Aver Vcplayer
To Playback the Recorded Video Using AVer VCplayer Make sure your computer meets the minimum system requirements below. Minimum System Requirements ... - Page 68 ENGLISH 1. Click start > All Programs > AVer VCplayer > VCplayer, or double-click on the desktop. 2. Click to locate and open the *vc file. 3. Select the file and click Open. 4. In the VCplayer control panel, you can do the following: Start playing the *.vc file.
-
Page 69: To Convert The File Using Vcplayer
ENGLISH To Convert the File Using VCplayer 1. Open the file you want to convert. Click and locate the *vc file. 2. Click to convert the file in *.mov format. The VCConvert will appear. 3. In the File information, it will show the number of video stream and type of the vc file. - Page 70 ENGLISH 2. The multiWidget will appear. Click Add. 3. Select the files you want to convert and click Open. 4. To save the file in different location, enable the Choose Destination and select the new folder location. Click Start to begin converting the files in *.mov format.
-
Page 71: Using The Vclink Mobile
This app is available in MAC and Android version. You can download it in MAC App Store and Android Market. Thru wifi connection, AVer Mobile allows you to control AVer HVC with the remote control interface. You can also edit and download the phonebook to save it in your mobile phone. - Page 72 ENGLISH 4. Click on Remote Control tab to be able to control the AVer HVC. Slide the lower panel to access other features. 5. Click the Phonebook > AVer HVC tab to download the phonebook list from the unit. To save the phonebook list in your phone, click Copy to Local.
-
Page 73: Using The Screenshare
1. Click to register the AVer HVC unit. 2. Register the AVer HVC unit. Enter a Title, the IP Address and VCLink/ScreenShare password of the device. Then click OK. 3. Select the registered AVer HVC in the list and click Log In... - Page 74 ENGLISH 4. Select the image you want to share and click Share. To stop sharing, click Log Out icon. 5. The screen will display the shared computer image.
-
Page 75: Troubleshooting
Press Zoom - or Zoom + button to adjust the focus of the AVer HVC camera. 4. I'm trying to share the contents from VGA port but when I pressed " Present" on the remote control, there is no VGA signal indicated on the selection Make sure the device such as document camera or computer is properly connected to ... -
Page 76: Network
If the IP/Subnet Mask/Default Gateway shown incorrect value, you can modify the value in “Static IP” Mode. The default Obtain IP address selection in AVer HVC is in “Static IP”. Please change the selection into DHCP in LAN Configuration, The system will automatically detect the IP from DHCP server. -
Page 77: Limited Warranty
This limited warranty extends only to You as the original purchaser. Except for the foregoing, the Product is provided “AS IS.” In no event does AVer warrant that You will be able to operate the Product without problems or interruptions, or that the Product is suitable for your purposes. -
Page 78: Federal Communications Commission Statement (Class A)
ADVISED OF THE POSSIBILITY OF SUCH DAMAGES. AVER’S TOTAL, AGGREGATE LIABILITY FOR DAMAGES OF ANY NATURE, REGARDLESS OF FORM OF ACTION, SHALL IN NO EVENT EXCEED THE AMOUNT PAID BY YOU TO AVER FOR THE SPECIFIC PRODUCT UPON WHICH LIABILITY IS BASED. -
Page 79: Disclaimer
The information contained in this documentation is subject to change without notice. In no event will AVer be liable for direct, indirect, special, incidental, or consequential damages arisin g out of the use or inability to use this product or documentation, even if advised of the possibility of such damages.
Need help?
Do you have a question about the HVC - series and is the answer not in the manual?
Questions and answers