Bosch Power Xpress Installation And Operating Instructions Manual
Charge station
Hide thumbs
Also See for Power Xpress:
- Installation instructions manual (16 pages) ,
- Installation instructions manual (38 pages) ,
- Firmware field update instructions (4 pages)
Table of Contents
Advertisement
Quick Links
Advertisement
Table of Contents

Related Manuals for Bosch Power Xpress


Summary of Contents for Bosch Power Xpress
- Page 1 Power Xpress Charge Station en Installation and Operating Instructions...
-
Page 2: Technical Support
Copyright © 2013 Bosch Automotive Service Solutions LLC All rights reserved. The information, specifications, and illustrations in this guide are based on the latest information available at the time of printing. Bosch Automotive Service Solutions LLC reserves the right to make changes at any time, without notice. -
Page 3: Table Of Contents
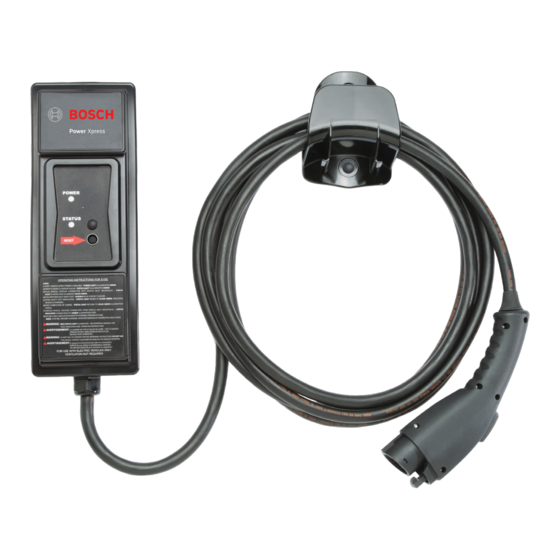
Installation and Operating Instructions | Power Xpress Charge Station | 1 | en Table of Contents Safety Regulatory Information Environmental Considerations Product Specification FCC Declaration of Conformity Radio and Television Interference Agency Approvals Features and Specifications Ground-fault protection Automatic reset... -
Page 4: Safety
| 2 | Installation and Operating Instructions | Power Xpress Charge Station Safety WARNING: Disconnect main service Save these instructions. Read all instruction before supply or unplug unit to achieve electrical installing or using the Power Xpress Charge Station. -
Page 5: Regulatory Information
Installation and Operating Instructions | Power Xpress Charge Station | 3 | en Regulatory Information Features and Specifications The Charge Station includes ground-fault protection, automatic reset upon grid power loss, ground assurance Environmental Considerations monitoring, and self-testing capabilities. Manual reset- At the end of service life, the Charge Station ting of the Charge Station is not necessary. -
Page 6: Product Features
| 4 | Installation and Operating Instructions | Power Xpress Charge Station Product Features Technical Specifications Voltage and • 240VAC single-phase: L1, L2, and Output 32A Max, Model Dependent Wiring Amperage safety ground. • (see output spec. label on side of (120V above •... -
Page 7: Package Contents
Installation and Operating Instructions | Power Xpress Charge Station | 5 | en Package Contents Tools Suggested for Installation (1) Charge Station (including attached cord and vehicle Stud finder coupler) (EL -50600-1) Tape measure (1) Wall-mounting bracket (EL -50600-1) 2-ft (61-cm) level... -
Page 8: Applicable Electrical Systems
| 6 | Installation and Operating Instructions | Power Xpress Charge Station Applicable Electrical Systems 208V 3-Phase Wye Connection (North IMPORTANT: Identify the onsite service America) connection before insthalling the Charge Any two of the legs can be used to provide 208V to the Station. -
Page 9: 240V 3-Phase Delta Connection (North America)
Installation and Operating Instructions | Power Xpress Charge Station | 7 | en 240V 3-Phase Delta Connection (North 230V Above Ground (Europe) America) with Center Tap on One Leg 230V Single Phase One leg must be center-tapped, and only the two phas-... -
Page 10: Electrical Requirements For Battery Charging
| 8 | Installation and Operating Instructions | Power Xpress Charge Station Electrical Requirements for Table 1. North American Current-Adjustment Settings Battery Charging Charge NEMA Charge Station Breaker Wire Receptacle Station Current- Required, Required, Required WARNING: The Charge Station must... -
Page 11: Mounting Template
Installation and Operating Instructions | Power Xpress Charge Station | 9 | en ss01412 Mounting Template See the back cover of this manual for the Charge Sta- tion mounting template. Finished Wall Charge Station Installation ss01410 Align the hash-marked center and lower horizontal lines of the template to the lines drawn on the wall. - Page 12 | 1 0 | Installation and Operating Instructions | Power Xpress Charge Station Note: ss01415 To avoid damage to the front of the Charge Station, place it on a soft or cardboard surface. ss01419 Remove the template from the wall. Using a ham- 10.
- Page 13 Installation and Operating Instructions | Power Xpress Charge Station | 11 | en ss01429 ss01423 L2/N 18. Remove the strain-relief assembly from the wiring chamber. 14. Cover the plastic bushing with the self=adhesive ss01430 foam dust-cover gasket, with the center-slit oriented ss01425 horizontally.
- Page 14 | 1 2 | Installation and Operating Instructions | Power Xpress Charge Station ss01443 ss01434 L2/N 27. Attach the wiring chamber lid with four (4) 3/4-in. (20-mm) square-drive screws. 28. Apply the self-adhesive chamber lid label. 22. Feed the L1 (black) [Europe H (brown)] wire into the L1 [Europe H] terminal slot in the wiring cham- ber.
-
Page 15: Masonry Wall Charge Station Installation
Installation and Operating Instructions | Power Xpress Charge Station | 13 | en ss01451 Masonry Wall Charge Station Installation ss01453 Locate and mark a point 45 in. (114.3 cm) above Using a 1/8-in. (3-mm) drill bit, drill the three (3) the floor surface. - Page 16 | 1 4 | Installation and Operating Instructions | Power Xpress Charge Station Note: 15. Secure the Charge Station to the mounted wall To avoid damage to the Charge Station, place it on a bracket by engaging the tabs on the Charge Station soft or cardboard surface.
- Page 17 Installation and Operating Instructions | Power Xpress Charge Station | 15 | en ss01432 ss01438 L2/N 21. Remove threaded ground lug. ss01434 26. Reinstall strain relief. Note: Select appropriate orientation of insert to achieve prop- er clamping for wire size used.
-
Page 18: Molded Plug-Connected Charge Station Installation
| 1 6 | Installation and Operating Instructions | Power Xpress Charge Station Molded Plug-Connected Charge Station Installation (North America only) ss01478 Install appropriate outlet box (ground-pin at 12-o’clock position) with top- or side-conduit feed. CAUTION: Do not feed the outlet box from Align the hash-marked center and lower horizontal the bottom. - Page 19 Installation and Operating Instructions | Power Xpress Charge Station | 17 | en ss01456 ss01432 L2/N 19. Remove threaded ground lug. 14. Using a 1 1/16-in. (28-mm) hole saw, with the pilot ss01434 hole as a guide, drill out the knockout.
- Page 20 | 1 8 | Installation and Operating Instructions | Power Xpress Charge Station ss01496 ss01438 25. Reinstall strain relief. Note: Select appropriate orientation of insert to achieve prop- er clamping. CAUTION: Do not overtighten. ss01491 30. Plug Charge Station plug into NEMA outlet.
-
Page 21: Operating Instructions
Installation and Operating Instructions | Power Xpress Charge Station | 19 | en Operating Instructions Power and Status LED Indications Verify service supply power is available; green POW- ER indicator LED is illuminated. Power LED Status LED Condition Retrieve Charge Station vehicle cable and coupler from rear-mounted holder (stowed position);... -
Page 22: Troubleshooting
| 2 0 | Installation and Operating Instructions | Power Xpress Charge Station Troubleshooting Problem Solution Indicated If there is a charging issue proceed with the following by LED steps. If the issue persists after three attempts call Status Bosch at 1-877-805-EVSE (3873) for assistance. -
Page 23: Maintenance
Installation and Operating Instructions | Power Xpress Charge Station | 21 | en Maintenance Cleaning CAUTION: Always turn off service power WARNING: Do not attempt to service the (supply-side power at the main service Charge Station. The Charge Station has panel) before cleaning the Charge Station no user-serviceable components. -
Page 24: Limited Warranty
| 2 2 | Installation and Operating Instructions | Power Xpress Charge Station Limited Warranty Disclaimer THIS WARRANTY IS EXPRESSLY LIMITED TO THE ORIGI- TO THE EXTENT PERMITTED BY APPLICABLE LAW AND NAL PURCHASER OF Bosch Automotive Service Solu- EXCEPT AS EXPRESSLY PROVIDED IN THE LIMITED tions LLC Charge Station product. - Page 26 Bosch Automotive Service Solutions LLC 28635 Mound Road Warren, MI 48092 USA Phone: (877) 805-EVSE (3873) www.pluginnow.com...
Need help?
Do you have a question about the Power Xpress and is the answer not in the manual?
Questions and answers