Table of Contents
Advertisement
Available languages
Available languages
Quick Links
H5GG5F UA
H5GG5E UA
H5GG1E UA
English
English
English
English
GB
Operating Instructions
COOKER AND OVEN
Contents
Operating Instructions,1
Description of the appliance-Overall view,3
Description of the appliance-Control Panel,4
Cooking modes,10
Украінська
Украінська
Украінська
UA
Інструкціі з експлуатаціі
Інструкціі з експлуатаціі
Інструкціі з експлуатаціі
КУХНЯ
КУХНЯ
КУХНЯ
Зміст
Зміст
Зміст
Інструкціі з експлуатаціі,1
,2
УВАГА
Опис установки - Загальнии вигляд,3
Опис установки-Панель управління,4
Встановлення,15
Включення і використання,19
Програми приготування іжі,20
Запобіжні засоби і поради,22
Догляд i технічне обслуговування,23
Допомога,23
Advertisement
Table of Contents

Subscribe to Our Youtube Channel
Related Manuals for Hotpoint Ariston H5GG5F UA


Summary of Contents for Hotpoint Ariston H5GG5F UA
-
Page 1: Table Of Contents
H5GG5F UA H5GG5E UA H5GG1E UA English English English English Operating Instructions COOKER AND OVEN Contents Operating Instructions,1 Warning,2 Description of the appliance-Overall view,3 Description of the appliance-Control Panel,4 Installation,5 Start-up and use,9 Cooking modes,10 Precautions and tips,12 Care and maintenance,13 Assistance,13 Украінська... -
Page 2: Warning,2
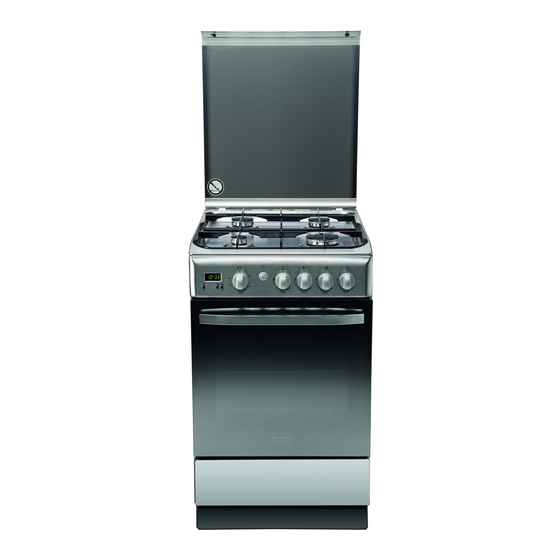
ЗАПОБІЖНИХ ЗАХОДІВ Warnings УВАГА! Під час роботи цей прилад, WARNING: The appliance and its а також його доступні частини accessible parts become hot during нагріваються до високих температур. use. Слід бути особливо обережними, щоб не торкатися нагрівальних елементів. Care should be taken to avoid Діти... - Page 3 Опис плити Description of the appliance Загальнии вигляд Overall view 1 Hob burner 1 Газовий пальник 2 Hob Grid 2 Піддон на випадок переливань 3.Control panel 3.Панель управління 4.Sliding grill rack 4.Полка РЕШІТKИ 5.DRIPPING pan 5.Полка ДEКО 6.Adjustable foot 6.Лапка для налаштування 7 Glass Cover 7 Скляна...
- Page 4 H5GG5F UA H5GG5E UA H5GG1E UA Опис плити Description of the appliance Панель управління Control panel 1.Сукоятка ТАЙМЕРА 1.TIMER knob 2.Ручка ДУХОВКА 2.OVEN CONTROL knob 3.КНОПКА РОЖНА та ОСВІТЛЕННЯ ДУХОВКИ 3.OVEN LIGHT / ROTISSERIE button 4.Ручки для керування газовими 4.Hob BURNER control knob...
-
Page 5: Installation
Installation ! Before operating your new appliance please read this instruction booklet carefully. It contains important information concerning the safe installation and operation of the appliance. ! Please keep these operating instructions for future reference. Make sure that the instructions are kept with the appliance if it is sold, given away or moved. -
Page 6: Gas Connection
Gas connection Levelling Connection to the gas network or to the gas cylinder If it is necessary to level may be carried out using a flexible rubber or steel hose, the appliance, screw the adjustable feet into the places in accordance with current national legislation and after provided on each corner of the base of the cooker (see fi g. -
Page 7: Adapting To Different Types Of Gas
! Perform the connection in such a way that the hose 4. Unscrew the nozzle using a length does not exceed a maximum of 2 metres, special nozzle socket spanner making sure that the hose is not compressed and does (see fi gure) or with a 7 mm not come into contact with moving parts. -
Page 8: Table Of Burner And Nozzle Specifications
(mm) Fast 3.00 (Large)(R) Semi Fast 1.90 (Medium)(S) Auxiliary 1.00 (Small)(A) Oven 2.80 H5GG5F UA Grill 2.30 H5GG5E UA Nominal (mbar) 28-30 Supply H5GG1E UA Minimum (mbar) Pressures Maximum (mbar) At 15°C 1013 mbar-dry gas Butane P.C.S. = 49,47 MJ/Kg Propane P.C.S. -
Page 9: Start-Up And Use
Start-up and use Using the hob Burner ř Cookware diameter (cm) Lighting the burners Fast (R) 24 - 26 For each BURNER knob there is a complete ring showing Semi Fast (S) 16 - 20 the strength of the flame for the relevant burner. Auxiliary (A) 10 - 14 To light one of the burners on the hob:... - Page 10 Lower compartment Adjusting the temperature There is a compartment underneath the oven that may To set the desired cooking temperature, turn the be used to store oven accessories or deep dishes. To OVEN control knob in an anticlockwise direction. open the door pull it downwards (see fi gure). Temperatures are displayed on the control panel and ! The internal surfaces of may vary between MIN (140°C) and MAX (250°C).
-
Page 11: Electronic Timer
Electronic timer minutes and 50 seconds. After this point, each press of the button represents an increase of one minute, up to This function displays the time and works as a timer a maximum of 10 hours. which counts down to zero. Pressing the button reduces the time. -
Page 12: Precautions And Tips
Precautions and tips • If the appliance breaks down, under no circumstances ! This appliance has been designed and manufactured in should you attempt to repair the appliance yourself. compliance with international safety standards. Repairs carried out by inexperienced persons may cause The following warnings are provided for safety reasons and injury or further malfunctioning of the appliance. -
Page 13: Care And Maintenance
Care and maintenance Switching the appliance off The cover Disconnect your appliance from the electricity supply If the cooker is fitted with before carrying out any work on it. a glass cover, this cover should be cleaned using Cleaning the appliance lukewarm water. - Page 14 WARNING! When reassembling the inner door Removing and fitting the oven door: glass insert the glass panel correctly so that the 1.Open the door text written on the panel is not reversed and 2.Make the hinge clamps of the oven door rotate can be easily legible.
- Page 15 Встановлення ! Важливо зберегти цю брошуру, щоб можна було до неі звернутися при необхідності у будь-якому випадку. У разі продажу, передачi iншiи особi або переізду, переконаитеся в тому, що вона залишається разом з виробом. ! Уважно прочитаите інструкціі: інформація про обладнання, використання...
- Page 16 Вирівнювання Підключення газу Якщо необхідно вирівняти плиту, вкрутіть регулюючі Підключення до газовоі мережі або балона може ніжки, що входять до виконуватися за допомогою гнучкого гумового шланга комплекту постачання, або шланга в сталевому обплетенні, згідно діючим у спеціальні місця, що національним нормам і після того, як встановлено, знаходяться...
- Page 17 3. видаліть пальник духовки Щоб підключити шланг, видаліть утримувач гумки, що після того, як відкрутите гвинти міститься в плиті (місце підключення газу до плити має V (див. малюнок); вигляд цилiндричноі трубки з різьбою папа 1/2 дюима) процедуру виконати легше, ! Виконаите з’єднання так, щоб довжина якщо...
- Page 18 від 15/12/04 (Електромагнітна полу. сумісність) та подальші зміни - 2009/142/EC від 30/11/09 (Gas) та подальші зміни - 93/68/EEC від 22/07/93 та H5GG5F UA подальші зміни - 2002/96/EC. H5GG5E UA 1275/2008 (Stand-by/ Off mode) H5GG1E UA Таблиця характеристик пальників і форсунок...
- Page 19 Включення і використання Користування робочою поверхнею Практичні поради з використання пальників Для кращоі продуктивності пальників і мінімального Включення пальників споживання газу необхідно використовувати посуд з У кожноі рукоятки ПАЛЬНИК, що відноситься до неі, плоским дном, накритии кришкою, і якии відповідає показании...
- Page 20 Нижніи відсік Під духовкою є відсік, якии може використовуватися Регулювання температури для зберігання речеи Щоб одержати бажану температуру приготування іжі, або посуду. Щоб обертаите рукоятку ДУХОВКА проти годинниковоі відкрити дверцята, стрілки. Значення температури показані на панелі поверніть іх донизу управління і починаються з МІН (140оC) до MAКС (див.
- Page 21 Електронний таймер натисненні на кнопку час збільшується на 10 секунд до 99 Увага хвилин і 50 секунд. Якщо ще притримати кнопку, збільшення Не дозволяйте дітям торкатися дверцят духовки, тому що часу відбуватиметься з кроком в одну хвилину до максимального вони...
- Page 22 Запобіжни засоби и поради • У разі пошкодження, в жодному випадку не намагаитеся ! Газова плита була розроблена і сконструиована самостіино полагодити внутрішні механізми. Зв’яжіться відповідно до міжнародних норм безпеки. із Сервiсною службою. Дані вказівки обумовлені вимогами безпеки і повинні бути уважно...
-
Page 23: Догляд I Технічне Обслуговування
Догляд i технічне обслуговування Відключіть електричне живлення Кришка До початку всіх робіт ізолюите прилад від мережі У моделях зі скляною електричного живлення. кришкою очищення здіиснюється за Чищення вироба допомогою теплоі води. Уникаите абразиві. ! Уникаите використання абразивних або роз’ідаючих Можна зняти кришку для чистячих... - Page 24 Indesit Company S.P.A. Viale Aristide Merloni,47 04/2014 -195122646.00 60044 Fabriano (AN) XEROX FABRIANO www.hotpoint.eu Знімання та встановлення дверцят духовки Поставте скло назад. Відкрийте дверцята ПОПЕРЕДЖЕННЯ! Духовкою не можна користуватися, коли скло дверцят зняте! Поверніть затискачі на петлях дверцят повністю назад (див. фото) ПОПЕРЕДЖЕННЯ! При...
Need help?
Do you have a question about the H5GG5F UA and is the answer not in the manual?
Questions and answers