Konica Minolta magicolor 8650 User Manual
Hide thumbs
Also See for magicolor 8650:
- Service manual (776 pages) ,
- User manual (561 pages) ,
- Installation manual (14 pages)
Table of Contents
Advertisement
Quick Links
Advertisement
Table of Contents
Troubleshooting

Subscribe to Our Youtube Channel
Related Manuals for Konica Minolta magicolor 8650


Summary of Contents for Konica Minolta magicolor 8650
- Page 1 User’s Guide...
-
Page 2: Energy Star
Introduction Thank you for choosing this machine. This manual contains details on the operation of the various functions of the machine, precautions on its use, and basic troubleshooting procedures. In order to ensure that this machine is used correctly and efficiently, carefully read this manual as needed. -
Page 3: Table Of Contents
Contents Introduction Energy Star®................................x-1 What is an ENERGY STAR® Product? ....................x-1 Contents ..................................x-2 Trademarks and copyrights ..........................x-14 OpenSSL statement ..........................x-15 NetSNMP License ..........................x-16 Kerberos ..............................x-18 Copyright ...............................x-18 For EU member states only ........................x-19 For EU member states only ........................x-19 SOFTWARE LICENSE AGREEMENT ........................x-20 About Adobe Color Profile...........................x-21 ICC Profile for TOYO INK Standard Color on Coated paper (TOYO Offset Coated 2.0) ........x-23 DIC STANDARD COLOR PROFILE LICENSE AGREEMENT ................x-24... - Page 4 1.5.2 Printing flow ............................1-30 Operating environment ........................1-31 1.6.1 Compatible computers and operating systems ..................1-31 Windows ..............................1-31 Macintosh ...............................1-31 1.6.2 Compatible interfaces..........................1-32 Ethernet interface ...........................1-32 USB interface............................1-32 Connection diagram ..........................1-32 1.6.3 Printer drivers applicable to operating systems ..................1-33 Setting up the system.......................... 1-34 1.7.1 Network connection ..........................1-34 1.7.2...
- Page 5 IPP Authentication Setting........................2-14 2.4.4 Specifying IPPS print settings ........................2-14 TCP/IP Settings ............................2-15 IPP Setting..............................2-15 SSL/TLS Setting .............................2-15 IPP Authentication Setting........................2-15 2.4.5 Specifying Bonjour print settings ......................2-15 Bonjour Setting............................2-15 2.4.6 Specifying AppleTalk print settings ......................2-16 AppleTalk Setting ...........................2-16 2.4.7 Specifying Web Service Function settings .....................2-17 TCP/IP Settings ............................2-17 Web Service Common Settings ......................2-18 Printer Settings ............................2-19...
- Page 6 Installation using the wizard (Windows 2000) ................... 3-28 3.5.1 Network connection (LPR/Port9100) ......................3-28 TCP/IP setting for this machine......................3-28 RAW port number setting for this machine ....................3-28 LPD setting for this machine ........................3-28 Printer driver installation using the Add Printer Wizard ................3-28 3.5.2 Network connection (SMB)........................3-30 TCP/IP setting for this machine......................3-30...
- Page 7 Parameter details for the PCL/PS drivers ................... 5-7 5.4.1 Basic tab..............................5-7 5.4.2 Layout tab..............................5-9 5.4.3 Finish tab ..............................5-10 5.4.4 Cover Mode tab............................5-11 5.4.5 Stamp/Composition tab .........................5-12 Editing watermark...........................5-14 Editing copy protect ..........................5-15 Editing date/time and page number .......................5-16 5.4.6 Quality tab ..............................5-17 5.4.7 Other tab..............................5-18 Print functions of the printer driver for Macintosh...
- Page 8 7.2.2 Recalling a job from the control panel......................7-8 When "SecurePrintAccess" is set to "Mode 1" ..................7-8 When "SecurePrintAccess" is set to "Mode 2" ..................7-9 Save in User Box..........................7-10 7.3.1 Setting up the printer driver........................7-10 For Windows............................7-10 For Macintosh OS X ..........................7-11 7.3.2 Recalling a job from the control panel....................7-13 Save in Annotation User Box ......................
- Page 9 Admin. Settings Menu ..........................8-13 Banner Printing Menu ..........................8-15 Parameters ............................8-16 8.3.1 Job Operation Menu..........................8-16 User name input items..........................8-16 Account name input items........................8-16 Document selection items ........................8-16 Printing items............................8-17 8.3.2 Paper Settings Menu ..........................8-17 8.3.3 User Settings Menu ..........................8-17 Print Reports............................8-17 Consumables............................8-18 System Settings............................8-18 Printer Settings ............................8-19...
- Page 10 Box settings ............................9-20 9.5.1 Changing user box settings or deleting a user box................9-20 Open User Box ............................9-20 9.5.2 Creating a new user box.........................9-21 Create User Box .............................9-21 9.5.3 Changing system box settings or deleting system boxes..............9-22 Open System User Box ..........................9-22 9.5.4 Creating a new system user box ......................9-23 Create System User Box ........................9-23...
- Page 11 9.14.3 TCP/IP Settings ............................9-56 9.14.4 SSL/TLS Setting .............................9-56 9.14.5 Web Service Common Settings ......................9-56 9.14.6 Action for Invalid Certificate ........................9-56 9.15 Performing IP address filtering ......................9-57 9.15.1 TCP/IP Settings ............................9-57 9.15.2 IP Filtering...............................9-57 9.16 Communicating using IPv6 ......................... 9-58 TCP/IP Setting ............................9-58 9.17 Communicating using IPsec.......................
- Page 12 9.23.2 Specifying the Administrator password....................9-89 Administrator Password Setting ......................9-89 9.24 Print Setting tab settings ........................9-90 9.24.1 Specifying initial settings for the print function ..................9-90 Basic Setting............................9-90 9.24.2 Specifying settings for PCL/PS/XPS print ....................9-91 PCL Settings............................9-91 PS Setting...............................9-92 XPS Settings............................9-93 9.24.3 Specifying the interface timeout ......................9-93 Interface Setting .............................9-93...
- Page 13 11.5.2 To empty the punch scrap box in the finisher FS-609 .................11-24 12 Care of the machine 12.1 Cleaning..............................12-2 12.1.1 Housing..............................12-2 12.1.2 Control panel ............................12-2 12.1.3 Electrostatic charger wire ........................12-3 12.1.4 Print head ...............................12-3 12.2 When the message "Time for periodic device check." appears ............. 12-5 13 Specifications 13.1 Specifications............................
- Page 14 15.1.3 Regulation notices ..........................15-2 USER INSTRUCTIONS FCC PART 15 - RADIO FREQUENCY DEVICES (For U.S.A. Users)....15-2 WARNING ...............................15-2 INTERFERENCE-CAUSING EQUIPMENT STANDARD (ICES- 003 ISSUE 4) (For Canada Users) ..15-3 15.2 Product features ..........................15-4 15.3 Part names and their functions ......................15-5 15.4 Using authentication unit (IC card type) AU-201 ................
-
Page 15: Trademarks And Copyrights
Trademarks and copyrights KONICA MINOLTA, the KONICA MINOLTA logo, and The essentials of imaging are registered trademarks of KONICA MINOLTA HOLDINGS, INC. PageScope and magicolor are registered trademarks or trademarks of KONICA MINOLTA BUSINESS TECHNOLOGIES, INC. Netscape is a registered trademark of Netscape Communications Corporation in the United States and other countries. -
Page 16: Openssl Statement
OpenSSL statement OpenSSL license Copyright © 1998-2005 The OpenSSL Project. All rights reserved. Redistribution and use in source and binary forms, with or without modification, are permitted provided that the following conditions are met: Redistributions of source code must retain the above copyright notice, this list of conditions and the following disclaimer. -
Page 17: Netsnmp License
THIS SOFTWARE IS PROVIDED BY ERIC YOUNG "AS IS" AND ANY EXPRESS OR IMPLIED WARRANTIES, INCLUDING, BUT NOT LIMITED TO, THE IMPLIED WARRANTIES OF MERCHANTABILITY AND FITNESS FOR A PARTICULAR PURPOSE ARE DISCLAIMED. IN NO EVENT SHALL THE AUTHOR OR CONTRIBUTORS BE LIABLE FOR ANY DIRECT, INDIRECT, INCIDENTAL, SPECIAL, EXEMPLARY, OR CONSEQUENTIAL DAMAGES (INCLUDING, BUT NOT LIMITED TO, PROCUREMENT OF SUBSTITUTE GOODS OR SERVICES;... - Page 18 Redistributions in binary form must reproduce the above copyright notice, this list of conditions and the following disclaimer in the documentation and/or other materials provided with the distribution. The name of Cambridge Broadband Ltd. may not be used to endorse or promote products derived from this software without specific prior written permission.
-
Page 19: Kerberos
Note User’s Guide may not be reproduced in part or in full without permission. KONICA MINOLTA BUSINESS TECHNOLOGIES, INC. will not be held liable for any incidents caused by using this printing system or User’s Guide. Information included in User’s Guide is subject to change without notice. -
Page 20: For Eu Member States Only
For EU member states only This symbol means: Do not dispose of this product together with your household waste! Please refer to the information of your local community or contact our dealers regrading the proper handling of end-of-life electric and electronic equipments. Recycling of this product will help to conserve natural resources and prevent potential negative consequences for the environment and human health caused by inappropriate waste handling. -
Page 21: Software License Agreement
SOFTWARE LICENSE AGREEMENT This package contains the following materials provided by KONICA MINOLTA BUSINESS TECHNOLOGIES, INC. (KMBT): software included as part of the printing system, the digitally-encoded machine-readable outline data encoded in the special format and in the encrypted form ("Font Programs"), other software which runs on a computer system for use in conjunction with the Printing Software ("Host Software"), and related... -
Page 22: About Adobe Color Profile
About Adobe Color Profile ADOBE SYSTEMS INCORPORATED COLOR PROFILE LICENSE AGREEMENT NOTICE TO USER: PLEASE READ THIS CONTRACT CAREFULLY. BY USING ALL OR ANY PORTION OF THE SOFTWARE YOU ACCEPT ALL THE TERMS AND CONDITIONS OF THIS SOFTWARE YOU ACCEPT ALL THE TERMS AND CONDITIONS OF THIS AGREEMENT. - Page 23 TERM This Agreement is effective until terminated. Adobe has the right to terminate this Agreement immediately if you fail to comply with any term hereof. Upon any such termination, you must return to Adobe all full and partial copies of the Software in your possession or control. GOVERNMENT REGULATIONS If any part of the Software is identified as an export controlled item under the United States Export Administration Act or any other export law, restriction or regulation (the "Export Laws"), you represent and warrant that you are not a citizen, or otherwise located within, an...
-
Page 24: Icc Profile For Toyo Ink Standard Color On Coated Paper (Toyo Offset Coated 2.0
ICC Profile for TOYO INK Standard Color on Coated paper (TOYO Offset Coated 2.0) This ICC Profile (TOYO Offset Coated 2.0) characterizes Japanese offset press on Coated paper and is fully compatible with ICC profile format. About "TOYO INK Standard Color on Coated paper" This is the standard for color reproduction of sheet-fed offset press on Coated paper made by TOYO INK MFG.CO., LTD. -
Page 25: Dic Standard Color Profile License Agreement
DIC STANDARD COLOR PROFILE LICENSE AGREEMENT IMPORTANT: PLEASE READ THIS STANDARD COLOR PROFILE LICENSE AGREEMENT ("LICENSE AGREEMENT") CAREFULLY BEFORE USING THE DIC STANDARD COLOR PROFILE, INCLUDING THE DIC STANDARD COLOR SFC1.0.1, DIC STANDARD COLOR SFC1.0.2, DIC STANDARD COLOR SFM1.0.2, DIC STANDARD COLOR SFU1.0.2, PROVIDED BY DIC HEREWITH, AND ANY CORRESPONDIMG ONLINE OR ELECTRONC DOCUMENTATION AND ALL UPDATES OR UPGRADES OF THE ABOVE THAT ARE PROVIDED TO YOU (COLLECTIVELY, THE "PROFILE"). - Page 26 LIMITATION OF LIABILITY DIC SHALL NOT BE LIABLE TO YOU OR ANY THIRD PARTY FOR ANY DIRECT, INDIRECT, SPECIAL, INCIDENTAL, PUNITIVE, COVER OR CONSEQUENTIAL DAMAGES (INCLUDING, BUT NOT LIMITED TO, DAMAGES FOR THE INABILITY TO USE EQUIPMENT OR ACCESS DATA, LOSS OF BUSINESS, LOSS OF PROFITS, BUSINESS INTERRUPTION OR THE LIKE), ARISING OUT OF THE USE OF, OR INABILITY TO USE, THE PROFILE AND BASED ON ANY THEORY OF LIABILITY INCLUDING BREACH OF CONTRACT, BREACH OF WARRANTY, TORT (INCLUDING NEGLIGENCE), PRODUCT LIABILITY...
-
Page 27: Explanation Of Manual Conventions
Explanation of manual conventions 8650 x-26... - Page 28 8650 x-27...
-
Page 29: Descriptions Of Paper
Descriptions of paper The descriptions used in this manual for paper is explained below. Whenever paper dimension is mentioned in this manual, the value shown as Y in the illustration refers to the width, and the value shown as X refers to the length. Lengthwise (w) If the width (Y) of the paper is shorter than the length (X), the paper has a vertical or portrait orientation, indicated by w. -
Page 30: User's Guides
User’s Guides This machine is provided with printed manuals and PDF manuals on the Documentation CD. Printed manual Installation Guide This manual contains procedure for installing the driver required in order to use the machine and procedure for connecting the machine and computer. Be sure to read this manual before using the machine. - Page 31 8650 x-30...
-
Page 32: Before Using The Machine
Before using the machine... -
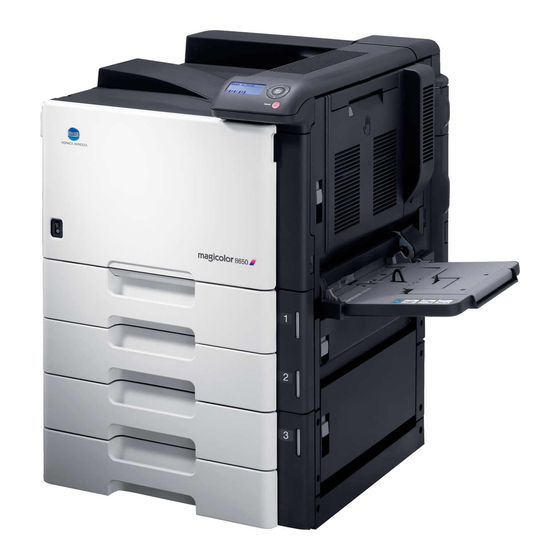
Page 33: Part Names And Their Functions
Before using the machine Before using the machine Part names and their functions 1.1.1 Options Part name Description Main unit The data sent from the computer is printed. Referred to as the "machine", the "main unit", or the "8650" throughout the manual. - Page 34 Before using the machine Part name Description Authentication unit (IC card Performs user authentication by reading the information registered on IC type) AU-201 cards. To use the authentication unit (IC card type), an optional hard disk drive HD- 508 and local interface kit EK-603 must be installed. Mount kit MK-711 Used for installing, local interface kit EK-603.
-
Page 35: Outside Of Machine
Before using the machine 1.1.2 Outside of machine *The illustration above shows the main unit with the optional tray4 (LCT) installed. Part name Description Automatic duplex unit Turns over the paper for double-sided printing. Tray 1 (bypass tray) Used when printing onto paper with a size not loaded into a paper tray or onto thick paper, OHP transparencies, postcards, envelopes, label sheets or ban- ner paper. - Page 36 Before using the machine *The illustration above shows the main unit with the optional double paper feed cabinet installed. Part name Description Automatic duplex unit re- Used to open the automatic duplex unit door when clearing paper misfeeds. lease lever Automatic duplex unit door Opened when clearing paper misfeeds in the automatic duplex unit.
- Page 37 Before using the machine *The illustration above shows the main unit with the optional tray 4 (LCT) and mount kit (local intarface kit) installed. *The illustration above shows the main unit with the optional double paper feed cabinet installed. Part name Description USB port (type A) Used for connecting the USB cable for the authentication unit (biometric type)
-
Page 38: Inside Of Machine
Before using the machine 1.1.3 Inside of machine Part name Description Fusing unit upper cover Opened when cleaning paper misfeeds in the fusing unit. Fusing cover lever M2 Opened when cleaning paper misfeeds in the fusing unit. Upper right-side door Opened when clearing paper misfeeds from inside the main unit. -
Page 39: Finisher Fs-519/Output Tray Ot-602/Punch Kit Pk-515
Before using the machine 1.1.4 Finisher FS-519/Output tray OT-602/Punch kit PK-515 Finisher FS-519 Part name Description Output tray 1 Collects printed pages. Output tray 2 Collects printed pages. Misfeed-clearing dial FN6 Turned when clearing paper misfeeds within the finisher. Misfeed-clearing dial FN5 Turned when clearing paper misfeeds within the finisher. - Page 40 Before using the machine Part name Description Misfeed-clearing dial FN2 Turned when clearing paper misfeeds within the finisher. Guide lever FN1 Raised when clearing paper misfeeds within the finisher. Punch scrap box FN3.1 Removed when emptying punch scraps that have accumulated from using the Punch settings.
-
Page 41: Saddle Stitcher Sd-505/Mailbin Kit Mt-502
Before using the machine 1.1.5 Saddle stitcher SD-505/Mailbin kit MT-502 Saddle stitcher SD-505 Part name Description Output tray Collects printed pages. Misfeed-clearing door Opened when clearing paper misfeeds within the saddle stitcher. Misfeed-clearing door re- Used to open the Misfeed-clearing door. lease lever 8650 1-10... - Page 42 Before using the machine Mailbin kit MT-502 Part name Description Bin 4 Collects printed pages. Bin 3 Collects printed pages. Bin 2 Collects printed pages. Bin 1 Collects printed pages. Guide lever FN7 Moved when clearing paper misfeeds within the mailbin kit. Misfeed-clearing door Opened when clearing paper misfeeds within the mailbin kit.
-
Page 43: Finisher Fs-609/Punch Kit Pk-501
Before using the machine 1.1.6 Finisher FS-609/Punch kit PK-501 Finisher FS-609 Part name Description Output tray 1 Collects printed pages Upper cover Opened when clearing paper misfeeds Horizontal transport unit Opened when clearing paper misfeeds from the horizontal transport unit cover Punch scrap box Removed when emptying hole-punch waste that has accumulated from using... - Page 44 Before using the machine Punch kit PK-501 Part name Description Punch kit* Punches holes for filing printed pages when punch kit is installed onto finisher FS-609. Parts marked with an asterisk are internal options and therefore are not shown in the illustration. Precautions for using the finisher: Do not place objects on top of the finisher and below the paper output trays, otherwise the machine may be damaged.
-
Page 45: Control Panel
Before using the machine 1.1.7 Control panel Menu Select Cancel Part name Description [Menu/Select] key While the machine is waiting to receive data, press this key to display the set- tings menu. If this key is pressed while a setting is displayed, that setting is selected. [Cancel] key Press this key to quit changing the settings in the menu. -
Page 46: Power Supply
Before using the machine Power supply 1.2.1 Turning on the machine Set the power switch to "n". Check that the display panel is turned on. Detail When the machine is turned on, the printer starts up and the message "Now warming up" appears. After the message "Ready to Print"... -
Page 47: Automatically Clearing Settings (System Auto Reset)
Before using the machine Do not turn off the machine with the power switch while it is making printing, otherwise a paper misfeed may occur. Do not turn off the machine with the power switch while a queued job or stored data is waiting to be printed, otherwise the jobs will be deleted. -
Page 48: Manually Switching To Power Save Mode
Before using the machine Detail The length of time until the machine enters Sleep mode can be changed. For details, refer to "System Settings" on page 8-18. 1.2.6 Manually switching to Power Save mode Power Save mode can be manually specified from the control panel. If "Immediately"... -
Page 49: Paper
Before using the machine Paper Use paper that meets the following specifications. 1.3.1 Possible paper sizes Non-standard-sized paper: Paper source Paper width Paper length Tray 1 (bypass tray)* 3-1/2 to 12-1/4 (90.0 mm to 311.1 mm) 5-1/2 to 47-1/4 (139.7 mm to 1200.0 mm) Tray 2 –... -
Page 50: Paper Types And Paper Capacities
Before using the machine Can be used when the optional punch kit is installed on the finisher. 12-1/4 × 18 is equivalent to 311.1 mm × 457.2 mm, which is one size larger than A3. 1.3.2 Paper types and paper capacities Paper type Plain paper Thick paper... -
Page 51: Precautions For Paper
Before using the machine Paper type Descriptions Thick 1 Select this setting when the thick paper that is loaded has a weight of 24-1/4 lb to 40 lb (91 g/m to 150 g/m A paper tray with this setting is not automatically selected when the "Auto" Paper set- ting is specified. -
Page 52: Paper Storage
Before using the machine 1.3.5 Paper storage Store paper in a cool, dark location with little humidity. If the paper becomes damp, paper misfeeds may occur. Paper that has not been loaded should be kept wrapped or placed in a plastic bag and stored in a cool, dark location with little humidity. -
Page 53: Loading Paper
Before using the machine Loading paper 1.4.1 Loading paper into the tray 1 (bypass tray) Paper can be fed manually through the tray 1 if you wish to print onto paper that is not loaded into a paper tray, or if you wish to print onto thick paper 4, postcards, envelopes, OHP transparencies or label sheets. Detail For thick paper 4, only A3 w, A4 v, 11 ×17 w and Letter v are available for printing. - Page 54 Before using the machine Reminder Push the paper guides firmly up against the edges of the paper. When loading postcards, load them in the w orientation, as shown in the illustration. Do not load postcards in the v orientation. If postcards are loaded, select "Thick 3". If label sheets are loaded, select "Thick 1".
- Page 55 Before using the machine A maximum of 10 envelopes can be loaded into the tray 1. Flap side When loading label sheets, load them in the w orientation, as shown in the illustration. Do not load label sheets in the v orientation. A maximum of 20 label sheets can be loaded into the tray 1.
-
Page 56: Loading Paper Into Tray 2/3/4/5
Before using the machine Note The image will be printed on the surface of the paper facing down when the paper is loaded into the tray 1. Detail For details on the paper sizes, refer to "Paper" on page 1-18. 1.4.2 Loading paper into tray 2/3/4/5 The paper loading method is the same for trays 2, 3, 4 and 5. -
Page 57: Loading Paper Into The Tray 4 (Lct)
Before using the machine – Load letterhead paper so that the side to be printed on faces down. How is curled paper loaded? % Flatten the paper before loading it. How many sheets of paper and other media can be loaded? % Do not load so many sheets of plain paper that the top of the stack is higher than the , mark. - Page 58 Before using the machine Pull out the tray 4 (LCT). Film Load the paper into the right side of the tray 4 (LCT) so that the side of the paper to be printed on (the side facing up when the package was unwrapped) faces up. , mark Film –...
- Page 59 Before using the machine Close the tray 4 (LCT). – If special paper is loaded, the paper type setting must be specified. For details, refer to "Paper Settings Menu" on page 8-17. Reminder Be careful not to touch the film. Do not load so many sheets of paper that the top of the stack is higher than the , mark.
-
Page 60: Printer Controller
Before using the machine Printer controller The printer controller is a device for performing printing functions and network printing functions with this machine. 1.5.1 Role of the printer controller The printer controller processes printing data in this machine, which plays an important role in the printing system. -
Page 61: Printing Flow
Before using the machine 1.5.2 Printing flow The following outlines the flow of operations for using this printing system. The printer driver receives print commands from applications. Data is transmitted to this machine over a USB interface when this machine is used via a USB connection, or over an Ethernet interface (TCP/IP, IPX/SPX, or AppleTalk) when this machine is used via an Ethernet connection. -
Page 62: Operating Environment
Before using the machine Operating environment The following descriptions the system requirements for using this printing system and the interfaces used for connection. 1.6.1 Compatible computers and operating systems Check that the computer being connected meets the following conditions. Windows Item Operating environment Operating System... -
Page 63: Compatible Interfaces
Before using the machine 1.6.2 Compatible interfaces The following interfaces can be used to connect this printing system to a computer. Ethernet interface Select to use this printing system via a network connection. Supports 10Base-T, 100Base-TX, and 1000Base-T standards. In addition, the Ethernet interface supports the TCP/IP (LPD/LPR, IPP, SMB), Web Service, IPX/SPX (NetWare), and AppleTalk (EtherTalk) protocols. -
Page 64: Printer Drivers Applicable To Operating Systems
The following lists the printer drivers included on the CD and the supported computer operating systems. Select the required printer driver. Printer driver Page description Supported operating systems language Konica Minolta PCL6 Windows NT Workstation/Server Version4.0 (Service Pack 6 or later) PCL Driver Windows 2000 Professional/Server (Service Pack 3 or later), Windows XP (PCL driver) -
Page 65: Setting Up The System
Before using the machine Setting up the system In order to use this printing system, it must first be set up. The setup procedure refers to a series of steps for connecting this machine to a computer and installing the printer driver on the computer. - Page 66 Before using the machine Note To update an existing printer driver, delete the existing printer driver first. For details, refer to "Uninstalling the printer driver" on page 3-36. If necessary, specify the interface timeout settings in the Utility mode on the control panel. For details, refer to "Printer Settings"...
-
Page 67: Contents Of Cd-Rom
Before using the machine Contents of CD-ROM The following CDs are available for printer controllers. magicolor 8650 Driver CD Application CD (PageScope Utilities) Documentation CD Each CD contains printer drivers (for Windows and Macintosh), utilities, document data such as User’s Guide manuals and release notes, and screen fonts. -
Page 68: Authentication Method
Before using the machine Authentication Method Specify user authentication and account track settings in order to control the use of this machine. User authentication settings are specified to manage individuals, and account track settings are specified to manage groups and multiple users. By specifying both user authentication and account track settings, the number of prints made by each account can be managed for each individual user. -
Page 69: When User Authentication And Account Track Are Used Separately
Before using the machine Parameter on Authentication Method screen Settings User Authentication Select "ON (External Server)" or "ON (MFP)". Account Track Select "ON", and then specify the account name and password. Synchronize User Authentication & Account Track Select "Synchronize". Account Name (on User Registration screen) Select an account name if "ON (MFP)"... -
Page 70: User Box Functions
Before using the machine 1.10 User Box functions The User Box functions allow print data to be saved on the internal hard disk of the machine and printed later. To save data to a box, create the box according to the purpose, and then save the data to the specified box. Note The User Box function is available only if a hard disk is installed on this machine. -
Page 71: Using Document Data
Before using the machine Using document data Documents saved in user boxes can be loaded by the "Job Operation" function of this machine. The document saved in boxes can be used as follows: User box Description Reference Public/personal/group user Saved documents can be printed. Multiple documents can be select- p. -
Page 72: Machine Authentication
Before using the machine Machine authentication Enter the user name and password to log in. Account track Enter the account name and password to log in. Detail With user authentication, the only boxes that are displayed are those accessible by the user that is logged on. -
Page 73: Limitation On User Box Registration
Before using the machine 1.10.4 Limitation on user box registration Public/personal/group user boxes There are "public" user boxes, which can be used by more than one person, "personal" user boxes, which can be used only by a single person, and group user boxes, which can be used only by authorized users in the account track settings. -
Page 74: When Only Account Track Settings Are Specified
Before using the machine If user authentication settings are canceled or if authentication method is changed, all personal user boxes become public user boxes. When only account track settings are specified Account A Public user box Group user box for account A Account B Group user box for account B... -
Page 75: When User Authentication And Account Track Settings Are Specified But Not Synchronized
Before using the machine Public user box Account A Personal user box for user 1 User 1 Group user box for account A Account B Personal user box for user 2 User 2 Group user box for account B Accessible Users can access all public user boxes, only group user boxes for the account that the user belongs to, and only personal user boxes that the user has created. - Page 76 Before using the machine Public user box Personal user box for user 1 User 1 Group user box for account A Group user box for account B Accessible Accessible by entering the account name and password Users can access all public user boxes and only personal user boxes that the user has created. Personal user boxes cannot be accessed by other users.
- Page 77 Before using the machine 8650 1-46...
-
Page 78: Network Settings
Network settings... -
Page 79: Specifying General Settings For Tcp/Ip-Based Communication
Network settings Network settings Specifying general settings for TCP/IP-based communication Specify settings to use this machine in a TCP/IP network environment. To use this machine by connecting to the network, specify these settings in advance. Reminder In order to apply all changes to the network settings, turn off this machine, then on again. When turning off the power switch and turning it on again, wait for 10 seconds or longer after power- off, and then turn on the power again. - Page 80 Network settings Item Definition Prior confirmation Default DNS Domain If not acquiring the DNS domain name automatically, specify Default Domain Name Name the domain name to which this machine belongs (up to 255 characters including the host name). DNS Search Domain Specify the DNS search domain name (up to 253 charac- Name 1 to 3 ters).
-
Page 81: Tcp/Ip Settings
Network settings Using PageScope Web Connection Specify settings for using PageScope Web Connection. This manual describes how to specify settings required for each operation using PageScope Web Connection. PageScope Web Connection is a device management utility supported by the HTTP server integrated into the printer controller. -
Page 82: Tcp Socket Setting
Network settings 2.2.3 TCP Socket Setting In Administrator mode of PageScope Web Connection, select the Network tab - "TCP Socket Setting". Specify the following settings. Note For details on logging in to Administrator mode of PageScope Web Connection, refer to "Logging in to Administrator mode of PageScope Web Connection"... -
Page 83: Logging In To Administrator Mode Of Pagescope Web Connection
Network settings Logging in to Administrator mode of PageScope Web Connection To specify settings for this machine with PageScope Web Connection, Administrator mode must be logged in. The following shows how to log in to Administrator mode. Detail When logged in to Administrator mode, the control panel of the machine is locked and cannot be used. Depending on the status of the machine, you may not be able to log in to Administrator mode. -
Page 84: Specifying Network Print Settings
Network settings Specifying network print settings 2.4.1 Specifying LPR/Port9100 print settings Specify settings for printing by using LPR or Port9100. LPR printing is performed via the network using the LPR protocol. LPR printing is used in the UNIX-like OS. Port9100 printing is performed via the network by directly specifying the RAW port (Port9100) of this machine connected to the TCP/IP network as a printer of the print destination. -
Page 85: Specifying Smb Print Settings
Network settings 2.4.2 Specifying SMB print settings Specify settings for printing by using SMB. The printer is sharable on the Windows network by using the SMB protocol. SMB printing is performed by directly specifying this machine on the Windows network from the computer. To specify a computer on another network using Windows name (NetBIOS name), a WINS server must be used. -
Page 86: Print Setting
Network settings Print Setting In Administrator mode of PageScope Web Connection, select the Network tab - "SMB Setting" - "Print Setting". Specify the following settings. Item Definition Prior confirmation SMB Print Select "ON". NetBIOS Name Specify the NetBIOS name with uppercase letters (up to 15 characters). -
Page 87: Direct Hosting Setting
Network settings Direct Hosting Setting In Administrator mode of PageScope Web Connection, select the Network tab - "SMB Setting" - "Direct Hosting Setting". Specify the following setting. Item Definition Prior confirmation Direct Hosting Setting To use the direct hosting service, select "ON". Whether the IPv6 envi- To communicate with the destination using an IPv6 address, ronment is available... -
Page 88: Wins Setting
Network settings WINS Setting In Administrator mode of PageScope Web Connection, select the Network tab - "SMB Setting" - "WINS Setting". Specify the following settings. Item Definition Prior confirmation WINS To use the WINS server, select "ON". Auto Obtain Setting To automatically obtain the WINS server address, select Whether automatic ac- "Enable". -
Page 89: Specifying Ipp Print Settings
Network settings 2.4.3 Specifying IPP print settings Specify settings for printing using IPP. IPP printing is performed via the network using the IPP protocol. Using the HTTP protocol can transfer print data to the printer on the network, and therefore also enabling output to a remote printer via the Internet. Specify the settings according to the following flowchart. -
Page 90: Ipp Setting
Network settings IPP Setting In Administrator mode of PageScope Web Connection, select the Network tab - "IPP Setting". Specify the following settings. Item Definition Prior confirmation IPP Setting Select "ON". Accept IPP job Select "ON". Printer Name Specify the printer name (up to 127 characters). Printer Location Specify the printer location (up to 127 characters). -
Page 91: Ipp Authentication Setting
Network settings IPP Authentication Setting In Administrator mode of PageScope Web Connection, select the Network tab - "IPP Setting". Specify the following settings. Item Definition Prior confirmation IPP Authentication Set- To perform IPP printing, select the "IPP Authentication Set- ting ting"... -
Page 92: Tcp/Ip Settings
Network settings TCP/IP Settings Specify settings to use this machine in a TCP/IP network environment. For details, refer to "Specifying general settings for TCP/IP-based communication" on page 2-2. IPP Setting Specify settings for printing by using IPP. For details, refer to "IPP Setting" on page 2-13. SSL/TLS Setting Encrypt communication with this machine using SSL. -
Page 93: Specifying Appletalk Print Settings
Network settings Item Definition Prior confirmation Bonjour Select "ON". Bonjour Name Specify the Bonjour name that appears as the name of the connected device (up to 63 characters). 2.4.6 Specifying AppleTalk print settings Specify settings for printing by connecting this machine to a Macintosh computer using AppleTalk. When connecting this machine to a Macintosh computer using AppleTalk, the AppleTalk settings must be specified. -
Page 94: Specifying Web Service Function Settings
Network settings 2.4.7 Specifying Web Service Function settings Specify settings for printing by using Web Service Function. Printing is possible using the Web Service function newly installed in Windows Vista. The Web Service Function detects this machine connected to the network, and then installs it as a WS-Printer. Specifying this machine installed as a WS-Printer when printing from Windows Vista allows printing using HTTP for communication. -
Page 95: Web Service Common Settings
Network settings Web Service Common Settings In Administrator mode of PageScope Web Connection, select the Network tab - "Web Service Settings" - "Web Service Common Settings". Specify the following setting. Item Definition Prior confirmation Friendly Name Specify setting for Friendly Name (up to 62 characters). 8650 2-18... -
Page 96: Printer Settings
Network settings Printer Settings In Administrator mode of PageScope Web Connection, select the Network tab - "Web Service Settings" - "Printer Settings". Specify the following settings. Item Definition Prior confirmation Print Function Select "ON". Printer Name* Specify the printer name (up to 63 characters). Printer Location* Specify the printer location (up to 63 characters). - Page 97 Network settings 8650 2-20...
-
Page 98: Installing The Printer Driver For Windows
Installing the printer driver for Windows... -
Page 99: Connection Methods Selectable In Each Operating System
Installing the printer driver for Windows Installing the printer driver for Windows Connection methods selectable in each operating system The connection method for this machine differs depending on the operating system of the computer. The printer driver installation method also differs depending on the connection method. This machine can be connected via a network or a USB interface. -
Page 100: Windows Vista
Installing the printer driver for Windows Note Before using this machine in a network environment, the network settings must be specified for this machine. For details, refer to the "Network settings" on page 2-2. To install the printer driver under Windows 2000, XP, or Server 2003, log on using a user name that is authorized by the administrator. -
Page 101: Windows Nt 4.0
Installing the printer driver for Windows 3.1.3 Windows NT 4.0 Setup method Connection method Refer to Connection A network connection using the LPR print "Installation using the wizard (Win- method that can service. dows NT 4.0)" on page 3-34 be set up with the Add Printer wizard Note... -
Page 102: Automatic Installation Using The Installer
Installing the printer driver for Windows Automatic installation using the installer This installer automatically detects whether this machine is connected via USB or on the same TCP/IP network as the computer, then installs the required printer driver. You can also manually specify the connection destination during installation. - Page 103 Installing the printer driver for Windows Click the "Printer Install" button. The installer of the printer driver starts. If you agree with all terms and conditions of the license agreement, click the [AGREE] button. – If not, the software cannot be installed. –...
- Page 104 Installing the printer driver for Windows Check the installation settings. – To change the settings, click the [Installation Settings] button, and then continue with step 7. – If not changing the settings, continue with step 8. Select the components to be installed, and then click the [OK] button. In the Confirm Installation Settings dialog box, click the [Install] button.
- Page 105 Installing the printer driver for Windows In the Finish Installing Drivers dialog box, click the [Finish] button. This completes the printer driver installation. In the Finish Installing Drivers dialog box, installation items can be confirmed and settings can be changed. [Review]: Confirm the installation settings.
-
Page 106: Installation Using The Wizard (Windows Xp/Server 2003)
Installing the printer driver for Windows Installation using the wizard (Windows XP/Server 2003) 3.3.1 Network connection (LPR/Port9100) When using the LPR/Port9100 printing, specify the port during the printer driver installation process. TCP/IP setting for this machine Specify the IP address on TCP/IP Setting of this machine. Detail For details on specifying the IP address of this machine, refer to "Network settings"... - Page 107 Installing the printer driver for Windows – Clear the "Automatically detect and install my Plug and Play printer" check box. The Select a Printer Port dialog box appears. Click "Create a new port", and select "Standard TCP/IP Port" for "Type of port:". Click the [Next] button.
- Page 108 Installing the printer driver for Windows – If the Finish dialog box appears, go to step 13. Select "Custom", and then click the [Settings] button. Change the settings according to the port, and then click the [OK] button. – For an LPR connection, select "LPR", and then enter "Print" in the "Queue name" box. –...
-
Page 109: Network Connection (Smb)
Installing the printer driver for Windows Click the [Next] button. Follow the on-screen instructions. – If the Windows Logo Testing or Digital Signature dialog box appears, click the [Continue] or [Yes] button. – When using a network connection, perform a test print after the network settings have been specified. -
Page 110: Printer Driver Installation By Specifying Printers Using The Add Printer Wizard
Installing the printer driver for Windows Printer driver installation by specifying printers using the Add Printer Wizard Reminder When installing on Windows XP or Server 2003, administrator permissions are required. Insert the printer driver CD-ROM into the CD-ROM drive of the computer. Click the [Start] button, and then click "Printers and Faxes". - Page 111 Installing the printer driver for Windows Click "Create a new port", and select "Local Port" for "Type of port:" In the "Enter a port name" box, enter "\\NetBIOS name\print service name". – Enter the same NetBIOS name and print service name those appear in "Print Setting" in the SMB Setting screen of this machine.
-
Page 112: Network Connection (Ipp Or Ipps)
Installing the printer driver for Windows – If the Windows Logo Testing or Digital Signature dialog box appears, click the [Continue] or [Yes] button. – When using a network connection, perform a test print after the network settings have been specified. -
Page 113: Local Connection
Installing the printer driver for Windows When the confirmation dialog box appears, click the [OK] button. Click the [Have Disk] button. Click the [Browse] button. Specify the desired folder on the CD-ROM that contains the printer driver, and then click the [Open] button. - Page 114 Installing the printer driver for Windows Click the [Next] button, and then follow the on-screen instructions. – If the Windows Logo Testing or Digital Signature dialog box appears, click the [Continue] or [Yes] button. Click the [Finish] button. When the installation is completed, make sure that the icon of the installed printer appears in the Printers and Faxes window.
-
Page 115: Installation Using The Wizard (Windows Vista)
Installing the printer driver for Windows Installation using the wizard (Windows Vista) 3.4.1 Network connection (LPR, Port9100, or SMB) In Windows Vista, the printer driver can be installed either by searching printers on the network, or by creating a new printer port. Specifying the TCP/IP setting for this machine Specify the IP address of this machine. - Page 116 Installing the printer driver for Windows Click "Add a printer" from the toolbar. The Add Printer window appears. Click "Add a network, wireless or Bluetooth printer". – If the printer is not detected, turn off this machine, then on again. –...
-
Page 117: Printer Driver Installation By Creating A Port Using The Add Printer Wizard
Installing the printer driver for Windows Click the [Have Disk] button. Click the [Browse] button. Specify the desired folder on the CD-ROM that contains the printer driver, and then click the [Open] button. – Select the specified folder according to the printer driver to be used, the operating system, and the language. - Page 118 Installing the printer driver for Windows Click "Add a printer" from the toolbar. The Add Printer window appears. Click "Add a local printer". The Select a Printer Port dialog box appears. Click "Create a new port", and select the port type. –...
-
Page 119: Network Connection (Ipp Or Ipps)
Installing the printer driver for Windows Click the [Next] button. The Install the printer driver dialog box appears. Click the [Have Disk] button. Click the [Browse] button. Specify the desired folder on the CD-ROM that contains the printer driver, and then click the [Open] button. -
Page 120: Specifying The Ipp Settings For This Machine
Installing the printer driver for Windows Specifying the IPP settings for this machine Enable IPP printing in "IPP Setting" of this machine. Detail For details on the IPP settings of this machine, refer to "Network settings" on page 2-2. To use IPPS printing, the certificate must be registered to this machine. For details, refer to "Specifying IPP print settings"... -
Page 121: Network Connection (Web Service Print)
Installing the printer driver for Windows – If the Verify the publisher dialog box of Windows Security appears, click "Install this driver software anyway". Click the [Finish] button. When the installation is completed, make sure that the icon of the installed printer appears in the Printers window. -
Page 122: Printer Driver Installation By Specifying The Ip Address Using The Add Printer Wizard
Installing the printer driver for Windows – The steps performed in the New Hardware Wizard dialog box are the same as those described in "Printer driver installation by specifying the IP address using the Add Printer Wizard". For details, refer to Steps 11 through 20 of "Printer driver installation by specifying the IP address using the Add Printer Wizard"... - Page 123 Installing the printer driver for Windows The Select a Printer Port dialog box appears. Click "Create a new port", and select the port type. – Select "Standard TCP/IP Port". Click the [Next] button. Select "Web Services Device" and enter the IP address. The Web Service print-supporting printer corresponding to the entered IP address is found, and then the Found New Hardware Wizard dialog box appears.
-
Page 124: Local Connection
Installing the printer driver for Windows 3.4.4 Local connection When this machine is connected via a USB port, the printer driver can be installed with plug-and-play. Note When a USB connection is used, the printer driver is installed easily with the Plug and Play feature. However, it can be installed using the Add Printer Wizard. -
Page 125: Installation Using The Wizard (Windows 2000)
Installing the printer driver for Windows Installation using the wizard (Windows 2000) 3.5.1 Network connection (LPR/Port9100) When using the LPR/Port9100 printing, specify the port during the printer driver installation process. TCP/IP setting for this machine Specify the IP address in the TCP/IP Setting screen of this machine. Detail For details on specifying the IP address of this machine, refer to "Network settings"... - Page 126 Installing the printer driver for Windows – Clear the "Automatically detect and install my Plug and Play printer" check box. The Select a Printer Port dialog box appears. Click "Create a new port", and select "Standard TCP/IP Port" for "Type of port:". Click the [Next] button.
-
Page 127: Network Connection (Smb)
Installing the printer driver for Windows Click the [Next] button. Follow the on-screen instructions. – When the Digital Signature dialog box appears, click the [Yes] button. Click the [Finish] button. After installation is completed, make sure that the icon of the installed printer appears in the Printers window. -
Page 128: Printer Driver Installation Using The Add Printer Wizard
Installing the printer driver for Windows Printer driver installation using the Add Printer Wizard Reminder When installing on Windows 2000, administrator permissions are required. Insert the printer driver CD-ROM into the CD-ROM drive of the computer. Click the [Start] button, point to "Settings", and then click "Printers". Double-click "Add Printer". -
Page 129: Network Connection (Ipp Or Ipps)
Installing the printer driver for Windows 3.5.3 Network connection (IPP or IPPS) For IPP printing, specify the network setting before installing the printer driver. Specifying the TCP/IP setting for this machine Specify the IP address of this machine. Detail For details on specifying the IP address of this machine, refer to "Network settings" on page 2-2. Specifying the IPP settings for this machine Enable IPP printing in "IPP Setting"... -
Page 130: Local Connection
Installing the printer driver for Windows Follow the on-screen instructions. – When the "Digital Signature" dialog box appears, click the [Yes] button. Click the [Finish] button. When the installation is completed, make sure that the icon of the installed printer appears in the Printers and Faxes window. -
Page 131: Installation Using The Wizard (Windows Nt 4.0)
Installing the printer driver for Windows Installation using the wizard (Windows NT 4.0) 3.6.1 Network connection (LPR) When using the LPR printing, specify the port during the printer driver installation process. TCP/IP setting for this machine Specify the IP address in the TCP/IP Setting screen of this machine. Detail For details on specifying the IP address of this machine, refer to "Network settings"... - Page 132 Installing the printer driver for Windows Printer drivers that can be selected: Windows NT 4.0: PCL driver Click the [OK] button. The "Printers" list appears. Click the [Next] button. Follow the on-screen instructions. Click the [Finish] button. After installation is completed, make sure that the icon of the installed printer appears in the Printers window.
-
Page 133: Uninstalling The Printer Driver
If the printer driver was installed with an installer, the delete function of the printer driver is included. Click the [Start] button, and then select "All Programs" (or "Programs"), select "KONICA MINOLTA", select "mc8650", and then click "Uninstall Printer Driver". -
Page 134: Manual Uninstallation
When you check folders and find a folder of the applicable model, delete it. However, if multiple drivers are installed including the Konica Minolta driver and PostScript Konica Minolta driver, the model information of all drivers is deleted. If other drivers are remaining, do not delete it. - Page 135 Installing the printer driver for Windows 8650 3-38...
-
Page 136: Installing The Printer Driver For Macintosh
Installing the printer driver for Macintosh... -
Page 137: Selectable Connection Methods
Installing the printer driver for Macintosh Installing the printer driver for Macintosh Selectable connection methods Macintosh OS can be used via a network connection. The following protocols are available. Setup method Connection method Refer to Connection Bonjour A network connection using Bonjour and "Installing the printer driver on Mac- method that can Rendezvous. -
Page 138: Installing The Printer Driver On Macintosh Osx 10.2/10.3/10.4
Installing the printer driver for Macintosh Installing the printer driver on Macintosh OSX 10.2/10.3/10.4 4.2.1 Installing the printer driver Start up the Macintosh computer. Insert the printer driver CD-ROM into the CD-ROM drive of the computer. – Exit all running applications, if any. Open the folder on the CD-ROM that contains the desired printer driver. -
Page 139: Selecting And Connecting The Printer (Os 10.4)
The connected printers are detected. From the "Printer Name" list, select the desired model name and connection (Bonjour). Select "KONICA MINOLTA" in "Print Using", select the desired model from the list of models, and then click the [Add] button. If the selected printer is registered in the printer list, the setting procedure is completed. -
Page 140: Specifying The Appletalk Settings
Installing the printer driver for Macintosh Note If the Installable Options window appears, proceed to change the option settings as necessary. For details, refer to "Options" on page 6-3. Specifying the AppleTalk settings Specifying the AppleTalk settings for this machine Enable AppleTalk in "AppleTalk Setting", and then enter the printer name. -
Page 141: Specifying The Lpr Settings
Installing the printer driver for Macintosh Select "KONICA MINOLTA" in "Print Using", select the desired model from the list of models, and then click the [Add] button. If the selected printer is registered in the printer list, the setting procedure is completed. - Page 142 From "Protocol", select "LPD". In "Address", enter the IP address of this machine. Select "KONICA MINOLTA" in "Print Using", select the desired model from the list of models, and then click the [Add] button. If the selected printer is registered in the printer list, the setting procedure is completed.
-
Page 143: Specifying The Ipp Settings
Installing the printer driver for Macintosh Specifying the IPP settings Specifying the TCP/IP setting for this machine Specify the IP address of this machine. Detail For details on specifying the IP address of this machine, refer to "Network settings" on page 2-2. IPP setting for this machine Enable IPP print in the IPP Setting screen of this machine. -
Page 144: Selecting And Connecting The Printer (Os 10.2 And 10.3)
Installing the printer driver for Macintosh Select "KONICA MINOLTA" in "Print Using", select the desired model from the list of models, and then click the [Add] button. If the selected printer is registered in the printer list, the setting procedure is completed. -
Page 145: Specifying The Appletalk Settings
The connected printers are detected. From the "Name" list, select the desired model name. Select "KONICA MINOLTA" in "Printer Model", select the desired model from the list of model names, and then click the [Add] button. If the selected printer is registered in the printer list, the setting procedure is completed. -
Page 146: Specifying The Lpr Settings
The connected printers are detected. From the "Name" list, select the desired model name. Select "KONICA MINOLTA" in "Printer Model", select the desired model from the list of model names, and then click the [Add] button. If the selected printer is registered in the printer list, the setting procedure is completed. -
Page 147: Specifying The Ipp Settings
For OS 10.3, from "Printer Type", select "LPD/LPR". In "Printer Address", enter the IP address of this machine. Select "KONICA MINOLTA" in "Printer Model", select the desired model from the list of model names, and then click the [Add] button. - Page 148 – Leave "Queue Name" blank. Select "KONICA MINOLTA" in "Printer Model", select the desired model from the list of model names, and then click the [Add] button. If the selected printer is registered in the printer list, the setting procedure is completed.
-
Page 149: Mac Os 9.2
Installing the printer driver for Macintosh Mac OS 9.2 4.3.1 Installing the printer driver After connected to a computer, this machine can be used as a printer by selecting a PostScript printer and by specifying the printer description (PPD) file. First, copy the printer description (PPD) file to the Macintosh computer. -
Page 150: Specifying The Lpr Settings
Installing the printer driver for Macintosh – If a different PPD file has already been selected, click the [Setup] button in step 3, and then click the [Select PPD] button from the window that is already displayed. A window for specifying options appears. Select options installed on this machine on the "Options Installed 1"... - Page 151 Installing the printer driver for Macintosh Click the close button at the upper left corner of the dialog box. – When the "Save changes to the current configuration?" message appears, click the [Save] button. Adding a printer Select "HDD" - "Applications" - "Utility", and then double-click "Desktop Printer Utility" to open it. The New Desktop Printer window appears.
-
Page 152: Uninstalling The Printer Driver
"KONICAMINOLTAmc8650CK.gz" Delete the unnecessary files from "Library" - "Printers". – Drag the "mc8650" folder, which is located in "Library" - "Printers" - "KONICA MINOLTA", to the "Trash" icon. – For Mac OS 10.2, drag all the "KONICA MINOLTA mc8650" folders, which are located in "Library"... - Page 153 Installing the printer driver for Macintosh 8650 4-18...
-
Page 154: Print Functions Of The Printer Drivers For Windows
Print functions of the printer drivers for Windows... -
Page 155: Printing Operations
Print functions of the printer drivers for Windows Print functions of the printer drivers for Windows Printing operations Print jobs are specified from the application software. Open the data in the application, click the [File] button, and then click "Print" from the menu. –... -
Page 156: Initializing The Pcl/Ps Printer Driver
Print functions of the printer drivers for Windows Initializing the PCL/PS printer driver When you have installed the printer driver, you need to change the initialization condition such as options, user authentication and account track functions and enable functions of the machine from the printer driver. Reminder If the model name, installed options, the User Authentication and Account Track functions are not specified on the Configure tab, the option functions cannot be used from the printer driver. -
Page 157: Settings Tab
Print functions of the printer drivers for Windows Item Description Device Option Specifies the model name of this machine, options that are installed on this machine and the status of the User Authentication and Account Track functions. Specify the status of each item from the "Setting"... -
Page 158: Registration Of The Default Settings
Print functions of the printer drivers for Windows Item Description Display paper set in Print Uses the paper that was added in [Server Properties] of the printer folder. Server Properties Verify Authentication Verifies the authentication settings for this machine before printing and displays a mes- settings before printing sage if the settings are not compatible. -
Page 159: Common Settings For The Pcl/Ps Drivers
Print functions of the printer drivers for Windows Common settings for the PCL/PS drivers The following describes the common settings and buttons that are displayed on all tabs. Item Description Click this button to close the dialog box and apply any settings that have been changed. Cancel Click this button to cancel any settings that have been changed and close the dialog box. -
Page 160: Parameter Details For The Pcl/Ps Drivers
Print functions of the printer drivers for Windows Parameter details for the PCL/PS drivers The print setting screen is the screen to set printer driver functions. Click the [Properties] or [Preferences] button on the Print dialog box, or right-click the printer icon of the "Printers"... - Page 161 Print functions of the printer drivers for Windows Function name Option Description Output Method Print Prints immediately. Secure Print Saves the document to be printed in "Secure Print User Box" of this machine. When printing, entering the ID and password is required in the control panel of this machine.
-
Page 162: Layout Tab
Print functions of the printer drivers for Windows 5.4.2 Layout tab Function name Option Description Combination 2 in 1, 4 in 1, 6 in 1, 9 in 1, 16 in 1, 2 Prints multiple pages on one page, or prints one sheet ×... -
Page 163: Finish Tab
Print functions of the printer drivers for Windows Function name Option Description [Image Shift Set- Units Selects the measurement unit that specifies the size. tings] Front Side/Back Side Specifies the shift direction and values. For 2-sided printing, clearing the "Same value for front and back sides"... -
Page 164: Cover Mode Tab
Print functions of the printer drivers for Windows Note "Staple", "Center Staple and Fold", and "Fold" functions are available only if the optional finisher is installed. The "Punch" function is available only when the punch kit is installed on the optional finisher. The "fold"... -
Page 165: Stamp/Composition Tab
Print functions of the printer drivers for Windows Function name Option Description [Edit List] List Name Selects the name of the list to be edited. The settings are listed. [Edit List Name..] Renames a list. [Up]/[Down] Moves the selected condition row up or down. Move the rows so that the page numbers are arranged in as- cending order. - Page 166 Print functions of the printer drivers for Windows Function name Option Description Print in Overlay ON/OFF Prints an original document on top of an overlay data that was created separately. [Edit] allows you to change the overlay printing method. [Edit] [Browse Files..] Loads an overlay file.
-
Page 167: Editing Watermark
Print functions of the printer drivers for Windows Editing watermark Watermark Name: Enter the name of the watermark. Watermark Text: Enter the text to be printed as the watermark. [Add]: Click to create a new watermark. [Delete]: Click to delete the selected watermark. Position: Specifies the vertical and horizontal positions. -
Page 168: Editing Copy Protect
Print functions of the printer drivers for Windows Editing copy protect Characters: Embeds the selected character string in a pattern. A preregistered character string (common stamp) or a character string registered on this machine (registered stamp) can be specified. Date/Time: Embeds the selected date and time in a pattern. By clicking the [Edit] button under "Format", you can specify the display type or the time format. -
Page 169: Editing Date/Time And Page Number
Print functions of the printer drivers for Windows The following settings are available when "Copy Protect" is selected. Pattern: Specifies the embedding method of a pattern. Pattern Overwrite: Specifies the order for printing a pattern on the original. Background Pattern: Specifies the pattern background. Text/Background Color: Specifies the color of the pattern. -
Page 170: Quality Tab
Print functions of the printer drivers for Windows 5.4.6 Quality tab Function name Option Description Select Color Full Color, Gray Scale, 2 Color Specifies the color to be printed. Quality Adjustment — Adjusts the image quality. You can select "Simple" to adjust entire documents or "Detail"... -
Page 171: Other Tab
Print functions of the printer drivers for Windows 5.4.7 Other tab Function name Option Description Excel Job Control ON/OFF When multiple Microsoft Excel sheets with different page settings are printed at one time, the sheets may be separated into single-sheet jobs depending on the data they contain. -
Page 172: Print Functions Of The Printer Driver For Macintosh
Print functions of the printer driver for Macintosh... -
Page 173: Printing Operations For Os X
Print functions of the printer driver for Macintosh Print functions of the printer driver for Macintosh Printing operations for OS X Print jobs are specified from the application software. Open the data in the application, click the [File] button, and then click "Print" from the menu. –... -
Page 174: Default Settings For The Os X Printer Driver
Print functions of the printer driver for Macintosh Default settings for the OS X printer driver When you have installed the printer driver, you need to change the initialization condition such as options before daily printing and enable functions of this machine from the printer driver. Reminder If the model name and installed options are not specified on the Printer Info dialog box, the option functions cannot be used from the printer driver. - Page 175 Print functions of the printer driver for Macintosh In the "Print" dialog box, select "Presets" and save the printer driver functions by selecting "Save As". When use this setting, select from "Presets". Detail For the function and settings of the printer driver, refer to "Parameter details for the OS X printer driver" on page 6-7.
-
Page 176: Common Settings For The Os X Printer Driver
Print functions of the printer driver for Macintosh Common settings for the OS X printer driver The following describes the common settings that are displayed by the specific operations (Output Method, Layout/Finish, Paper Tray/Output Tray, Cover Sheet/OHP Interleave, Per Page Setting, Stamp/Composition and Quality) for this machine specified in the Print dialog box. -
Page 177: How To Add A Custom Size For The Os X Printer Driver
Print functions of the printer driver for Macintosh How to add a custom size for the OS X printer driver To print on paper sizes other than the standard sizes, register the custom paper size. In the [File] menu, select "Page Setup" (or "Paper Setup"). For Mac OS 10.4, select "Manage Custom Sizes"... -
Page 178: Parameter Details For The Os X Printer Driver
Print functions of the printer driver for Macintosh Parameter details for the OS X printer driver The printer driver functions are specified in the following dialog boxes: In "Page Attributes" from the Page Setup dialog box; In "Output Method", "Layout/Finish", "Paper Tray/Output Tray", "Cover Sheet/OHP Interleave", "Per Page Setting", "Stamp/Composition", and "Quality"... -
Page 179: Output Method
Print functions of the printer driver for Macintosh Function name Option Description Copies 1 to 999 Specifies the number of copies to be printed. Collated ON/OFF Do not specify this function. Select "Output Method", and then specify "Collate". Pages — Specifies the print range to print. -
Page 180: Checking The Output Method Setting Details
Print functions of the printer driver for Macintosh Function name Option Description [Detail Settings] — Displays the functions for which the setting details have been specified. Detail For details on Output Method, refer to "Function detail description" on page 7-2. Checking the Output Method setting details By clicking the [Detail Settings] button, the "Output Method"functions for which detail settings have been specified are shown. - Page 181 Print functions of the printer driver for Macintosh Popup Authentication Dialog when printing: Displays the User Authentication and Account Track dialog box when a print job is specified and checks entry of a user name and a department name each time. Encryption Passphrase: Specifies an encryption passphrase to use user-defined key to communicate with this machine.
-
Page 182: Layout/Finish
Print functions of the printer driver for Macintosh 6.5.4 Layout/Finish You can switch between the Layout dialog box and the Finish dialog box. Note When printing a job that contains pages of different sizes and orientations with the "Poster Mode" setting specified, images may be missing or overlapping when the document is printed. - Page 183 Print functions of the printer driver for Macintosh Function name Option Description Print Type 1-Side, 2-Sided, Booklet Specifies duplex printing and booklet printing. Binding Position Left stitch, right stitch, top stitch Specifies the binding position. Poster Mode 2 × 2, 3 × 3, 4 × 4 Prints one sheet of an original divided on multiple pag- es.
-
Page 184: Paper Tray/Output Tray
Print functions of the printer driver for Macintosh 6.5.5 Paper Tray/Output Tray Function name Option Description Paper Tray Auto, Tray 1-5, Tray1 (Bypass Tray), Selects the paper tray to be used. Tray4 (LCT) The selectable items differ depending on the options that are installed. -
Page 185: Cover Mode/Transparency Interleave
Print functions of the printer driver for Macintosh 6.5.6 Cover Mode/Transparency Interleave You can switch between the Cover Mode dialog box and the Transparency Interleave dialog box. 8650 6-14... -
Page 186: Per Page Setting
Print functions of the printer driver for Macintosh Function name Option Description Front Cover Off, Print, Blank Attaches a front cover page. You can specify it when "Auto" is not selected for the paper tray. Tray 1-5, Tray1 (Bypass Tray), Selects the paper tray for the cover page. -
Page 187: Stamp/Composition
Print functions of the printer driver for Macintosh 6.5.8 Stamp/Composition Function name Option Description Copy Protect ON/OFF Prints a special pattern to prevent copying. You can specify items, positions and the composition to be printed by clicking the [Settings] button. [Settings] —... -
Page 188: Editing Copy Protect
Print functions of the printer driver for Macintosh Editing copy protect Characters: Embeds the selected character string in a pattern. A preregistered character string (common stamp) or a character string registered on this machine (registered stamp) can be specified. Date/Time: Embeds the selected date and time in a pattern. By clicking the [Edit] button under "Format", you can specify the display type or the time format. -
Page 189: Editing Date/Time
Print functions of the printer driver for Macintosh The following settings are available when "Copy Protect" is selected. Copy Protect: Embeds a hidden pattern that appears on unauthorized copies. Pattern: Specifies the embedding method of a pattern. Pattern Overwrite: Specifies the order for printing a pattern on the original. Background Pattern: Specifies the pattern background. -
Page 190: Editing Page Number
Print functions of the printer driver for Macintosh Editing page number Starting Page: Specifies the page to start printing the page number. Starting Page Number: Specifies the start number for printing the page number. Cover Mode: If cover pages are attached, specifies whether to print the page number on the front cover page or the back cover page. -
Page 191: Quality
Print functions of the printer driver for Macintosh 6.5.9 Quality Function name Option Description Select Color Full Color, Gray Scale Specifies the color to be printed. Glossy Mode ON/OFF Prints using a gloss finish. Toner Save ON/OFF Controls the print density and saves the toner con- sumption. -
Page 192: Printing Operations For Os 9
Print functions of the printer driver for Macintosh Printing operations for OS 9 Print jobs are specified from the application software. Open the data in the application, click the [File] button, and then click "Print" from the menu. – If the menu is not available, click the [Print] button. The Print dialog box appears. -
Page 193: Default Settings For The Os 9 Printer Driver
Print functions of the printer driver for Macintosh Default settings for the OS 9 printer driver When you have installed the printer driver, you need to change the initialization condition such as options before daily printing and enable functions of this machine from the printer driver. Reminder If the model name and installed options are not specified, the option functions cannot be used from the printer driver. - Page 194 Print functions of the printer driver for Macintosh Note The settings cannot be saved from the Page Setup dialog box. The "General" settings on the Print dialog box cannot be saved. 8650 6-23...
-
Page 195: Parameter Details For The Os 9 Printer Driver
Print functions of the printer driver for Macintosh Parameter details for the OS 9 printer driver The printer driver functions are specified in the Page Attributes dialog box called from the Page Setup dialog box or the Layout/Finish dialog boxes called from the Print dialog box. 6.8.1 Page Attributes In the [File] menu, select "Page Setup"... -
Page 196: General
Print functions of the printer driver for Macintosh 6.8.3 General In the [File] menu, select "Print". Copies: Specifies the number of copies to be printed. Collated: Specifies whether to print multiple copies by collating them. Pages: Specifies the print range to print. Paper Source: Selects the paper tray to be used. -
Page 197: Printer Specific Options (Finishing Options 1 To 5)
Print functions of the printer driver for Macintosh 6.8.5 Printer specific options (Finishing Options 1 to 5) Specifies the printer specific options. These options are specified when functions of this machine such as staple and punch are to be used. Offset: Specifies offset. - Page 198 Print functions of the printer driver for Macintosh Edge Enhancement: Highlights the edge of characters, graphics and images to make small characters more visible. It can be specified when "Gray Scale" is selcted for the color. Reminder The "Staple" and "Fold" functions are available only if the optional finisher is installed. The "punch"...
- Page 199 Print functions of the printer driver for Macintosh 8650 6-28...
-
Page 200: Function Detail Description
Function detail description... -
Page 201: Proof Print
7.1.1 Setting up the printer driver The following four printer drivers support setup of this feature: Konica Minolta PCL Printer Driver for Windows Konica Minolta PostScript Printer Driver for Windows PostScript PPD Printer Driver for Mac OS X PostScript PPD Printer Driver for Mac OS 9.2 Print with following settings specified: Output Method: "Proof Print"... -
Page 202: For Macintosh Os X
Function detail description For Macintosh OS X Display the "Output Method" dialog box. Select "Proof Print" from options under "Output Method". Specify the number of copies to be printed. One copy is printed for checking. Note In OS 9.2, select "Output Method" in the "Finishing Option 3" dialog box. 8650... -
Page 203: Recalling A Job From The Control Panel
Function detail description 7.1.2 Recalling a job from the control panel Press the [Menu/Select] key, and then the "Utility" menu appears. From this menu, select [Job Operation] - [Proof print]. Note For details on the "Utility" menu operations, refer to "Control panel" on page 8-2. Note If the user authentication function has been specified on the machine, the screen to input the user name appears after the Job Operation screen. -
Page 204: Secure Print
7.2.1 Setting up the printer driver The following three printer drivers support setup of this feature: Konica Minolta PCL Printer Driver for Windows Konica Minolta PostScript Printer Driver for Windows PostScript PPD Printer Driver for Mac OS X Print with the following setting specified: Output Method: "Secure Print"... - Page 205 Function detail description Enter the ID and password. – When password rules are enabled on this machine, the passwords that can be used with Secure Print are limited and the jobs are deleted when a password that does not comply with the password rules is entered.
-
Page 206: For Macintosh Os X
Function detail description For Macintosh OS X Display the "Output Method" dialog box. Select "Secure Print" from the "Output Method" drop-down list. Enter the ID and password. – When password rules are enabled on this machine, the passwords that can be used with Secure Print are limited and the jobs are deleted when a password that does not comply with the password rules is entered. -
Page 207: Recalling A Job From The Control Panel
Function detail description 7.2.2 Recalling a job from the control panel "Secure Print" jobs are saved in the secure print user box. To print a secured document, the ID and password that were specified in the printer driver are required. Press the [Menu/Select] key, and then the "Utility"... -
Page 208: When "Secureprintaccess" Is Set To "Mode 1
Function detail description Note If the user authentication function has been specified on the machine, the screen to input the user name appears after the Job Operation screen. Enter the user name and password. If the Account Track function has been specified on the machine, the screen to input the department name appears after the Job Operation screen. -
Page 209: Save In User Box
7.3.1 Setting up the printer driver The following three printer drivers support setup of this feature: Konica Minolta PCL Printer Driver for Windows Konica Minolta PostScript Printer Driver for Windows PostScript PPD Printer Driver for Mac OS X Print with the following settings specified: Output Method: "Save in User Box"... -
Page 210: For Macintosh Os X
Function detail description Enter the file name of the document and the user box number for the save location. Print the document. Reminder The file name and user box number that are required to save in a user box can be preregistered in the User Settings dialog box on the Basic tab. - Page 211 Function detail description Enter the file name of the document and the user box number for the save location. – Select the "Save Settings" check box to save the specified settings. In addition, if the "Do not show this window when setting" check box is selected, the dialog box does not appear when the function is specified.
-
Page 212: Recalling A Job From The Control Panel
Function detail description 7.3.2 Recalling a job from the control panel "Save in User Box" and "Save in User Box/Print" jobs are saved in a user box of the specified number. To print a document saved in a user box, open the specified user box to retrieve the document. To call the user box, press the [Menu/Select] key, and then the "Utility"... - Page 213 Function detail description Note If the user authentication function has been specified on the machine, the screen to input the user name appears after the Job Operation screen. Enter the user name and password. If the Account Track function has been specified on the machine, the screen to input the department name appears after the Job Operation screen.
-
Page 214: Save In Annotation User Box
7.4.1 Setting up the printer driver The following three printer drivers support setup of this feature: Konica Minolta PCL Printer Driver for Windows Konica Minolta PostScript Printer Driver for Windows PostScript PPD Printer Driver for Mac OS X Print with the following settings specified: Output Method: "Save in User Box"... -
Page 215: For Macintosh Os X
Function detail description Enter the file name of the document and the Annotation user box number for the save location. Print the document. Reminder The file name and user box number that are required to save in a user box can be preregistered in the User Settings dialog box on the Basic tab. - Page 216 Function detail description Enter the file name of the document and the Annotation user box number for the save location. – Select the "Save Settings" check box to save the specified settings. In addition, if the "Do not show this window when setting" check box is selected, the dialog box does not appear when the function is specified.
-
Page 217: Recalling A Job From The Control Panel
Function detail description 7.4.2 Recalling a job from the control panel "Save in User Box" and "Save in User Box/Print" jobs are saved in an Annotation user box of the specified number. To print a document saved in an Annotation user box, open the specified Annotation user box to retrieve the document. - Page 218 Function detail description Note If the user authentication function has been specified on the machine, the screen to input the user name appears after the Job Operation screen. Enter the user name and password. If the Account Track function has been specified on the machine, the screen to input the department name appears after the Job Operation screen.
-
Page 219: Save In Encrypted Pdf Box
Function detail description Save in Encrypted PDF Box The Encrypted PDF Box is a function to save print jobs of the Encrypted PDF format in this machine. To save in Encrypted PDF Box, specify the desired file on the Direct Print tab of the PageScope Web Connection, and then execute output from the control panel. -
Page 220: Recalling A Job From The Control Panel
Function detail description 7.5.2 Recalling a job from the control panel The Encrypted PDF file is saved in the Encrypted PDF Box on this machine. To print a document saved in a box, open the Encrypted PDF Box to retrieve the document. The PDF password is required when specifying a document. -
Page 221: Printing On A Machine With The User Authentication Set Up
Settings]-[Security Details] is set to mode 2, the relevant user is locked and access may be blocked if the authentication information is not entered correctly. The following three printer drivers support setup of this feature: Konica Minolta PCL Printer Driver for Windows Konica Minolta PostScript Printer Driver for Windows PostScript PPD Printer Driver for Mac OS X Note If printing is not allowed, printing cannot be performed even when used by a registered user. - Page 222 Function detail description Select "Recipient User", and then enter the user name and password. – If the machine has been set to permit public users, "Public User" can be selected to access the machine. – The password can also be preset in the printer driver as a default value so that it does not have to set for each job.
-
Page 223: For Macintosh Os X
Function detail description For Macintosh OS X In the "File" menu, select "Print". Select "Output Method". Select the "User Authentication" check box. Select "Recipient User", and then enter the user name and password. – If the machine has been set to permit public users, "Public User" can be selected to access the machine. -
Page 224: Printing With The Machine Enabling The Account Track Function
The following three printer drivers support setup of this feature: Konica Minolta PCL Printer Driver for Windows Konica Minolta PostScript Printer Driver for Windows PostScript PPD Printer Driver for Mac OS X Note If printing is not allowed, printing cannot be performed even for a registered account. - Page 225 Function detail description Enter the department name and password. – The password can also be preset in the printer driver as a default value so that it does not have to set for each job. Click the [OK] button, and specify the desired settings, and then print the document. If the entered password is a password registered on this machine, the job is printed and counted as a job for the account.
-
Page 226: For Macintosh Os X
Function detail description For Macintosh OS X In the "File" menu, select "Print". Select "Output Method". Select the "Account Track" check box. Enter the department name and password. Note Select the "Save Settings" check box to save the specified settings. In addition, if the "Do not show this window when setting"... -
Page 227: Touch And Print
Function detail description Touch and Print When an optional authentication unit (biometrics type) or authentication unit (IC card type) is used, simply touching the authentication unit with the finger or an IC card enables user authentication and printing. This function is referred to as the Touch and Print. Also with this type of user authentication, to print via a computer, enter the user name and password in the printer driver, just like when using common user authentication. -
Page 228: Recalling A Job From The Control Panel
Function detail description Detail For details on the authentication unit, refer to "Authentication unit (Biometric type AU-101)" on page 14-2 or "Authentication unit (IC card type AU-201)" on page 15-2. 7.8.2 Recalling a job from the control panel The jobs output by the Touch and Print function are saved in the Touch & Print Box on this machine and can be manually retrieved by opening the Touch &... -
Page 229: Specifying A User-Defined Encryption Passphrase
Function detail description Specifying a user-defined encryption passphrase The machine and the printer driver communicate with each other by encrypting a user password, account password or secure document password using a common encryption key. Although an encryption passphrase for generating the encryption common key is preset as a default setting, it can also be generated with a user-defined encryption passphrase. -
Page 230: Setting Up The Printer Driver
Setting up the printer driver The following three printer drivers support setup of this feature: Konica Minolta PCL Printer Driver for Windows (PCL driver) Konica Minolta PostScript Printer Driver for Windows (PS driver) PostScript PPD Printer Driver for Mac OS X For Windows Display the Properties screen. -
Page 231: For Macintosh Os X
Function detail description For Macintosh OS X Display the Output Method dialog box. Click the [Detail Settings] button. The Detail Settings dialog box appears. Select "Administrator Settings", and then click the [Settings] button. The Administrator Settings dialog box appears. Select the "Encryption Passphrase" check box and enter the encryption passphrase. –... -
Page 232: Icc Profile Settings
7-35. 7.10.1 Setting up the printer driver The following two printer drivers support setup of this feature: Konica Minolta PostScript Printer Driver for Windows (PS driver) PostScript PPD Printer Driver for Mac OS X For Windows Display the Quality tab. - Page 233 Function detail description For Macintosh OS X Display the Quality dialog box. Click the [Quality Adjustment] button. The Quality Adjustment dialog box appears. Select relevant items for "RGB Source", "Destination Profile", and "Simulation Profile" according to the type of the document to be printed. –...
-
Page 234: Setting Up The Printer Driver
7.11.1 Setting up the printer driver The following two printer drivers support setup of this feature: Konica Minolta PostScript Printer Driver for Windows PostScript PPD Printer Driver for Mac OS X Detail To register ICC profile in the machine, use the Download Manager (magicolor) application. For details, refer to the Help for the application software. - Page 235 Function detail description Click the tab and select a color profile type. Select a desired profile from the "Available Profile" list, and then click the [Add] button. – To register the current driver settings as a profile, click the [New] button, and then enter a file name and a profile name.
-
Page 236: For Macintosh Os X
Function detail description For Macintosh OS X Display the Quality dialog box. Click the [Quality Adjustment] button. The Quality Adjustment dialog box appears. Click the [Manage Profile] button. – The Color Profile Management function communicates with the machine to read profiles available to the machine. - Page 237 Function detail description Select a desired profile from the "Available Profile" list, and then click the [Add ->] button. – To register the current driver settings as a profile, click [New], and then enter a file name and a profile name.
-
Page 238: Banner Paper Printing Function
Click the [OK] button. Note For the Konica Minolta PCL Printer Driver, custom size setting can also be preregistered on the Initial Setting tab in the printer driver activated from the Windows "Printer" window ("Printers and Faxes" for Windows XP/Server 2003). -
Page 239: Printing
Function detail description 7.12.4 Printing To execute the Banner paper printing, press the [Menu/Select] key, and then the "Utility" menu appears. From this menu, select [Banner Printing]. Press the [Menu/Select] key. Select [Banner Printing], and then press the [Menu/Select] key. Select [Yes], and then press the [Menu/Select] key. - Page 240 Function detail description Install the mounting kit to the Tray 1. Erect the guide of the mounting kit. With the side to be printed on facing down, insert the paper as much as possible into the feed slot. – Place in the tray as many sheets as the specified number of copies to be printed. Slide the lateral guides of the Tray 1 to fit the size of paper being loaded.
- Page 241 Function detail description If the following screen appears, press the [Menu/Select] key. The data is printed. To continue printing, send the document data via the computer. To finish printing the job, press the [Cancel] key, select [Yes], and then press the [Menu/Select] key. Not to finish printing the job, select [No] to continue printing.
-
Page 242: Settings For Control Panel
Settings for control panel... -
Page 243: Control Panel
Settings for control panel Settings for control panel Control panel The control panel allows you to print or delete jobs, specify default settings for paper, or change network settings. 8.1.1 Basic operations The following shows examples of changing settings on the control panel using the following functions. Basic menu operations ->... - Page 244 Settings for control panel Press the [,] key several times to select [Print Reports], and then press the [Menu/Select] key. The Print Reports Menu appears. Press the [,] key several times to select [Configuration], and then press the [Menu/Select] key. The Configuration Menu appears.
-
Page 245: Operations For Changing Numeric Values
Settings for control panel Operations for changing numeric values Example: Displaying the Administrator Settings screen Press the [Menu/Select] key. Menu Select The Main Menu of the "Utility" menu appears. Press the [,] key several times to select [Admin. Settings], and then press the [Menu/Select] key. The password input screen appears. - Page 246 Settings for control panel Press the [)] key to move the cursor to the second character place. If an incorrect value was entered, press the [*] key to move the cursor, and then specify the correct value. Repeat steps 3 and 4 to specify values for all digits of the password. After entering the password, press the [Menu/Select] key.
-
Page 247: List Of "Utility" Menu Parameters
Settings for control panel List of "Utility" menu parameters The following outlines items displayed in the "Utility" menu. The menu to be displayed differs depending on other parameters or whether options are installed. Main Menu Note [Meter Count] and [Service Mode] are the menus for adjusting and maintaining the printer used by your service representative or the manufacturer. -
Page 248: Paper Setting Menu
Settings for control panel Paper Setting Menu Note When "ON" is specified for [Admin. Sec. Levels] of [Admin. Settings], the password is required to display the Paper Setting Menu. The factory default password is "1 2 3 4 5 6 7 8". Specify the password in [Admin. -
Page 249: User Setting Menu
Settings for control panel User Setting Menu 8650... - Page 250 Settings for control panel Note When "ON" is specified for [Admin. Sec. Levels] of [Admin. Settings], the password is required to display the User Setting Menu. Specify the password in [Admin. Password] accessed by selecting [Admin. Settings] - [Security Settings]. The factory default password is "1 2 3 4 5 6 7 8". If an incorrect password is entered, the User Setting Menu does not appear.
-
Page 251: System Setting Menu
Settings for control panel System Setting Menu 8650 8-10... - Page 252 Settings for control panel 8650 8-11...
- Page 253 Settings for control panel Note When "ON" or "MINIMUM" is specified for [Admin. Sec. Levels] of [Admin. Settings], the password is required to display the System Setting Menu. The factory default password is "1 2 3 4 5 6 7 8". Specify the password in [Admin.
-
Page 254: Admin. Settings Menu
Settings for control panel Admin. Settings Menu 8650 8-13... - Page 255 Settings for control panel 8650 8-14...
-
Page 256: Banner Printing Menu
Settings for control panel Note To display the Admin. Settings Menu, the password is required. Specify the administrator password in [Admin. Password] accessed by selecting [Admin. Settings] - [Security Settings]. The factory default password is "1 2 3 4 5 6 7 8". If an incorrect administrator password is entered, the Admin. -
Page 257: Parameters
Settings for control panel Parameters 8.3.1 Job Operation Menu User name input items Menu Description User Name Enter the user name. User Name List Select the user name from the user name list displayed. User Password Enter the user password. Note The User name input items are displayed when using the User authentication function on the machine. -
Page 258: Printing Items
Settings for control panel Printing items When documents, one document from one box, are selected in the Job Operation Menu, the printing-related menu appears. Menu Description Default Setting Print Start printing. – Simplex/Duplex Specify "2-Sided" or "1-Sided". 1-Side Number of Copies Specify the number of copies. -
Page 259: Consumables
Settings for control panel Consumables Menu Description Imaging Unit C Displays the status of use. Imaging Unit M Imaging Unit Y Imaging Unit K Fusing Unit TransferBelt Unit System Settings Menu Description Default Setting Language Setting Select the language of the panel message. English PowerSave Set- Low Power Setting... -
Page 260: Printer Settings
Settings for control panel Printer Settings Menu Description Default Setting Basic Settings PDL Setting Specify the printer description language as "Auto", Auto "PCL", or "PS". Number of Copies Specify the number of copies to be printed (between 1 and 999). OriginalDirection Select the orientation of the print image. -
Page 261: Font List
Settings for control panel Font List Font Name Font Name Courier Helvetica BoldOblique CG Times Helvetica Narrow CG Times Bold Helvetica Narrow Bold CG Times Italic Helvetica Narrow Oblique CG Times Bold Italic Helvetica Narrow Bold Oblique CG Omega Palatino Roman CG Omega Bold Palatino Bold CG Omega Italic... -
Page 262: System Settings Menu
Settings for control panel 8.3.4 System Settings Menu System Settings Menu Description Default Setting Date/TimeSettings Date Setting Specify the date. MM/DD/YY Time Setting Specify the time. xx:xx Time Zone Setting Specify the time zone. 00:00 Time Adjustment Connect to the specified server to correct the time. –... - Page 263 Settings for control panel Menu Description Default Setting TCP/IP TCP/IP Setting Select whether or not TCP/IP is used. IP Setting Select whether or not DHCP is used to automatically Auto Set- acquire the IP address. ting If "Manual Input" is selected, specify settings for "IP Address", "Subnet Mask", and "Default Gateway".
-
Page 264: Printer Settings
Settings for control panel Menu Description Default Setting TCP Socket TCP Socket Specify settings for using the TCP Socket function. – TCP Socket ASCII Specify settings for using the TCP Socket (ASCII) – function. Detail Settings Network Speed Select the operating speed. Auto Set- ting TimeAdjustmentSet... -
Page 265: Admin. Settings Menu
Settings for control panel 8.3.5 Admin. Settings Menu Security Settings Menu Description Default Setting Admin. Password Changes the administrator password. 12345678 Admin. Sec. Levels Define parameters opened to the user. Minimum OFF: The password is required for [Admin. Settings] and [Service Mode]. Minimum: The password is required for [System Set- ting], [Admin. - Page 266 Settings for control panel Menu Description Default Setting HDD Settings Format HDD Format the hard disk. – CheckHDDCapacity Information concerning the hard disk capacity is dis- – played. OverwriteAllArea Select this parameter to overwrite and delete all data Mode1 on the entire hard disk in the specified patterns for mode 1 through mode 8 when returning the machine from lease or disposing the machine in order to pre- vent disclosure of the data.
-
Page 267: User Box Settings
Settings for control panel Mode 3: Overwritten with 0x00. → Overwritten with 0xff. → Overwritten with random 1-byte numbers. → Verifies. Mode 4: Overwritten with random 1-byte numbers. → Overwritten with 0x00. → Overwritten with 0xff. Mode 5: Overwritten with 0x00. → Overwritten with 0xff. → Overwritten with 0x00. → Overwritten with 0xff. -
Page 268: Expert Adjustment
Settings for control panel Note [AuthDeviceSetting] is displayed when the authentication unit and HDD are installed. [CardAuth.Settings] is displayed when the IC card authentication unit is installed. [BioAuth.Settings] is displayed when the biometric authentication unit is installed. Detail To use biometric authentication, register the vein patterns in the finger in advance. For details on specifying authentication settings for the authentication unit (biometric type) and on registering finger vein patterns, refer to "Authentication unit (Biometric type AU-101)"... -
Page 269: Option Settings
Settings for control panel Note If "Print" is selected for [PrinterAdjustment], test print is performed through which you can check the set value. [Finisher Adjust] is displayed when the finisher is installed. Settings for [Center Staples Pos] and [Half-Fold Pos] in [Finisher Adjust] vary depending on the finisher installed. -
Page 270: Firmware Update
Settings for control panel Firmware Update Connect to the FTP server, and then update the firmware. Note [Firmware Update] requires you to access the FTP server where the update data is stored. For details, refer to "Using the TCP Socket/OpenAPI/FTP server function" on page 9-79. Press the [Menu/Select] key on the control panel of this machine. - Page 271 Settings for control panel – Password: update Transfer the update file to this machine. Press the [Menu/Select] key on the control panel of this machine. Data download begins. After download is completed, this machine is rebooted. – This machines automatically rebooted in a short time after data download. Update is completed when the machine is rebooted.
-
Page 272: Pagescope Web Connection
PageScope Web Connection... -
Page 273: Using Pagescope Web Connection
PageScope Web Connection PageScope Web Connection Using PageScope Web Connection PageScope Web Connection is a device management utility supported by the HTTP server integrated into the printer controller. Using a Web browser on a computer connected to the network, machine settings can be specified and the status of the machine can be checked. -
Page 274: Web Browser Cache
PageScope Web Connection 9.1.3 Web browser cache The most recent information may not appear in the PageScope Web Connection pages because older versions of pages are saved in the cache for the Web browser. In addition, problems may occur when the cache is used. -
Page 275: Structure Of Pages
The pages of PageScope Web Connection are constructed as shown below. Item Description Konica Minolta logo Click the logo to go to the Konica Minolta Web site at the following URL. http://konicaminolta.com PageScope Web Connection logo Click the logo to display the version information for PageScope Web Connection. - Page 276 PageScope Web Connection Item Description Tabs Select the category of the page to be displayed. The following tabs are displayed in User mode. • Information • Job List • User Box • Direct Print Menu Information and settings for the selected tab are listed. The menu that appears differs depending on the tab that is selected.
-
Page 277: Logging On And Logging Off
PageScope Web Connection Logging on and logging off 9.2.1 Login and logout operations When the machine is accessed with PageScope Web Connection, the logon page appears if user authentication and account track settings have been specified on the machine. If user authentication and account track settings have not been specified, the page for a public user appears. -
Page 278: When User Authentication And Account Track Settings Are Specified
PageScope Web Connection When user authentication and account track settings are specified The User Authentication/Account Track screen appears. Enter the required information to log in. To log in as a different user or an administrator, log out. Log in again. 8650... -
Page 279: Logout
PageScope Web Connection 9.2.2 Logout Click the [Logout] button in the upper right side of the window to display a logoff confirmation dialog box. To return to the logon page again, click the [OK] button. Detail The logon page that appears differs depending on the authentication settings specified on the machine. If a timeout occurs because no operation is performed for a set length of time while logged on or if the authentication settings are changed from the machine’s control panel while logged on to User mode, you will automatically be logged off. -
Page 280: Logging On As A Public User
PageScope Web Connection Logging on as a public user If user authentication settings have not been specified on the machine, logon will be as a public user. In the logon page, select "Public user", and then click the [Login] button. Logging on as a registered user If user authentication settings have been specified on the machine, the name and password for a registered user is required to log on. -
Page 281: Logging On To Administrator Mode
PageScope Web Connection Detail If "ProhibitFunctions" in [Admin. Settings]-[Security Details] is set to "Mode 2" and a user enters an incorrect password the specified number of times, that user is locked out and can no longer use the machine. Contact the administrator to cancel operation restrictions. Logging on to Administrator mode In order to specify system and network settings, log on to Administrator mode. -
Page 282: Overview Of User Mode
PageScope Web Connection Overview of User mode By logging on to PageScope Web Connection in User mode, the following functions can be specified. Note For other details on the User mode, refer to the PageScope Web Connection Help on the PageScope Utilities CD-ROM. -
Page 283: Job
PageScope Web Connection 9.3.2 Item Description Current Jobs The running job and queued jobs can be displayed. Job History The completed jobs can be displayed. 9.3.3 8650 9-12... -
Page 284: Direct Print
PageScope Web Connection Item Description Open User Box A currently created public, personal or group user box can be opened to work on a saved document or to change user box settings. Create User Box New user boxes can be created. Open System User Box System user boxes can be opened to work on a saved document or to change user box settings. -
Page 285: Overview Of Administrator Mode
PageScope Web Connection Overview of Administrator mode By logging on to PageScope Web Connection in Administrator mode, the following functions can be specified. 9.4.1 Maintenance Item Description Meter Count Counters managed by the machine can be displayed. ROM Version The ROM version can be displayed. Import/Export Machine settings can be saved as a file (exported), or settings can be written to the machine (imported). -
Page 286: Security
PageScope Web Connection Item Description Network TWAIN Not available for this machine. Reset Resets the network settings or controller settings. Header/Footer Registration The list of headers/footers can be displayed, and they can be registered or edited. Note Display items related to Copy, Scan or Fax are not available for this machine. 9.4.2 Security Item... -
Page 287: Box
PageScope Web Connection 9.4.3 When logged on in Administrator mode, user boxes can be used without typing in the password. Item Description Open User Box A currently created public, personal or group user box can be opened to work on a saved document or to change user box settings. -
Page 288: Print Setting
PageScope Web Connection 9.4.4 Print Setting Item Description Basic Setting The default printer settings can be specified. PCL Setting The default settings for PCL mode can be specified. PS Setting The default settings for PS mode can be specified. XPS Settings The XPS print settings can be specified. -
Page 289: Network
PageScope Web Connection 9.4.5 Network Item Description TCP/IP Setting Specify the TCP/IP settings to connect the machine to the network. E-Mail Setting Specify the E-Mail TX/RX setting. Display items related to the S/MIME function are not available for this machine. 8650 9-18... - Page 290 PageScope Web Connection Item Description LDAP Setting Not available for this machine. IPP Setting Specify the settings for IPP printing. FTP Setting Specify the settings to use this machine as an FTP server. "FTP TX Setting" is not available for this machine. SNMP Setting Specify the SNMP settings.
-
Page 291: Box Settings
PageScope Web Connection Box settings This section describes other items specifiable on the Box tab for the PageScope Web Connection. From the Box tab, user boxes can be created and basic user box information can be viewed. Note The Box tab appears only if the optional HDD is installed. 9.5.1 Changing user box settings or deleting a user box Change created user box settings or delete a user box. -
Page 292: Creating A New User Box
PageScope Web Connection 9.5.2 Creating a new user box Create a new user box. Detail Public user boxes can be created only, and they cannot be changed in Administrator mode. User Boxes include Public User Boxes, Personal User Boxes for individual users that can be used when the user authentication function is enabled, and Account User Boxes for accounts that can be used when the Account Track function is enabled. -
Page 293: Changing System Box Settings Or Deleting System Boxes
PageScope Web Connection Detail If "Password Rules" is enabled, no password containing less than eight characters can be registered. If you have already registered a user password containing less than eight characters, change it to one using eight characters before enabling "Password Rules". For details on the password rules, refer to "Admin. -
Page 294: Creating A New System User Box
PageScope Web Connection 9.5.4 Creating a new system user box Create a new system user box. Create System User Box In Administrator mode of PageScope Web Connection, select the Box tab - "Create System User Box". Specify the following settings. When "Annotation User Box"... -
Page 295: Importing Or Exporting Setting Information
PageScope Web Connection Importing or exporting setting information Import or export setting information of this machine. Machine settings can be saved (exported) from this machine to the computer, or can be written from the computer to the machine (imported). Import/Export In Administrator mode of PageScope Web Connection, select the Maintenance tab - "Import/Export". -
Page 296: Specifying The Date And Time On This Machine
PageScope Web Connection Specifying the date and time on this machine Specify the date and time of the internal clock of this machine. The following specification methods are available: manual specification and acquisition from the NTP server via the network. To make this machine log in to the Active Directory, it may be necessary to specify the date and time of this machine. -
Page 297: Tcp/Ip Settings
PageScope Web Connection Item Definition Prior confirmation Year Enter the year. Month Enter the month. Enter the day. Hour Enter the hour. Minute Enter the minutes. Time Zone Select the time difference from GMT. Time zone Daylight Saving Time If necessary, specify the daylight saving time setting. 9.7.2 TCP/IP Settings Specify settings to use this machine in a TCP/IP network environment. - Page 298 PageScope Web Connection Item Definition Prior confirmation Port Number Default setting: 123 Port number for the serv- Specify the port number. [Adjust] Connects to the NTP server with the specified conditions to adjust the time. 8650 9-27...
-
Page 299: Limiting Users Using This Machine (Machine Authentication)
PageScope Web Connection Limiting users using this machine (Machine authentication) Specify settings for using this machine using machine authentication. Specify user authentication and account track settings in order to control the use of this machine. User authentication settings are specified to manage individuals, and account track settings are specified to manage groups and multiple users. -
Page 300: User Auth/Account Track
PageScope Web Connection 9.8.1 User Auth/Account Track In Administrator mode of PageScope Web Connection, select the Security tab - "Authentication" - "User Auth/Account Track". Specify the following settings. Item Definition Prior confirmation General Settings Select "ON (MFP)". Public User Access Specify whether to allow public users. -
Page 301: User Registration
PageScope Web Connection 9.8.2 User Registration In Administrator mode of PageScope Web Connection, select the Security tab - "User Registration" - [New Registration]. Specify the following settings. 8650 9-30... - Page 302 PageScope Web Connection Item Definition Prior confirmation Enter the registration number. User Name Enter the user name. E-mail Address Not available for this machine. User Password Enter the password. Retype User Password Enter the password again. Account Name Register the account to which the user belongs. Before se- lecting the account name, register the account.
-
Page 303: Account Track Registration
PageScope Web Connection 9.8.3 Account Track Registration In Administrator mode of PageScope Web Connection, select the Security tab - "Account Track Registration" - [New Registration]. Specify the following settings. Item Definition Prior confirmation Enter the registration number. Account Name Enter the account name. Password Enter the password. -
Page 304: Limiting Users Using This Machine (Active Directory)
PageScope Web Connection Limiting users using this machine (Active Directory) Specify settings for limiting users of this machine using Active Directory. To perform authentication using Active Directory of Windows Server, use this setting. This setting limits functions available on a user basis. Specify the settings according to the following flowchart. -
Page 305: External Server Registration
PageScope Web Connection 9.9.2 External Server Registration In Administrator mode of PageScope Web Connection, select the Security tab - "Authentication" - "External Server Registration" - [Edit]. Specify the following settings. Item Definition Prior confirmation Displays the registration number. External Server Name Enter the name of the external authentication server (up to 32 characters). -
Page 306: User Auth/Account Track
PageScope Web Connection 9.9.3 User Auth/Account Track In Administrator mode of PageScope Web Connection, select the Security tab - "Authentication" - "User Auth/Account Track". Specify the following settings. Item Definition Prior confirmation General Settings Select "ON (External Server)". Ticket Hold Time Setting Specify the ticket hold time. -
Page 307: Default Function Permission
PageScope Web Connection 9.9.4 Default Function Permission In Administrator mode of PageScope Web Connection, select the Security tab - "Authentication" - "Default Function Permission". Specify the following settings. Item Definition Prior confirmation Copy Limits functions available to authorized users on this ma- chine. -
Page 308: Limiting Users Using This Machine (Windows Domain/Workgroup)
PageScope Web Connection 9.10 Limiting users using this machine (Windows domain/workgroup) Specify settings for limiting users of this machine using NTLM authentication. To perform authentication using NTLM when using Active Directory of Windows Server, use this setting. This setting limits functions available on a user basis. Specify the settings according to the following flowchart. -
Page 309: External Server Registration
PageScope Web Connection 9.10.2 External Server Registration In Administrator mode of PageScope Web Connection, select the Security tab - "Authentication" - "External Server Registration" - [Edit]. Specify the following settings. Item Definition Prior confirmation Displays the registration number. External Server Name Enter the name of the external authentication server (up to 32 characters). -
Page 310: User Auth/Account Track
PageScope Web Connection 9.10.3 User Auth/Account Track In Administrator mode of PageScope Web Connection, select the Security tab - "Authentication" - "User Auth/Account Track". Specify the following setting. Item Definition Prior confirmation General Settings Select "ON (External Server)". 9.10.4 Default Function Permission Limits functions available to authorized users on this machine. -
Page 311: Client Setting
PageScope Web Connection 9.10.5 Client Setting In Administrator mode of PageScope Web Connection, select the Network tab - "SMB Setting" - "Client Setting". Specify the following setting. Item Definition Prior confirmation User Authentication Select "ON". (NTLM) Detail Specifying "OFF" for "User authentication (NTLM)" when "OFF" is specified for "User authentication (NTLM)", "NTLM v1"... -
Page 312: Wins Setting
PageScope Web Connection 9.10.6 WINS Setting In Administrator mode of PageScope Web Connection, select the Network tab - "SMB Setting" - "WINS Setting". Specify the following settings. Item Definition Prior confirmation WINS To use the WINS server, select "ON". Auto Obtain Setting To automatically obtain the WINS server address, select Whether automatic ac- "Enable". -
Page 313: Limiting Users Using This Machine (Nds)
PageScope Web Connection 9.11 Limiting users using this machine (NDS) Specify settings for limiting users of this machine using NDS. To perform NDS-based authentication using NetWare 5.1 or NetWare 6.0, use this setting. This setting limits functions available on a user basis. Specify the settings according to the following flowchart. -
Page 314: User Auth/Account Track
PageScope Web Connection Item Definition Prior confirmation Displays the registration number. External Server Name Enter the name of the external authentication server (up to 32 characters). External Server Type Select "NDS". Default NDS Tree Name Enter the default NDS tree name. Default NDS Context Enter the default NDS context name. -
Page 315: Netware Setting
PageScope Web Connection 9.11.4 NetWare Setting In Administrator mode of PageScope Web Connection, select the Network tab - "NetWare Setting" - "NetWare Setting". Specify the following settings. Item Definition Prior confirmation IPX Setting Select "ON". Ethernet Frame Type Specify the frame type to be used. Frame type User Authentication Set- Select "ON". -
Page 316: Limiting Users Using This Machine (Ldap)
PageScope Web Connection 9.12 Limiting users using this machine (LDAP) Specify settings for limiting users of this machine using the LDAP server. To perform authentication using the LDAP server, use this setting. This setting limits functions available on a user basis. Specify the settings according to the following flowchart. -
Page 317: External Server Registration
PageScope Web Connection 9.12.2 External Server Registration In Administrator mode of PageScope Web Connection, select the Security tab - "Authentication" - "External Server Registration" - [Edit]. Specify the following settings. Item Definition Prior confirmation Displays the registration number. External Server Name Enter the name of the external authentication server (up to 32 characters). -
Page 318: User Auth/Account Track
PageScope Web Connection 9.12.3 User Auth/Account Track In Administrator mode of PageScope Web Connection, select the Security tab - "Authentication" - "User Auth/Account Track". Specify the following setting. Item Definition Prior confirmation General Settings Select "ON (External Server)". 9.12.4 Default Function Permission Limits functions available to authorized users on this machine. -
Page 319: Ldap Over Ssl
PageScope Web Connection 9.12.5 LDAP over SSL External Server Registration In Administrator mode of PageScope Web Connection, select the Security tab - "Authentication" - "External Server Registration" - [Edit]. Specify the following settings. Item Definition Prior confirmation Enable SSL To encrypt communication between this machine and the Whether the sever sup- LDAP server using SSL, select the "Enable SSL"... -
Page 320: Creating A Certificate For This Machine For Ssl-Based Communication
PageScope Web Connection 9.13 Creating a certificate for this machine for SSL-based communication Specify settings to create a certificate for this machine for SSL-based communication. Creating a certificate for this machine encrypts communication from a client computer to this machine using SSL in order to prevent disclosure of communication contents and password. -
Page 321: Create A Self-Signed Certificate
PageScope Web Connection 9.13.1 Create a self-signed Certificate In Administrator mode of PageScope Web Connection, select the Security tab - "SSL/TLS Setting" - "SSL/TLS Setting" - [Setup] - "Create a self-signed Certificate". Specify the following settings. Item Definition Prior confirmation Common Name Displays the IP address or domain name of the machine. -
Page 322: Request A Certificate
PageScope Web Connection 9.13.2 Request a Certificate In Administrator mode of PageScope Web Connection, select the Security tab - "SSL/TLS Setting" - "SSL/TLS Setting" - [Setup] - "Request a Certificate". Specify the following settings. Item Definition Prior confirmation Common Name Displays the IP address or domain name of the machine. -
Page 323: Install A Certificate
PageScope Web Connection Item Definition Prior confirmation Certificate Signing Re- Displays certificate signing request data. quest Data [Save] Saves certificate signing request data in the computer as a file. 9.13.3 Install a Certificate In Administrator mode of PageScope Web Connection, select the Security tab - "SSL/TLS Setting"- "SSL/TLS Setting"... -
Page 324: Set An Encryption Strength
PageScope Web Connection Item Definition Prior confirmation Encryption Strength Specify the encryption method. Mode using SSL/TLS Specify the SSL/TLS application range. [Install] Installs the certificate. 9.13.4 Set an Encryption Strength In Administrator mode of PageScope Web Connection, select the Security tab - "SSL/TLS Setting" - "SSL/TLS Setting"... -
Page 325: Set Mode Using Ssl
PageScope Web Connection 9.13.5 Set Mode using SSL In Administrator mode of PageScope Web Connection, select the Security tab - "SSL/TLS Setting" - "SSL/TLS Setting" - [Setup] - "Set Mode using SSL". Specify the following setting. Item Definition Prior confirmation Mode using SSL/TLS If necessary, change the set SSL/TSL application range. -
Page 326: Using Ssl Communication Between Vista And This Machine With Web Service Function
PageScope Web Connection 9.14 Using SSL communication between Vista and this machine with Web Service Function When using the Web Service function, execute SSL-based encryption of communication from a Windows Vista-equipped computer to this machine. To perform SSL communication, both communications from the computer to this machine and from this machine to the computer must be encrypted by SSL. -
Page 327: Tcp/Ip Settings
PageScope Web Connection 9.14.3 TCP/IP Settings Specify settings to use this machine in a TCP/IP network environment. For details, refer to "Specifying general settings for TCP/IP-based communication" on page 2-2. 9.14.4 SSL/TLS Setting Encrypt communication with this machine using SSL. For details, refer to "Creating a certificate for this machine for SSL-based communication"... -
Page 328: Performing Ip Address Filtering
PageScope Web Connection 9.15 Performing IP address filtering Specify settings for performing IP address filtering. Performing IP address filtering limits access from specified IP addresses. Specify addresses from which this machine is accessible and inaccessible. Specify the settings according to the following flowchart. TCP/IP Settings IP Filtering Finish... -
Page 329: Communicating Using Ipv6
PageScope Web Connection 9.16 Communicating using IPv6 Specifying settings for IPv6-based communication To allocate the IPv6 address to this machine, use this setting. IPv6 can run simultaneously with IPv4. However, Ipv6 does not run independently. When using this machine under the IPv6 environment, there are the following restrictions. SMB Print and NTLM Authentication are not available. - Page 330 PageScope Web Connection Specify the following settings. 8650 9-59...
- Page 331 PageScope Web Connection Item Definition Prior confirmation TCP/IP Select "ON". IPv6 Select "ON". Auto IPv6 Setting To automatically obtain the IPv6 address, select "ON". Whether to automatically obtain the IPv6 address Link-Local Address Displays the link-local address generated from the MAC ad- dress.
-
Page 332: Communicating Using Ipsec
PageScope Web Connection 9.17 Communicating using IPsec Specify settings for IPsec-based communication Communicating using IPsec prevents falsification and disclosure of data by IP packet. This function ensure safer communication even if transport or application that does not support encryption is used Specify the settings according to the following flowchart. -
Page 333: Ipsec
PageScope Web Connection 9.17.2 IPsec In Administrator mode of PageScope Web Connection, select the Network tab - "TCP/IP Setting" - "IPsec". Specify the following setting. Item Definition Prior confirmation IPsec Select "ON". 8650 9-62... -
Page 334: Ike Setting
PageScope Web Connection 9.17.3 IKE Setting In Administrator mode of PageScope Web Connection, select the Network tab - "TCP/IP Setting" - "IPsec" - "IKE" - [Edit]. Specify the following settings. (Up to four groups can be registered in "IKE".) Item Definition Prior confirmation Key Validity Period... -
Page 335: Peer
PageScope Web Connection 9.17.5 Peer In Administrator mode of PageScope Web Connection, select the Network tab - "TCP/IP Setting" - "IPsec" - "Peer" - [Edit]. Specify the following settings. (Up to 10 peers can be registered in "Peer".) Item Definition Prior confirmation Perfect Forward Secrecy To increase the IKE strength, select "ON". -
Page 336: Monitoring This Machine Using The Snmp Manager
PageScope Web Connection 9.18 Monitoring this machine using the SNMP manager Specify settings for monitoring this machine using a general SNMP manager. SNMP manager-based communication with this machine allows acquisition, management, and monitoring of the information of this machine via the network. SNMP runs in a TCP/IP or IPX/SPX environment. In addition, use of the TRAP function of SNMP allows setting for notification of the status of this machine. -
Page 337: Netware Setting
PageScope Web Connection 9.18.2 NetWare Setting In Administrator mode of PageScope Web Connection, select the Network tab - "NetWare Setting" - "NetWare Setting". Specify the following settings. Item Definition Prior confirmation IPX Setting Select "ON". Ethernet Frame Type Specify the frame type to be used. Frame type 8650 9-66... -
Page 338: Snmp Setting
PageScope Web Connection 9.18.3 SNMP Setting In Administrator mode of PageScope Web Connection, select the Network tab - "SNMP Setting". Specify the following settings. Item Definition Prior confirmation SNMP Specifies whether to use the SNMP. If yes, specify whether Protocol to be used to use SNMP v1/v2 (IP), SNMP v3, and SNMP v1 (IPX). - Page 339 PageScope Web Connection Item Definition Prior confirmation priv-password Specify the read only user privacy password to be used for privacy (encryption) (up to 32 characters). Write User Name Specify the reading/writing user name (up to 32 characters). Security Level Specify the security level for reading/writing user. auth-password Specify the reading/writing user authentication password to be used for authentication (up to 32 characters).
-
Page 340: Providing Notification Of The Status Of This Machine (E-Mail)
PageScope Web Connection 9.19 Providing notification of the status of this machine (E-mail) Specify settings for notifying the administrator of the machine status via E-mail. Using this function provides notification for a specified address when a warning message occurs on this machine. -
Page 341: E-Mail Tx (Smtp)
PageScope Web Connection 9.19.2 E-mail TX (SMTP) In Administrator mode of PageScope Web Connection, select the Network tab - "E-mail Setting" - "E-mail TX (SMTP)". Specify the following settings. Item Definition Prior confirmation E-mail TX Setting Select "ON". E-mail Notification Select "ON". -
Page 342: Status Notification Setting
PageScope Web Connection 9.19.3 Status Notification Setting In Administrator mode of PageScope Web Connection, select the Maintenance tab - "Status Notification Setting" - "E-mail Address" - [Edit]. Specify the following settings. Item Definition Prior confirmation Notification Address Specify the notification address. Notification address Replenish Paper Tray Provides notification when a paper-out condition occurs. -
Page 343: Smtp Over Ssl/Start Tls
PageScope Web Connection 9.19.4 SMTP over SSL/Start TLS E-mail TX (SMTP) In Administrator mode of PageScope Web Connection, select the Network tab - "E-mail Setting" - "E-mail TX (SMTP)". Specify the following settings. Item Definition Prior confirmation Use SSL/TLS To encrypt communication between this machine and the Whether the sever sup- SMTP server using SSL/TTS, select "SMTP over SSL"... -
Page 344: Smtp Authentication
PageScope Web Connection 9.19.5 SMTP Authentication In Administrator mode of PageScope Web Connection, select the Network tab - "E-mail Setting" - "E-mail TX (SMTP)". Specify the following settings. Item Definition Prior confirmation SMTP Authentication To perform SMTP authentication, select the "SMTP Authen- Whether the sever re- tication"... -
Page 345: E-Mail Rx (Pop)
PageScope Web Connection E-mail RX (POP) In Administrator mode of PageScope Web Connection, select the Network tab - "E-mail Setting" - "E-mail RX (POP)". Specify the following settings. Item Definition Prior confirmation E-mail RX Setting To perform POP before SMTP, select "ON". POP Server Address Specify the POP server address. -
Page 346: Pop Over Ssl
PageScope Web Connection 9.19.7 POP over SSL E-mail RX (POP) In Administrator mode of PageScope Web Connection, select the Network tab - "E-mail Setting" - "E-mail RX (POP)". Specify the following settings. Item Definition Prior confirmation Use SSL/TLS To encrypt communication between this machine and the Whether the sever sup- POPS server using SSL, select the "Use SSL/TLS"... -
Page 347: Apop Authentication
PageScope Web Connection 9.19.8 APOP Authentication In Administrator mode of PageScope Web Connection, select the Network tab - "E-mail Setting" - "E-mail RX (POP)". Specify the following settings. Item Definition Prior confirmation APOP Authentication To encrypt the login name and password when logging in to Whether the sever re- the POP server, select "ON". -
Page 348: Providing Notification Of The Status Of This Machine (Trap)
PageScope Web Connection 9.20 Providing notification of the status of this machine (TRAP) Specify settings for notifying the administrator of the machine status using the TRAP function of SNMP. Using this function provides notification for a specified IP address or IPX address when a warning message occurs on this machine. -
Page 349: Netware Setting
PageScope Web Connection 9.20.2 NetWare Setting In Administrator mode of PageScope Web Connection, select the Network tab - "NetWare Setting" - "NetWare Setting". Specify the following settings. Item Definition Prior confirmation IPX Setting Select "ON". Ethernet Frame Type Specify the frame type to be used. Frame type 9.20.3 TRAP Setting... -
Page 350: Using The Tcp Socket/Openapi/Ftp Server Function
PageScope Web Connection 9.21 Using the TCP Socket/OpenAPI/FTP server function Specify settings for TCP Socket, OpenAPI, and FTP server of this machine. TCP socket is used during data transmissions between the computer application and this machine. To synchronize this machine with a different OpenAPI-based system, specify settings for OpenAPI. This machine serves as an FTP server by specifying settings for the FTP server function of this machine. -
Page 351: Tcp Socket Setting
PageScope Web Connection 9.21.3 TCP Socket Setting In Administrator mode of PageScope Web Connection, select the Network tab - "TCP Socket Setting". Specify the following settings. Detail To use SSL/TLS, install the certificate in advance. For details, refer to "Creating a certificate for this machine for SSL-based communication"... -
Page 352: Openapi Setting
PageScope Web Connection 9.21.4 OpenAPI Setting In Administrator mode of PageScope Web Connection, select the Network tab - "OpenAPI Setting". Specify the following settings. Detail To use SSL/TLS, install the certificate in advance. For details, refer to "Creating a certificate for this machine for SSL-based communication"... -
Page 353: Ftp Server Setting
PageScope Web Connection 9.21.5 FTP Server Setting In Administrator mode of PageScope Web Connection, select the Network tab - "FTP Setting" - "FTP Server Setting". Specify the following setting. Item Definition Prior confirmation FTP Server Select "ON". Detail If "EnhancedSecurity" is set to "ON", "OFF" is selected. 8650 9-82... -
Page 354: Other Items On The Maintenance Tab
PageScope Web Connection 9.22 Other items on the Maintenance tab This section describes other items specifiable on the Maintenance tab for the PageScope Web Connection. 9.22.1 Using the timer function Specify settings for the timer function of this machine. Settings for the power save function can be specified. Power Save Setting In Administrator mode of PageScope Web Connection, select the Maintenance tab - "Timer Setting"... -
Page 355: Resetting Setting Information
PageScope Web Connection 9.22.2 Resetting setting information Reset machine settings. Network settings and controller settings can be reset. Network Setting Clear In Administrator mode of PageScope Web Connection, select the Maintenance tab - "Reset" - "Network Setting Clear". To reset to the factory default network settings, click [Clear]. Detail If "EnhancedSecurity"... -
Page 356: Reset
PageScope Web Connection Reset In Administrator mode of PageScope Web Connection, select the Maintenance tab - "Reset" - "Reset". To reset the controller, click [Reset]. 8650 9-85... -
Page 357: Registering The Header Or Footer
PageScope Web Connection 9.22.3 Registering the header or footer To print on this machine, register a text that can be printed as a header or footer. The header or footer registered here can be selected in the printer driver. Header/Footer Registration In Administrator mode of PageScope Web Connection, select the Maintenance tab - "Header/Footer Registration"... - Page 358 PageScope Web Connection Item Definition Header/Footer Specify whether to print the following items. • Header String/Footer String (up to 40 characters each) • Date/Time Setting • Distribution Number • Job Number • Serial Number • User Name/Account Name 8650 9-87...
-
Page 359: Other Items On The Security Tab
PageScope Web Connection 9.23 Other items on the Security tab This section describes other items specifiable on the Security tab for the PageScope Web Connection. 9.23.1 Specifying the auto logout time Specify the length of time before Administrator mode or User mode is automatically logged out. If no operation is performed for the length of time specified here, the user will automatically be logged out. -
Page 360: Specifying The Administrator Password
PageScope Web Connection 9.23.2 Specifying the Administrator password Specify the password for the machine’s administrator. Administrator Password Setting In Administrator mode of PageScope Web Connection, select the Security tab - "Administrator Password Setting". Specify the following settings. Detail If "EnhancedSecurity" is set to "ON", this menu item does not appear. If the certificate for this machine is not installed, this menu item does not appear. -
Page 361: Print Setting Tab Settings
PageScope Web Connection 9.24 Print Setting tab settings This section describes other items specifiable on the Print Setting tab for the PageScope Web Connection. On the Print Setting tab, specify settings for the print function of this machine. 9.24.1 Specifying initial settings for the print function Specify initial settings for the print function. -
Page 362: Specifying Settings For Pcl/Ps/Xps Print
PageScope Web Connection Item Definition No Matching Paper in Specify whether to continue printing from a different paper tray when there is no paper of Tray Setting the appropriate size in the specified paper tray. A4/A3←→LTR/LGR Select whether to print an A4 (Letter)/A3 (Ledger) original in the same size with disregard Auto Switch to image missing when the Letter (A4)/Ledger (A3) paper tray is selected. -
Page 363: Ps Setting
PageScope Web Connection PS Setting In Administrator mode of PageScope Web Connection, select the Print Setting tab - "PS Setting". Specify the following settings. Item Definition PS Error Print Specify whether to print error message when an error occurs during PS rasterization. ICC Profile Settings Specify the ICC profile. -
Page 364: Xps Settings
PageScope Web Connection XPS Settings In Administrator mode of PageScope Web Connection, select the Print Setting tab - "XPS Settings". Specify the following settings. Item Definition Verify XPS Digital Signa- Specify whether to verify digital signature. When "ON" is selected, the document without ture a valid digital signature is not printed. - Page 365 PageScope Web Connection 8650 9-94...
-
Page 366: Troubleshooting
Troubleshooting... -
Page 367: When An Error Code Appears
Troubleshooting Troubleshooting 10.1 When an error code appears There are three types of errors; errors that can be cleared by opening/closing the front door, errors that can be cleared by turning the power off/on, and errors that cannot be cleared. Clear the error by following the on- screen instructions. -
Page 368: When The Message "Misfeed Detected. Xxxx Remove Paper." Appears
Troubleshooting 10.2 When the message "Misfeed detected. XXXX Remove paper." appears If a misfeed occurs during printing, the message "Misfeed detected. XXXX Remove paper." appears and the location of the misfeed is indicated in the screen. (misfeed location screen) At this time, printing cannot continue until the misfeed is adequately cleared. Note The procedure for clearing misfed paper differs depending on where the misfeed occurs. -
Page 369: Paper Misfeed Indications
Troubleshooting 10.2.1 Paper misfeed indications 13,14,15,16,17,18 *The illustration above shows the main unit with optional finisher FS-519, mailbin kit and the double paper feed cabinet installed. 19,20 *The illustration above shows optional finisher FS-519, saddle stitcher and the tray 4 (LCT) installed. *The illustration above shows optional finisher FS-609 and the double paper feed cabinet installed. -
Page 370: Clearing A Paper Misfeed In The Fusing Unit
Troubleshooting Code Description 1001 A paper misfeed in the tray 1 (Bypass Tray) (p. 10-12) 1101 A paper misfeed in the tray 2 (p. 10-16) 1201 A paper misfeed in the tray 3 (p. 10-19) 1301 A paper misfeed in the tray 4 (p. 10-20) 1401 A paper misfeed in the tray 5 (p. - Page 371 Troubleshooting Slowly remove any misfed paper from the fusing unit. – Pull down any misfed paper from the fusing unit. – Toner that did not pass through the fusing unit may get on your hands or clothes. Be extremely careful when removing the paper.
- Page 372 Troubleshooting Remove any misfed paper. Close the tray. 7 CAUTION The area around the fusing unit is extremely hot. %Touching anything other than the indicated levers and dials may result in burns. If you get burnt, immediately cool the skin under cold water, and then seek professional medical attention.
-
Page 373: Clearing A Paper Misfeed In The Main Unit
Troubleshooting Reminder If the paper is misfed as described below, contact your service representative or the manufacturer. The paper is wrapped around the roller in the fusing unit. The paper is folded or shredded by the roller in the fusing unit. The paper that was removed tore and remains in the fusing unit. - Page 374 Troubleshooting If the edge of the paper is around the timing roller, open the internal cover M1. Slowly remove any misfed paper from the timing roller. – Toner that did not pass through the fusing unit may get on your hands or clothes. Be extremely careful when removing the paper.
- Page 375 Troubleshooting Close the tray. 7 CAUTION The area around the fusing unit is extremely hot. %Touching anything other than the indicated levers and dials may result in burns. If you get burnt, immediately cool the skin under cold water, and then seek professional medical attention.
-
Page 376: Clearing A Paper Misfeed In The Automatic Duplex Unit
Troubleshooting 10.2.4 Clearing a paper misfeed in the automatic duplex unit Detail For details on the positions of paper misfeeds, refer to "Paper misfeed indications" on page 10-4. Open the door of the automatic duplex unit. Slowly remove any misfed paper from the automatic duplex unit. -
Page 377: Clearing A Paper Misfeed In The Tray 1 (Bypass Tray)
Troubleshooting Remove any misfed paper. Close the tray. Reminder Be careful not to touch the film with your hands. 10.2.5 Clearing a paper misfeed in the tray 1 (bypass tray) Detail For details on the positions of paper misfeeds, refer to "Paper misfeed indications" on page 10-4. Remove the paper from the tray 1. - Page 378 Troubleshooting Open the internal cover M1. Slowly remove any misfeed paper. Close the upper right-side door. 8650 10-13...
-
Page 379: Clearing A Paper Misfeed In The Paper Transport Section
Troubleshooting 7 CAUTION The area around the fusing unit is extremely hot. %Touching anything other than the indicated levers and dials may result in burns. If you get burnt, immediately cool the skin under cold water, and then seek professional medical attention. - Page 380 Troubleshooting Pull up the center right-side door release lever, and then open the center right-side door. Carefully remove any misfed paper. Close the center right-side door. Pull out the tray being used. 8650 10-15...
-
Page 381: Clearing A Paper Misfeed In Tray 3
Troubleshooting Remove any misfed paper. Close the tray. Reminder Be careful not to touch the film with your hands. 10.2.7 Clearing a paper misfeed in tray 2 Detail For details on the positions of paper misfeeds, refer to "Paper misfeed indications" on page 10-4. Pull up the upper right-side door release lever, and then open the upper right-side door. - Page 382 Troubleshooting Carefully remove any misfed paper. Close the upper right-side door. Pull out tray 2. Remove any misfed paper. 8650 10-17...
- Page 383 Troubleshooting Close the tray. 7 CAUTION The area around the fusing unit is extremely hot. %Touching anything other than the indicated levers and dials may result in burns. If you get burnt, immediately cool the skin under cold water, and then seek professional medical attention.
- Page 384 Troubleshooting 10.2.8 Clearing a paper misfeed in tray 3 Detail For details on the positions of paper misfeeds, refer to "Paper misfeed indications" on page 10-4. Pull up the center right-side door release lever, and then open the center right-side door. Carefully remove any misfed paper.
-
Page 385: Clearing A Paper Misfeed In Paper Feed Cabinet (Tray 4/5)
Troubleshooting Pull out tray 3. Remove any misfed paper. Close the tray. Reminder Be careful not to touch the film with your hands. 10.2.9 Clearing a paper misfeed in paper feed cabinet (Tray 4/5) Detail For details on the positions of paper misfeeds, refer to "Paper misfeed indications" on page 10-4. Pull up the lower right-side door release lever, and then open the lower right-side door. - Page 386 Troubleshooting Carefully remove any misfed paper. Close the lower right-side door. Pull out paper tray. Remove any misfed paper. 8650 10-21...
-
Page 387: Clearing A Paper Misfeed In The Tray 4 (Lct)
Troubleshooting Close the tray. Reminder Be careful not to touch the film with your hands. 10.2.10 Clearing a paper misfeed in the tray 4 (LCT) Detail For details on the positions of paper misfeeds, refer to "Paper misfeed indications" on page 10-4. Pull up the lower right-side door release lever, and then open the lower right-side door. -
Page 388: To Clear A Banner Paper Misfeed
Troubleshooting Press the tray release button, and then pull out the tray 4 (LCT). Remove any misfed paper. Close the tray 4 (LCT). Reminder Be careful not to touch the film with your hands. 10.2.11 To clear a banner paper misfeed Pull up the upper right-side door release lever, and then open the upper right-side door. - Page 389 Troubleshooting – If the end of the paper cannot be seen or cannot be grabbed, remove the paper in the direction of the arrow. Open inside cover M1. Remove any paper caught in the timing roller section. Push up the fusing unit upper cover, and then remove any misfed paper.
- Page 390 Troubleshooting Open the fusing cover M2. Remove any misfed paper. Remove any paper caught in the fusing unit. Close the fusing cover M2. 8650 10-25...
- Page 391 Troubleshooting Close the fusing unit upper cover. Close the upper right-side door. 8650 10-26...
- Page 392 Troubleshooting 7 CAUTION The area around the fusing unit is extremely hot. %Touching anything other than the indicated levers and dials may result in burns. If you get burnt, immediately cool the skin under cold water, and then seek professional medical attention.
-
Page 393: Clearing A Paper Misfeed In Finisher Fs-519
Troubleshooting 10.2.12 Clearing a paper misfeed in finisher FS-519 Detail For details on the positions of paper misfeeds, refer to "Paper misfeed indications" on page 10-4. Pull the finisher release lever 1 to unlock the finisher. Grab the finisher at "2", and then slide the finisher away from the main unit. - Page 394 Troubleshooting Raise lever FN1, turn dial FN2, and then remove any paper. Lower guide FN3, and then remove any paper. – If the punch kit is installed, pull out the punch scrap box FN3.1. Return guide FN3 to its original position. –...
- Page 395 Troubleshooting Turn dial FN4 to feed the paper, open the transport unit cover, and then remove any paper. Turn dial FN5 or dial FN6, and then remove any paper. Close the front door. Return the finisher to its original position. 8650 10-30...
-
Page 396: Clearing A Paper Misfeed In The Mailbin
Troubleshooting – When returning the finisher to its original position, do not grab the handle on the front door, the control panel, the mail bins, or the saddle stitcher. 10.2.13 Clearing a paper misfeed in the mailbin Detail For details on the positions of paper misfeeds, refer to "Paper misfeed indications" on page 10-4. Open the front door. - Page 397 Troubleshooting Turn dial FN5 or dial FN6 to feed out the paper. While pressing down lever FN7, remove any paper. Pull lever FN8 to open the misfeed-clearing door. Remove any paper in the mailbin. 8650 10-32...
-
Page 398: Clearing A Paper Misfeed In The Saddle Stitcher
Troubleshooting Close the misfeed-clearing door. Close the front door. 10.2.14 Clearing a paper misfeed in the saddle stitcher Detail For details on the positions of paper misfeeds, refer to "Paper misfeed indications" on page 10-4. Open the front door. Turn dial FN5 or dial FN6 to feed out the paper. Remove all paper from the finishing tray. - Page 399 Troubleshooting Open the misfeed-clearing door, and then remove any paper. Close the misfeed-clearing door. Close the front door. 10.2.15 To clear a paper misfeed in finisher FS-609 Slide the finisher away from the machine. Open the horizontal transport unit cover, and then remove any misfed paper.
- Page 400 Troubleshooting Open the front door of the finisher. Turn misfeed-clearing dial 1 clockwise until the removal indicator is completely blue. Removal indicator What should be done if misfeed-clearing dial 1 is turned too far? % Turn the misfeed-clearing dial 1 counterclockwise to finely adjust it.
- Page 401 Troubleshooting Open the misfeed-clearing guide for the finisher, and then remove any misfed paper. Open the right-side door, and then remove any misfed paper in the transport section. If the paper could not be removed in step 10, turn the misfeed-clearing dial in the folding section clockwise.
- Page 402 Troubleshooting Reminder If the message "Misfeed detected." appears, be sure to open the front door, turn the misfeed-clearing dial until the removal indicator is completely blue, and then remove the paper. If the paper is removed with too much force, the finisher may be damaged. Do not remove paper remaining in the transfer unit with too much force, otherwise the folding unit may be damaged.
-
Page 403: When The Message "Staple Jam Detection" Appears
Troubleshooting 10.3 When the message "Staple Jam Detection" appears If a staple jam occurs in the finisher, the message shown below appears. Reminder Be careful when clearing jammed staples since injuries may result. 10.3.1 Clearing jammed staples in finisher FS-519 Detail For details on clearing misfed paper in the finisher, refer to "Clearing a paper misfeed in finisher FS- 519"... - Page 404 Troubleshooting Remove the staple cartridge holder. – Pull the staple cartridge holder toward you to remove Raise the shutter of the staple cartridge holder, and then remove one sheet of staples. Return the shutter of the staple cartridge holder to its original position. Insert the staple cartridge holder, sliding it along the rails in the compartment.
-
Page 405: Clearing Jammed Staples In The Saddle Stitcher
Troubleshooting 10.3.2 Clearing jammed staples in the saddle stitcher Detail For details on clearing misfed paper in the finisher, refer to "Clearing a paper misfeed in finisher FS- 519" on page 10-28. For details on clearing misfed paper in the saddle stitcher, refer to "Clearing a paper misfeed in the saddle stitcher"... -
Page 406: To Clear Jammed Staples In Finisher Fs
Troubleshooting 10.3.3 To clear jammed staples in finisher FS-609 Reminder If the following procedure is not followed and the paper is removed with too much force, the stapler unit may be damaged. Detail For details on clearing misfed paper in the finisher, refer to "To clear a paper misfeed in finisher FS-609" on page 10-34. - Page 407 Troubleshooting Grasp both sides of the staple cartridge holder, lift it up, Staple cartridge and then pull it out. holder Swing open the shutter of the staple cartridge. Pull out toward you the two staples jammed at the end of the staple cartridge.
- Page 408 Troubleshooting Insert the staple cartridge holder until it locks into place. – Check that the staple cartridge holder is securely installed. Carefully move the stapler unit back into its original position. Close the front door. Slide the finisher back against the machine. Reminder Do not remove paper with too much force, otherwise the folding unit may be damaged.
-
Page 409: When The Message "Replenish Paper" Appears
Troubleshooting 10.4 When the message "Replenish paper" appears If a tray has run out of paper during printing, the message "Replenish paper" appears. Detail For details on loading paper, refer to "Loading paper into tray 2/3/4/5" on page 1-25, and "Loading paper into the tray 4 (LCT)"... -
Page 410: When The Message "Memory Overflow" Appears
Troubleshooting 10.5 When the message "Memory Overflow" appears This message appears when memory space is not sufficient and the job being read was deleted. Check the size of the data to be sent. 8650 10-45... -
Page 411: When The Message "Replace Xxxx Soon." Appears
Troubleshooting 10.6 When the message "Replace XXXX soon." appears When it is almost time to replace consumables or a part within this machine, a message similar to the one shown below appears, warning about the replacement period. Detail When the message appears, replace the specified consumables or part. After the message "Replace XXXX soon."... -
Page 412: When The Message "Please Replace Xxxx." Appears
Troubleshooting 10.7 When the message "Please replace XXXX." appears When it is time to replace consumables or a part within this machine, a message similar to the one shown below appears. Note When the message appears, replace the specified consumables or part. Detail Dispose of the used consumables or parts according to your local regulations. -
Page 413: When The Message "Remote Operation Please Do Not Turn Off Power." Appears
Troubleshooting 10.8 When the message "Remote Operation Please do not turn off power." appears This message appears when the machine is being accessed in Administrator mode of PageScope Web Connection. Reminder Do not turn off the machine while this message is displayed. After access to the machine with PageScope Web Connection has ended, the Basic screen appears again. -
Page 414: Simple Troubleshooting
Troubleshooting 10.9 Simple troubleshooting Symptom Possible cause Remedy Main unit The machine does not Is no power supplied from the elec- Correctly insert the power supply start up when the power trical outlet? plug into the electrical outlet. switch is turned on. The machine does not Is the right-side door of the ma- Securely close the right-side door... - Page 415 Troubleshooting Symptom Possible cause Remedy Printer The message "No printers The printer driver selected for Check the printer name selected. driver are connected." or "Print printing is not compatible with the error" appears. printer controller. The network cable, parallel cable, Check that the cable is connected or USB cable is disconnected.
- Page 416 Troubleshooting Symptom Possible cause Remedy The staple function cannot Stapling is not possible if "Paper Check each setting in the printer be specified. Type" is set to "Thick" or "Trans- driver. parency". For stapling, an optional finisher Install the required optional finisher must be installed.
-
Page 417: Main Messages And Their Remedies
Troubleshooting 10.10 Main messages and their remedies Message Cause Remedy Set correct paper Paper of a suitable size is not loaded Either select a different size or feed Check paper Size in a paper tray. paper of a suitable size from the Check paper Type tray 1 (bypass tray). -
Page 418: Replacing Consumables
Replacing consumables... -
Page 419: Replacing The Toner Cartridge
Replacing consumables Replacing consumables 11.1 Replacing the toner cartridge When the toner is about to run out, an advanced warning message similar to the one shown below appears. Detail When the message appears, prepare to replace the toner cartridge. When the toner is empty, a message similar to the one shown below appears, warning that the toner cartridge should be replaced. -
Page 420: To Replace The Toner Cartridge
Replacing consumables 7 CAUTION Precautions for toner spills Be careful not to spill toner inside the machine or get toner on your clothes or hands. If your hands become soiled with toner, immediately wash them with soap and water. If toner gets in your eyes, immediately flush them with water, and then seek professional medical attention. - Page 421 Replacing consumables Remove the new toner cartridge from its packaging, and then shake the cartridge up and down 5 to 10 times. – The toner within the toner cartridge may have become compacted. If it has, be sure to shake the toner cartridge until the toner is mostly broken up before installing the cartridge.
- Page 422 Replacing consumables Reminder When replacing a toner cartridge, be sure to clean the electrostatic charger wire corresponding to the color of the replaced toner cartridge. Dispose of the used toner cartridge according to your local regulations. 8650 11-5...
-
Page 423: Replacing The Waste Toner Box
Replacing consumables 11.2 Replacing the waste toner box When it is almost time to replace the waste toner box, the message shown in the following illustration appears, warning about the replacement period. Note When the message appears, prepare to replace the waste toner box. Detail The number of prints that can be made from the time that the message "Replace Waste Toner soon."... - Page 424 Replacing consumables Lift up and remove the waste toner box. Install the new waste toner box. Close the front door. 7 CAUTION Handling toner and the waste toner box Do not throw toner or the waste toner box into a fire. Toner expelled from the fire may cause burns.
- Page 425 Replacing consumables Reminder Do not tilt the removed waste toner box, otherwise waste toner may spill. Dispose of the used waste toner boxes according to your local regulations. 8650 11-8...
-
Page 426: Replacing An Imaging Unit
Replacing consumables 11.3 Replacing an imaging unit When it is almost time to replace an imaging unit, an advanced warning message similar to the one shown below appears. Note When the message appears, prepare to replace the imaging unit. When the time to replace the imaging unit is reached, an advanced warning message similar to the one shown below appears. -
Page 427: To Replace The Imaging Unit
Replacing consumables Detail For details on replacing the imaging unit, refer to "To replace the imaging unit" on page 11-10. Reminder Be sure to replace the imaging unit only after the message "IU needs to be replaced. [x]" appears. In addition, do not replace the imaging unit of any color other than the one indicated in the message on the message window. - Page 428 Replacing consumables Remove the imaging unit from its packaging. – The imaging unit can easily be damaged by light. Leave the imaging unit in the black protective bag until immediately before it is to be installed. – Do not hold the top part of the imaging unit, otherwise the PC drum may be damaged, resulting in decreased image quality.
- Page 429 Replacing consumables Peel off the tape. Remove the packing material and securing material. Align the + mark of the imaging unit and the , mark of the machine. Insert the imaging unit into the machine. – Make sure that the imaging unit is the same color as the label on the imaging unit compartment.
- Page 430 Replacing consumables Push the imaging unit until it bottoms. Close the front door. Insert the used imaging unit into the empty black protective bag and box of the new imaging unit. Set the power switch "n". Adjust the image stabilization. –...
- Page 431 Replacing consumables Reminder Be careful not to touch the PC drum. Dispose of the used imaging units according to your local regulations. 8650 11-14...
-
Page 432: Replacing The Staple Cartridge
Replacing consumables 11.4 Replacing the staple cartridge When the staple cartridge is empty, the message "Replace Staple Cartridge" appears. Replace the staple cartridge. Reminder Be sure to replace the staple cartridge only after the message appears, otherwise the machine may be damaged. - Page 433 Replacing consumables Remove the empty cartridge from the staple cartridge holder. Load the new staple cartridge into the staple cartridge holder. – Do not remove the remaining staples, otherwise the machine will not be able to staple after the cartridge is replaced.
-
Page 434: To Replace The Staple Cartridge In Saddle Stitcher
Replacing consumables 11.4.2 To replace the staple cartridge in saddle stitcher Raise the output tray, and then push down the staple cartridge holder and remove it. Press in the area marked "PUSH" to unlock the staple cartridge holder. Remove the empty staple cartridge from the staple cartridge holder. - Page 435 Replacing consumables Load the new staple cartridge into the staple cartridge holder. Slowly pull off the seal. Insert the staple cartridge holder, and then push it up until it locks into place. – When inserting the staple cartridge holder, be sure to insert it so that it faces the correct direction.
-
Page 436: To Replace The Staple Cartridge For Finisher Fs
Replacing consumables Pull the handle of the misfeed-clearing door to open it, and then close it. 11.4.3 To replace the staple cartridge for finisher FS-609 Open the front door of the finisher. Slowly pull out the stapler unit as far as possible. Stapler unit Grasp both sides of the staple cartridge holder, lift it up, Staple cartridge holder... - Page 437 Replacing consumables Press the button marked "PUSH" on the side of the staple cartridge holder. Staple cartridge Staple case holder The staple case is released. Pull up the staple case. Remove the staple cartridge from the staple case. Staple cartridge Load the new staple cartridge into the staple cartridge holder.
- Page 438 Replacing consumables Press the staple case down. Peel the tape off of the staple cartridge. Insert the staple cartridge holder, making sure the tabs on the holder slide along the rails in the compartment. Insert the staple cartridge holder until it locks into place. –...
- Page 439 Replacing consumables Reminder Replace the staple cartridge only after the message has appeared. If the staple cartridge is replaced before the message appears, the machine may be damaged. 8650 11-22...
-
Page 440: Emptying The Punch Scrap Box
Replacing consumables 11.5 Emptying the punch scrap box If the punch scrap box in the punch kit installed on the finisher becomes full, the message shown below appears. 11.5.1 To empty the punch scrap box in the finisher FS-519 Follow the procedure described below to empty the punch scrap box. Open the front door. - Page 441 Replacing consumables Empty the punch scrap box. Insert the punch scrap box into its original position. Close the front door. 11.5.2 To empty the punch scrap box in the finisher FS-609 Follow the procedure described below to empty the punch scrap box. Slide the finisher away from the machine.
- Page 442 Replacing consumables Empty the punch scrap box. Insert the punch scrap box into its original position. Slide the finisher back against the machine. 8650 11-25...
- Page 443 Replacing consumables 8650 11-26...
-
Page 444: Care Of The Machine
Care of the machine... -
Page 445: Cleaning
Care of the machine Care of the machine 12.1 Cleaning This section describes the procedures for cleaning each part. 12.1.1 Housing Clean the surface of the housing by wiping it with a soft cloth dampened with a mild household detergent. Reminder Be sure to turn off the machine (set the power switch to o) before cleaning it. -
Page 446: Electrostatic Charger Wire
Care of the machine 12.1.3 Electrostatic charger wire If the electrostatic charger wire is dirty, streaks will appear though the printed images. If this occurs, follow the procedure described below to clean the electrostatic charger wire. Open the machine’s front door. Slowly pull out the charger-cleaning tool as far as possible. - Page 447 Care of the machine Insert the print head glass cleaning tool into the print head cleaning opening, pull it out, and then repeat this back-and-forth movement twice or three times. 8650 12-4...
-
Page 448: When The Message "Time For Periodic Device Check." Appears
Care of the machine 12.2 When the message "Time for periodic device check." appears If the message "Time for periodic device check." appears, contact service representative or the manufacturer. 8650 12-5... - Page 449 Care of the machine 8650 12-6...
-
Page 450: Specifications
Specifications... -
Page 451: Main Unit
Specifications Specifications 13.1 Specifications 13.1.1 Main unit Specifications Type Desktop/Freestanding printer Photoconductor Copying system Laser electrostatic copy method Developing system Dry-type dual-component HMT developing method Fusing system Roller fixing Paper types Plain paper 16 lb to 24 lb (60 g/m to 90 g/m thick paper 1 24-1/4 lb to 40 lb (91 g/m to 150 g/m... - Page 452 Compatible computers IBM PC or compatible, and Macintosh (PowerPC or Intel Processor) (Intel Processor is Mac OS X 10.4 only) Printer Konica Minolta Windows NT Workstation /Server Version4.0 (Service Pack 6 or later) driver PCL Driver Windows 2000 Professional /Server (Service Pack 3 or later)
-
Page 453: Automatic Duplex Unit
Specifications 13.1.2 Automatic duplex unit Specifications Paper types Plain paper 17 lb to 24 lb (64 g/m to 90 g/m ), thick paper 1 24-1/4 lb to 40 lb (91 g/m 150 g/m ), thick paper 2 40-1/4 lb to 55-1/2 lb (151 g/m to 209 g/m ), thick paper 3 55-3/4 lb to 68 lb (210 g/m... - Page 454 Specifications 13.1.4 Paper feed cabinet PC-205 Specifications Paper types Plain paper 16 lb to 24 lb (60 g/m to 90 g/m Thick paper 1 24-1/4 lb to 40 lb (91 g/m to 150 g/m Thick paper 2 40-1/4 lb to 55-1/2 lb (151 g/m to 209 g/m Thick paper 3 55-3/4 lb to 68 lb (210 g/m to 256 g/m...
-
Page 455: Punch Kit Pk
Specifications 13.1.6 Finisher FS-519 Specifications Finishing trays Finishing tray 1, finishing tray 2 Feed settings "Sort (each set of prints)", "Group (each page of prints)", "Offset/Sort", "Offset/Group", and "Staple" Paper types Finishing tray 1, finishing tray 2: "Sort", "Group": Plain paper 16 lb to 24 lb (60 g/m to 90 g/m ), thick paper 24-1/4 lb to 72 lb (91 g/m to 271... -
Page 456: Saddle Stitcher Sd
Specifications 13.1.8 Saddle stitcher SD-505 Specifications Number of bins 1 bin Paper types Plain paper 16 lb to 24 lb (60 g/m to 90 g/m thick paper 24-1/4 lb to 55-1/2 lb (91 g/m to 209 g/m Paper sizes 11 × 17 w, Letter w, A3 w, B4 w, A4 w, B5 w Paper capacity Plain paper 16 lb to 24 lb (60 g/m to 90 g/m... - Page 457 Specifications 13.1.11 Finisher FS-609 Specifications Output trays Output tray 1, output tray 2 Settings Normal settings: "Group", "Sort", "Offset/Group", "Offset/Sort", "Offset/Staple", and "Saddle Staple" Paper types Output tray 1: "Group/Sort" setting: Plain paper 16 lb to 24 lb (60 g/m to 90 g/m thick paper 24-1/4 lb to 68 lb (91 g/m to 256 g/m...
-
Page 458: Consumable And Replacement Part Life Expectancy Charts
Specifications 13.2 Consumable and replacement part life expectancy charts 13.2.1 Consumable life expectancy Item Average life expectancy Toner cartridge Original toner cartridge: An average of 26,000 pages (intermittent printing: 4P/J) Black (K) Replacement toner cartridge: An average of 26,000 pages (intermittent printing: 4P/J) Toner cartridge Yellow (Y) Original toner cartridge: An average of 20,000 pages (intermittent printing: 4P/J) - Page 459 Specifications 8650 13-10...
-
Page 460: Authentication Unit (Biometric Type Au-101)
Authentication unit (Biometric type AU-101) -
Page 461: Safety Information
Authentication unit (Biometric type AU-101) Authentication unit (Biometric type AU-101) 14.1 Safety information 14.1.1 Important information When using the authentication unit (biometric type), observe the following precautions in addition to the safety information in the Safety Information Guide. Authentication unit (biometric type) is optional. It is sold or permitted to use as it is. This product is designed, manufactured and intended for general business use. -
Page 462: Product Features
Authentication unit (Biometric type AU-101) 14.2 Product features This device is a biometric authentication system that performs user authentication by scanning vein patterns in a finger. Print job operations can be authenticated with finger vein patterns when using machines with user authentication settings specified. -
Page 463: Part Names And Their Functions
Authentication unit (Biometric type AU-101) 14.3 Part names and their functions Rear view Top view Part name Description Status indicator Indicates this device’s status. Security slot Used for connecting the security cable to prevent thefts. (complies with the security cable standards of the Kensington Computer Prod- ucts Group) USB port (type mini-B) Used to connect a USB cable (mini-B plug). -
Page 464: Using Authentication Unit (Biometric Type) Au-101
Authentication unit (Biometric type AU-101) 14.4 Using authentication unit (Biometric type) AU-101 In order to use this device, user finger vein patterns must first be registered with the machine. A registered user can print a print job after completing authentication with their finger vein patterns. The following procedures describe how to specify the necessary settings on the machine and register users. -
Page 465: Machine Settings
Authentication unit (Biometric type AU-101) The finger should not The finger should not be be positioned too far positioned at an angle. forward or backward. The finger should not The middle section of the be positioned out of finger is not positioned line to the left or right. - Page 466 Authentication unit (Biometric type AU-101) Specify the settings for "Beep Sound" and "Operation Setting". – For "Beep Sound", specify whether or not to raise an electric sound when scan of the vein patterns in the finger is successfully completed. – For "Operation Setting", specify the print method after registration.
-
Page 467: Registering Users
Authentication unit (Biometric type AU-101) Specify the settings for "Touch & Print User Box" and "Print". – If "OFF" is selected for "Touch & Print User Box", the Touch & Print function cannot be used. – If "ON" is selected for "Touch & Print User Box", "1-to-1 Auth." cannot be selected. –... -
Page 468: Setup
Authentication unit (Biometric type AU-101) Reminder PageScope Data Administrator ver. 3.0 or later must first be installed on the computer. For details on the operating environment and installation procedure for PageScope Data Administrator, refer to the User’s Guide for the PageScope Data Administrator. Setup Turn off the machine with the power switch, and then disconnect this device from the machine. - Page 469 Authentication unit (Biometric type AU-101) Select the "Include this location in the search" check box, check that the application CD-ROM appears as a location to be searched, and then click [Next]. – If the application CD-ROM does not appear as a location to be searched for the driver, click [Browse], select the BioDriver (USB-Driver) folder on the CD-ROM, and then click [OK].
- Page 470 Authentication unit (Biometric type AU-101) Click [Finish]. Repeat steps 5 through 7. The installation of BioDriver (USB-Driver) is completed. Install PageScope Data Administrator Bio Plugin. Open the DA_Bio_Plugin folder on the application CD-ROM, and then click "setup.exe". Select the language, and then click [OK]. The installer starts up.
- Page 471 Authentication unit (Biometric type AU-101) Select "I accept the terms of the license agreement", and then click [Next]. Click [Install]. Click [Finish]. PageScope Data Administrator Bio Plugin is installed, and the setup is completed. 8650 14-12...
-
Page 472: Registering Users
Authentication unit (Biometric type AU-101) Registering users Detail In order to register users with PageScope Data Administrator, this device must be connected to the USB port of the computer, and the computer and the machine must be connected over a network. Network 8650 This device... - Page 473 Authentication unit (Biometric type AU-101) The Device information pane appears. Select "User authentication settings" in the Function selection pane, and then click [Add]. 8650 14-14...
- Page 474 Authentication unit (Biometric type AU-101) Select a template, and then click [OK]. The User settings dialog box appears. Type in the user name and password, click the Vein Authentication tab, and then click [Import]. – If desired, type in the e-mail address. Position the finger on this device, and then click [Start reading].
- Page 475 Authentication unit (Biometric type AU-101) – Scan the finger vein pattern three times, removing and repositioning the same finger each time. Click [Register]. Click [OK]. – Repeat steps 5 through 10 until all users have been registered. 8650 14-16...
- Page 476 Authentication unit (Biometric type AU-101) Click [Export to the device]. – To change the registered data, select the user name, and then click [Edit]. Click [Write]. The registered user data is specified on the machine. Click [OK]. Disconnect this device from this USB port of the computer. Turn off the machine with the power switch, connect this device, and then turn on the machine with the power switch.
- Page 477 Authentication unit (Biometric type AU-101) Detail PageScope Data Administrator is equipped with a batch copy feature that allows the registered user data to be specified on multiple machines specified to be used with this device. Note When the machine is turned off, then on again with the power switch, wait at least 10 seconds to turn the machine on after turning it off.
-
Page 478: Care Of Authentication Unit (Biometric Type) Au-101
Authentication unit (Biometric type AU-101) 14.5 Care of authentication unit (Biometric type) AU-101 Reminder Before cleaning this device, disconnect it from the machine. If a force is applied to the USB port, it may be damaged. When cleaning this device, do not allow water to enter the device, otherwise the system may be damaged. -
Page 479: Specifications
Authentication unit (Biometric type AU-101) 14.6 Specifications Product name Authentication unit (Biometric type) AU-101 Compatible finger width 3/8 to less than 1 (10 mm to less than 25 mm) Interface USB 2.0 Dimensions Approx. 3 (W) × 3-3/4 (D) × 2-1/4 (H) (78 mm (W) ×... -
Page 480: Troubleshooting
Authentication unit (Biometric type AU-101) 14.7 Troubleshooting If a problem occurs while running the system, refer to the following. Condition Possible cause Remedy The USB cable is connected be- The USB port of the machine may Turn the machine off with the power tween this device and the machine, be malfunctioning. - Page 481 Authentication unit (Biometric type AU-101) Condition Possible cause Remedy The Add New Hardware Wizard Is this device connected to the same If this device is connected to a USB starts when this device is connected USB port used when the driver was port different from the one used when to the computer.
-
Page 482: Authentication Unit (Ic Card Type Au-201)
Authentication unit (IC card type AU-201) -
Page 483: Safety Information
Authentication unit (IC card type AU-201) Authentication unit (IC card type AU-201) 15.1 Safety information 15.1.1 Important information When using the authentication unit (IC card type), observe the following precautions in addition to the safety information in the Safety Information Guide. Authentication unit (IC card type) is optional. -
Page 484: Interference-Causing Equipment Standard (Ices- 003 Issue 4) (For Canada Users)
Authentication unit (IC card type AU-201) INTERFERENCE-CAUSING EQUIPMENT STANDARD (ICES- 003 ISSUE 4) (For Canada Users) (This device complies with RSS-Gen of IC Rules.) Operation is subject to the following two conditions: (1) this device may not cause interference, and (2) this device must accept any interference, including interference that may cause undesired operation of this device. -
Page 485: Product Features
Authentication unit (IC card type AU-201) 15.2 Product features This device is an IC card authentication system that performs user authentication by IC cards. Print job operations can be authenticated with IC cards when using machines with user authentication settings specified. -
Page 486: Part Names And Their Functions
Authentication unit (IC card type AU-201) 15.3 Part names and their functions Part name Description Card scanning area Position the IC card on this area. USB cable Used for connecting this device to the machine. 8650 15-5... -
Page 487: Using Authentication Unit (Ic Card Type) Au-201
Authentication unit (IC card type AU-201) 15.4 Using authentication unit (IC card type) AU-201 In order to use this device, user IC card IDs must first be registered with the machine. A registered user can print a print job after completing authentication with their IC card IDs. The following procedures describe how to specify the necessary settings on the machine and register users. - Page 488 Authentication unit (IC card type AU-201) Specify the settings for "IC Card Type" and "Operation Setting". – For "IC Card Type", specify the IC card type to be used. – For "Operation Setting", specify the print method after registration. Card: Documents can be printed by specifying the user name and password in the printer driver, and placing the card on the authentication unit.
-
Page 489: Registering Users
Authentication unit (IC card type AU-201) Specify the settings for "Touch & Print User Box" and "Print". – If "OFF" is selected for "Touch & Print User Box", the Touch & Print function cannot be used. – If "ON" is selected for "Touch & Print User Box", "Card + Password" cannot be selected. –... -
Page 490: Setup
Authentication unit (IC card type AU-201) Reminder PageScope Data Administrator ver. 3.0 or later must first be installed on the computer. For details on the operating environment and installation procedure for PageScope Data Administrator, refer to the User’s Guide for the PageScope Data Administrator. Setup Turn off the machine with the power switch, and then disconnect this device from the machine. - Page 491 Authentication unit (IC card type AU-201) Select the "Include this location in the search" check box, check that the application CD-ROM appears as a location to be searched, and then click [Next]. – If the application CD-ROM does not appear as a location to be searched for the driver, click [Browse], select the IC Card Driver (USB-Driver) folder on the CD-ROM, and then click [OK].
- Page 492 Authentication unit (IC card type AU-201) Click [Finish]. The installation of IC Card Driver (USB-Driver) is completed. Install PageScope Data Administrator IC Card Plugin. Open the IC_Card_Plugin folder on the application CD-ROM, and then click "setup.exe". Select the language, and then click [OK]. The installer starts up.
- Page 493 Authentication unit (IC card type AU-201) Select "I accept the terms of the license agreement", and then click [Next]. Click [Install]. Click [Finish]. Data Administrator IC Card Plugin is installed, and the setup is completed. 8650 15-12...
-
Page 494: Registering Users
Authentication unit (IC card type AU-201) Registering users Detail In order to register users with PageScope Data Administrator, this device must be connected to the USB port of the computer, and the computer and machine must be connected over a network. Network machine Computer... - Page 495 Authentication unit (IC card type AU-201) The Device information pane appears. Select "User authentication settings" in the Function selection pane, and then click [Add]. 8650 15-14...
- Page 496 Authentication unit (IC card type AU-201) Select a template, and then click [OK]. The User settings dialog box appears. Type in the user name and password, and then click the IC card authentication tab. – If desired, type in the e-mail address. Position the IC card on this device, and then click [Start reading].
- Page 497 Authentication unit (IC card type AU-201) – Repeat steps 5 through 9 until all users have been registered. Click [Export to the device]. – To change the registered data, select the user name, and then click [Edit]. 8650 15-16...
- Page 498 Authentication unit (IC card type AU-201) Click [Write]. The registered user data is specified on the machine. Click [OK]. Disconnect this device from this USB port of the computer. Turn off the machine with the power switch, connect this device, and then turn on the machine with the power switch.
-
Page 499: Care Of Authentication Unit (Ic Card Type) Au-201
Authentication unit (IC card type AU-201) 15.5 Care of authentication unit (IC card type) AU-201 Reminder Before cleaning this device, disconnect it from the machine. If a force is applied to the USB port, it may be damaged. When cleaning this device, do not allow water to enter the device, otherwise the system may be damaged. -
Page 500: Specifications
Authentication unit (IC card type AU-201) 15.6 Specifications Product name Authentication unit (IC card type) AU-201 Dimensions Approx. 3-1/2 (W) × 2-1/2 (D) × 3/4 (H) (92 mm (W) × 64 mm (D) × 16 mm (H)) Weight Approx. 1/4 lb (120 g) Power requirements Through USB port Environment conditions... -
Page 501: Troubleshooting
Authentication unit (IC card type AU-201) 15.7 Troubleshooting If a problem occurs while running the system, refer to the following. Condition Possible cause Remedy The message appears on a compu- With this device, the scanning time Refer to "Positioning the IC card" on ter where registration failed. -
Page 502: Installing Options
Installing options... -
Page 503: Introduction
Installing options Installing options 16.1 Introduction This chapter describes how to install the following options. Option Description Mount kit MK-713 Can be loaded with banner paper up to 47-1/4 (1,200 mm) in length. Authentication unit (biometric type) Performs user authentication by scanning vein patterns in the finger. AU-101 To use the authentication unit (biometric type), an optional hard disk drive HD- 508 and local interface kit EK-603 must be installed. -
Page 504: Installing The Mount Kit Mk-713
Installing options 16.2 Installing the mount kit MK-713 Installing the mount kit MK-713 allows you to load banner paper up to 47-1/4 (1,200 mm) in length. Open the tray 1. Install the mount kit to the tray 1. 8650 16-3... - Page 505 Installing options Erect the guide of the mount kit. Reminder Do not open the tray extension. If it is already open, close it. Detail For details on printing on banner paper, refer to "Banner paper printing function" on page 7-39. 8650 16-4...
-
Page 506: Authentication Unit (Biometric Type) Components
Installing options 16.3 Installing the authentication unit (biometric type) AU-101 Note Before installing the authentication unit (biometric type), access "Authentication" on this machine, and then select "ON (MFP)" for "General Settings". Detail For details on specifying authentication settings, refer to "User Auth/Account Track" on page 9-35. 16.3.1 Authentication unit (biometric type) components Part name... - Page 507 Installing options Connect the USB cable to the machine. Insert the power supply plug of the machine into the electrical outlet, and then turn on the machine. Press the [Menu/Select] key. Menu Select Press the [,] key several times to select [Admin. Settings], and then press the [Menu/Select] key. Type in the password, and then press the [Menu/Select] key.
- Page 508 Installing options Press the [,] key several times to select [Option Settings], and then press the [Menu/Select] key. Press the [,] key several times to select [AuthDeviceSetting], and then press the [Menu/Select] key. Press the [Menu/Select] key. Press the [,] key several times to select [Biometric], and then press the [Menu/Select] key. Press the [Cancel] key.
-
Page 509: Installing The Authentication Unit (Ic Card Type)
Installing options 16.4 Installing the authentication unit (IC card type) AU-201 Note Before installing the authentication unit (IC card type), access "Authentication" on this machine, and then select "ON (MFP)" for "General Settings". Detail For details on specifying authentication settings, refer to "User Auth/Account Track" on page 9-35. 16.4.1 Authentication unit (IC card type) components Part name... - Page 510 Installing options If necessary, use the included Velcro fastenings (A and B) to secure the authentication unit to the working table. Connect the USB cable to the machine. Insert the power supply plug of the machine into the electrical outlet, and then turn on the machine. Press the [Menu/Select] key.
- Page 511 Installing options Press the [,] key several times to select [Option Settings], and then press the [Menu/Select] key. Press the [,] key several times to select [AuthDeviceSetting], and then press the [Menu/Select] key. Press the [Menu/Select] key. Press the [,] key several times to select [Card], and then press the [Menu/Select] key. Press the [Cancel] key.
- Page 512 Installing options Reminder Mount the ferrite core at a location approx. 2-1/4 (60 mm) away from the authentication unit. Detail For details on using the authentication unit (IC card type) AU-201, refer to "Authentication unit (IC card type AU-201)" on page 15-2. 8650 16-11...
- Page 513 Installing options 8650 16-12...
-
Page 514: Appendix
Appendix... -
Page 515: Configuration Page
Appendix Appendix 17.1 Configuration page 8650 17-2... -
Page 516: Ppd Driver (For Linux And Applications)
In the Choose a driver dialog box, click the [Import] button. Select "KONICA MINOLTA mc8650 OpenOffice PPD", and then click the[OK] button. From the "Please Select a Suitable driver." list, select "KONICA MINOLTA mc8650 OpenOffice PPD", and then click the [Next] button. -
Page 517: About The Ppd Driver For Applications
Appendix 17.2.3 About the PPD driver for applications PPD registration destination (example: Adobe PageMaker) For PageMaker 6.0 Copy the PPD file to RSRC\PPD4, which is under the folder to which PageMaker is installed. For PageMaker 6.5/7.0 Copy the PPD file to RSRC\<Language>\PPD4, which is under the folder to which PageMaker is installed. -
Page 518: Netware
Appendix 17.3 NetWare 17.3.1 Connection methods selectable for NetWare The following protocols are available for NetWare. NetWare version Protocol used Connection method NetWare 4.x Bindery Pserver Nprinter/Rprinter NetWare 5.x NDS Pserver Nprinter/Rprinter TCP/IP NDPS NetWare 6.x NDS Pserver TCP/IP NDPS Note For details on the NetWare functions, refer to the NetWare operation manual of the NetWare. -
Page 519: For Remote Printer Mode With Netware 4.X Bindery Emulation
Appendix For Remote Printer mode with NetWare 4.x bindery emulation Before using bindery emulation, check that bindery emulation is compatible with the NetWare server. From a client computer, log in to NetWare with the Administrator permission as Bindery. Start up Pconsole. From the "Available Options"... -
Page 520: For Netware 4.X Remote Printer Mode (Nds)
Appendix For NetWare 4.x Remote Printer mode (NDS) Log in to NetWare as an administrator from a client computer. Start up NWadmin. Select either the organization or organizational unit container that offers the print service, and then click "Print Services Quick Setup" on the "Tools" menu. Enter the appropriate names in the "Print Server Name", "Printer Name", "Print Queue Name", and "Print Queue Volume"... -
Page 521: For Netware 5.X/6 Novell Distributed Print Service (Ndps)
Appendix For NetWare 5.x/6 Novell Distributed Print Service (NDPS) Before specifying settings for NDPS, check that the NDPS broker and NDPS manager have been created and loaded. Also, check that the TCP/IP protocol is specified in the NetWare server, the IP address is specified for this machine, then this machine is running. -
Page 522: Netware Status
Appendix 17.3.3 NetWare Status In Administrator mode of PageScope Web Connection, select the Network tab - "NetWare Setting" - "NetWare Status". NetWare connection status can be checked, if necessary. 17.3.4 Windows Client Setting Install the printer driver using the Add Printer Wizard for an Window client who uses a printer. Reminder When installing on NT4.0/2000/XP/Vista/Server 2003, administrator permissions are required. -
Page 523: Tray Mapping Setting
Appendix 17.4 Tray Mapping Setting The actual paper source mapping against the value specified by the paper tray command included in the PCL command can be changed. This machine uses the following HP-compatible commands when specifying the paper tray. PCL5: "PAPER SOURCE" command PCL XL: "MEDIA SOURCE"... - Page 524 Appendix (3) PCLID for Auto Tray Cannot be omitted even if some trays (Tray 6, for exam- ple) do not actually exist. (4) PCLID for Tray 1 (bypass tray) Be sure to describe definitions for all of (3) to (9). (5) PCLID for Tray 2 (6) PCLID for Tray 3 (7) PCLID for Tray 4...
-
Page 525: Sending The Prn File
Appendix 17.4.3 Sending the PRN file Send the PRN file created in 16.4.2 to this machine using the lpr command. Start the command prompt, and then execute the following command. lpr –S (IP address of this machine) –P printer (PRN file created in 16.5.2) 17.4.4 Restarting this machine Turn off the main power of this machine, then on again. -
Page 526: Returning The Tray Mapping Setting To The Default
Appendix 17.4.6 Returning the tray mapping setting to the default To return the entire tray mapping settings to the factory default, specify "-1" for PCLID of each tray. %!PS-Adobe-3.0 /df { /dest exch store /buf 512 string def /sourcef (%stdin) (r) file def /destf dest (w) file def sourcef buf readstring { destf exch writestring }... - Page 527 Appendix 8650 17-14...
-
Page 528: Index
Index... - Page 529 Index Index 18.1 Index Bin Assignment ............8-18 Numerics Binding Margin ............5-9 2-Sided Print ............8-19 Binding Position .... 5-9 6-12 6-26 8-17 8-19 BindingPos. Adjust ..........8-19 Accept IPP jobs ...........8-22 BioAuth.Settings ..........8-26 Access Setting .............8-23 Blank Page Print ..........8-18 Accessing ..............9-2 Bonjour ........
- Page 530 Index Create a self-signed Certificate ......9-50 EraseLeadingEdge ..........8-27 Create Overlay File ..........5-12 Ethernet ...............1-32 Create System User Box ........9-23 Expert Adjustment ..........8-27 Create User Box ..........9-21 Exporting .............9-24 Custom Page Size ..........6-24 External Server Registration ........9-34 Custom paper size ..........6-6 Custom Size ..........5-7 7-39 Finish tab .............5-10...
- Page 531 Index Inside of machine ..........1-7 Manage Profile .............7-35 Install a Certificate ..........9-52 Manage the profile ........5-17 6-20 Installation .............3-5 Management List ..........8-21 Installer ..............3-5 Manual Setting .............9-25 Installing ............4-3 4-14 Memory ..............10-45 Interface Setting ..........9-93 Menu operations ............8-2 Interfaces .............1-32 Menu/Select ............8-2 IP address ..............3-5 Message...
- Page 532 Index OverwriteAllArea ..........8-25 Power supply ............1-15 OverwritePriority ..........8-25 PowerSave Setting ..........8-18 Ovewrite HDDdata ..........8-25 PPD ..............4-14 PPD driver ..........1-33 17-3 Print .......... 5-8 8-17 8-26 Page Attributes ..........6-7 6-24 Print head ............12-3 Page Number ..........5-13 6-16 Print in Overlay ............5-13 Page number ..........5-16 6-19 Print Output ............8-18...
- Page 533 Index Registered user .............9-9 Stamp/Composition tab ........5-12 RegisterHDDLockPW ..........8-25 Staple ......5-10 6-12 6-26 8-19 10-38 Registering the header or footer ......9-86 Staple cartridge ..........11-15 Remove a certificate ..........9-54 Staple jam ............10-38 Rendezvous ...........4-2 Statistics Page .............8-17 Request a Certificate ...........9-51 Status Notification Setting ........9-71 Reset ..............9-85 Structure of pages ..........9-4...
- Page 534 Index Uninstallation ............3-36 Uninstalling ..........3-36 4-17 USB ...........1-32 3-27 USB Timeout ............8-23 User Auth .............9-29 User Authentication ..........6-8 User authentication ....1-40 1-42 7-22 User box ..............9-20 User Box Settings ..........8-26 User mode ............9-11 User name ............8-16 User Registration ..........9-30 User Setting Menu ..........8-8 User Settings Menu ..........8-17 UserAuth.
- Page 535 Index 8650 18-8...
- Page 536 http://konicaminolta.com Copyright A02E-9561-01A 2007 2007.11...
Need help?
Do you have a question about the magicolor 8650 and is the answer not in the manual?
Questions and answers