Oce ColorWave 600 User Manual
Hide thumbs
Also See for ColorWave 600:
- User manual (440 pages) ,
- User manual (24 pages) ,
- User manual (24 pages)
Table of Contents
Advertisement
Quick Links
Download this manual
See also:
User Manual
Advertisement
Table of Contents

Related Manuals for Oce ColorWave 600


Summary of Contents for Oce ColorWave 600
- Page 1 Océ ColorWave™ Ride the wave of color User manual Installation...
- Page 2 Océ-Technologies B.V. © 2008, Océ-Technologies B.V. Venlo, The Netherlands. All rights reserved. No part of this work may be reproduced, copied, adapted, or transmitted in any form or by any means without written permission from Océ. Océ-Technologies B.V. makes no representation or warranties with respect to the contents hereof and specifically disclaims any implied warranties of merchantability or fitness for any particular purpose.
- Page 3 Trademarks Trademarks Océ, Océ ColorWave™ 600 and the Océ Express WebTools are registered trademarks of Océ-Technologies B.V. Adobe ® and PostScript ® 3™ are registered trademarks of Adobe ® Systems Incorporated. Macintosh ® is a registered trademark of Apple ® Computer, Inc. Microsoft ®...
- Page 4 Only the US-English version of this manual is available as a hardcopy manual. You can find this manual in multiple languages on the user documentation CD- ROM as PDF files and as online documents. Note: Visit Océ on the Internet at www.oce.com for the latest information.
-
Page 5: Table Of Contents
Contents Contents Chapter 1 Introduction.........................7 Notes for the reader...................8 Available documentation................10 Chapter 2 Get to know the printing system................13 The Océ ColorWave™ 600 printing system...........14 The Océ ColorWave™ 600 printing system consumables......16 The Océ ColorWave™ 600 printer..............17 Printer working area [Footprint]..............17 The printer hardware components (front)..........18... - Page 6 Contents Print the Customer Acceptance Test (CAT) demo print .......77 Appendix A Reference information....................79 The job states....................80 Change the password..................81 Define the folder value..................82 Appendix B Reader's comment sheet..................83 Reader's comment sheet.................84 Appendix C Addresses of local Océ organizations..............87 Addresses of local Océ organisations ............88...
-
Page 7: Chapter 1 Introduction
Chapter 1 Introduction... -
Page 8: Notes For The Reader
Notes for the reader Notes for the reader Introduction This manual helps you to use the Océ ColorWave™ 600. The manual contains a descrip- tion of the product and guidelines to use and operate the Océ ColorWave™ 600. Definition Attention-Getters Parts of this manual require your special attention. - Page 9 Notes for the reader Word Icon Indicates Caution Moving parts Caution Laser beam The use of heat-resistant gloves is mandatory when you carry out these actions. Safety information The safety information for this product is included in a separate manual with the title Safety information.
-
Page 10: Available Documentation
User manual - Operating On CD-ROM Wave™ 600 information Available as an online document in multiple languages. On www.oce.com Available as an online document or as a PDF file in multiple lan- guages. User manual - Safety Manu- Hardcopy manual (multilingual) - Page 11 On-line Help Embedded in the application Available in multiple languages. Océ TDS-TCS connectivity On CD-ROM manual Available as a PDF file in English only. Note: Visit Océ on the Internet at www.oce.com for the latest information. Chapter 1 - Introduction...
- Page 12 Available documentation Chapter 1 - Introduction...
-
Page 13: Get To Know The Printing System
Chapter 2 Get to know the printing system... -
Page 14: The Océ Colorwave™ 600 Printing System
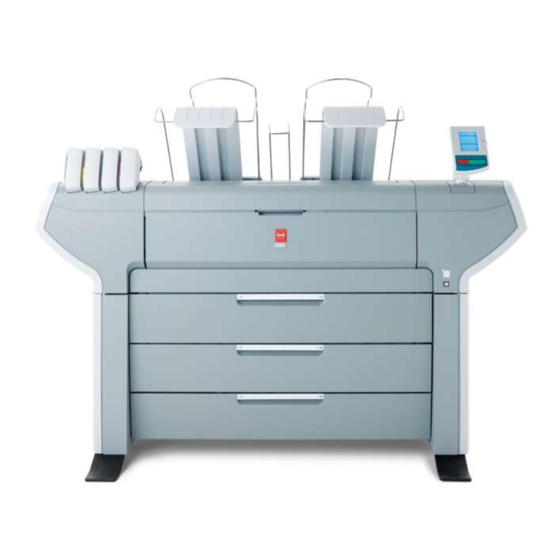
The Océ ColorWave™ 600 printing system The Océ ColorWave™ 600 printing system Introduction The Océ ColorWave™ 600 is the first wide format TonerPearl printer in the world and consequently also the first of a new family of color wide format printers that use the new patented 'Océ... - Page 15 The Océ ColorWave™ 600 printing system Illustration The main components of the Océ ColorWave™ 600 printing system Component Description / Function The 'Océ ColorWave™ Creates the printed output. 600 Printer' The 'Océ Express The 'Océ Express WebTools' provide multiple users a WebTools' remote view on the system and control on the system's workflow, without any need to install software.
-
Page 16: The Océ Colorwave™ 600 Printing System Consumables
The Océ ColorWave™ 600 printing system consumables The Océ ColorWave™ 600 printing system consumables Consumable Consumable part Description 'Media' 'Roll' Roll that carries the media. A roll can have a 2" core or a 3" core. 'Core' The core of the media roll is the card- board inner part of the roll. -
Page 17: The Océ Colorwave™ 600 Printer
Printer working area [Footprint] The Océ ColorWave™ 600 printer Printer working area [Footprint] The Océ ColorWave™ 600 requires a floor space / working area of at least 3100 mm x 2270 mm (122 inch x 90 inch). Chapter 2 - Get to know the printing system... -
Page 18: The Printer Hardware Components (Front)
The printer hardware components (front) The printer hardware components (front) Illustration Component - function table Component Description / Function 'Lower left cover' 'Media drawer' Media drawer that contains the media roll 5 and/or 6. (see ‘The Media drawer’ on page 'Media drawer' Media drawer that contains the media roll 3 and/or 4. - Page 19 The printer hardware components (front) Component Description / Function 'Top left cover' 'Toner cartridge' (cyan) Toner cassette for cyan 'Océ TonerPearls™' 'Toner cartridge' (yellow) Toner cassette for yellow 'Océ TonerPearls™' 11 / 'Toner cartridge' (black) Toner cassette for black 'Océ TonerPearls™' 'Toner cartridge' (magenta) Toner cassette for magenta 'Océ...
- Page 20 The printer hardware components (front) Component Description / Function 'Foot' Chapter 2 - Get to know the printing system...
-
Page 21: The Printer Hardware Components (Back)
The printer hardware components (back) The printer hardware components (back) Illustration Component - function table Component Description / Function 'Wheel' 'Left cover of the media drawer' 'Back cover of the media drawer' 'Connection panel' The connection panel of the 'Océ PowerM controller' (standard embedded controller) the 'Océ... - Page 22 The printer hardware components (back) Component Description / Function 'Ventilation cover' Covers the 'Océ PowerM controller' / 'Océ PowerM Plus controller ' 'Maintenance tray drawer' 'Top back left cover' 'Top back cover' Used for error recovery. Note: It is possible to install an optional 'Receiving rack (basket)' or a folder.
-
Page 23: The 'Media Drawer
The 'Media drawer' The 'Media drawer' Illustration Component - function table Attention: Only use intact media rolls. Dented media rolls can damage the 'Imaging devices'. Component Description / Function 'Roll' 1 Media roll 3 or 5 in other media drawers 'Roll' 2 Media roll 4 or 6 in other media drawers 'Roll holder'... - Page 24 The 'Media drawer' Component Description / Function 'Roll loading station' Groove integrated behind the front cover of the media drawer. To load new media on the printer, the opera- tor must proceed as follows place the new media roll temporarily on the roll loading station insert the roll holder into the new media roll...
-
Page 25: The 'Imaging Section
The 'Imaging section' The 'Imaging section' Illustration [19] When you open the 'Top cover' you get access to the 'Imaging section'. Component - function table Component Description / Function 'Print surface' The print surface is designed to keep the me- dia that is printed on flat. -
Page 26: The Printer Operator Panel
The hardware of the Printer operator panel The printer operator panel The hardware of the Printer operator panel Illustration Component - function table Component Description / Function 'Numeric keys' Keys with the numeric values 0-9 in the lower part of the 'Printer operator panel', that allow the operator to enter a numeric value, for ex- ample the number of prints. - Page 27 The hardware of the Printer operator panel Component Description / Function 'Status light' The status light indicates the status of the printer. A green light indicates that the printer is ready. A blinking green light indicates that the printer is busy. A red light can indicate the following.
- Page 28 The hardware of the Printer operator panel Component Description / Function 'Green start key' The green key on the printer operator panel that allows the operator to start a print job from the 'Queue' or 'Mailbox'¹. 11 / 'Red stop key' The red key on the 'Printer operator panel' that allows the operator to immediately stop the print job that is currently printed.
-
Page 29: The Main Screens On The Printer Operator Panel
The main screens on the printer operator panel The main screens on the printer operator panel Screen Function The 'Home' screen is the basic screen that displays only the most relevant information: the condition of the system and what it is doing now. Tasks (performed by 'Any user'): Monitor the system status. - Page 30 The main screens on the printer operator panel Screen Function The 'Queue' screen allows you to monitor and control the progress of print jobs. Tasks (performed by 'Any user'): Monitor print jobs - what is the progress (= the 'Queue' pane).
- Page 31 The main screens on the printer operator panel Screen Function The 'Maintenance' screen allows you to perform mainte- nance tasks and troubleshooting tasks. Tasks (performed by 'Any user', but most likely by the 'Key operator') to solve problems with the printer: 'Calibration' 'Calibrate the printer' - 'Clear system'...
-
Page 32: The Finishing Options
The finishing options The finishing options Introduction The Océ ColorWave™ 600 is delivered with a 'Top delivery tray' to collect your printed output. The 'Top delivery tray' can collect 50 - 100 plain paper prints with a maximum length of 48" [1200mm]. Note: The media type you use influences the output capacity. - Page 33 The finishing options The finishing options 'Receiving rack (basket)' Illustration The 'Receiving rack (basket)' is hooked at the rear side of the printer. It can collect 2 - 5 prints. The 'Receiving rack (basket)' bends the printed output. Not all media types are appropriate for this finishing option.
- Page 34 The finishing options Copy delivery tray Illustration The Copy delivery tray is a flat tray be- hind the printer. The Copy delivery tray can collect a maximum of 100 prints. Note: The folder is not supported in combination with the 'Receiv- ing rack (basket)' or folder.
-
Page 35: Prepare The Printing System For Use And Get Started
Chapter 3 Prepare the printing sys- tem for use and get start-... -
Page 36: Introduction
Introduction Introduction This chapter contains all the information you need to prepare your Océ ColorWave™ 600 for use. You can learn more about the following. How to move the printer. How to connect the power supply cable and the network cable. How to run the installation procedure. -
Page 37: How To Move The Océ Colorwave™ 600 Printer
How to move the Océ ColorWave™ 600 printer How to move the Océ ColorWave™ 600 printer Introduction Attention: If connected you must first switch off and disconnect the Océ ColorWave™ 600. Attention: Close the media drawers. Chapter 3 - Prepare the printing system for use and get started... - Page 38 How to move the Océ ColorWave™ 600 printer Note: Be aware of the printer working area. (see ‘Printer working area [Footprint]’ on page Action Illustration Use both hands to pull at the 'Lower left cover'. Remove the 'Lower left cover'. Pull at the Foot cover.
- Page 39 How to move the Océ ColorWave™ 600 printer Action Illustration Move the Océ ColorWave™ 600 printer. Note: Be aware of the printer working area. Pull out the left 'Foot' [1] until it touches the ground and locks [2]. You should hear a click as it locks.
- Page 40 How to move the Océ ColorWave™ 600 printer Action Illustration Notch: Replace the 'Lower left cover'. Pin: Place the pin into the notch. Chapter 3 - Prepare the printing system for use and get started...
- Page 41 How to move the Océ ColorWave™ 600 printer Action Illustration Notch: Repeat action 6 till 8 at the right hand side. Replace the 'Lower right cover' Chapter 3 - Prepare the printing system for use and get started...
-
Page 42: Connect The Océ Colorwave™ 600 Printer
How to connect the network cable Connect the Océ ColorWave™ 600 printer How to connect the network cable Action Illustration Remove the cover of the 'Con- nection panel' at the rear side of the printer. Lead the connection cable through the cover. Connect one side of the data ca- ble (UTP cable with a RJ45 connector) to the indicated net-... - Page 43 How to connect the network cable Action Illustration Place the cover of the 'Connec- tion panel'. Chapter 3 - Prepare the printing system for use and get started...
-
Page 44: How To Connect The Mains Supply Cable
How to connect the mains supply cable How to connect the mains supply cable Action Illustration Plug in the 'Power' cable at the power connection on the 'Con- nection panel' at the back of the printer. Put the other side of the 'Power' cable into the socket. -
Page 45: How To Switch On The Printer
How to switch on the printer How to switch on the printer Action Illustration Switch on the green main switch at the rear side of the Océ Color- Wave™ 600. Switch on the Océ Color- 'On / Off switch' [19] Wave™... -
Page 46: The Installation Procedure
Introduction The installation procedure Introduction To install the printer and integrate the Océ ColorWave™ 600 system in your company network you must follow four main steps. Run the installation wizard from the printer operator panel. If you connect the network cable of your company network and you switch on your Océ... -
Page 47: Run The Installation Wizard From The Printer Operator Panel
Run the installation wizard from the printer operator panel Run the installation wizard from the printer operator panel Introduction If you integrate the printer according to a network policy, please contact your network administrator to get information about the network infrastructure and parameters. As a network administrator, please refer to the Océ... - Page 48 Run the installation wizard from the printer operator panel How to run the installation wizard Action Illustration If you connect the network cable to your company network and you switch on your Océ ColorWave™ 600 for the first time, an installation wizard starts au- tomatically.
- Page 49 Run the installation wizard from the printer operator panel Action Illustration The printer operator panel displays the number of rolls detected. Use the 'Upper right softkey' to go to the next step. Use the 'Scroll wheel' to select 'Yes' when asked if you want to configure the network settings now.
- Page 50 Run the installation wizard from the printer operator panel Action Illustration Select one of the following options. 'Auto detect' Use the 'Scroll wheel' to select 'Auto detect' if the system must automatically detect your network settings. Confirm your entry with the 'Confirmation key' above the 'Scroll wheel'.
- Page 51 Run the installation wizard from the printer operator panel Action Illustration 11 / The following message is displayed: 'Insert the toner cartridges' Follow the steps as indicated in the wizard to complete the installation of the printer. For more information about specific steps please refer to the following sections.
- Page 52 Run the installation wizard from the printer operator panel Action Illustration The following message in the 'Home' screen is dis- played: 'Ready to print'. Continue with the following procedure: ‘Complete the printer configuration in the ’ on page Chapter 3 - Prepare the printing system for use and get started...
-
Page 53: Configure The Network Settings Manually
Configure the network settings manually Configure the network settings manually Introduction If you want configure the network settings manually, please contact your network admin- istrator to get information about the network infrastructure and parameters. How to configure the network settings manually Action Illustration If you want enter the network settings manually,... - Page 54 Configure the network settings manually Action Illustration Enter your IP address. Use the 'Scroll wheel' to select the first numeric field. Confirm your selection with the 'Confirma- tion key' above the 'Scroll wheel'. Use the 'Numeric keys' to enter the first value of your IP address.
- Page 55 Configure the network settings manually Action Illustration Enter your DNS address. Use the 'Scroll wheel' to select the first numeric field. Confirm your selection with the 'Confirma- tion key' above the 'Scroll wheel'. Use the 'Numeric keys' to enter the first value of your DNS address.
-
Page 56: Load Or Replace A Toner Cartridge
Load or replace a toner cartridge Load or replace a toner cartridge Illustration Component Description / Function 'Toner cartridge' (cyan) Toner cassette for cyan 'Océ TonerPearls™' 'Toner cartridge' (yel- Toner cassette for yellow 'Océ TonerPearls™' low) 11 / B 'Toner cartridge' Toner cassette for black 'Océ... - Page 57 Load or replace a toner cartridge How to load or replace a toner cartridge Action Illustration The printer operator panel dis- plays a request when you must load or replace a toner cartridge. Unpack the toner cartridge. Note: Please do not throw away the empty packag- ing of the new toner cartridge.
- Page 58 Load or replace a toner cartridge Action Illustration Place the new toner cartridge. Note: You must place the ton- er cartridge in the cor- rect color position. The toner cartridges have fixed positions. When the new toner cartridge is placed correctly, the following message is displayed on the printer operator panel.
-
Page 59: Replace The Maintenance Tray
Replace the maintenance tray Replace the maintenance tray Illustration Component Description / Function 'Maintenance tray drawer' How to replace the maintenance tray Action Illustration The printer operator panel dis- plays a request when you must replace the maintenance tray. Chapter 3 - Prepare the printing system for use and get started... - Page 60 Replace the maintenance tray Action Illustration Follow the instructions in the wizard. Note: Please note that the 'Maintenance tray drawer' is located at the rear side of the Océ ColorWave™ 600 printer. Push the 'Maintenance tray drawer' to open it. Pull the 'Maintenance tray drawer' open.
- Page 61 Replace the maintenance tray Action Illustration Place the empty maintenance tray. Push the 'Maintenance tray drawer' shut. When the new maintenance tray is placed correctly, press 'Finish' on the 'Printer operator panel' to continue. Chapter 3 - Prepare the printing system for use and get started...
-
Page 62: Load A Media Roll
The 'Media drawer' Load a media roll The 'Media drawer' Illustration Component - function table Attention: Only use intact media rolls. Dented media rolls can damage the 'Imaging devices'. Component Description / Function 'Roll' 1 Media roll 3 or 5 in other media drawers 'Roll' 2 Media roll 4 or 6 in other media drawers 'Roll holder'... - Page 63 The 'Media drawer' Component Description / Function 'Roll loading station' Groove integrated behind the front cover of the media drawer. To load new media on the printer, the opera- tor must proceed as follows place the new media roll temporarily on the roll loading station insert the roll holder into the new media roll...
-
Page 64: Unpack A Media Roll
Unpack a media roll Unpack a media roll How to unpack a media roll Attention: Handle the media roll with care. A dented media roll can damage the imaging devices. Attention: Please note down the media code (for example LFM090) indicated on the sticker on the media box. - Page 65 Unpack a media roll Action Illustration Remove the plug from the media roll. Carefully remove the media roll from the box. Remove the other plug and plastic around the media roll. Chapter 3 - Prepare the printing system for use and get started...
-
Page 66: Load A Roll
load a roll load a roll How to load a media roll Attention: Do not use dented media rolls to prevent damage to the imaging devices. Attention: Do not open the media drawer during the print process. When the last print is delivered, wait 10 seconds before you open the media drawer. - Page 67 load a roll Action Illustration Open the correct media drawer to load the new media roll. Place the new media roll on the roll loading station. Pull the handle of the roll holder locking mechanism towards you. Chapter 3 - Prepare the printing system for use and get started...
- Page 68 load a roll Action Illustration Slide the roll holder in the core of the new media roll. Align the roll with the correct size indicator on the roll holder (At the left and right hand side). Release the handle of the locking mechanism.
- Page 69 load a roll Action Illustration Keep the media tight on the roll and in-line with the side edge. Use both hands to turn the me- dia roll backwards until the me- dia flap has passed the metal pa- per guide (1). Chapter 3 - Prepare the printing system for use and get started...
- Page 70 load a roll Action Illustration Use both hands to slide the me- dia under the metal paper guide. A "beep" confirms the correct paper transport (2). Close the media drawer. Note: Do not open the 'Media drawer' during loading. 11 / The following screen appears on the printer operator panel.
-
Page 71: Complete The Printer Configuration In The Océ Express Webtools
Complete the printer configuration in the Océ Express WebTools Open a web browser on a customer workstation connected to the network. Enter the following address: 'http://<Océ ColorWave 600 IP address>' (for example http://134.188.26.173) to access the Océ Express WebTools. Note: If the Océ... - Page 72 Complete the printer configuration in the Océ Express WebTools Select 'Configuration' - 'Network'. Chapter 3 - Prepare the printing system for use and get started...
- Page 73 Complete the printer configuration in the Océ Express WebTools In the 'Identification' section, click 'Edit'. Chapter 3 - Prepare the printing system for use and get started...
- Page 74 Complete the printer configuration in the Océ Express WebTools Use the password 'SysAdm' or the new password to logon as System administrator. (see ‘Change the password’ on page Note: It is advised to change the password. (see ‘Change the password’ on page Once logged in, enter the printer 'Host name' (for example: OceColorWave600) in the 'Identification' window, in order to address the Océ...
- Page 75 Complete the printer configuration in the Océ Express WebTools Enter the following address: 'http://<Océ ColorWave 600 Hostname>' (for example http://OceColorWave600) in the workstation web browser: If the Océ Express WebTools appear the printer is integrated in the network and ready for use.
-
Page 76: Configure The Regional Settings Of The Océ Colorwave™ 600
Configure the regional settings of the Océ ColorWave™ 600 Configure the regional settings of the Océ ColorWave™ 600 Purpose The regional settings are configured during the installation of your Océ ColorWave™ 600. If you want to change the initial configuration, you can do so in the 'Regional set- tings'. -
Page 77: Print The Customer Acceptance Test (Cat) Demo Print
Print the Customer Acceptance Test (CAT) demo print Print the Customer Acceptance Test (CAT) demo print When to do When you have installed the printer and prepared the printer for use, you can print the Customer Acceptance Test demo print. You can use this demo print to check if the Océ ColorWave™... - Page 78 Print the Customer Acceptance Test (CAT) demo print Action Illustration Use the 'Scroll wheel' to select Customer Acceptance Test and confirm with the 'Confirmation key' (above the 'Scroll wheel'). Press 'Finish' to print the Customer Acceptance Test. Select ' Back' and 'Home' to return to the 'Home' screen.
-
Page 79: Appendix A Reference Information
Appendix A Reference information... -
Page 80: The Job States
The job states The job states State Description 'Active job' The active job that the system is currently printing. 'Waiting job' The waiting jobs are all not-active jobs, regardless of their state. 'Processing job' The system is processing the job data. 'Attention job' A job that requires user intervention before it can be printed (load media, enter accounting info, password…... -
Page 81: Change The Password
Change the password Change the password When to do For security reasons it is advised to periodically change the password for the 3 access modes (Key operator, System administrator, Power user) to the Océ Express WebTools. How to change the password Click 'Preferences' - 'System defaults' - 'Passwords'. -
Page 82: Define The Folder Value
Define the folder value Define the folder value Introduction If you use a folder you must set the folder value. How to define the folder value Attention: Access the Océ Express WebTools. This setting is editable for the Key Operator and the Power user. -
Page 83: Appendix B Reader's Comment Sheet
Appendix B Reader's comment sheet... -
Page 84: Reader's Comment Sheet
Reader's comment sheet Reader's comment sheet Questions Have you found this manual to be accurate? O Yes O No Were you able to operate the product, after reading this manual? O Yes O No Does this manual provide sufficient background information? O Yes O No Is the format of this manual convenient in size, readability and arrangement (page layout,... - Page 85 Please return this sheet to: Océ-Technologies B.V. For the attention of ITC User Documentation. P.O. Box 101, 5900 MA Venlo The Netherlands Send your comments by E-mail to: itc-userdoc@oce.com For the addresses of local Océ organisations see: http://www.oce.com Appendix B - Reader's comment sheet...
- Page 86 Reader's comment sheet Appendix B - Reader's comment sheet...
-
Page 87: Addresses Of Local Océ Organizations
Appendix C Addresses of local Océ organizations... -
Page 88: Addresses Of Local Océ Organisations
Océ-Australia Ltd. Océ-Österreich GmbH P.O. Box 363 Postfach 95 Ferntree Gully MDC 1233 Vienna Vic 3165 Austria Australia http://www.oce.at/ http://www.oce.com.au/ Océ-Belgium N.V./S.A. Océ-Brasil Comércio e Indústria Ltda. J. Bordetlaan 32 Av. das Nações Unidas, 11.857 1140 Brussel Brooklin Novo Belgium São Paulo-SP 04578-000... - Page 89 Addresses of local Océ organisations Océ-Hungaria Kft. Océ-Ireland Ltd. 1241 Budapest 3006 Lake Drive Pf.: 237 Citywest Business Campus Hungary Saggart http://www.oce.hu/ Co. Dublin Ireland http://www.oce.ie/ Océ-Italia S.p.A. Océ Japan Corporation Strada Padana Superiore 2/B 3-25-1, Nishi Shinbashi 20063 Cernusco sul Naviglio (MI)
- Page 90 5450 North Cumberland Avenue Chicago, IL 60656 http://www.oceusa.com/ Note: The web site http://www.oce.com gives the current addresses of the local Océ organiza- tions and distributors. Note: The addresses of local Océ organizations for information about the Wide Format Printing Systems and the Production Printing Systems can be different from the addresses above.
- Page 91 Index ................17 Index Hardware components back ..............21 Cartridge front ...............18 ................56 Hardware configuration load a toner cartridge ........56 folder ..............82 remove a toner cartridge .........56 Hostname replace a toner cartridge ........56 ..............53, 71 ................77 Change password ............81 Configure Imaging network settings ..........71 carriage ............25...
- Page 92 Index load ..............66 home screen ............29 replace ............66 mailbox screen ..........29 unpack ............64 maintenance screen .........29 Move the printer queue screen ...........29 ................37 system screen ..........29 Printer working area ................17 Printing system consumables ...........16 NetBIOS overview ............14 ................71 Network cable ................42 Network settings ................71...
- Page 93 Index ................29 Time format ................76 Toner cartridge ................56 TonerPearls ................56 Top delivery tray ................32 Total Area Click ................29 Unpack media roll ............64 Working area ................17...
- Page 96 And in offices around the world, people use Océ professional document systems to keep the wheels of business and government turning. Océ is also at work in publishing on demand, newspaper production and wide format color for spectacular display graphics.' Visit us at www.oce.com...
Need help?
Do you have a question about the ColorWave 600 and is the answer not in the manual?
Questions and answers