Table of Contents
Advertisement
Advertisement
Table of Contents

Subscribe to Our Youtube Channel
Related Manuals for Powerline BSG10X


Summary of Contents for Powerline BSG10X
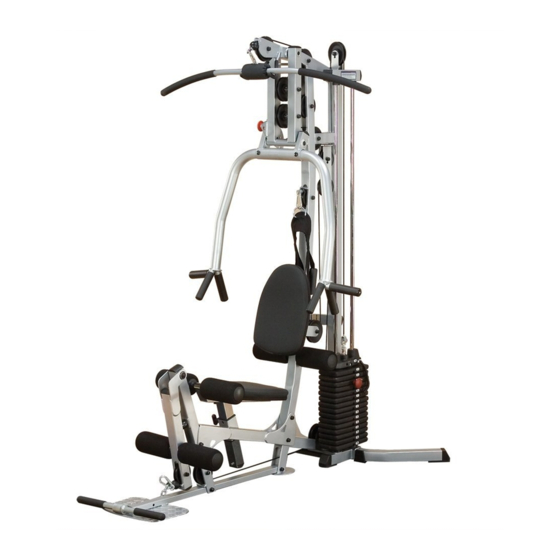
- Page 1 BSG10X O w n e r ’ S M a n u a l © Best Company srl...
-
Page 2: Before You Begin
BefOre YOu BeGin Thank you for purchasing the Powerline BSG10X. This gym is part of the Powerline line of quality strength training machines, which let you target specific muscle groups to achieve better muscle tone and overall body conditioning. To maximize your use of the equipment please study this Owner’s Manual thoroughly. -
Page 3: Important Safety Instructions
Forest Park, IL 60130 USA damaged the equipment. • Assemble and operate the BSG10X on a solid, level Retain this Owner’s Manual for future surface. Locate the unit a few feet from the walls or furniture to provide easy access. -
Page 4: Safety Guidelines
SafetY GuidelineS Successful resistance training programs have one prominent feature in common...safety. Resistance training has some inherent dangers, as do all physical activities. The chance of injury can be greatly reduced or completely removed by using correct lifting techniques, proper breathing, maintaining equipment in good working condition, and by wearing the appropriate clothing. -
Page 5: Assembly Instructions
Assembly of the BSG10X takes professional installers about 2 hours to complete. If this is the first time you have assembled this type of equipment, plan on significantly more time. rofessional installers are highly recommended However, if you acquire the appropriate tools, obtain assistance, and follow the assembly steps se- quentially, the process will take time, but is fairly easy. - Page 6 S t e p Be careful to assemble all components in the sequence they are presented. nOte: finger tighten all hardware in this step. • Be careful to not remove the shipping straps holding the lower frame against the main upright. Stand the gym upright being careful to prevent the gym from falling over until Rear Leg (B) is attached.
- Page 7 S T E P S t e p S T E P Above shows STEP 1 assembled and completed. © Best Company srl...
- Page 8 S t e p Be careful to assemble all components in the sequence they are presented. nOte: finger tighten all hardware in this step. Secure the lower frame to Main Frame (A) by using: Two 75 (3/8” x 3” hex head bolt)* Four 56 (3/8”...
- Page 9 S T E P S T E P S t e p Above shows STEP 2 assembled and completed. © Best Company srl...
- Page 10 S t e p Be careful to assemble all components in the sequence they are presented. Install Press Arms (J) and (K) into Press Arm Frame and secure using: Two 73 (3/8” x 2 1/2” carriage bolt) Two 56 (3/8” washer) Two 63 (3/8”...
- Page 11 S T E P S t e p S T E P Above shows STEP 3 assembled and completed. © Best Company srl...
- Page 12 S t e p Be careful to assemble all components in the sequence they are presented. Install chrome Guide Rods (F) into lower Main Frame (A) and Rear Leg (B) as shown in the diagram. Slide two Rubber Donuts (28) onto each chrome Guide Rod (F). Tilt Guide Rods (F) away from Main Frame (A) and install weight plates (46).
- Page 13 S T E P S t e p S T E P Above shows STEP 4 assembled and completed. © Best Company srl...
- Page 14 S t e p Be careful to assemble all components in the sequence they are presented. Install pre-assembled Seat Assembly (Q) and Back Rest Assembly (Q) into adjustment sockets. Install Safety Catch Bolts (65) and Spring Lock Washers (57) into ends of brackets. Turn the two locking T-Shaped Pop Pins (10) to secure the seat or back rest after positioned.
- Page 15 S T E P S T E P S t e p Above shows STEP 5 assembled and completed. © Best Company srl...
- Page 16 S t e p Be careful to assemble all components in the sequence they are presented. Install one Foam Roller (25) onto Foam Roller Bar (1) using a Plastic Washer (26) and Plastic End Cap (27) as shown. Do this three times: onto one side of each of the three Foam Roller Bars (1). Slide (partially assembled) Foam Rollers Bar (1) into holes in Main Frame (A) under Back Pad (Q), in front of Seat Pad (Q) and into the lower hole in the leg extension.
- Page 17 S T E P S t e p S T E P Above shows STEP 6 assembled and completed. © Best Company srl...
- Page 18 iMpOrtant SafetY inStructiOnS Be sure that all users carefully read and understand all warning, safety and maintenance labels on the machine before each use. Failure to do so may result in serious injury. It is imperative that you retain this Owner’s Manual and be sure all warning labels are legible and intact.
- Page 19 Warning Safety and Maintenance of Cables Although Powerline Equipment provides the highest quality of materi- als and workmanship in its products, the fact remains that component parts eventually wear out over time and with use. This is particularly true with reference to pliable moving parts such as cables.
- Page 20 Routine inspection and maintenance is of critical impor- tance to ensure the maximum safety and performance of the BSG10X. Powerline Equipment uses the highest qual- NUTS/BOLTS/FASTENERS: ity materials available, but wear is inevitable. Therefore, l Periodically inspect all nuts and bolts.
- Page 21 FOR POWERLINE CUSTOMER SERVICE: http://www.bodysolid.com/support/powerline/docs.html © Best Company srl...
- Page 22 pHraSeS, terMS, tipS & GuidelineS BEGINNER’S GUIDELINES • Work out at least two times a week. • Include six to eight exercises that train major muscle groups. • Perform two or three sets of at least eight to 12 repetitions. AEROBIC EXERCISE LARGE MUSCLES FIRST Exercise that primarily uses oxygen to burn fuel at low to moder-...
- Page 23 pHraSeS, terMS, tipS & GuidelineS START I NG RESI STANCE L EVEL If you begin weight training at too high a level, you risk serious injury. You will also develop poor form, which will hinder your efforts and discourage you. Use this as a guideline: if you cannot lift the weight eight times with proper form, the weight is too heavy.
- Page 24 nutritiOn characterized by a decrease in the total amount intake of saturated fats is directly related to Good nutrition is a diet in which foods are of bone mineral in the body and by a decrease eaten in proper quantities and with the needed increased cardiovascular disease.
-
Page 25: Exercise Prescription
eXerciSe preScriptiOn Sets Rest Periods Between Workouts Sets are defined as a combination of any number of reps of The amount of rest between training sessions depends on the one exercise. The number of sets used in a workout is directly recovery ability of the individual. - Page 26 traininG tipS fOr BeGinner’S ARE YOU A “BEGINNER”? A beginner can be classified as someone who has never touched a weight, may have lifted for a while, but has taken a substantial amount of time off, or has not consistently trained over the last six months. If you happen to fall into any of these categories, pay close attention, because the following information will be detrimental to the start of your training program.
- Page 27 cOMMOn traininG MiStaKeS Lack of Adequate Warm-Up and Inadequate Flexibility A warmed muscle is a more flexible muscle that’s better able to lift heavier weights and work in a full range of motion. Those warmed muscles also greatly reduce your chance of training injuries. Improper Form The use of improper form is a good way to keep you out of the gym.
- Page 28 perSOnal prOGraM It is important to first estab- lish specific and realistic Once you have determined your personal goals, you goals. You should determine your long term goal and then will need to set up a schedule that helps you attain set a series of short term them.
-
Page 29: Determine Your Training Method
deterMine YOur traininG MetHOd There are three basic types of weight training methods: FOR MUSCULAR FOR POWER FOR STRENGTH ENDURANCE & DEFINITION AND MUSCLE MASS 1. Training for muscular This training method incorporates This is the method most This type of training is the most achieving and maintaining a high often used by bodybuilders endurance and definition... -
Page 30: Exercise Tips
eXerciSe tipS Listed below are Body-Solid’s picks of the best exercises you can do for each body part. These exercises can be done using free weights, machines and multi-station gyms. Learn to do each exercise in proper form. You can make substitutions in your training and try variations of each using different Body-Solid grips, cable attachments and accessories to slightly change the emphasis of a particular exercise. -
Page 31: Anatomy Chart
anatOMY cHart © Best Company srl... - Page 32 fitneSS GOalS © Best Company srl...
-
Page 33: Exercise Log
eXerciSe lOG © Best Company srl... - Page 34 eXerciSe lOG © Best Company srl...
- Page 35 eXerciSe lOG © Best Company srl...
- Page 36 StretcHinG The following pages show illustrations with descriptions of static stretching for warm up and post-exercise cool down. Remember... stretch your large muscle groups first and do all stretches in a smooth, slow, controlled manner. Flexibility is an important component of physical fitness and needs to be addressed in a resistance training program.
- Page 37 StretcHinG Cross Arm in Front of Chest MUSCLE(S) AFFECTED: latissimus dorsi and teres major Stand or sit with the right arm slightly flexed (15° to 30°) and adducted across the chest. Grasp the upper arm just above the elbow, placing the left hand on the posterior side of the upper arm.
- Page 38 StretcHinG Side Bend with Straight Arms MUSCLE(S) AFFECTED: external oblique, latissimus dorsi and serratus anterior Stand with feet 14 to 16 inches apart. Stretching the Interlace the fingers with palms facing each other. sides, upper Reach upward with straight arms. back and Keeping arms straight, lean from waist to left side.
- Page 39 StretcHinG Stretching the hamstrings with emphasis on Sitting Toe Touch insertion of the MUSCLE(S) AFFECTED: hamstrings, hamstrings and spinal erectors and gastrocnemius calves. Sit with the upper body nearly vertical and legs straight. Lean forward from waist and grasp toes with each hand, slightly pull toes towards the upper body, and pull chest towards leg.
- Page 40 StretcHinG Straddle (Spread Eagle) MUSCLE(S) AFFECTED: gastrocnemius, hamstrings, spinal erectors, adductors and sartorius Stretching the hamstring and groin Sit with the upper body nearly vertical and legs straight, and with emphasis on spread legs as far as possible. insertion of the With right hand, grasp toes of right foot and pull on toes slightly, hamstrings and while pulling chest toward right leg.
- Page 41 StretcHinG Step Stretch MUSCLE(S) AFFECTED: gastrocnemius and soleus; also, achilles tendon Have ready a step or board 3 to 4 inches high. Place balls of both feet on the step or board, 1 inch from its edge. With straight legs, lower heels as far as possible. Hold for 10 to 15 seconds.
- Page 42 cHeSt wOrKOut Vertical Grip (Pectorals) Insert pin into weight stack at desired resistance level. Adjust seat pad height so that when seated the vertical press handles bisect the Chest (pectoral) muscles. Seat yourself comfortably on the seat pad with your back straight. Grasp vertical bench handles with your arms bent and palms facing in.
- Page 43 cHeSt wOrKOut (Latissimus Dorsi) Insert pin into weight stack at desired resistance level. Attach Lat Bar to high pulley cable. Adjust seat pad so your knees fit comfortably under leg hold-down foam rollers. Sit on seat pad facing into machine. Grasp Lat Bar 3 to 6 inches wider than your shoulders, on each side.
- Page 44 arMS wOrKOut (Triceps) Insert pin into weight stack at desired resistance level. Attach Tricep Strap to middle pulley cable. Adjust seat pad to a comfortable position. Sit comfortably facing away from the machine. Reach behind your head and secure your hands into the loops of the Tricep Strap. Bend slightly at the waist away from the machine.
- Page 45 SHOulderS wOrKOut (Deltiods) (Deltiods) Insert pin into weight stack at desired resistance level. Insert pin into weight stack at desired resistance level. Attach Stirrup Handle (optional) to low pulley cable. Attach Stirrup Handle (optional) to low pulley cable. Take an overhand grasp of the Stirrup Handle (optional) with your palm Take an overhand grasp of the Stirrup Handle (optional) with your palm facing down.
- Page 46 leG wOrKOut (Hamstrings) Insert pin into weight stack at desired resistance level. Stand facing machine and hook your heel under the bottom roller pad with your knee positioned slightly below the top roller pad. Use Hamstring strength to pull and curl your foot upward, bending your knee as much as possible.
- Page 47 leG wOrKOut (Inner Thigh) Insert pin into weight stack at desired resistance level. Attach Ankle Strap to left ankle and low pulley cable. Stand 1 to 2 feet away from the pulley with your left side toward machine. Keeping your legs straight and your body balanced, allow the weight to pull your leg away from your body and toward the machine.
- Page 48 Hardware (actual Size Shown) PART# PART# PART# PART# PART# © Best Company srl...
- Page 49 Hardware (actual Size Shown) PART# PART# PART# PART# PART# PART# © Best Company srl...
-
Page 50: Hardware List
Hardware liSt PART# KEY# DESCRIPTION LOWER MAIN FRAME P1LMF-A REAR LEG P1RL-B MAIN FRAME BSGMF-A REAR UPRIGHT P1RU-C REAR LEG BSGRL-B UPPER MAIN FRAME P1UMF-D SEAT FRAME BSGSF-C REAR UPPER BEAM P1RUB-E LEG EXTENSION POST BSGLEP-D WEIGHT RAISER P1WR-F FLAT PLATE BSGFP-E GUIDE ROD P1GR-G... - Page 51 Hardware liSt PART# KEY# DESCRIPTION CEC1.75 END CAP 1 3/4” X 1 3/4” CEC2X2 END CAP 2” X 2” CMS1.125 METAL SPACER 1 1/8”L X 3/8”ID CPP4.25 PULLEY 4 1/4”OD CS.75X10 SHAFT 3/4” X 10”L CSB.75X1.25 STEEL BUSHING 3/4”ID X 1 1/4”OD CEC1X2 END CAP 1”...
- Page 52 Hardware liSt PART# KEY# DESCRIPTION CEC1.75 END CAP 1 3/4” X 1 3/4” CEC2X2 END CAP 2” X 2” CMS1.125 METAL SPACER 1 1/8”L X 3/8”ID CPP4.25 PULLEY 4 1/4”OD CBB.5X.75 BRONZE BUSHING 1/2” X 3/4” CS.75X10 SHAFT 3/4” X 10”L STEEL BUSHING CSB.75X1.25 STEEL BUSHING 3/4”ID X 1 1/4”OD...
-
Page 53: Reference Drawings
reference drawinGS Note: Due to continuing product improvements, specifications and designs are subject to change without notice. © Best Company srl Even though we have prepared this manual with extreme care, neither the publisher nor the author can accept responsibility for any errors in, or omission from, the information given. - Page 54 © Best Company srl...
-
Page 55: Exploded View Diagram
eXplOded View diaGraM © Best Company srl... - Page 56 1900 S. Des Plaines Ave. Forest Park, Il 60130 1 (800) 556-3113 Hours: M-F 8:30 - 5:00 CST Copyright 2003. Body-Solid. All rights reserved. Body-Solid reserves the right to change design and specifications when we feel it will improve the product. Body-Solid machines maintain several patented and patent pending features and designs.
Need help?
Do you have a question about the BSG10X and is the answer not in the manual?
Questions and answers