Table of Contents
Advertisement
Quick Links
Download this manual
See also:
User Manual
Advertisement
Table of Contents

Related Manuals for Rosewill RNX-N4


Summary of Contents for Rosewill RNX-N4
-
Page 1: Quick Installation Guide
Wireless Router RNX-N4 Quick Installation Guide... - Page 2 Wireless Router RNX-N4 Quick Installation Guide The Wireless-N Gigabit Router is a draft 802.11n compliant device that delivers up to 6x faster speeds than 802.11g while staying backward compatible with 802.11g and 802.11not only a Wireless Access Point, which lets you connect to the network without wires.
-
Page 3: Rear Panel
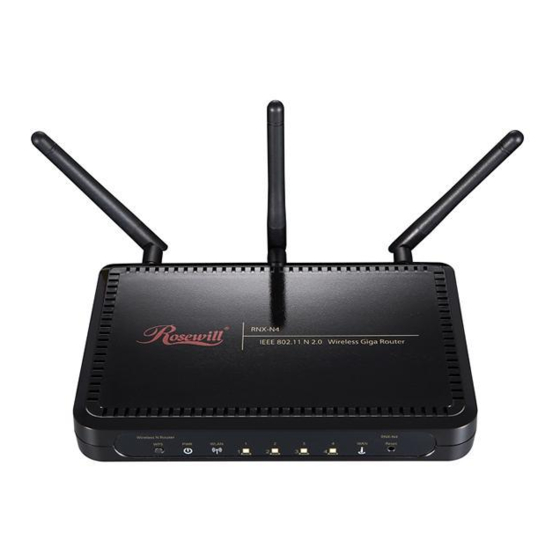
Wireless Router RNX-N4 Quick Installation Guide Rear Panel Antenna Antenna Antenna Connector Connector Connector DC Connector Front Panel LAN 1-4 LED Wi-Fi Protected WLAN LED Internet Reset to Factory setting Setup... - Page 4 Wireless Router RNX-N4 Quick Installation Guide Step Label Description Use an Ethernet cable to connect each port to a computer on LAN Ports (1-4) your Local Area Network (LAN). WAN Port Use an Ethernet cable to connect this port to your WAN router.
-
Page 5: Hardware Installation
Wireless Router RNX-N4 Quick Installation Guide Hardware Installation 1. Place the unit in an appropriate place after conducting a site survey. 2. Plug one end of the Ethernet cable into the LAN port of the device and another end into your PC/Notebook. -
Page 6: Ip Address Configuration
Wireless Router RNX-N4 Quick Installation Guide IP Address Configuration The default IP address of the device is 192.168.1.2 In order to log into this device, you must first configure the TCP/IP settings of your PC/Notebook. 1. In the control panel, double click Network Connections and then double click on the connection of your Network Interface Card (NIC). -
Page 7: Internet Connection Wizard
Wireless Router RNX-N4 Quick Installation Guide Logging In 1. To configure the device through the web-browser, enter the IP address of the device (default: 192.168.1.2) into the address bar of the web-browser and press Enter. 2. After connecting to the IP address, the web-browser will display the login page. -
Page 8: Wan Dhcp
Wireless Router RNX-N4 Quick Installation Guide WAN DHCP 1. Select the DHCP Connection (Dynamic IP Address) radio button and then click on the Next button. 2. You have the option of cloning your PCs MAC address onto the device. Click on the Clone Your PCs MAC Address to automatically copy the MAC address. - Page 9 Wireless Router RNX-N4 Quick Installation Guide PPTP 1. Select the PPTP radio button and then click on the Next button. 2. Address Mode: PPTP can be used with a dynamic or static IP address. If you select the Dynamic IP radio button, then the IIP address in the next field is not required. However, if you select the Static IP radio button, then the IP address in the next field is required.
- Page 10 Wireless Router RNX-N4 Quick Installation Guide L2TP 1. Select the L2TP radio button and then click on the Next button. 2. Address Mode: L2TP can be used with a dynamic or static IP address. If you select the Dynamic IP radio button, then the IIP address in the next field is not required. However, if you select the Static IP radio button, then the IP address in the next field is required.
-
Page 11: Static Ip Address
Wireless Router RNX-N4 Quick Installation Guide Static IP Address 1. Select the Static IP Address Connection radio button and then click on the Next button. 2. IP Address: Specify the IP address for this device, which is assigned by your ISP. -
Page 12: Wireless Network Setup
Wireless Router RNX-N4 Quick Installation Guide Wireless Network Setup 1. Click on the Wizard_Wireless link under the Basic menu, and then click on the Wireless Network Setup Wizard button. The wizard will inform you that there are two options: auto and manual. -
Page 13: Manual Network Setup
Wireless Router RNX-N4 Quick Installation Guide Manual Network Setup 1. If you select the Manual option, then you will be required to specify the SSID and select the appropriate network security. 2. Click on the Next button to continue. The wireless wizard will inform you that there are three major steps in the process. -
Page 14: Wireless Security Level: Best (Wpa2)
Wireless Router RNX-N4 Quick Installation Guide Wireless Security Level: BEST (WPA2) 1. Select the BEST radio button which supports WPA2 encryption. Then click on the Next button. 2. Enter a security password between 2 and 20 characters then click on the Next button. -
Page 15: Wireless Security Level: None (Security Disabled)
Wireless Router RNX-N4 Quick Installation Guide Wireless Security Level: None (Security Disabled) 1. Select the NONE radio button if you do not want to activate any security features. Then click on the Next button. 2. The setup is complete. Click on the Save button and then reboot the device.
Need help?
Do you have a question about the RNX-N4 and is the answer not in the manual?
Questions and answers