
Related Manuals for ESP GuardCam


Summary of Contents for ESP GuardCam
- Page 1 Combined security camera floodlight system www.cctvireland.ie Lo-Call 1890 866 900 e-sales@cctvireland.ie...
-
Page 2: Table Of Contents
Step 3 - Installing the GuardCam ........ -
Page 3: Guardcam Motion Light With Video Camera
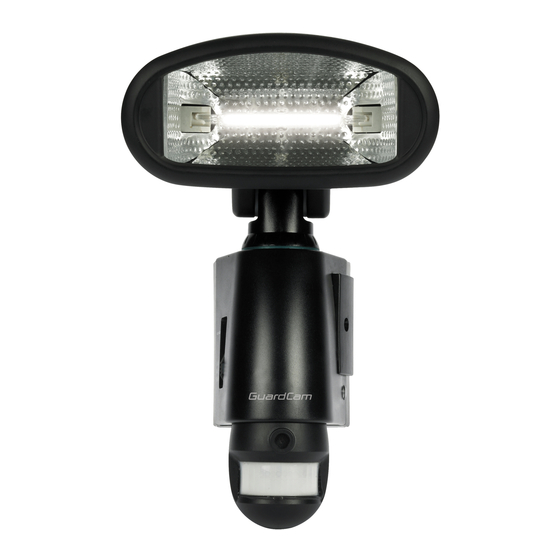
GuardCam Motion Light with Video Camera overview Floodlight Cover Halogen lamp 45º 45º 50º Waterproof cover 3 mode selection Camera lens PIR lens Low battery indicator 45º 45º 35º Step 1 - Assembly Install/replace the halogen lamp (see Fig. 1) I Make sure to unplug unit or turn off power first. -
Page 4: Step 2 - Insert/Remove Sd Card
Installation and replacement of back up batteries The Function of the back up batteries is to Provide power to complete a part finished recording if a mains power outage occurs and preserve date/time settings for a minimum of 120 hours prior to mains power being restored. Unscrew the screw A and remove back cover. -
Page 5: Step 3 - Installing The Guardcam
If you are not sure, please contact your retailer. Note: It is recommend to mount GuardCam 2M above the ground for optimum performance, do not mount the fixture below 1.2M. See Fig. 3 for details of performance range. - Page 6 Step 4 - Mounting your GuardCam (see Fig. 4 & Fig. 5) 1. Place plastic masonry plugs into desired surface aligning holes as shown below. Using an electric screwdriver, fasten mounting plate directly to surface using screws E. 2. Feed the cable through the back mounting box and bush the cable entry to avoid abrasion to the cable.
-
Page 7: Step 5 - Adjusting The Settings
Step 5 - Adjusting the Settings (see Figs. 7 - 9) I Time control: Turn the time control knob to”+” side to increase the illumination time (7 minutes max.), turn the control knob to “-“ side to reduce the illumination time (30 seconds min.) I Sensitivity control: Adjust the detector range of Passive Infrared Motion Sensor (±... -
Page 8: Step 6 - Set The Date And Time
Fig. 9 Step 6 - Set the Date and Time This will allow the security video taken by GuardCam to display the correct date and time it was taken. Push TIME/DATE SET button (see Fig. 10) for 3 seconds, The LCD screen will then flash 3 times, indicating you have entered Time/Date setting mode. -
Page 9: Step 7 - Viewing Video
The LCD screen will shut off automatically 10 seconds later. * On the ”P” (photo) setting, GuardCam will take a series of digital photographs at a rate of 3 photos every second when the motion sensor is triggered. -
Page 10: Technical Specifications
Technical Specifications Features and specification: I PIR detection angle 160 Deg and detection range up to 10M I Records 20 seconds image recording for image stream:10fps at 480*640 Pixels I Built in SD card slot for SD memory card I SD card slot for additional storage, max memory size up to 2G I SD card specification: FAT I Automatic exposure control, white balance and sharpness I Auto Date &... -
Page 11: General Information And Safety
G Use a soft lens cloth for cleaning lens. Avoid touching lens with fingers. G Remove dirt or stains with a soft cloth dampened with water or neutral detergent. Keep the GuardCam Motion Light with Video Camera in a dry and cool dust-free environment or container when it is NOT used G Do not open the GuardCam Motion Light with Video Camera for unauthorized service.
Need help?
Do you have a question about the GuardCam and is the answer not in the manual?
Questions and answers
Have had a guradcam for many years. The green light turned red. I took and then put back the sd card and then pressed the top reset button but the light remained red. Any advice please?