
Subscribe to Our Youtube Channel
Related Manuals for ESP GuardCam RF


Summary of Contents for ESP GuardCam RF
- Page 1 GuardCam RF Manual_Layout 2 01/08/2013 09:27 Page 1 Combined security camera floodlight system with remote signalling capability...
- Page 2 GuardCam RF Manual_Layout 2 01/08/2013 09:27 Page 2 IMPORTANT NOTES - PLEASE READ The requirement to install back up batteries has now been removed from the latest version of GuardCam. Time and date settings will now be maintained during mains power outages for a minimum of 72 hours.
-
Page 3: Table Of Contents
GuardCam RF Manual_Layout 2 01/08/2013 09:27 Page 3 Table of contents Contents of package ..........3 GuardCam Motion Light with Video Camera . -
Page 4: Guardcam Motion Light With Video Camera
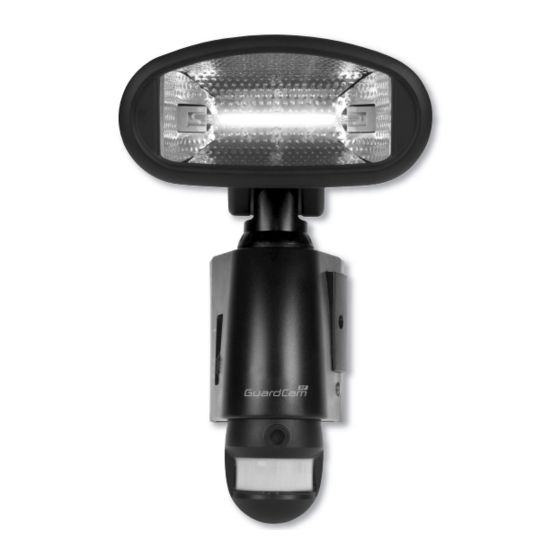
GuardCam RF Manual_Layout 2 01/08/2013 09:27 Page 4 GuardCam Motion Light with Video Camera overview Floodlight Cover Halogen lamp 45º 45º 50º Waterproof cover 3 mode selection Camera lens PIR lens 45º 45º Step 1 - Assembly 35º Install/replace the halogen lamp (see Fig. 1) ... -
Page 5: Step 2 - Insert/Remove Sd Card
GuardCam RF Manual_Layout 2 01/08/2013 09:27 Page 5 Step 2 - Insert/remove SD card (see Fig. 2) Unscrew the waterproofed cover using provided Allen key, then insert the SD card until it automatically locks into place. If you need to remove the SD card, please press OFF button and take it out within 30 seconds. -
Page 6: Step 4 - Mounting The Guardcam
GuardCam RF Manual_Layout 2 01/08/2013 09:27 Page 6 Step 4 - Mounting your GuardCam (see Fig. 4 & Fig. 5) 1. Place plastic masonry plugs into desired surface aligning holes as shown below. Using an electric screwdriver, fasten mounting plate directly to surface using screws E. -
Page 7: Step 5 - Adjusting The Settings
GuardCam RF Manual_Layout 2 01/08/2013 09:27 Page 7 Step 5 - Adjusting the Settings (see Figs. 7 - 9) Time control: Turn the time control knob to ” ” side to increase the illumination time (7 minutes max.), turn the control knob to “... - Page 8 GuardCam RF Manual_Layout 2 01/08/2013 09:27 Page 8 Audio mode: To Change audio mode press the audio mode button (Fig. 8). The audio mode will cycle through the available options on each push. Option 1 : Warning you are being recorded by a security camera...
-
Page 9: Step 6 - Setting The Date And Time And Video Mode
GuardCam RF Manual_Layout 2 01/08/2013 09:27 Page 9 Step 6 - Set the Date and Time and Video Mode This will allow the images taken by GuardCam to display the correct date and time it was taken. Push TIME/DATE SET button (see Fig. 10) for 3 seconds, The LCD screen will then flash 3 times, indicating you have entered Time/Date setting mode. -
Page 10: Step 7 - Rf Trigger Settings
To ensure trigger signals are only received by the intended devices the RF codes on both units must be set. An RF coding switch block for the GuardCam RF can be found on the rear panel adjacent to the main power input (Fig. 7). Each of the four switches can be set to on or off. - Page 11 GuardCam RF Manual_Layout 2 01/08/2013 09:27 Page 11 Optional extras AlertCam RA Wire free remote alarm/chime receiver Alarm or chime mode Up to 60m range Time and volume adjustable AlertCam RS Wire free remote switching unit ...
-
Page 12: Technical Specifications
GuardCam RF Manual_Layout 2 01/08/2013 09:28 Page 12 Technical Specifications Features and specification: PIR detection angle 160 Deg and detection range up to 10M 20 seconds of image recording for image streaming SD card slot for storage, max memory size up to 32GB ...
Need help?
Do you have a question about the GuardCam RF and is the answer not in the manual?
Questions and answers