Visonic PowerMaxExpress Installer's Manual
Fully supervised wireless alarm control system
Hide thumbs
Also See for PowerMaxExpress:
- Installer's manual (45 pages) ,
- User manual (38 pages) ,
- Brochure (8 pages)
Table of Contents
Advertisement
Quick Links
PowerMaxExpress
Fully Supervised Wireless Alarm Control System
1. INTRODUCTION ....................................................... 3
2. SPECIFICATIONS..................................................... 3
2.1 General Data....................................................... 3
2.2 RF Section .......................................................... 3
2.3 Electrical Data ..................................................... 3
2.4 Communication ................................................... 4
2.5 Physical Properties ............................................. 4
3. INSTALLATION ......................................................... 4
3.1 Unpacking the Equipment................................... 4
3.2 Supplying Power to the Unit................................ 4
3.3 System Planning & Programming ....................... 4
3.4 Mounting ............................................................. 4
3.5 Wiring .................................................................. 4
3.6 Backup Battery Insertion..................................... 6
3.7 Optional GSM Module Mounting ........................... 7
3.8 Power Cable Connection .................................... 7
3.9 Control Panel Final Closure ................................ 7
4. PROGRAMMING....................................................... 8
4.1 INTRODUCTION ................................................ 8
4.1.1 General Guidance............................................ 8
4.1.2 Entering an Invalid Installer Code ....................... 8
4.1.3 Installer's Menu ................................................ 8
4.1.4 Setting a New Installer Code ........................... 8
PowerMaxExpress that has 2 Installer Codes ........... 8
TRANSMITTERS........................................................... 9
4.2.1 General Guidance............................................ 9
4.2.2 Enrolling Type .................................................. 9
4.2.3 Enroll/Delete Sensors ...................................... 9
4.2.4 Enroll/Delete Keyfob Transmitters ......................... 9
4.2.5 Enroll/Delete Wireless Commander........................ 9
4.2.6 Enroll/Delete 2-Way Keypad ............................ 9
4.2.7 Enroll/Delete Wireless Siren............................. 9
& PARTITION .............................................................. 11
4.4.1 Preliminary Guidance..................................... 12
4.4.3 Exit Delay ....................................................... 12
4.4.4 Bell Time ........................................................ 12
4.4.5 Abort Time...................................................... 12
4.4.6 Alarm Cancel.................................................. 12
4.4.7 Quick Arm ...................................................... 12
4.4.8 Bypass............................................................ 12
4.4.9 Exit Mode ....................................................... 13
4.4.10 Piezo Beeps ................................................. 13
4.4.11 Trouble Beeps.............................................. 13
4.4.12 Panic Alarm.................................................. 13
4.4.13 Swinger Stop................................................ 13
4.4.14 Cross Zoning................................................ 13
4.4.15 Supervision .................................................. 13
4.4.16 NOT READY ................................................ 13
4.4.17 AUX Button A ............................................... 13
4.4.18 AUX Button B 2-W-KF.................................... 13
D-302017
TABLE OF CONTENTS
4.6 GSM Auto Detection.............................................. 23
4.7 BBA Auto Detection............................................... 23
4.9 DEFINE CUSTOM................................................. 24
4.10 DIAGNOSTIC TEST ............................................ 24
4.11 USER FUNCTIONS ............................................ 25
4.12 RETRIEVING FACTORY DEFAULTS ................ 25
4.13 SERIAL NUMBER ............................................... 25
4.14 CALLING UPLOAD/DOWNLOAD SERVER....... 25
4.15 ENABLING/DISABLING PARTITIONS ............... 26
4.16 WALK-TEST ........................................................ 26
5. TESTING PROCEDURES ...................................... 27
6. MAINTENANCE ...................................................... 27
7. READING THE EVENT LOG .................................. 27
Assignments ................................................................ 29
4.4.19 Jam Detect................................................... 13
4.4.20 Latchkey....................................................... 14
4.4.21 "Not Active" .................................................. 14
4.4.23 Duress.......................................................... 14
4.4.24 Piezo Siren................................................... 14
4.4.25 Reset Option ................................................ 14
4.4.26 Tamper Option ............................................. 14
4.4.27 Siren On Line ............................................... 14
4.4.28 Memory Prompt ........................................... 14
4.4.29 Disarm Option .............................................. 14
4.4.30 Bell/Rep. Option........................................... 14
4.4.31 Low-Bat Ack................................................. 14
4.4.32 Screen Saver ............................................... 14
4.4.33 Confirm Alarm .............................................. 14
4.4.34 AC FAIL REP ............................................... 14
4.4.36 User Permission .......................................... 15
4.4.39 Key Zones Options (Optional) ..................... 15
Preliminary Guidance.............................................. 17
4.5.1 PSTN / GSM (Fig. 4.5 Detail A) ....................... 17
4.5.2 GPRS / BB [Fig. 4.5 Detail B] ........................ 17
4.5.3 C.S. Reporting (Fig. 4.5 Detail C).................. 18
4.5.4 Private Report (Fig. 4.5 Detail D) .................... 19
5.1 Preparations...................................................... 27
5.2 Diagnostic Test ................................................. 27
5.3 Keyfob Transmitter Test ................................... 27
5.4 Emergency Transmitter Test ............................ 27
6.1 Dismounting the Control Panel......................... 27
6.2 Replacing the Backup Battery .......................... 27
6.3 Fuse Replacement............................................ 27
6.4 Replacing/Relocating Detectors ....................... 27
A1. Detector Deployment Plan.................................. 29
A2. Keyfob Transmitter List....................................... 29
A3. Emergency Transmitter List................................ 30
A4. Non-Alarm Transmitter List................................. 30
Installer Guide
1
Advertisement
Table of Contents

Subscribe to Our Youtube Channel
Related Manuals for Visonic PowerMaxExpress


Summary of Contents for Visonic PowerMaxExpress
-
Page 1: Table Of Contents
4.1.4 Setting a New Installer Code ......8 4.1.5 Setting a New Installer Code in 4.7 BBA Auto Detection..........23 PowerMaxExpress that has 2 Installer Codes ... 8 4.9 DEFINE CUSTOM..........24 4.2 ENROLLING WIRELESS DEVICES AND KEYFOB TRANSMITTERS............9 4.10 DIAGNOSTIC TEST .......... - Page 2 C5. Gas Zone............33 MESSAGE TO THE INSTALLER The PowerMaxExpress control panel is supplied with 2 instruction manuals: Installer Guide (this manual - for your exclusive use) User’s Guide (for your use during installation only - Must be handed over to the master user after testing the system).
-
Page 3: Introduction
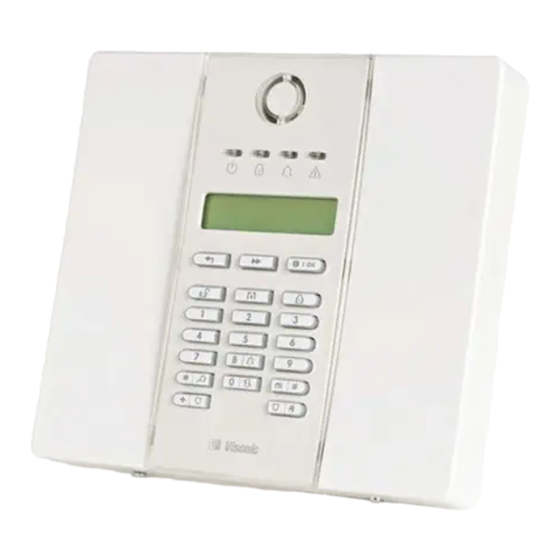
Control Facilities: According to the European standard EN50131-1, the - Integral keypad PowerMaxExpress security grading is 2 – "low to medium - PowerCode / Code-Secure™ hand-held transmitters. risk" and environmental classification is II – "indoor general" - One way / two way keypads. -
Page 4: Communication
Program the system now as instructed in the programming section. 3.2 Supplying Power to the Unit 3.4 Mounting Connect power to the PowerMaxExpress temporarily (see figure 3.7). Alternatively, you may power up from the Required tool: Philips screwdriver #2. backup battery, as shown in figure 3.3. - Page 5 Remove front cover Back unit Mark 4 drilling points on mounting surface Release screws Fasten the back unit with 4 screws Drill 4 holes and insert wall anchors Figure 3.1 – Back Unit Mounting CABLES ROUTING GUIDE Cables entry possibilities Cable clips (example) Remove the left or right side...
-
Page 6: Backup Battery Insertion
3.6 Backup Battery Insertion back into place, be sure to align them carefully with the Connect battery pack as shown in the next drawing. pins on the PCB. Misaligned or reverse insertion of terminals may damage internal PowerMaxExpress circuits! D-302017... -
Page 7: Optional Gsm Module Mounting
3.8 Power Cable Connection Battery Connect the power cable and close the control panel as insertion shown below. Electrical socket-outlet shall be installed near the equipment and shall be easily accessible. Connect the power adapter to the power connector. Battery connection Figure 3.3 - Battery Insertion 3.7 Optional GSM Module Mounting Fig. -
Page 8: Programming
PowerMaxExpress that 4.1.1 General Guidance Installer Codes We recommend to program the PowerMaxExpress on the For PowerMaxExpress with 2 installer codes, INSTALLER work bench before actual installation. Operating power code (default 8888) and MASTER INSTALLER code may be obtained from the backup battery or from the AC (default 9999), set new codes as shown in figure 4.1c. -
Page 9: Enrolling Wireless Devices And Keyfob Transmitters
The wireless siren is a remote siren that is activated upon wireless devices. predefined events by the PowerMaxExpress system. To 4.2.2 Enrolling Type enroll / delete up to 2 wireless sirens, refer to figure 4.2. - Page 10 ENROLLING TYPE ENROLL SENSORS ENROLL KEYFOB normal enroll SET SENSITIV. Keyfob No: - by tamper higher sensitivity [Keyfob No.] (****) (**) (e.g. 5) lower sensitivity Select by Keyfob No: 5 Keyfob No: 5 TRANSMIT NOW <OFF> TO DELETE ZONE No: - - (press (First display is READY or NOT READY)
-
Page 11: Defining Zone Types, Names, Chime Zones & Partition
4.3 DEFINING ZONE TYPES, NAMES, CHIME ZONES & PARTITION This mode allows you to assign one of 15 zone types to A list of factory defaults is printed in table 1. You may fill each of the system's 29 (wireless & wired) zones. In out the blank columns even before you start and proceed addition, it also allows you to assign a name to each zone to program according to your own list. -
Page 12: Defining Control Panel Parameters
4.4.1 Preliminary Guidance However, when disarming partition PowerMaxExpress Partition system) the siren ceases to This mode allows you to customize the control panel and sound. adapt its characteristics and behavior to the requirements 4.4.5 Abort Time of the particular user. An illustrated process is shown in Figure 4.4. -
Page 13: Exit Mode
Option Detection and Reporting when Note: Swinger Stop is defined for the entire alarm system UL (20/20) There is continuous 20 seconds of and not per partition (in a PowerMaxExpress Partition (USA standard) jamming system). EN (30/60) There is an accumulated 30 seconds of (Europe standard) jamming within 60 sec. -
Page 14: Latchkey
DD243). activity of sick, elderly or disabled people. If no sensor D. During entry delay, or by using the PowerMaxExpress detects and reports movement at least once within the keypad in AWAY mode. -
Page 15: User Permission
When using wired key zones, the control panel toggles between AWAY mode and Disarm. Note: In "Singapore" versions of the PowerMaxExpress, an open circuit arms the alarm system in AWAY mode and a closed circuit changes the state of the alarm system from AWAY mode to Disarm. - Page 16 Refer to Figure 4.1a 01: ENTRY DELAY 1 02: ENTRY DELAY 2 03: EXIT DELAY 04: BELL TIME to gain access to USER SETTINGS entry dly1 00 s entry dly2 00 s exit delay 30 s bell time 1 m menu bell time 3 m entry dly1 15 s...
-
Page 17: Defining Communication Parameters
<5> Not applicable in phone numbers The following table provides a list of the keys used by the PowerMaxExpress editor for the GPRS APN, GPRS Note: A "+" can be entered at the beginning of the line by Username, GPRS Password menus and Custom Zone... -
Page 18: Reporting (Fig. 4.5 Detail C)
PSTN/GSM RCVR1 [Fig 4.5.3(8)] - see note in Fig. 4.5 4.5.3 C.S. Reporting (Fig. 4.5 Detail C) Detail C Report Events [Fig 4.5.3(1)] – see note in Fig. 4.5 Detail C Here you program telephone number of the 1 central station Here you determine which types of event will be reported (including area code, 16 digit max) to which the system will to central stations. -
Page 19: Private Report (Fig. 4.5 Detail D)
PowerMaxExpress memory. private telephone subscribers. The options are as follows: Attention! If "0000" is used, it will not enable • Alarms + alerts connection of the PowerMaxExpress to the PC for upload/download purpose. • Alarms • Alerts Upload Option [Fig 4.5.3(21d)]... - Page 20 Here you define the second SMS phone number (including Note: In the single acknowledge mode, receiving an area code, 16 digits maximum) to which pre-selected acknowledge signal from a single telephone is sufficient to event types (see par. 4.6.3) will be reported. consider the current event closed and call off the communication session.
- Page 21 FIGURE 4.5 - DETAIL C Note 3:C.S. REPORTING For Control Panel that has installer code & master 4.5.3(1) Par. 4.5.3(2) Par. 4.5.3(3) Par. 4.5.3(4) installer code, the following REPORT EVENTS 1st RPRT METHOD 2nd RPRT METHOD 3rd RPRT METHOD functions are available only if the M ASTER INSTA LLE R code is entered: PSTN/GSM RCVR1...
- Page 22 FIGURE 4.5 - DETAIL C continued REPORT EVENTS (see DETAIL C in previous drawing) Par. 4.5.3(20) Par. 4.5.3(21) LINE FAIL REPORT PSTN UP / DOWN 4.5.3(20a) Par. 4.5.3(20b) 4.5.3(21a) Par. 4.5.3(21b) PSTN Remote access Mast. downl code GSM/GPRS immediately rem. access ON downl.
-
Page 23: Gsm Auto Detection
In the event that the GSM modem auto detection fails and the automatic enrollment of the GSM modem into the modem was previously enrolled in the PowerMaxExpress PowerMaxExpress control panel memory. GSM modem control panel, the message "Cel Rmvd Cnfrm" will be auto detection is activated in one of two ways: after tamper displayed. -
Page 24: Define Custom
4.9 DEFINE CUSTOM This mode allows you to define up to 5 zones names (in addition to the zone names that can be defined in the DEFINE ZONES mode - see par. 4.3). (see figure 4.1a) 9. DEFINE CUSTOM CUST. ZONES NAME EDIT USER TERM 1 EDIT USER TERM 2 EDIT USER TERM 3... -
Page 25: User Functions
This will re-validate your installer code. • Set the squawk option 4.12 RETRIEVING FACTORY DEFAULTS If you want to reset the PowerMaxExpress parameters to the Entering to/exit from the FACTORY 12. FACTORY DEFLT DEFLT menu is shown in figure 4.1a factory default parameters, you should enter the installer menu and perform the "FACTORY DEFLT"... -
Page 26: Enabling/Disabling Partitions
When the partition feature is disabled, zones, user codes [inst. code] and features will operate the same as in a regular 1. NEW INSTL CODE PowerMaxExpress unit. When partition is enabled, menu displays are changed to incorporate the partition feature. enable 15. PARTITIONING disable <OK>... -
Page 27: Testing Procedures
“Disarm, ready to arm" conducting this test, or just disconnect the telephone line from should be heard and the display should revert to: the PowerMaxExpress during the test, to prevent false alarms. R E A D Y H H : M M Test the AUX button in each keyfob in accordance with the 6. - Page 28 (**) CODE _ _ _ _ LIST OF EVENTS CLEAR EVENT LOG <OK TO EXIT (Enter 4-digit installer code) Latest Event <OFF> TO DELETE (Return to normal operation) Oldest Event Figure 7 - Reading / Erasing the Event Log While the system is in normal operation mode, click to review the event log.
-
Page 29: Appendix A. Detector Deployment & Transmitter Assignments
APPENDIX A. Detector Deployment & Transmitter Assignments A1. Detector Deployment Plan Zone Zone Type Sensor Location or Transmitter Assignment Chime (in non-alarm or emergency zones) (Yes / No) 29 (*) 30 (*) Zone Types: 1 = Interior follower 2 = Perimeter 3 = Perimeter follower 4 = Delay 1 5 = Delay 2... -
Page 30: A3. Emergency Transmitter List
A3. Emergency Transmitter List Tx # Transmitter Type Enrolled to Zone Name of holder A4. Non-Alarm Transmitter List Tx # Transmitter Type Enrolled to Zone Name of holder Assignment D-302017... -
Page 31: Appendix B. Event Codes
APPENDIX B. Event Codes SIA Event Codes Contact ID Event Codes Code Definition Code Definition Code Definition Code Definition AC Restore Gas trouble restore Emergency Telco fault AC Trouble Holdup Alarm (duress) Fire Fire detector trouble Burglary Alarm Phone Line Restore Panic Loss of supervision Burglary Bypass... -
Page 32: Understanding The Scancom Reporting Protocol Data Format
Panic / 24 Hours - 8 users User No. Panic CP Duress digit digit Arm HOME and AWAY (Closing) User No. Cancel alarm Recent Close digit digit Disarm (Opening) User No. digit digit Trouble Event Fuse Fuse Jamming Jamming CPU Low CPU Low Fail Restore... -
Page 33: Appendix C. Programmable Zone Types
10 seconds, during C7. Interior Follower Zones which it beeps rapidly. The PowerMaxExpress has two types of delay zones, for which different delay times may "Interior Follower" zone is a zone that is located between be set. -
Page 34: D1. Powermaxexpress Compatible Detectors
PowerMaxExpress Compatible PowerMaxExpress Compatible Detectors Transmitters Each detector compatible with the PowerMaxExpress system is packed with its own installation instructions. The PowerMaxExpress system is compatible with multi- Read them carefully and install as indicated. button single button key-ring hand-held A. PIR Motion Detectors transmitters that use PowerCode and CodeSecure coding methods. - Page 35 Siren transmit its status signal to the alarm system). When an identifiable activation command is received from the PowerMaxExpress, the siren activates its sounder and the flash light (strobe light every 1.5 seconds). D-302017...
- Page 36 CONSEQUENTIAL OR OTHERWISE, BASED ON A CLAIM THAT THE PRODUCT FAILED TO FUNCTION. VISONIC LTD. (ISRAEL): P.O.B 22020 TEL-AVIV 61220 ISRAEL. PHONE: (972-3) 645-6789, FAX: (972-3) 645-6788 VISONIC INC. (U.S.A.): 65 WEST DUDLEY TOWN ROAD, BLOOMFIELD CT. 06002-1376. PHONE: (860) 243-0833, (800) 223-0020. FAX: (860) 242-8094 VISONIC LTD. (UK): 7 COPPERHOUSE COURT, CALDECOTTE, MILTON KEYNES.
Need help?
Do you have a question about the PowerMaxExpress and is the answer not in the manual?
Questions and answers