Visonic Powermax Installation Instructions Manual
Fully supervised wireless alarm control system
Hide thumbs
Also See for Powermax:
- User manual (38 pages) ,
- Installer's manual (32 pages) ,
- Programming manual (24 pages)
Table of Contents
Advertisement
Quick Links
POWERMAX
POWERMAX
POWERMAX
POWERMAX
Fully Supervised Wireless Alarm Control System
TABLE OF CONTENTS
TABLE OF CONTENTS
TABLE OF CONTENTS
TABLE OF CONTENTS
1. INTRODUCTION .......................................................... 2
2. SPECIFICATIONS ..................................................... 2
2. 1 General Data .......................................................2
2. 2 RF Section...........................................................2
2. 3 Electrical Data .....................................................2
2. 4 Communication ...................................................2
2. 5 Physical properties ..............................................2
3. INSTALLATION .......................................................... 3
3. 1 Unpacking the Equipment ...................................3
3. 2 Supplying Power to the Unit ................................3
3. 3 Programming.......................................................4
3. 4 Mounting the Bracket ..........................................4
3. 5 Wiring ..................................................................5
3. 7 Connecting the AC Transformer..........................6
3. 8 Detectors Compatible with the PowerMax ..........6
3. 10 Mounting the RS232 Module.............................7
control panel is supplied with 3 instruction manuals:
The PowerMax
Installation Instructions (this manual - for your exclusive use)
Programming Guide (for your exclusive use)
User's Guide (for your use during installation only. Must be given to the master user after testing).
Appendices A and B to the installation instructions will help you prepare an installation plan. Please take
time to fill out the forms - your job will become much easier and confusion will be prevented. Filling out
the forms will also help you create a list of detectors and transmitters that must be obtained for the
particular application. Compatible detectors and transmitters are listed and described briefly in
Paragraphs 3.8 and 3.9 of this manual.
Remember - it is advisable to power up the control panel temporarily after unpacking and program it on
the work bench, in accordance with the programming plan. Programming may then be carried out -
Paragraph 3.3 of this manual refers you to the programming guide.
The programming flow charts in the programming guide show all options available for each parameter.
Factory defaults are marked with a dark box to their right, and other options (those that can be selected
instead) are marked by clear boxes. This method allows you to put a checkmark in the appropriate clear
box whenever you deviate from the factory defaults.
Although time and date are considered user settings, we recommend that you set the time and date in
the course of programming. Access to the "User Settings" is possible through item 9 on the installer's
menu (see User's manual for exact procedure).
When you are through programming, proceed to install the system as detailed in the Installation
Instructions, from paragraph 3.4 onward.
MESSAGE TO THE INSTALLER
Preliminary
4. TESTING PROCEDURES .......................................... 8
4. 1 Preparations ....................................................... 8
4. 2 Diagnostic Test................................................... 8
4. 3 Keyfob Transmitter Test ..................................... 8
4. 4 Appliance ON/OFF Test ..................................... 8
4. 5 Emergency Transmitter Test .............................. 8
5. MAINTENANCE .......................................................... 9
5. 1 Dismounting the Control panel ........................... 9
5. 2 Replacing the Backup Battery ............................ 9
5. 3 Fuse Replacement ............................................. 9
TRANSMITTER ASSIGNMENTS ............................. 10
A. 1 Detector Deployment Plan ............................... 10
A. 2 Keyfob Transmitter List .................................... 10
A. 3 Emergency Transmitter List ............................. 11
A. 4 Non-Alarm Transmitter List .............................. 11
APPENDIX B. X-10 UNIT ASSIGNMENTS ................... 11
FCC STATEMENTS ....................................................... 12
Installation Instructions
1
Advertisement
Table of Contents

Related Manuals for Visonic Powermax


Summary of Contents for Visonic Powermax
-
Page 1: Table Of Contents
A. 3 Emergency Transmitter List ......11 3. 7 Connecting the AC Transformer......6 A. 4 Non-Alarm Transmitter List ......11 3. 8 Detectors Compatible with the PowerMax ..6 3. 9 Transmitters Compatible with the PowerMax..6 APPENDIX B. X-10 UNIT ASSIGNMENTS ....11 3. -
Page 2: Introduction
• The installer can access and change the user settings. EASY TO MAINTAIN • Status, alarm memory and trouble data displayed upon A fully equipped alarm system based on the PowerMax request. consists of the units shown in Figure 2 of the user’s guide. -
Page 3: Communication
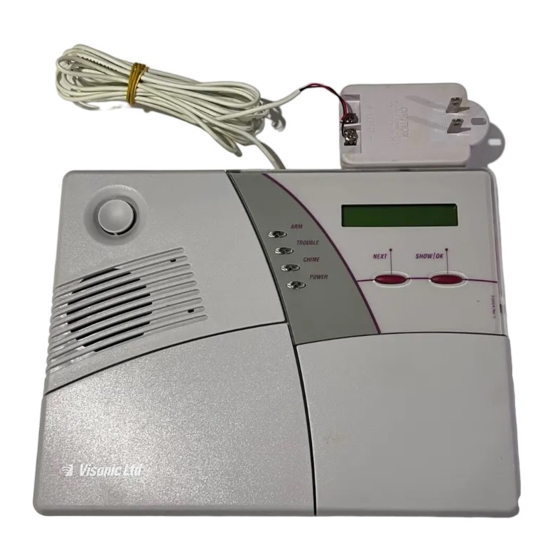
3.2 Supplying Power to the Unit Enrolling the transmitting devices’ identification codes in the PowerMax memory is easier to carry out before actual installation, with all detectors near the control panel, preferably on a work bench. It is therefore necessary to power up the PowerMax temporarily from the original power transformer or from its backup battery. -
Page 4: Programming
PowerMax programming Guide (Publication DE5450P). 3.4 Mounting the Bracket A. Detaching the Bracket from the Cabinet A notable advantage of the PowerMax is that the unit can be mounted without having to open its cabinet. All connectors and terminals are accessible through a Figure 8. -
Page 5: Wiring
Figure 8. 3.5 Wiring All terminals and connectors are accessible within the opening at the back of the PowerMax (see Figure 9). All Figure 9. Sunken Wiring Area Layout screw terminal blocks (except for “EARTH”) can be pulled out, wired appropriately and plugged back in. -
Page 6: Connecting The Ac Transformer
3.8 PowerMax-Compatible Detectors Each detector compatible with the PowerMax system is packed with its own installation instructions. Read them carefully and install as indicated. A. PIR Motion Detectors... -
Page 7: Mounting The Rs232 Module
Figure 17. MCT-423 The control panel can be equipped with an optional RS232 3 3 3 3 ..9 9 9 9 PowerMax-Compatible Transmitters module that allows serial data interchange with a local computer. If this module is not supplied, a special plastic... -
Page 8: Testing Procedures
Para. 3.6. E. Prepare an RS-232 flat modular cable and terminate it with a 6-position RJ-11 plug at the PowerMax end. 4 4 4 4 . TESTING PROCEDURES . TESTING PROCEDURES . -
Page 9: Maintenance
Clear it by arming the system and immediately disarming. 5.3 Fuse Replacement The PowerMax has two fuses which can be replaced if burnt out: Battery Fuse - 1 A, time delay type, UL recognized Sounder Fuse - 0.5 A, time delay type, UL recognized Figure 26. -
Page 10: Appendix A. Detector Deployment And Transmitter Assignments
APPENDIX A. Detector Deployment & Transmitter Assignments APPENDIX A. Detector Deployment & Transmitter Assignments APPENDIX A. Detector Deployment & Transmitter Assignments APPENDIX A. Detector Deployment & Transmitter Assignments A1. Detector Deployment Plan Zone Zone Type Sensor Location or Transmitter Assignment Chime Controls PGM Controls... -
Page 11: A3. Emergency Transmitter List
A3. Emergency Transmitter List Tx # Transmitter Type Enrolled to Zone Name of holder A4. Non-Alarm Transmitter List Tx # Transmitter Type Enrolled to Zone Name of holder Assignment APPENDIX B. X-10 Unit Assignments Unit Controlled ON by Timer ON by Zone No. Appliance by Alarm by Memory... - Page 12 VISONIC LTD. (ISRAEL): P.O.B 22020 TEL-AVIV 61220 ISRAEL. PHONE: (972-3) 645-6789, FAX: (972-3) 645-6788 VISONIC INC. (U.S.A.): 10 NORTHWOOD DRIVE, BLOOMFIELD CT. 06002-1911. PHONE: (860) 243-0833, (800) 223-0020. FAX: (860) 242-8094 VISONIC LTD. (UK): UNIT 1, STRATTON PARK, DUNTON LANE, BIGGLESWADE, BEDS. SG18 8QS. PHONE: (01767) 600857 FAX: (01767) 601098 : www.visonic.com INTERNET WEB SITE VISONIC LTD.
Need help?
Do you have a question about the Powermax and is the answer not in the manual?
Questions and answers