Table of Contents
Advertisement
Quick Links
Camera and Electronic Products for Integrators
W
VIEW™ PRO HD1
ALL
Vaddio™ PRO Series Cable System with
High Speed Differential Signaling for the
Sony® EVI-HD1 High Definition PTZ Camera
OVERVIEW
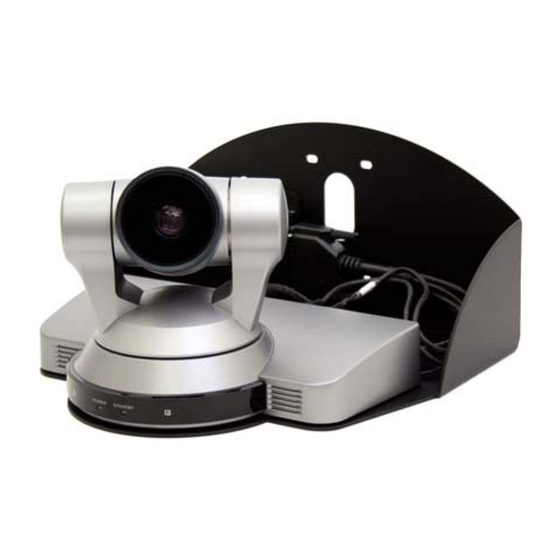
The Vaddio WallVIEW PRO HD1 (Figure 1) is built
around the Sony EVI-HD1 2-megapixel CMOS high
definition PTZ Camera. The WallVIEW PRO HD1 uses
high speed differential signaling (HSDS), an active
transmission
system
definition or standard definition video over Cat. 5 cabling
distances up to 500 feet.
The WallVIEW PRO HD1 system is capable of 1080i or
720p HD resolution in a 16:9 format or standard
definition (SD) resolutions – using the optional SD
Break-out cable – in a variety of screen configurations to
fit most monitors. The HD1 camera offers both NTSC
and PAL video standards.
The WallVIEW PRO system also has many new features, including a unique IR forwarding system which
allows the user to forward IR commands from third party IR remote controls, through the WallVIEW system to
a third party device such as a videoconference codec (see Figure 2). Other new features include video
outputs on BNC connectors (Y,Pb, Pr or Y-C and composite), a four position distance adjustment for Cat. 5
cabling, Y-Gain adjustment, and the EZ Interface Module (EZIM). Like all Vaddio WallVIEW systems, the
Thin Profile Wall Mount and mounting hardware is included.
INTENDED USE
Before installing the Vaddio WallVIEW PRO HD1 Camera System, please read the entire manual thoroughly.
All Vaddio camera systems are designed for use indoors. Outdoor operation is not recommended, has not
been tested, and could damage the camera and/or create a potentially unsafe operating condition. Use only
the Vaddio PowerRite power supply provided.
SAVE THESE INSTRUCTIONS
The information contained in this manual will help you install the Vaddio WallVIEW PRO system. For
reference, Vaddio keeps copies of Specifications, Installation and User Guides and most pertinent product
drawings for the Vaddio product line on the website. These documents can be downloaded from
www.vaddio.com free of charge.
IMPORTANT SAFEGUARDS
Read and understand all instructions before using. Do not operate the any electrical device if it has been
dropped or damaged. In this case, a Vaddio technician must examine the product before operating. To
reduce the risk of electric shock, do not immerse in water or other liquids and avoid extremely humid
conditions.
Use only the power supply provided with the Vaddio WallVIEW products.
Use of any unauthorized power supply will void any and all warranties.
INFORMATION
For RS-232 control information, please see the full-length Technical Manual for the SONY EVI-HD1 model.
This manual can be found either on the Vaddio or Sony website. Vaddio has also prepared a number of
TechNotes, specifications and drawings designed to inform and educate integrators' of the value and the
specific uses of Vaddio products.
©2008 Vaddio - All Rights Reserved. Reproduction in whole or in part without written permission is prohibited. Specifications and pricing subject to change. Vaddio,
WallVIEW, HSDS, Quick-Connect, EZIM and PowerRite are registered trademarks of Vaddio, Inc. All other trademarks are property of their respective owners.
Document Number 341-661 Rev D.
that
delivers
low-loss,
Installation and User Guide
HSDS™
WITH
high
Figure 1:
WallVIEW PRO HD1 System with Camera,
Wall Mount and EZIM
Advertisement
Table of Contents

Related Manuals for VADDIO WALLVIEW PRO HD1


Summary of Contents for VADDIO WALLVIEW PRO HD1
- Page 1 Vaddio products. ©2008 Vaddio - All Rights Reserved. Reproduction in whole or in part without written permission is prohibited. Specifications and pricing subject to change. Vaddio, WallVIEW, HSDS, Quick-Connect, EZIM and PowerRite are registered trademarks of Vaddio, Inc. All other trademarks are property of their respective owners.
-
Page 2: Installation
(152.4m) from the Quick-Connect box to the EZ Interface Module, which connects to the camera. See Step 9 for additional information on HDX 9000 IR wiring. WallVIEW PRO HD1 Installation and User Guide 341-661 Rev. D Page 2 of 14... - Page 3 Video and Control Cat. 5 cables can be run up to 500 from the Quick-Connect box to the EZ Interface Module, which connects to the camera. WallVIEW PRO HD1 Installation and User Guide 341-661 Rev. D Page 3 of 14...
- Page 4 Figure 4: Basic connectivity of the WallVIEW PRO HD1 with TANDBERG Video Switch. The WallVIEW HD1 connected to a TANDBERG 6000 MXP codec and utilizes an Optional RJ-45 to DB-9 adapter for PTZ control between the HD1 and codec.
-
Page 5: Mounting Instructions
(see Figure 6). Figure 8: 25-pin connector mounted to EZIM (left) EZIM mounted to the back of the Wall Mount (right) WallVIEW PRO HD1 Installation and User Guide 341-661 Rev. D Page 5 of 14... - Page 6 Modulated IR signal from Quick-Connect PRO to IR probe attached to the front panel IR window of the codec Compatible IR Emitters Xantech 282MRP Xantech 283M WallVIEW PRO HD1 Installation and User Guide 341-661 Rev. D Page 6 of 14...
- Page 7 “GND”. Attach the probe over the IR window of the codec. Make sure the dipswitch is in the correct position Figure 11: Terminating Xantech Probe cable to 2-position Phoenix type connector WallVIEW PRO HD1 Installation and User Guide 341-661 Rev. D Page 7 of 14...
-
Page 8: Completing The Installation
COMPLETING THE INSTALLATION: Connect the Vaddio 36 VDC power supply to an AC outlet. Power will travel down the Power Cat. 5 cable to the EZIM, powering the camera. The camera will “Home” to a centered position ready for control information from the provided IR Remote Control or RS-232 Camera controller of the integrators’... -
Page 9: General Specifications
8° tele to 70° wide (16:9) Weight Approx. 4 lbs 7 oz (2kg) Dimensions Approx 10.25” W x 6” H x 6.75” D (259mm x 150mm 169mm) WallVIEW PRO HD1 Installation and User Guide 341-661 Rev. D Page 9 of 14... -
Page 10: Appendix 1: Cable Pin-Outs For The Wallview Pro System
GND Out RXD Out TXD Out DTR Out EZIM DSR Out GND IN TXD IN RXD IN DTR IN POWER RS-232 RS-232 VIDEO DSR IN CVBS/PR C/PB WallVIEW PRO HD1 Installation and User Guide 341-661 Rev. D Page 10 of 14... - Page 11 RS-232 IN Connector (8-Pin Mini Din) Signal Unused Unused Sony HD Video (analog component) Pin-outs: Video Output Connector (DB-15HD) Signal Unused Unused Unused Unused Unused Unused WallVIEW PRO HD1 Installation and User Guide 341-661 Rev. D Page 11 of 14...
-
Page 12: Fcc, Ices-003 Compliance And Ce Declaration Of Conformity
Operation is subject to the following two conditions: (1) This device may not cause interference, and (2) This device must accept any interference including interference that may cause undesired operation of the device. Changes or modifications not expressly approved by Vaddio can affect emission compliance and could void the user’s authority to operate this equipment. -
Page 13: Warranty Information
Products not under warranty - Payment arrangements are required before outbound shipment for all out of warranty products. *Vaddio manufactures its hardware products from parts and components that are new or equivalent to new in accordance with industry standard practices. WallVIEW PRO HD1 Installation and User Guide 341-661 Rev. D... - Page 14 Toll Free: 800-572-2011 ▪ Phone: 763-971-4400 ▪ FAX: 763-971-4464 www.vaddio.com ©2008 Vaddio - All Rights Reserved. Reproduction in whole or in part without written permission is prohibited. Specifications and pricing subject to change. Vaddio, WallVIEW, HSDS, Quick-Connect, EZIM and PowerRite are registered trademarks of Vaddio. All other trademarks are property of their respective owners.
Need help?
Do you have a question about the WALLVIEW PRO HD1 and is the answer not in the manual?
Questions and answers