Table of Contents
Advertisement
Advertisement
Table of Contents

Related Manuals for Uniwell SX-7005


Summary of Contents for Uniwell SX-7005
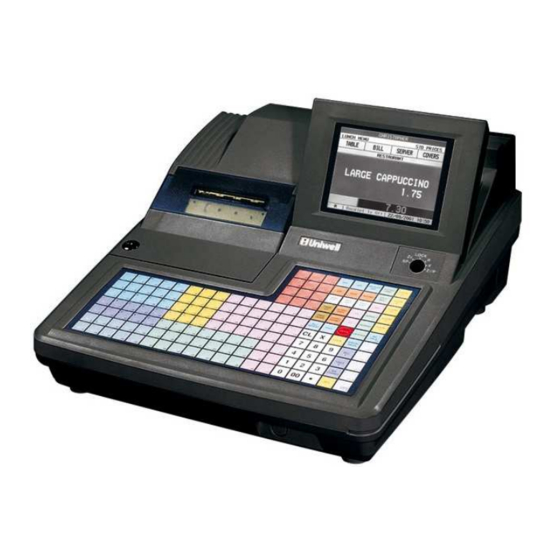
- Page 1 INLAND CASH REGISTER 118 East Third Street San Bernardino, CA 92410 (909) 884-0475 Fax (909) 888-3278 http://www.skan.com On the Web EMAIL info@skan.com SX-7005 Version 4.5 FOR TECHNICAL SUPPORT, CONTACT THE INLAND CASH REGISTER SUPPORT DEPARTMENT AT (909) 884-0475...
-
Page 2: Table Of Contents
Receipt Paper........................................2 Displays.........................................2 Display Contrast......................................3 Communications Ports - - - - - - - SX-7005 ..............................3 Dimensions - - - - - - - SX-7005..................................4 Replacing Paper Rolls - - - - - - -SX-7005..............................5 * Printer Problems - Printer Jam................................6 ................................7... - Page 3 TABLE OF CONTENTS REPORTS------------------------------------------------------------------------------------SECTION 2 ..............1 OVERVIEW OF REPORTS....................................1 How to Run X or Z1/P Reports..................................1 How to Run Z2 Reports....................................1 – C ..................................2 REDIT LOSE ATCH This will send the batch totals to the bank and print a report of credit card totals in the current batch..........2 ....................................3 HIFT HANGE...
- Page 4 This key position is for taking 'read and reset' 2nd level reports. LOCK Lock Mode LCD suspended and key input is not accepted. Only the LED lamp (Uniwell logo) is lit in red. Register Mode This is the main sales mode.
-
Page 5: Printer
Printer 2-Station Thermal Printer model Epson M-T245 thermal printer with an auto cutter Printer Printing speed 14 lines/sec Columns 24 columns for receipt/journal Receipt Paper Paper Specs Single thermal roll 44.5 mm x diameter 83 mm (1.718” wide X max. 220’ diameter) Part # 8930 (50 Rolls) Ordering... -
Page 6: Hardware
Display Contrast LCD Display Contrast is adjusted by using the SCROLL BACK and SCROLL FORWARD keys with no Team Member Logged on. Communications Ports - - - - - - - SX-7005 Standard Port CH-A: RS485 RJ45 8-pin modular Register to Register... -
Page 7: Dimensions
Dimensions - - - - - - - SX-7005 SX-7005 14.88” wide x 17.32” deep x 7.89” to 10.23” high Dimensions Width x Depth x Height (The maximum height is changed by an upright screen angle) Maximum height when customer display is pole mounted: (16.5”) -
Page 8: Replacing Paper Rolls
Replacing Paper Rolls - - - - - - -SX-7005 1. Roll Size: Single Thermal Roll – 44.5 mm x diameter 83 mm 2. Removing the printer cover: Turn the printer cover lock key counter-clockwise and gently lift the cover. -
Page 9: Printer Problems - Printer Jam
* Printer Problems - Printer Jam If the auto-cutter is locked by a paper jam or if something comes into the auto-cutter and it becomes locked, please follow the sequences below: Turn the power switch off. Open the printer cover. Remove the printer screw. -
Page 10: Transactions And Registrations
Transactions and Registrations Clerk Sign On Once clocked in, each Team Member must Sign On with their own Clerk number to register a sale. Enter the Clerk number and press the CLERK key. The Team Member name will be displayed at the top of the LCD display and the screen will be cleared to permit registration of items. -
Page 11: Function Keys
Function Keys NOTE: A sample keyboard is included in the attachments. Refer to the keyboard locations of the following keys CLERK This is the Sign On key for entry of the Team Member’s Clerk number in all key positions. Using the X, M or Z key, turn the key lock to the R, X, Z1/P, Z2, or SP position. R (Register Mode), X (Report Print/Display Mode), Z1/P (Report Level 1 Print/Reset and Program Modes), Z2 (Report Level 2 Print/Reset Mode), or SP (Supervisor Program Mode) -
Page 12: Page Down
This is the quantity/multiplication key. Enter a quantity and press the X key; enter the PLU number and press the PLU key. This key can also be used to enter text into a transaction. Press the X key, the display will show ENTER TEXT at the top of the display and show an entry field at the bottom of the display #<... -
Page 13: Receipt Copy
RECEIPT COPY This key can be used to print a second receipt after the transaction has been finalized. Press the RECEIPT COPY key The top of the operator display will show the message CLERK TO PRINT? Press the RECEIPT COPY key again to confirm the printing of a second receipt. A second receipt will print. -
Page 14: Paid Out
PAID OUT Paid Out entries cannot be included in a regular sales transaction. Paid Out is a separate transaction type. Enter the Team Member’s Clerk number and press the CLERK key. Press the PAID OUT key. The screen displays a list of 8 paid out types, number 1 through Press the number 1 through 8 that corresponds with the type of Paid Out entry to be made When the number is pressed the screen displays PAID OUT –... -
Page 15: Refund
REFUND The refund key is under manager’s control; a warning message box appears on the LCD display when the refund key is pressed in the R or X key lock position. The key lock must be turned to the Z1/P position using the Z or M key while the Clerk is signed on. -
Page 16: Void
VOID Sample Erroneous Sale #1: Enter the Team Member’s Clerk number CHOCOLAT PRO 32oz 5.70 and press the Clerk key 10% DISC %10.00 -0.57 5.13 TAX 1 0.31 CASH 5.44 2 3 8 & PLU key TEAM MEMBER NAME #001-008-0008-0001 05/13/2002 11:00- 10 Open Discount key... - Page 17 VOID Sample Transaction #1: The VOID key is under manager’s control; a warning message box appears on the LCD display when the VOID key is pressed in the R or X key lock position. The key lock must be turned to the Z1/P position while the Clerk is signed on. The VOID key should only be used for canceling previously registered erroneous items.
-
Page 18: Credit Card
Sample Erroneous Sale #2: Enter the Team Member’s Clerk number BUILD UP and press the Clerk key in the R key lock 90.00 position. 90.00 TAX 1 5.40 CREDIT CARD 95.40 TEAM MEMBER NAME #001-008-0008-0001 05/13/2002 11:00- 90 00 EAS / BUILD UP key STREET ADDRESS CITY STATE ZIP Credit Card key... - Page 19 VOID Sample Transaction #2: After running the charge on the Credit Card Machine, the charge is declined. This sale now needs to be voided. The VOID key is under manager’s control; a warning message box appears on the LCD display when the VOID key is pressed in the R or X key lock position. The key lock must be turned to the Z1/P position while the Clerk is signed on.
-
Page 20: Error Correct
ERROR CORRECT The ERROR CORRECT key may be used within a transaction to correct a previous entry that was incorrectly or unintentionally entered. Two methods can be used with the ERROR CORRECT key. If the mistake is discovered immediately upon registration and no other key registrations have occurred;... -
Page 21: 15% Disc (15% Discount)
15% DISC (15% Discount) - - - - RETAIL ITEMS ONLY - - - - The 15% DISC key is an item discount, not a subtotal discount to only be used on Retail Item Sales. When pressed immediately following an open amount item it will calculate 15 % of the item price, display the descriptor, discount percent, and the net dollar amount of the discount with a minus sign. -
Page 22: Tax 1 Exempt
TAX 1 EXEMPT This key is used to exempt the sale of Smoothies from Sales Tax 1, or any item taxed by Sales Tax 1. (This may vary depending upon your local taxing authority.) After the sale has been registered, press the SUBTOTAL key, you will see the amount of the sale including all applicable taxes. -
Page 23: Tender Keys
Tender Keys CASH This is the key for use when tendering a sale with cash. Two methods of tendering are allowed with this key: Over tendering and exact tendering Over Tendering is when the guest pays with an amount greater than the subtotal and results in change due back to the guest. -
Page 24: Credit Card
SUPER PUNCH PLUS 40oz 6.99 10% DISC %10.00 -0.70 SUPER PUNCH PLUS 32oz 5.25 15% DISC %15.00 -0.79 ---------- 10.75 TAX 1 0.94 ---------- 11.69 CASH 11.69 TEAM MEMBER NAME #001-008-0005-0001 05/10/2002 17:00-R STREET ADDRESS CITY STATE ZIP $5, $10, $20, $50 These four keys are set as “Preset”... -
Page 25: Check
CHECK When a guest is paying by check register the transaction the same as if it were a cash sale. Press the SUBTOTAL key to obtain the total, which will be displayed on both the guest and Team Member displays Tell the guest what the total of the sale is. -
Page 26: No Sale
and the register display will show the message SHORT TENDER, and beep at one second intervals until the transaction is finalized by an amount equal to or greater than the total balance due. Generally, credit card, check and gift certificate redemptions will be the first type of tender used. -
Page 27: Healthy Value Meals
Healthy Value Meals Healthy Value Meal #1 Enter the Team Member’s Clerk number and press the CLERK key Enter the PLU number of the 12 oz Tea Enter the PLU number of the Muffin Press the HEALTHY VALUE MEAL 1 key. This will provide a discount of $0.50. Press SUBTOTAL to show amount owing including taxes Enter amount tendered by guest and press appropriate key (eg. -
Page 28: Catering Program
Catering Program In order to register sales from the Catering Program the following is a guideline on how to register these sales. The Catering Program is broken down into the following items: 12oz CATERING TAXABLE 12oz CATERING NO TAX 20oz CATERING TAXABLE 20oz CATERING NO TAX 32oz CATERING TAXABLE 32oz CATERING NO TAX... - Page 29 Step 3 – Catering Sample 1 Team Member 01 Drink Menu Std Prices In case of error TABLE BILL SERVER PERSON Press ERROR CORRECT and Location Return to Step 2 above X 50.00 20oz CATERING TA XABLE Press SUBTOTAL to determine the price including Sales 124.50 124.50 SUBTOTAL...
- Page 30 Step 5 – Catering Sample 1 The Receipt will Print 50x 20oz CATERING TAXABLE 2.49 124.50 --------- SUBTOTAL 124.50 TAX 1 7.47 --------- SUBTOTAL 131.97 CHECK 131.97 Team Member 01 #001-008-003-001 08/27/2002 10:38-R STREET ADDRESS CITY STATE ZIP Sample Receipt Enter Clerk Drink Menu Std Prices...
-
Page 31: Sample 2
Sample 2 Tax Exempt Catering Sale of 35 – 12 oz Soda for a NON TAXABLE Program at $2.19 each. Step 1 – Catering Sample 2 With no Team Member Logged-On Using the X, Z or M Key Turn to the R position Enter a valid Team Member PIN number Press CLERK Step 2... - Page 32 Step 6 – Catering Sample 2 The Receipt will Print 35x 12oz CATERING NO TAX 2.19 76.65 --------- SUBTOTAL 76.65 CASH 76.65 Team Member 01 #001-008-003-001 08/27/2002 10:38-R STREET ADDRESS CITY STATE ZIP Sample Receipt Enter Clerk Drink Menu Std Prices TABLE BILL SERVER...
-
Page 33: Reports
REPORTS------------------------------------------------------------------------------------SECTION 2 Please be aware, X Reports are for readings and do not clear or reset any data. Z1 or Z2 reports will clear or reset the data. Once a Z1 or Z2 report is run it can NOT be re-printed, so make sure there is enough paper and it has been installed properly BEFORE running ANY reports. -
Page 34: Credit Card - Close Batch
Credit Card – Close Batch This will send the batch totals to the bank and print a report of credit card totals in the current batch. Step 1 With no Clerk / Server Logged-On Using the Z or M Key Turn to the Z1/P position Enter a valid Clerk / Server number Press CLERK... -
Page 35: Shift Change Procedures
Shift Change Procedures The following Shift Change Procedures are only intended as a guide, your individual requirements may vary: 1) Check Receipt Paper, replace if less than 1/16 inch of paper remains on the roll. Refer to page 3-4 of this manual for instructions. 2) Take an X Reading, (X-01 - AUTO FULL TRANS REPORT). -
Page 36: Auto Full Trans Report (Shift Change)
X-01 – AUTO FULL TRANS REPORT (Shift Change) Step 1 – X-01 Auto Full Trans Report With no Team Member Logged-On Using the X, Z or M Key Turn to the X position Enter a valid Team Member Clerk number Press CLERK Step 2 Select Option... - Page 37 Step 4 – X-01 Auto Full Trans Report X-87-ASSORTED 1 REPORT Press ENTER to print the report Team Member 01 TO ISSUE PRESS – [ENTER] TO ISSUE TO LCD – --MORE-- RECEIPT IS ON 08/27/02 23:39 X-87-Assorted 1 Report Menu Step 5 X-01 The Report will Print...
-
Page 38: Register Closing Procedures (Daily)
Register Closing Procedures (Daily) The following Register Closing Procedures are only intended as a guide, your individual requirements may vary: 1) Check Receipt Paper, replace if less than 1/16 inch of paper remains on the roll. Refer to page 3-4 of this manual for instructions. 2) Take an X Reading, (X-87-ASSORTED 1 REPORT). -
Page 39: Assorted 1 Report - Read Only (Daily Register Close)
X-87 – Assorted 1 Report – Read Only (Daily Register Close) X – 87 – ASSORTED 1 REPORT (Read Only) will print the following reports: 01 - Auto Full Transaction Report 06 - Hourly Report 21 - Full Group Report (Department Report) 47 - Grouped PLU Report Step 1 –... - Page 40 Step 4 – X-87-ASSORTED 1 REPORT X-87-ASSORTED 1 REPORT Press ENTER to print the report Team Member 01 TO ISSUE PRESS – [ENTER] TO ISSUE TO LCD – --MORE-- RECEIPT IS ON 08/27/02 23:39 X-87-Assorted 1 Report Menu Step 5 X-87 The Report will Print ----------ASSORTED 1 REPORT----------...
-
Page 41: Z1-88 - Assorted 2 Report - Read & Reset (Daily Register Close)
Z1-88 – Assorted 2 Report – Read & Reset (Daily Register Close) Z1 – 88 – ASSORTED 2 REPORT (RESET) will print the following reports: 01 - Auto Full Transaction Report 06 - Hourly Report 21 - Full Group Report (Department Report) 47 - Grouped PLU Report NOTE: DAILY TOTALS WILL BE RESET AND CANNOT BE RE-PRINTED !! Step 1 –... - Page 42 Step 4 – Z1-88-ASSORTED 2 REPORT Z1-88-ASSORTED 2 REPORT Press ENTER to print the report Team Member 01 TO ISSUE PRESS – [ENTER] --MORE-- Z1/P RECEIPT IS ON 08/27/02 23:54 Z1-88-Assorted 2 Report Menu Step 5 Z-88 The Report will Print ----------ASSORTED 2 REPORT---------- 08/27/2002 Z-01...
-
Page 43: Register Closing Procedures (Period / Month End)
Register Closing Procedures (Period / Month End) The following Register Closing Procedures for Period / Month End are only intended as a guide, your individual requirements may vary: 1) Follow the instructions given above in “Register Closing Procedures (Daily)” 2) Take an X Reading, (X-02, X-22, X-48) NOTE: This report is to be run as a duplicate copy of the Z2-89 NOTE: This report will be for your monthly reconciliation 3) Take a Z Reading, (Z2-89-ASSORTED 3 REPORT). -
Page 44: Z2-89 - Assorted 3 Report - Read & Reset (Period / Month End)
Z2-89 – Assorted 3 Report – Read & Reset (Period / Month End) Z2 – 89 – ASSORTED 3 REPORT (RESET) will print the following reports: 02 - Auto Full Transaction Report 22 - Full Group Report (Department Report) 48 - Grouped PLU Report NOTE: PERIOD / MONTH END TOTALS WILL BE RESET and CAN NOT BE RE- PRINTED !! Step 1 –... - Page 45 Step 5 Z2-89 The Report will Print ----------ASSORTED 3 REPORT---------- 08/31/2002 Z2-02 --------AUTO FULL TRANS REPORT--------- 08/31/2002 Z2-89-Assorted 3 Report CLERK LOGGED OFF You are automatically Logged-Off --MORE-- RECEIPT IS ON 08/31/02 23:55 Z2-Logon Required Step 6 Return to Register mode Using the M Key Turn to the R position 2-13...
-
Page 46: Description Of Reports
Description of Reports 01 - Auto Full Transaction Report This report automatically generates the Major Group Report, Group Report, Clerk Report, Terminal Financial Report, and Grand Total 1 and 2 values 06 - Hourly Report This report shows the quantity and amount of sales by hour of the day. 11 - Full Clerk Report Sales and accountability totals for each Team Member who has operated the register since the last Z report was taken (Also included in 01 Report) -
Page 47: Pre-Programmed Reports
Pre-Programmed Reports X-87 – Daily Report (no reset) As a part of the nightly closing procedure sales reports need to be taken at the register. These reports are used to determine cash over/short and to properly complete Reports. For convenience the registers have been preprogrammed to print the required reports by choosing a single menu option. -
Page 48: Z1-88 - Daily Resets & Reports
Z1-88 – Daily Resets & Reports Z REPORTS are intended to be run once at the end of the business day. Once a report is taken in the Z1/P key lock position the totals are cleared to prepare for the next business day. -
Page 49: Z2-89 - End Of Period Resets & Reports
Z2-89 – End of Period Resets & Reports Z2 REPORTS are intended to be run once at the end of each period. Once a report is taken in the Z2 key lock position the totals are completely cleared to prepare for the next business period. -
Page 50: Weekly Sales Journal - Z Tape Net Totals
Dept #11 – Hot Line / King Stix 6.97 18 32ozPR Dept #12 – Supplements 31.90 0.00 19 40ozPR Dept #13 – N/A for Uniwell 0.00 Dept #14 – Smoothie 32 oz 46.96 20 12ozPR Dept #27 – Catering 12oz smo 10.00 0.00... -
Page 51: Weekly Sales Journal - Tax Totals
Weekly Sales Journal – Tax Totals This illustration shows how the Sales Tax section of the Weekly Sales Journal is completed. Discounts and taxes with zero sales figures will not be listed on the 01 Auto Full Trans Report. It is important to note that NET 1 and b.NET 2(GROSS) will not balance to one another, as NET 1 does not include sales tax collected. -
Page 52: Programming
PROGRAMMING-------------------------------------------------------------------------SECTION 3 SP-101 PLU Price Changes Step 1 – SP-101 PLU Price Changes With no Team Member Logged-On Using the M Key Turn to the SP position Enter a valid Team Member Clerk number Press CLERK Step 2 Select Option Using the PAGE &... - Page 53 Step 4 – SP-101 PLU Price Changes SP-101 PLU PRICES PLU 15-SHAKES & MALTS 20 oz In case of error Press CLEAR and return to Step 3 Team Member 01 Std Prices 1: 3.99 Std Prices 2: 0.00 Std Prices 3: 0.00 Happy Hour 1: 0.00...
- Page 54 Step 7 – SP-101 PLU Price Changes Select Option To Log-Off Press CLERK Team Member 01 SP-100 PLU MODIFIERS SP-101 PLU PRICES SP-102 PLU HALOS SP-103 HARD CLERKS SP-117 CLERK IBUTTONS SP-104 CLERK CARDS SP-105 CLERK COMMISSION SP-106 MEDIA EXCHANGE RATE SP-107 DISCOUNT AMOUNT SP-108 PRICE LEVEL --MORE--...
- Page 55 SP-122 PLU Programming – Adding a new Item Step 1 – SP-122 PLUS With no Team Member Logged-On Using the M Key Turn to the SP position Enter a valid Team Member PIN number Press CLERK Step 2 Select Option Using the PAGE &...
- Page 56 Step 4 – SP-122 PLUS – (NAME) In case of error SP-122 PLUS Press CLEAR and return to Step 3 above PLU 2 Team Member 01 NAME: GRP: Using the SCROLL keys Std Prices 1: 0.00 Std Prices 2: 0.00 Std Prices 3: 0.00 Highlight NAME and press ENTER...
- Page 57 Step 7 – SP122 – PLUS (Price Change) SP-122 PLUS PLU 2 In case of error Return to Step 6 above Team Member 01 NAME: 12oz Soda GRP: Std Prices 1: 0.89 Std Prices 2: 0.00 To edit another PLU, Std Prices 3: 0.00 Happy Hour 1:...
- Page 58 Step 9 – SP122 PLUS (FLAG1) Using the SCROLL keys Highlight H – PLU IS NEGATIVE and press ENTER to toggle from NO to YES. (Discount PLU’s, Coupons, etc, When this amount is to be deducted from the sale.) Please use great care when modifying these fields Incorrect flags will result in Revenue &...
- Page 59 Step 10 – SP-122 PLUS SP-122 PLUS PLU 2 To Exit Press CLEAR Team Member 01 Evening 0.00 FLAG1: FLAG2: FLAG3: FLAG4: FLAG5: HALO: CATEGORY: COOK: --MORE-- RECEIPT IS ON 08/27/02 12:48 PLUS Screen 3 Step 11 SP-122 PLUS To edit another PLU Return to Step 3 above Team Member 01 To Exit...
-
Page 60: Sp-123 Clerks
SP-123 CLERKS Step 1 – SP-123 CLERKS With no Team Member Logged-On Using the M Key, Turn to the SP position Enter a valid Team Member Clerk number Press CLERK Step 2 Select Option Using the PAGE & SCROLL keys Team Leader 01 SP-122 PLUS Highlight SP-123 CLERKS and press ENTER... - Page 61 Step 4 – SP-123 CLERKS (NAME) SP-123 CLERKS Using the SCROLL keys Team Leader 01 NAME: Team Member 05 Highlight NAME and press ENTER CODE: **** COMMISSION: 0.00 Enter the new NAME and press ENTER FLAG1: REP SECURE: PRG SECURE: FLAG2: JOB 1 JOB 2...
- Page 62 Step 7 – SP-123 CLERKS – (FLAG1) Please use great care when modifying these fields In case of error Press CLEAR and Return to Step 6 above Incorrect flags will result in Revenue collecting inconsistencies SP-123 CLERKS KAREN Using the SCROLL keys FLAG 1 - 20 H –...
- Page 63 Step 10 – SP-123 CLERKS Select Option To LOG-OFF Press CLERK Team Leader 01 SP-122 PLUS SP-123 CLERKS SP-124 MEDIAS SP-125 CONDIMENT GRP SP-126 COPOKING INST GROUPS SP-127 EDIT RANGE OF PLUS SP-128 CREATE RANGE OF PLUS SP-129 PERSON TYPE SP-130 USER TEXT SP-131 WARNING MESSAGES --MORE--...
-
Page 64: Sp-141 Logo Lines
SP-141 Logo Lines (Store Address on Receipt) Step 1 – SP-141 Logo Lines With no Team Member Logged-On Using the M Key Turn to the SP position Enter a valid Team Member Clerk number Press CLERK Step 2 Select Option Using the PAGE &... - Page 65 Step 3 – SP-141 Logo Lines Select Option If Store Number has changed: Team Member 01 Using the SCROLL keys * Thank You* 04 - ************ Highlight Line 06 and press ENTER 05 - 06 - Inland Cash Register #123 Enter Inland Cash Register #456 and press ENTER...
- Page 66 Step 5 – SP141 Logo Lines In case of error Return to Step 4 above Select Option If City or State or ZIP has changed: Team Member 01 Using the SCROLL keys * Thank You* 04 - ************ Highlight Line 08 and press ENTER 05 - 06 - Inland Cash Register...
- Page 67 Step 8 – SP-141 Logo Lines Return to Register mode Using the M Key Turn to the R position 2-16...
- Page 68 SP-155 Tax Rates Notice: After making Tax Rate changes, it is STRONGLY recommended that you immediately verify these rates in the Register mode. Step 1 – SP-155 Tax Rates With no Team Member Logged-On Using the M Key Turn to the SP position Enter a valid Team Member Clerk number Press CLERK Step 2...
- Page 69 Step 3 – SP-155 Tax Rates Please use great care when modifying Tax Rates Using the SCROLL keys Incorrect Tax Rates will result in Tax Collecting inconsistencies Highlight TAX1 and press ENTER Enter 550 (for a 5.5% tax rate) and Press ENTER SP-155 TAX RATES 1% is entered as 100 Team Member 01...
- Page 70 Step 5 – SP-155 Tax Rates SP-155 TAX RATES In case of error Team Member 01 Return to Step 4 above TAX 1 5.50 TAX 2 7.50 TAX 3 0.00 NO TAX 4 0.00 To Exit Press CLEAR RECEIPT IS ON 08/27/02 12:39 PLU Price Change Screen 2 Step 6...
- Page 71 SP-190 TIME & DATE Step 1 – SP-190 TIME & DATE With no Team Member Logged-On Using the M Key Turn to the SP position Enter a valid Team Member Clerk number Press CLERK Step 2 Select Option Using the PAGE & SCROLL keys Team Member 01 SP-170 ASSORTED REPORT Highlight SP-190 TIME &...
- Page 72 Step 4 – SP-190 TIME & DATE SP-155 TAX RATES In case of error Return to Step 3 above Team Member 01 TIME(HHMMSS) Using the PAGE & SCROLL keys DATE(YYYYMMDD) Highlight DATE (YYYYMMDD) and press ENTER Enter The New Date (20020826) and press ENTER Note: 4 Digit Year –...
-
Page 73: Sp-191 Tare Weights
SP-191 TARE WEIGHTS Step 1 – SP-191 Tare Weights With no Team Member Logged-On Using the M Key Turn to the SP position Enter a valid Team Member Clerk number Press CLERK Step 2 Select Option Using the PAGE & SCROLL keys Team Member 01 SP-124 MEDIAS Highlight SP-145 TARE press ENTER... - Page 74 Step 4 – SP-145 TARE SP-145 TARE In case of error Press CLEAR and return to Step 3 above Team Member 01 NAME : TARE 5 Highlight TARE 5 and press ENTER WEIGHT .00 LB RECEIPT IS ON 08/27/02 12:39 Step 5 SP-145 TARE In case of error...
- Page 75 Step 7 SP-145 TARE To Exit Press CLEAR Team Member 01 NAME : TARE 2 WEIGHT .02 LB RECEIPT IS ON 08/27/02 12:39 Step 8 SP-145 TARE Verification Receipt will Print Team Member 01 01 – SM PLATE To program another tare weight, return to Step 3 above 02 –...
-
Page 76: Initial Reset Sx 7005 - Reset Printer
INITIAL RESET SX 7005 – Reset Printer If you become stuck in a transaction and the cash register does not respond when pressing either the clear or Clerk keys or the printer has quit functioning, then follow these steps to “re-initialize.” Initial Reset Step 1 Turn cash register power switch off. - Page 77 Step 4 While still holding down the three “IR” keys, Turn the cash register power switch on. If done correctly, the "IR Done" message is displayed and the buzzer sounds. The three “IR” keys can be released Turn the key to the "R" Mode and sign on a clerk 2-26...
- Page 78 Q: I just got my Uniwell POS System, where do I start? A: Be good to your self and your Uniwell by getting some coffee (or cup of tea) and this manual. Both are packed with all kinds of good things for you! Q: Noting prints on my receipt, but the paper advances.
Need help?
Do you have a question about the SX-7005 and is the answer not in the manual?
Questions and answers