Table of Contents
Advertisement
Advertisement
Table of Contents

Related Manuals for Botex DC-136


Summary of Contents for Botex DC-136
- Page 1 DC-136 136 Channels DMX Operator Pro User Instructions Rev 1.1 No. 24-004-1410...
-
Page 2: Table Of Contents
DC-136 Table of Contents General Introduction………………………………………………………………………...….. 3 Safety Rules……………………………………………………………………………………..3 3 Notice Information……………………..………………………………………………………... 3 4 Features and Specifications…………………………………………………………………..4 4.1 Features………………………………………………………………………….…………4 4.2 Specifications……………………………………………………………………………..4 Basic Control Parts…………………………………………………………………………….. 4 5.1 Front view………………………………………………………………………………….. 4 5.2 Rear view……………………………………………………………………………………6 Operation Guide………………………………………………………………………………….7 (operation upon Fixtures)………………………………………………………………….…7 6.1 Control Fixture channels by “joystick”…………………………………………………... 7 6.2 Program or record a Fixture Scene / Chase…………………………………………….7... -
Page 3: General Introduction
Fixtures and the PARs jointly and effectively according to different requirements towards scenic lighting effect. 2 Safety Rules In order to use the DC-136 more availably and effectively, please take good care of this unit. The following rules give important information regarding safety during use and maintenance. -
Page 4: Features And Specifications
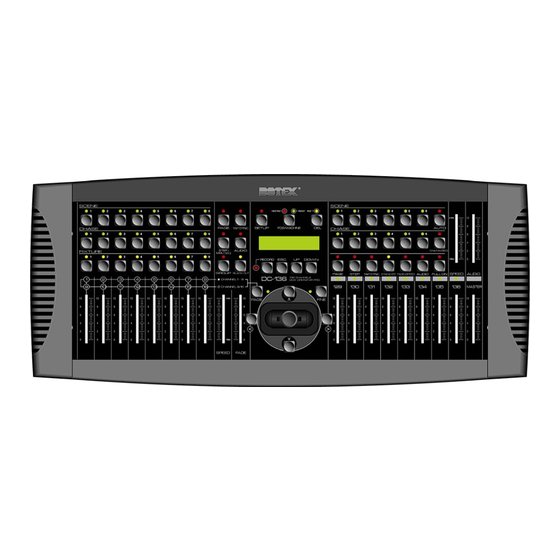
Power failure memory and Fog Machine trigger • MIDI control over scenes, chases and blackout • Audio input and built-in microphone for music sync. function 4.2 Specifications • Model DC-136 • Power Input DC 9~15V, 600 mA min. • 2×16 characters • Audio Trigger Built-in microphone or line in •... - Page 5 • PAGE button: To select relevant Scene-page or Chase-page. • STEP / MIX / SEQ button: To activate the “STEP” function or switch between the Mix mode and the Sequence mode. • TAP SYNC button: Repeatedly tap this button to establish different chase rate. •...
-
Page 6: Rear View
BLACKOUT button. • FADE+SPEED button: To select FADE TIME or NO FADE TIME. • FULL ON button: Press this button to output all the PARs at full intensity. • AUTO button: Used to activate AUTO mode. • ONE/MIX/SEQ button: To select One mode, Mix mode or Sequence mode. •... -
Page 7: Operation Guide
6 Operation guide Operation upon Fixtures 6.1 Control Fixture channels by “joystick” • This unit has 8 FIXTURE buttons to select 1—8 fixtures respectively. • Each fixture can be selected by pressing relevant Chase button. Its LED will be lit when being selected. -
Page 8: Program / Record A Fixture Chase
Note: In Record mode, user can delete a Fixture Scene. Select and press a recorded Scene button in the Record mode, its LED will blink quickly. Then press the DEL button to delete the scene, all LEDs will blink suddenly. (Press ESC button to exit.) 6.2.2 Program / record a Fixture Chase Press and hold down the RECORD button for about 5 seconds to enter the CHASE / SCENE mode. -
Page 9: Delete A Fixture Chase
Enter this mode, press corresponding buttons to operate the programs. The LED flashes when relevant program runs, while other LEDs don’t flash. Close all the running programs before exit this mode. • Mix mode: In this mode, LEDs (relevant to the running programs) will flash simultaneously and programs can also run synchronously. -
Page 10: Operation Upon Pars
LCD shows: EDIT CHASE× / TL×× ADD ESC STEP×× (“TL××” means “TOTAL” ) (3) press the “DEL” button while pressing and holding down the Chase button simultaneously, the chase will be deleted within few seconds (all LEDs will blink suddenly). (4) Press “ESC”... -
Page 11: Select Or Deselect A Par Scene / Chase
STEP×× Use UP or DOWN button to select the Chase Step to be programmed. Set a scene for Chase recording. Press the RECORD button, all LEDs will blink briefly, and LCD will show you the new step. Pressing the DEL button can delete the current step, all LEDs will blink briefly. User can press ESC button to exit . -
Page 12: Delete A Par Chase
one step. (7) FADE TIME / NO FADE TIME Press “FADE+SPEED” to select “FADE TIME / NO FADE TIME”. FADE TIME and SPEED can interact on each other jointly. (8) STAND BY Press this button will shutter the PAR’s output during operating. 6.7 Delete a PAR Chase (1) Press RECORD key to enter CHASE/SCENE mode. -
Page 13: Read From The Cf Card
7. 3 Read from the CF card • Enter the setting mode, choose 1. CF CARD and press RECORD , LCD will show you: 1. READ FROM CF 2. STORE TO CF • Use UP/DOWN buttons to choose 1. READ FROM CF , and press the RECORD button to enter. -
Page 14: Midi Channel
• Turn off the power when connect or disconnect CF card with the unit. • CF card (32M) can be used only for DC-136, otherwise the data would probably be missing. • Outputting of DMX would be stopped during the reading or storing to CF card. And so does to “ASSIGN CH.”... -
Page 15: To Clear The Memory
NOTE NUMBER FUNCTION 22-33 FIXTURE PAGE 1-12 34-49 PAR PAGE 1-16 50-57 FIXTURE SCENE 1-8 58-65 FIXTURE CHASE 1-8 66-71 PAR SCENE 72-77 PAR CHASE STANDBY FADE + SPEED FIXTURE BLACKOUT FIXTURE AUDIO AUDIO AUTO STEP FIXTURE MIX/SEQ ONE/MIX/SEQ FULL ON 10 To clear the memory Turn off the power, simultaneously holding down the Chase buttons 3, 6 and the Fixture buttons 2, 7 , and at the same time, turn on the power.
Need help?
Do you have a question about the DC-136 and is the answer not in the manual?
Questions and answers