
Related Manuals for Pentax QS-1


Summary of Contents for Pentax QS-1
- Page 1 Introduction Getting Started Digital Camera Shooting Playback Operating Manual Settings Appendix To ensure the best performance from your camera, please read the Operating Manual before using the camera.
- Page 2 S-SW151 Start Guide Lenses that can be used with the PENTAX Q-S1 Lenses that can be used with the camera are Q-mount lenses. A K-mount lens can be attached to the camera with the use of the optional Adapter Q for K Mount Lens. (p.80)
- Page 3 Introducing the PENTAX Q-S1 Getting Started Taking Pictures Playback Functions Changing the Settings Appendix...
-
Page 4: Table Of Contents
Introducing the PENTAX Q-S1 Taking Pictures ..p.7 ........p.32 Gives you an overview of the PENTAX Q-S1. Once you’ve confirmed that the camera works Read this and get to know your Q-S1! properly, try out the camera and take lots of pictures! ... - Page 5 Playback Functions Appendix ........ p.56 ............. p.77 Explains various operations for playing back Provides various resources. and editing images. Restrictions on Each Capture Mode ....p.77 Playback Mode Palette Items ......p.56 Functions Available with Various Lenses ..p.80 ...
- Page 6 Setting the Display Language ........32 Setting the Date and Time ........... 32 Formatting a Memory Card .......... 33 Introducing the PENTAX Q-S1 ....9 Basic Shooting Operation ........33 Names and Functions of the Working Parts ...9 Reviewing Images ..........35 Operating Controls ............
- Page 7 Changing the Settings ......75 Setting a File Format ..........53 Still Pictures ..............53 Camera Settings ..........75 Movies ................. 53 Setting the M/V Functions ........75 Adjusting the Color and Brightness of Images ..54 Saving the Settings of a Captured Image ....77 White Balance ..............
- Page 8 Regarding copyrights Images taken with this camera that are for anything other than personal enjoyment cannot be used without permission according to the rights as specified in the Copyright Act. Please take care, as there are cases where limitations are placed on taking pictures even for personal enjoyment during demonstrations, performances or of items on display.
-
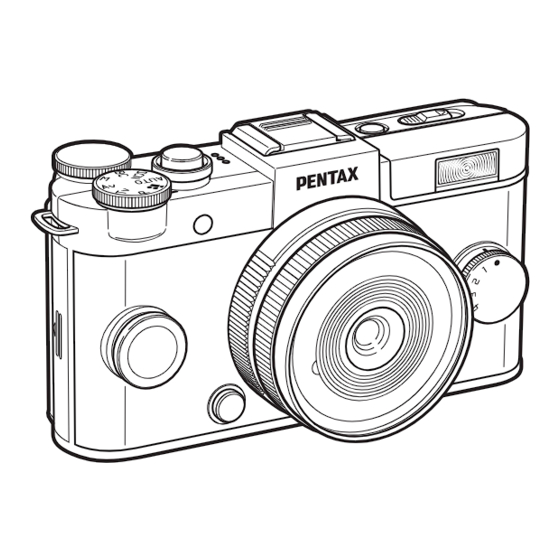
Page 9: Names And Functions Of The Working Parts
Names and Functions of the Working Parts Speaker Lens mount index (red dot) AF assist light/ Self-timer lamp Built-in flash Strap lug Remote control receiver Lens information contacts Card cover CMOS sensor Microphone Hot shoe Remote control receiver Card access lamp Strap lug HDMI terminal (Type D) -
Page 10: Operating Controls
1 E-dial (V) Operating Controls Sets the shutter speed, aperture, and exposure compensation values. (p.35) You can change the camera settings when the control panel is displayed. (p.14) You can change the menu tabs when a menu screen is displayed. (p.15) In playback mode, use this to magnify an image or display multiple images at the same time. -
Page 11: Monitor Display
0 Green/Delete button (M/L) Monitor Display Resets the values being adjusted. Also, you can assign a function to this button. (p.69) Press to delete images during playback. (p.31) Capture Mode a OK button (E) When the camera enters capture mode, the subject and the When the control panel or a menu is displayed, current shooting function settings are displayed on the monitor. - Page 12 tMemo Standby Mode • The displayed items vary depending on the current camera setup. 1 2 3 4 5 6 9 10 11 • In [Live View] of the A3 menu, you can change the style of the display in standby mode. (p.17) Control Panel A mode +1.7...
- Page 13 16 JPEG Recorded Pixels 20 Recording Sound Level Playback Mode and Quality Level (p.48)/ (p.18) Movie Recorded Pixels 21 Destination (p.72) The captured image and shooting information are displayed (p.49) 22 Current date and time in single image display of the playback mode. 17 Shake Reduction (p.17)/ 23 Memory card Press G to change the type of information displayed in single...
- Page 14 tMemo Detailed Information Display • The screen selected in the Playback Info Display selection screen is displayed in playback mode when the camera is Still pictures turned off and on again. If [Playback Info Display] is set to [Off] in [Memory] of the A3 menu, the [Standard Information 100-0001 100-0001 Display] always appears first when the camera is turned on.
-
Page 15: How To Change Function Settings
25 White Balance (p.49) 30 Custom Image setting How to Change Function Settings 26 White Balance fine-tuning (p.52) 27 Shooting date and time 31 Custom Image 28 Color Space parameters The camera functions and their settings can be selected 29 HDR Capture (p.51)/ 32 Recording time and changed by using the following ways. -
Page 16: Using The Control Panel
Using the Control Panel You can set frequently used shooting functions. Press G in standby mode. Use ABCD to select an item. Aspect Ratio Aspect Ratio 99999 99999 Use V to change settings. Aspect Ratio Aspect Ratio 99999 99999 Cancel Cancel MENU Press E to confirm the... -
Page 17: Using The Menus
Using the Menus Most functions are set from the menus. Functions that can be set on the control panel can also be set from the menus. Use V to switch the menu tabs. Custom Image Custom Image Digital Filter Digital Filter HDR Capture HDR Capture Use AB to select an item. -
Page 18: Menu List
Menu List Rec. Mode Menus Menu Item Function Default Setting Page Sets the image finishing tone such as color and contrast Custom Image Bright p.52 before shooting an image. Digital Filter Applies a digital filter effect when taking pictures. No Filter p.53 HDR Capture Enables capturing images with high dynamic range. - Page 19 Menu Item Function Default Setting Page ND Filter Sets whether to use the ND filter built-in to the lens. Distortion Correction Reduces distortions occurring due to lens properties. Highlight Expands the dynamic range and prevents bright areas Auto Correction from occurring. D-Range p.51 Settings...
-
Page 20: Movie Menu
Menu Item Function Default Setting Page Green Button Assigns a function to M. Green Button p.69 Green Action in M/TAv Sets the camera action for when M is pressed in L / K P LINE p.70 Button Mode mode. E-dial in Program Sets the value to change when V is turned in G mode. -
Page 21: Playback Menu
Playback Menu Menu Item Function Default Setting Page Display Duration Sets an image display interval. 3 sec. Screen Effect Sets a transition effect when the next image is displayed. Starts the slideshow again from the beginning after the last Slideshow p.59 Repeat Playback image is displayed. -
Page 22: Set-Up Menus
Set-up Menus Menu Item Function Default Setting Page Language/W Changes the display language. English p.28 Date Adjustment Sets the date and time and the display format. 01/01/2014 p.29 Switches the displayed date and time to that of your World Time Hometown p.72 hometown or a specified city. -
Page 23: Custom Setting Menus
Menu Item Function Default Setting Page Enables saving battery power by setting the monitor display Power Saving to dim automatically if no operations are made within 5 seconds. Sets the time until the camera turns off automatically Auto Power Off 1min. - Page 24 Menu Item Function Default Setting Page Sets the tungsten light color tone when the white balance Subtle 7. AWB in Tungsten Light is set to g (Auto White Balance). Correction Sets the action priority for when the shutter release button 8.
-
Page 25: Attaching The Strap
Attaching the Strap Attaching a Lens Pass the end of the strap Make sure that the camera is turned off. through the strap lug and Remove the body mount secure it on the inside cover (1) and lens mount of the clasp. cover (2). -
Page 26: Using The Battery And Charger
uCaution Using the Battery and Charger • If the lens is removed while the power is on, the shutter release button is locked. Do not attach or remove the lens while the power is on. Use the battery D-LI68 and battery charger D-BC68P •... -
Page 27: Inserting/Removing The Battery
• Store the battery in a location where the temperature will uCaution remain at or below room temperature. Avoid locations with • Do not use the battery charger D-BC68P to charge batteries high temperatures. other than D-LI68. Charging other batteries may cause •... -
Page 28: Using The Ac Adapter
tMemo Close the battery cover. • The battery level may not be displayed properly if the camera is used at low temperatures or when performing continuous Make sure that the connection shooting for a long time. cable comes out from the •... -
Page 29: Inserting A Memory Card
uCaution Inserting a Memory Card • Do not remove the memory card while the card access lamp is lit. • If the card cover is opened while the power is on, the camera This camera uses a commercially available SD Memory Card, turns off. -
Page 30: Initial Settings
Setting the Display Language Initial Settings Use ABCD to select the desired language Turn the camera on and make the initial settings and press E. The [Initial Setting] screen Turning the Camera On Initial Setting Initial Setting appears in the selected English English language. -
Page 31: Setting The Date And Time
Setting the Date and Time Formatting a Memory Card Press D, and use AB Press F. Date Adjustment Date Adjustment to select the date format. The A1 menu appears. Date Format Date Format mm/dd/yy mm/dd/yy 24h Date Date 01/01/2014 01/01/2014 Time Time 00:00... -
Page 32: Basic Shooting Operation
The selected capture mode is Basic Shooting Operation displayed on the monitor (Guide Display). Auto Picture Auto Picture Take pictures in R mode in which the camera automatically selects the optimal capture mode. Remove the front lens cap by View the subject on the monitor. pushing the top and bottom When using a zoom lens, portions as indicated... -
Page 33: Reviewing Images
Changes the type of information Reviewing Images displayed. (p.11) Displays the playback mode Review the captured image on the monitor. palette. (p.56) Press 3. tMemo • When Jv is displayed on the monitor, the JPEG image The camera enters playback that was just taken can also be saved in RAW format (Save mode and the most recently RAW Data). -
Page 34: Selecting The Appropriate Capture Mode
tMemo Selecting the Appropriate Capture • The functions that can be set vary depending on the capture Mode mode. Refer to “Restrictions on Each Capture Mode” (p.77) for details. Select the capture mode that suits the subject and shooting conditions. The following capture modes are available on this camera. -
Page 35: Scene Modes
Takes three consecutive images at three Scene Modes Night Scene different exposure levels to create a single composite image with them. Set the mode dial to S. Night Snap For taking snapshots in poorly lit place. The scene mode selection screen appears. Captures 3 images to generate a single HDR image and provides a wider dynamic range. -
Page 36: Blur Control Mode
Blur Control Mode Exposure Modes × x: Available #: Restricted : Not available Set the mode dial to U. Change Change Change EV Com- Mode Shutter Aperture Sensitivity pensation Speed Value 2000 2000 F2.8 F2.8 1600 1600 37 37 Program Automatic Use V to adjust the level Exposure... - Page 37 Available operations Set the mode dial to G, I, J or L. Starts/ends adjusting the compensation value. D appears next to the value that Resets the adjustment value to the default can be changed. setting. tMemo • Exposure Bracketing shooting enables you to take pictures 2000 2000 F2.8 F2.8...
-
Page 38: Movie Mode
Movie Mode Press the shutter release button. The shutter remains open as long as the shutter release Set the mode dial to C. button is kept pressed (up to 30 seconds). Sound Use V and J to adjust the Take your finger off the shutter release button. exposure compensation value when [Exposure Setting] Exposure ends. - Page 39 tMemo Stops playback. • You can change the movie settings from the control panel Adjusts the volume (6 levels). or the C1 menu. (p.18) • When [Focus Method] is set to v, [Movie Continuous AF] Saves the displayed frame as in the C1 menu is set to [On], and an auto-focus lens other a JPEG file (when paused).
-
Page 40: Setting The Exposure
AE Metering Setting the Exposure v/A1 Choose the part of the sensor to use for measuring brightness and determining exposure. Sensitivity Set in the control panel or [AE Metering] of the A1 menu. Press A in standby mode. Meters the brightness in multiple different zones of the sensor. -
Page 41: Using The Built-In Flash
Discharges a flash immediately before Using the Built-in Flash Trailing closing the shutter. Curtain Sets to a slow shutter speed. Sync Captures moving objects as if they are Press C in standby mode. leaving a light trail behind them. Use CD to select an item. Flash Off The flash is deactivated. -
Page 42: Focusing
• You cannot take pictures while the flash is being charged. Focusing If you want to take pictures while charging the flash, set [12. Release While Charging] in the E2 menu. • Depending on the lens being used, the use of the built-in flash Focus Method may be limited. -
Page 43: Setting The Autofocus Method
Setting the Autofocus Method Selecting the Desired Focusing Area v/A1 You can set the position and size of the autofocusing area You can choose from the following autofocus methods. (AF area). Detects and tracks faces of people. The main face detection frame for AF Set [Autofocus Method] to g or h. -
Page 44: Adjusting The Focus Manually (Manual Focus)
Adjusting the Focus Manually (Manual Turn the focus ring. Focus) The image on the monitor is magnified. Set [Focus Method] to w. x2 x2 Press F. The camera is in standby mode. Available operations Magnifies the image (x2, x4, or x6). While viewing the monitor, turn the focus ring. -
Page 45: Setting The Drive Mode
Exposure Setting the Drive Mode Enables Exposure Bracketing shooting Bracket+Remote with remote control. Ctrl Creates a composite picture by taking multiple You can choose from the following drive modes. Multi-exposure images and merging them into a single image. Single Frame W Self-timer+ Multi- Enables Multi-exposure shooting with Normal capture mode... -
Page 46: Continuous Shooting
Continuous Shooting Self-timer Shooting Press D in standby mode. Press D in standby mode. The Drive Mode screen appears. The Drive Mode screen appears. Use CD to select M Use CD to select O Continuous Shooting (Hi) Continuous Shooting (Hi) Self-timer (12 sec.) Self-timer (12 sec.) and press B. -
Page 47: Remote Control Shooting
Remote Control Shooting Exposure Bracketing Press D in standby mode. Press D in standby mode. The Drive Mode screen appears. The Drive Mode screen appears. Use CD to select Q and Use CD to select T and press B. Remote Control Remote Control press B. -
Page 48: Multi-Exposure
Multi-exposure Interval Shooting Press D in standby mode. Press D in standby mode. The Drive Mode screen appears. The Drive Mode screen appears. Use CD to select Y and press B. Use CD to select V and press B. Use ABCD to set the Interval Shooting Interval Shooting Use CD to select V, W or X, and press B. -
Page 49: Interval Movie Record
Press the shutter release button to start shooting. Interval Movie Record When [Start Interval] is set to [Now], the first picture is taken. When set to [Set Time], shooting starts at the set time. In C mode, you can use the Interval Movie Record feature to To cancel shooting, press F. -
Page 50: Setting A File Format
Setting a File Format Press E to finish setting. The camera returns to standby mode. Still Pictures Press the shutter release button to start shooting. v/A1 When [Start Interval] is set to [Now], the first picture is Set the file format for still pictures in the control panel or [Image taken. -
Page 51: Adjusting The Color And Brightness Of Images
Movies Adjusting the Color and Brightness v/C1 of Images Set the file format for movies in the control panel or [Movie Capture Settings] of the C1 menu. Recorded Pixels White Balance u, t, s Framerate 30 fps, 25 fps, 24 fps Press B in standby mode. - Page 52 Color Adjusting the White Balance Manually White Balance Temperature You can measure the white balance at a selected location. Color Temperature – Enhancement Select o in Step 2 on p.49 and press B. o Manual 1 to 3 – Use CD to select o1 Proceed to Step 5 if you do not need to fine-tune the white Manual White Balance Manual White Balance...
-
Page 53: Adjusting Brightness
tMemo Adjusting Brightness • Specific HDR settings are used and HDR Capture cannot be set when k or r of the S mode is selected. Highlight Correction/Shadow Correction v/A2 Expands the dynamic range and enables a wider range of tones by the CMOS sensor and reduces the occurrence of overexposed/underexposed areas. -
Page 54: Controlling The Image Finishing Tone
Bright Muted Controlling the Image Finishing Natural Bleach Bypass Tone Portrait Reversal Film Landscape Monochrome Vibrant Cross Processing When you want to take images with a slightly different style, Radiant you can set the desired picture style before you start shooting. The following functions are available. -
Page 55: Digital Filter
Saving the Cross Processing Settings of a Captured Digital Filter v/A1 Image Select [Digital Filter] in the control panel, The outcome of Cross Processing for Custom Image and Smart and press E. Effect varies each time a picture is taken. If you take a cross The Digital Filter setting screen appears. -
Page 56: Saving Frequently Used Functions To The Quick Dial
Press E. Press D, and use AB to Quick Dial Quick Dial The screen of Step 2 reappears. select the function to save. Smart Effect Smart Effect Aspect Ratio Aspect Ratio Focus Method Focus Method Press E. Focus Peaking Focus Peaking ND Filter ND Filter Cancel... - Page 57 Shooting with Smart Effect Press F twice. The camera returns to standby mode. Save [Smart Effect] for [Quick Dial]. tMemo • The shooting settings of your favorite images can be saved in In standby mode, turn the quick dial to select [USER1 - 3] of [Smart Effect].
-
Page 58: Playback Functions
Item Function Page Playback Mode Palette Items Saves the white balance Save as Manual settings of the captured p.50 Playback functions can be set from image as Manual White Image Rotation Image Rotation the playback mode palette as well Balance. as the B1 menu (p.19). -
Page 59: Changing The Playback Method
Deleting Selected Images Changing the Playback Method Press L in Step 1 of “Displaying Multiple Images”. Displaying Multiple Images Select the images to delete. You can display 4, 9, 30 or 56 thumbnail images at the same time. Turn V to the left in Delete Delete MENU... -
Page 60: Displaying Images By Folder
Displaying Images by Folder Displaying Images by Shooting Date Images are grouped and displayed by shooting date. Turn V to the left in Step 1 of “Displaying Multiple Select G in Step 1 of “Displaying Multiple Images”. Images”. The folder display screen The display style selection screen appears. -
Page 61: Playing Back Images Continuously (Slideshow)
Playing Back Images Continuously (Slideshow) Displaying Rotated Images When you take pictures with the camera held vertically, Select Z in the playback mode palette. the image rotation information is saved when shooting. Slideshow starts. During playback, the image is automatically rotated based on the rotation information when [Auto Image Rotation] Available operations in the B1 menu is set to [On]. -
Page 62: Connecting The Camera To An Av Device
uCaution Connecting the Camera to an AV Device • When using the video output, images are output at normal resolution regardless of the resolution supported by the AV You can connect the camera to a TV or other device with a video device. -
Page 63: Connecting The Camera To A Computer
Save the captured images to the computer. Connecting the Camera to a Computer Disconnect the camera from the computer. uCaution Connect the camera to a computer using the provided • The camera cannot be operated while it is connected USB cable I-USB7. to a computer. -
Page 64: Editing And Processing Images
Cropping Out Part of the Image (Cropping) Editing and Processing Images Crops out only the desired area of the selected image and saves it as a new file. Changing the Image Size Display the image to edit in single image display. uCaution •... -
Page 65: Removing The Red-Eye Effect
Removing the Red-eye Effect Processing Images with Digital Filters You can correct images where the flash has caused the subject Display the image to edit in single image display. to appear with red eyes. Select T in the playback mode palette. Display the image to edit in single image display. - Page 66 Use AB to select a Select [Recreating filter Brightness Brightness parameter, and use CD effects] and press E. Applying the digital filter Applying the digital filter to adjust the value. The filter effects used for Recreating filter effects Recreating filter effects the selected image appear.
-
Page 67: Creating A Composite Image (Index)
Select a type of image selection in [Selection]. Creating a Composite Image (Index) q Auto Picks images automatically from Joins a number of images together and creates a new image all of the images saved. with them. r Select Lets you select images that you image(s) want to include in the index image. -
Page 68: Editing Movies
Editing Movies Use CD to move the selection frame and press Display the movie to edit in single image display. 00 ' 05" 00 ' 05" 10 ' 00" 10 ' 00" The segments to delete are Select c in the playback mode palette. specified. -
Page 69: Raw Development
Select the parameter setting RAW Development method and press E. Develop images as shot Develop images as shot You can develop RAW images into JPEG images, and save Develop images with Develop images with them as a new file. modified settings modified settings MENU Select b in the playback mode palette. - Page 70 uCaution • Only RAW images captured with this camera can be developed. tMemo • When [Develop multiple images] or [Develop images in folder] is selected in Step 2, a “xxxR_JPG” folder with a new number is created, and the JPEG images are stored in it. •...
-
Page 71: Camera Settings
Setting Function Camera Settings AE Lock Locks the exposure setting. Autofocus is performed only when M is Setting the M/V Functions Enable AF pressed and not when the shutter release button is pressed halfway. The functions assigned to M and V can be changed with [Green Button] of the A3 menu. - Page 72 Setting the V Operation in P Mode Setting the M Operation in M/TAv Mode Set the value to be changed with V when in G mode. You can set the function of M when in L or K mode. Select [Green Button] in [Green Button] of A3 Select [Green Button] in [Green Button] of A3 menu.
-
Page 73: Saving The Settings Of A Captured Image
Saving the Settings of a Captured Image Select a USER mode 100-0001 100-0001 number and press E. Saves this image's settings Saves this image's settings If you take an image that you like, you can save the settings as Smart Effect as Smart Effect The selected image along with used in that image to make it even easier to replicate the look... -
Page 74: Displaying The Local Date And Time Of The Specified City
Using the Saved Settings Displaying the Local Date and Time of the Specified City You can load and use the saved settings when taking pictures. The date and time set at the time of initial setting (p.28) serve Select [Quick Dial] in A3 menu. as the date and time of your present location and are reflected in the shooting date and time for images. -
Page 75: File Management Settings
tMemo File Management Settings • Refer to “List of World Time Cities” (p.91) for cities that can be selected as a hometown or destination. • Select [F Hometown] in Step 3 to change the city and DST settings for the hometown. Protecting Images from Deletion (Protect) •... -
Page 76: Selecting The Folder/File Number Settings
created using this feature. Multiple empty folders cannot be Selecting the Folder/File Number Settings created consecutively. • When [Develop multiple images] or [Develop images in folder] of [RAW Development] is performed, a “xxxR_JPG” Folder folder with a new number is created, and the JPEG images are stored in it. -
Page 77: Transferring Images Via Wireless Lan
tMemo Transferring Images via Wireless LAN • When the file number reaches 9999, a new folder is created and the file number is reset. You can transfer images to your computer via wireless LAN by • One of the following string of characters is used as the file using a memory card with a built-in wireless LAN (Eye-Fi card). - Page 78 tMemo Select the image(s) to • [Eye-Fi] of the D2 menu cannot be selected when an Eye-Fi 000/100 000/100 100-0001 100-0001 card is not inserted. transfer. • When an Eye-Fi card is used, 100 images can be stored Images that have already been in a single folder.
-
Page 79: Restrictions On Each Capture Mode
Restrictions on Each Capture Mode × #: Restricted : Not available Capture Mode Function - ISO × Sensitivity AUTO AUTO AUTO AUTO AUTO AUTO AUTO AUTO AUTO AUTO AUTO 1600 × × × × × × Flash Single Frame × ×... - Page 80 Capture Mode Function × × Shake Reduction White Balance × × × × × × × × × × × × Custom Image × Digital Filter × × × × HDR Capture × × × × × Save RAW Data Fixed to;...
-
Page 81: Restrictions On The Combinations Of Special Functions
Restrictions on the Combinations of Special Functions × : Not available Continuous Exposure Interval Multi-exposure Digital Filter Smart Effect HDR Capture Shooting Bracketing Shooting × Flash Continuous × × × × Shooting × × × × Self-timer Remote Continuous × ×... -
Page 82: Functions Available With Various Lenses
No focusing mechanism on 07 MOUNT SHIELD Functions Available with Various Set the aperture manually. Lens shutter built-in to the adapter used. Lenses Set [1. Lens Shutter Options] to [Lens and electronic shutters] or [Electronic shutter only] in the E1 menu. When [Lens and electronic shutters] is selected, you can take pictures at higher 01 STANDARD PRIME speeds with the electronic shutter than with the lens shutter. -
Page 83: Using A K-Mount Lens
Available operations About Hoods Changes the value of each digit. When using a hood with a 02 STANDARD ZOOM lens, be sure Selects a digit. to use the PH-RBB 40.5mm. If the PH-SBA 40.5mm is used, Selects a value from the list. vignetting may occur at the wide-angle setting. -
Page 84: Functions When Using An External Flash
tMemo Functions when Using an External • When an external flash is attached directly to the hot shoe of the camera, the camera’s center of gravity is shifted, making Flash it difficult to take pictures. Attach the Hot Shoe Adapter F (optional) to the camera hot shoe and the Off-Camera Shoe Using an optional external flash AF540FGZ, AF540FGZ II, Adapter F (optional) to the bottom of the external flash, and... -
Page 85: Troubleshooting
Problem Cause Remedy Troubleshooting [Autofocus Set [Autofocus Method] to g, Method] is set to h or i. (p.41) e or f. tMemo The focus cannot The capture mode [Autofocus Method] is fixed • In rare cases, the camera may not operate correctly due to be locked. -
Page 86: Error Messages
Problem Cause Remedy Error Messages Activate [Dust Removal] from the D4 menu. The Dust Error Messages Description Removal function can be activated every time the camera The memory card is full and no more Dust or dirt is turned on and off. Memory card full images can be saved. - Page 87 Error Messages Description Error Messages Description Not enough battery power You are trying to set a function that is not This function is not available remaining to activate Pixel available for the capture mode that is set. Appears during Pixel Mapping or when in the current mode Mapping (p.77)
-
Page 88: Main Specifications
Model Description SD Memory Cards, SDHC Memory Cards, SDXC Storage Media Type Lens-interchangeable SL digital camera Memory Cards and Eye-Fi Cards Lens Mount PENTAX bayonet Q-mount Date (100_1018, 100_1019...)/ PENTX (100PENTX, Storage Folder 101PENTX...) Compatible Lens Q-mount lenses LCD Monitor... - Page 89 Face Detection, Tracking, Multiple AF Points, Select, From wide open to F8 Autofocus Method spot Aperture • Aperture is fixed when using a lens that has no lens shutter. AF Assist Light Dedicated LED AF assist light Off/On MF Autozoom Off/×2/×4/×6 ND Filter •...
- Page 90 Dynamic Range Recording interval: 3 sec., 5 sec., 10 sec., 30 sec., Highlight Correction, Shadow Correction Setting Interval Movie 1 min., 5 min., 10 min., 30 min., 1 hr. Record Recording time: 12 sec. to 99 hr. Lens Correction Distortion Correction Start Interval: immediately, from the set time Toy Camera, High Contrast, Shading, Tone Movie Continuous...
- Page 91 Customization Accessories Custom Functions 16 items USB Cable I-USB7, Strap O-ST131, Rechargeable Lithium-ion Battery D-LI68, Battery Charger Mode Memory 11 items Package D-BC68P, AC plug cord, Software (CD-ROM) Contents S-SW151, Start Guide M/L button: Green Button, Preview, One Push File <Mounted on the camera>...
- Page 92 • The number of storable images may vary depending on the subject, Approximate Image Storage Capacity and Playback shooting conditions, selected capture mode and memory card, etc. Time (When using the fully charged battery) Flash Photography Normal Playback Battery Temperature Shooting Time 50% Use...
- Page 93 List of World Time Cities Video Video Video Region City Output Region City Output Region City Output Format Format Format Honolulu NTSC Rome Kathmandu Africa/West Asia Anchorage NTSC Copenhagen Dacca Vancouver NTSC Berlin Yangon NTSC San Francisco NTSC Prague Bangkok Los Angeles NTSC Stockholm...
-
Page 94: Operating Environment For Usb Connection And Provided Software
Macintosh Operating Environment for USB Connection and Provided Software OS X 10.9, 10.8 or 10.7, or Mac OS X 10.6 With the provided software “Digital Camera Utility 5”, you can Intel Core 2 Duo or higher develop RAW files on a computer. Install the software from 2 GB or more the provided CD-ROM (S-SW151). -
Page 95: Index
Index Symbols Candlelight t ....33 Capture mode....32 A menu......16 AC adapter ...... 26 Backlight Card access lamp....7 C menu......18 Action in M/TAv Mode ..70 Silhouette s ....33 Card cover ......7 B menu......19 AE Lock ...... - Page 96 Depth of field ....36 Exposure Modes ..... 34 Forest i ......33 Initial settings....28 Destination ...... 72 Exposure Setting ..18, 36 Format ......29 Initializing Detailed Information External flash....82 Framerate ......49 a memory card .... 29 Display ......
- Page 97 Link AE and Multiple AF Points Portrait Remote control AF Point ...... 38 (Autofocus Method)..41 (Custom Image) ..52 receiver ......7 Live View ....10, 17 Multi-segment Portrait b....... 33 Remote Control metering ...... 38 Posterization shooting....... 45 Museum v.....
- Page 98 Shading Strap ........ 23 Vibrant Color Enhance (Digital Filter)..53, 63 Sunset g ....... 33 (Smart Effect) ....54 Shadow Correction..51 Surf & Snow q ....33 Video output format ..60 Shake Reduction ..... 17 Switch ........ 8 Video terminal ....
-
Page 99: For Using Your Camera Safely
• Some portions of the camera heat up during use. There is a risk of For Using Your Camera Safely low temperature burns when holding such portions for long periods. • Should the monitor be damaged, be careful of glass fragments. Also, be careful not to allow the liquid crystal to get on your skin or in your eyes or mouth. - Page 100 Caution • Precautions for D-LI68 Battery Usage: USE SPECIFIED CHARGER ONLY. • Do not place or drop heavy objects on or forcefully bend the AC plug DO NOT INCINERATE. cord. Doing so may damage the cord. Should the AC plug cord be DO NOT DISASSEMBLE.
-
Page 101: Care To Be Taken During Handling
• Sudden temperature changes will cause condensation on the inside and Care to be Taken During Handling outside of the camera. Place the camera in your bag or a plastic bag, and remove it after temperatures of the camera and surroundings are equalized. - Page 102 About SD Memory Cards About Eye-Fi Cards • The SD Memory Card is • An SD Memory Card with a built-in wireless LAN (“Eye-Fi card”) can be equipped with a write-protect used with this camera. switch. Setting the switch to •...
- Page 103 Trademarks AVC Patent Portfolio License This product is licensed under the AVC Patent Portfolio License for the Microsoft, Windows and Windows Vista are registered trademarks of personal use of a consumer or other uses in which it does not receive Microsoft Corporation in the United States of America and other countries.
-
Page 104: Warranty Policy
camera will be returned to you upon completion of servicing. WARRANTY POLICY If the camera is not covered by warranty, regular charges of the manufacturer or of its representatives will apply. Shipping charges are to be borne by the owner. If your camera All our cameras purchased through authorized bona fide was purchased outside of the country where you wish to have photographic distribution channels are guaranteed against... - Page 105 For customers in USA For customers in Canada STATEMENT OF FCC COMPLIANCE This Class B digital apparatus complies with Canadian This device complies with Part 15 of the FCC Rules. Operation ICES-003. is subject to the following two conditions: (1) This device may not cause harmful interference, and (2) this device must accept Pour les utilisateurs au Canada any interference received, including interference that may...
-
Page 106: Declaration Of Conformity
Product Name: Digital Camera For more information about collection and recycling of used Model Number: PENTAX Q-S1 products, please contact your local authorities, your waste disposal service or the point of sale where you purchased Contact person: Customer Service Manager the products. - Page 107 2. In other countries outside the EU These symbols are only valid in the European Union. If you wish to discard used products, please contact your local authorities or dealer and ask for the correct method of disposal. For Switzerland: Used electrical/electronic equipment can be returned free of charge to the dealer, even when you don’t purchase a new product.
- Page 108 Memo...
- Page 110 RICOH IMAGING Am Kaiserkai 1, 20457 Hamburg, GERMANY DEUTSCHLAND GmbH (http://www.ricoh-imaging.de) RICOH IMAGING UK LTD. PENTAX House, Heron Drive, Langley, Slough, Berks SL3 8PN, U.K. (http://www.ricoh-imaging.co.uk) RICOH IMAGING AMERICAS 633 17th Street, Suite 2600, Denver, Colorado 80202, U.S.A. CORPORATION (http://www.us.ricoh-imaging.com)
Need help?
Do you have a question about the QS-1 and is the answer not in the manual?
Questions and answers