JVC SP-PWV70 Instructions Manual
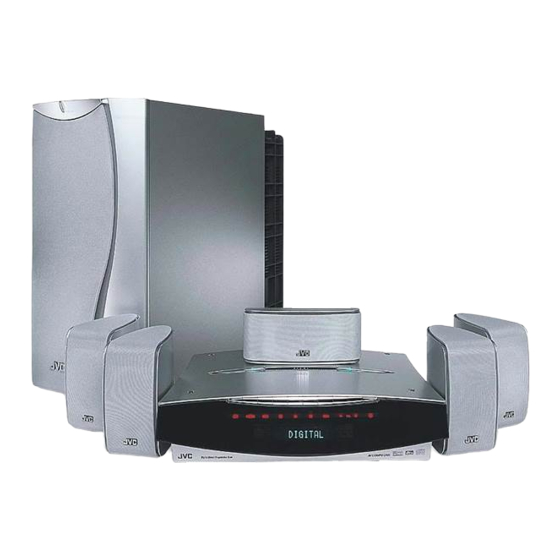
Dvd digital cinema system consists of xv-thv70, sp-pwv70, sp-xsv70, and sp-xcv70
Hide thumbs
Also See for SP-PWV70:
- User manual (241 pages) ,
- Instructions manual (86 pages) ,
- Service manual (70 pages)
Table of Contents
Advertisement
Quick Links
DVD DIGITAL CINEMA SYSTEM
TH-V70
Consists of XV-THV70, SP-PWV70, SP-XSV70, and SP-XCV70
D V D
D I G I T A L
C I N E M A
T H - V 7 0
INSTRUCTIONS
S Y S T E M
For Customer Use:
TV
AUDIO
AUX
FM/AM
DVD
VCR 1
VCR
DECODE
AUDIO
ANGLE
SUBTITLE
RETURN
DIGEST
ZOOM
VFP
+
PROGRESSIVE
TOP MENU
MENU
ZOOM
–
SOUND
–
+
CONTROL
SUBWOOFER
EFFECT
VCR
1
2
3
–
+
CENTER
TEST
TV
4
5
6
SLEEP
–
+
REAR-L
7
8
9
SETTING
–
REAR-R
+
10
0
+10
TV RETURN
FM MODE
100+
ON
SCREEN
AUDIO/
TV/VCR
CATV/DBS
ENTER
SURROUND
CHOICE
MODE
TV VOL
CHANNEL
VOLUME
TV/VIDEO
MUTING
1
¡
/REW
PLAY
FF/
DOWN
TUNING
UP
REC
STOP
PAUSE
MEMORY
STROBE
DIMMER
RM–STHV70U
DVD CINEMA SYSTEM
Enter below the Model No. and Serial
No. which are located either on the rear,
bottom or side of the cabinet. Retain this
information for future reference.
Model No.
Serial No.
LVT0865-015A
[A]
Advertisement
Table of Contents

Related Manuals for JVC SP-PWV70


Summary of Contents for JVC SP-PWV70
- Page 1 DVD DIGITAL CINEMA SYSTEM TH-V70 Consists of XV-THV70, SP-PWV70, SP-XSV70, and SP-XCV70 INSTRUCTIONS AUDIO RETURN TOP MENU CONTROL D V D D I G I T A L C I N E M A S Y S T E M...
-
Page 2: Warnings, Cautions And Others
Caution –– Disconnect the mains plug to shut the power off completely (the goes off). • When the system is on standby, the • When the system is turned on, the operation lamps light red. The power can be remote controlled. CAUTION To reduce the risk of electrical shocks, fire, etc.: 1. - Page 3 IMPORTANT FOR LASER PRODUCTS REPRODUCTION OF LABELS 1 CLASSIFICATION LABEL, PLACED ON EXTERIOR SURFACE 2 WARNING LABEL, PLACED INSIDE THE UNIT 1. CLASS 1 LASER PRODUCT 2. DANGER: Visible and invisible laser radiation when open and interlock failed or defeated. Avoid direct exposure to beam. 3.
- Page 4 Place on the level surface. Maintain adequate air path for ventilation by placing on a stand with a height of 10 cm more. Side view Wall or XV-THV70 obstructions 1 cm SP-PWV70 15 cm Front Floor...
-
Page 5: Table Of Contents
Table of Contents Introduction ... 2 Notes on handling ... 2 Checking the supplied accessories ... 2 Names of parts and controls ... 3 About discs ... 6 Playable disc types ... 6 Disc structure ... 7 Playback Control function (PBC) ... 7 Getting started ... -
Page 6: Introduction
Introduction Notes on handling Important cautions Installation of the system • Select a place which is level, dry and neither too hot nor too cold between 5°C and 35°C (41°F and 95°F). • Leave sufficient distance between the system and the TV. •... -
Page 7: Names Of Parts And Controls
Front panel Placed vertically (with DISP.SET set to “V”) SOURCE D V D Placed horizontally (with DISP.SET set to “H”) 4 5 6 7 8 w q SOURCE Rear panel TO SP-PWV70 DIGITAL IN COMPU LINK OPTICAL LOOP ANTENNA COAXIAL NTSC DISP.SET... -
Page 8: Display Window
Display window Placed vertically (with DISP.SET set to “V”)* LS S DSP CH PRO LOGIC RESUME TUNED STEREO AUTO MUTING SURROUND DIGITAL Placed horizontally (with DISP.SET set to “H”) RESUME TUNED STEREO AUTO MUTING LS S DSP CH PRO LOGIC SURROUND DIGITAL * This manual explains operations using the illustrations of the display window that are shown when the center unit is placed... -
Page 9: Remote Control
Names of parts and controls Remote control FM/AM AUDIO ANGLE SUBTITLE RETURN DIGEST ZOOM TOP MENU MENU ZOOM – – CONTROL SUBWOOFER – CENTER – SLEEP REAR-L – SETTING REAR-R TV RETURN FM MODE SCREEN ENTER CHOICE TV VOL CHANNEL VOLUME TV/VIDEO MUTING... -
Page 10: About Discs
About discs Playable disc types This system has been designed to play back the following discs: DVD Video, Video CD, Super Video CD (SVCD), Audio CD, CD-R, and CD-RW. • This system can also play back MP3 and JPEG files recorded on CD-Rs and CD-RWs. For in-depth information about MP3, see “MP3 disc playback”... -
Page 11: Disc Structure
About discs Disc structure A DVD Video disc consists of “titles,” and each title may be divided into some “chapters.” (See Example 1.) For example, if a DVD disc contains some movies, each movie may have its own title number, and it may be further divided into some chapters. -
Page 12: Getting Started
You can place the center unit either vertically (on the supplied stand) or horizontally (without the stand) as illustrated below. Before installing the center unit, set the DISP.SET selector according to your selection. • The position of the remote control sensor also changes according to this setting. See page 19. TO SP-PWV70 LOOP COAXIAL DISP.SET... -
Page 13: When Placing The Center Unit Vertically
Getting started When placing the center unit vertically When placing the center unit vertically, attach the supplied stand. 1 Connect the cords by passing them through the holes of the stand as illustrated below. For connections, see pages 10 to 15. VI DE S- VI TA L... -
Page 14: Connections
• You need to set “MONITOR TYPE” in the PICTURE menu correctly according to the aspect ratio of your TV. See page 58. 7 To connect a TV without the component video input jacks DIGITAL IN TO SP-PWV70 COMPU LINK... -
Page 15: Connecting The Fm And Am Antennas
Outdoor single vinyl-covered wire (not supplied) If reception is poor: Connect an outdoor single vinyl- covered wire to the AM EXT terminal. (Keep the AM loop antenna connected.) TO SP-PWV70 Center unit LOOP COAXIAL DISP.SET 7 FM antenna Connecting the supplied FM antenna... -
Page 16: Connecting The Powered Subwoofer
Connecting the powered subwoofer Connect the supplied powered subwoofer (SP-PWV70) using the supplied system cord. • Connect the system cord by matching the 5 marks on the plugs to the ones on the system and powered subwoofer. TO SP-PWV70 System cord (supplied) Ensure that the 5 mark on the plug faces down. - Page 17 Getting Started 7 Connecting the satellite (front, center, rear) speakers Connect the satellite speakers to the powered subwoofer using the supplied speaker cords. • Connect the white cord to the red (+) terminal and the black cord to the black (–) terminal. CAUTION: •...
-
Page 18: Connecting To An Analog Component
RCA pin plugs (not supplied). • Connect the white plug to “AUX IN L” (the left audio jack), the red to “AUX IN R” (the right audio jack). AUX IN TO SP-PWV70 RCA pin plug cord To audio... -
Page 19: Connecting The Power Cord
Getting started Connecting the power cord Make sure that all connections have been made, before plugging the power cords of the center unit and powered subwoofer. DIGITAL IN TO SP-PWV70 COMPU LINK OPTICAL LOOP ANTENNA COAXIAL NTSC DISP.SET VIDEO OUT SELECT... -
Page 20: Installing The Equipment On The Wall
Installing the equipment on the wall When attaching the rear speakers to a wall Using the supplied speaker wall brackets, you can fix the rear speakers to the wall. CAUTION: Attaching the brackets to the wall When attaching the brackets to the wall, have them attached to the wall by a qualified person. DO NOT attach the brackets to the wall by yourself to avoid an unexpected damage due to their falling from the wall, caused by incorrect attachment or weakness in the wall. -
Page 21: When Attaching The Center Unit To A Wall
Getting started When attaching the center unit to a wall You can attach the center unit to a wall. CAUTIONS: location of attachment to a wall • Take care when selecting a location for attaching the center unit to the wall. Injury to personnel, or damage to the center unit, may result if the center unit is attached in a location which interferes with daily activities, or a location that the users are liable to knock their bodies or heads against the center unit. - Page 22 3 Hook the center unit onto the mounted screws, and slide it to left, then down. Make sure that the center unit is attached securely. • Adjust the screws if the center unit is not attached securely. NOTES: • Do not place anything on top of the center unit. Doing so may cause the center unit to fall down, and cause injury to the persons arround. •...
-
Page 23: Using The Remote Control
Getting Started Using the remote control The remote control makes it easy to use many of the functions of the system at a distance of up to 7 m (23 feet) away. • You can also operate other components from the remote control supplied with this system. –... -
Page 24: Using The Remote Control For Tv Operations
7 Setting the remote control signal for operating your TV. • You can operate your TV without setting the remote control signal if your TV is a JVC TV. 1 Slide the remote control mode selector to ”AUDIO/TV/VCR.” 2 Press and hold TV •... -
Page 25: Basic Operations
Basic operations This section mainly explains operations commonly used when you enjoy this system. • This manual mainly explains operations when the center unit is placed vertically (the DISP.SET selector is set to “V”) as an example. • Turn also on your TV and select the correct input mode on the TV. IMPORTANT: When using the remote control, check to see if its remote control mode selector is set to the correct... -
Page 26: Selecting The Source To Play
From the remote control: DVD: Select the DVD player, and the remote control can be used to operate the DVD player. (See pages 27 and 37.) FM/AM: Select an FM or AM broadcast, and the remote control can be used to operate the tuner (FM/AM). (See page 31.) •... -
Page 27: Turning Off The Sound Temporarily
Basic operations AUDIO FM/AM VCR 1 DECODE AUDIO ANGLE SUBTITLE RETURN DIGEST ZOOM PROGRESSIVE TOP MENU MENU ZOOM – SOUND – CONTROL SUBWOOFER EFFECT – CENTER TEST – SLEEP REAR-L – SETTING REAR-R TV RETURN FM MODE 100+ SCREEN AUDIO/ TV/VCR CATV/DBS ENTER... -
Page 28: Turning Off The Power With The Timer
Turning off the power with the timer Using the sleep timer, you can fall asleep while listening to music, and know the system will turn off by itself rather than play all night. From the remote control ONLY: Press SLEEP. Each time you press the button, the shut-off time changes as follows: ] 0min (cancelled) ] 10min (minutes) ] 20min ] 30min ] 60min ] 90min ] 120min ] 150min ] (back to the beginning) -
Page 29: Changing The Decode Mode
Basic operations Changing the decode mode When you play a disc (or software) encoded with Dolby Digital or DTS Digital Surround, the following symptoms may occur: • Sound does not come out at the beginning of playback. • Noise comes out while searching for or skipping chapters or tracks. In these cases, change the decode mode to “DOLBY D”... -
Page 30: Changing The Scan Mode
DVD in the progressive scan mode. In such a case, change the scan mode to “INTERLACE.” To check the compatibility of your TV, contact your local JVC customer service center. • All JVC progressive TVs and High-Definition TVs are fully compatible with this system. -
Page 31: Basic Playback
VIDEO SUPER AUDIO • Before operating the DVD player from the remote control, press DVD to use the remote control for the disc operations. • Turn on your TV and select the correct input mode on the TV. IMPORTANT: When using the remote control, check to see if its... -
Page 32: Stopping Playback Temporarily
2 Insert a disc into the disc slot with the label side facing the front or up as shown below. Insert a disc halfway, then it is pulled into the center unit automatically. • When the center unit is placed vertically Label side Disc slot After the system reads the disc information, playback starts. -
Page 33: Stopping Playback Completely
Basic playback SOURCE Stopping playback completely Press STOP. From the remote control: Press 7. On the center unit: 7 When the resume playback is set to “ON” (see page 62): Once you press the button, playback stops and the position where playback has been stopped is stored. (The RESUME indicator lights up.) To clear the stored position, press STOP (or 7 on the center unit) again. -
Page 34: Searching For A Particular Point
Searching for a particular point You can search for a particular point while playing a disc. 7 Method 1 (from the remote control ONLY): To fast-forward playback, press ¡ during playback. Each time you press the button, the search speed changes as follows. To fast-reverse playback, press 1 during playback. -
Page 35: Tuner Operations
Tuner operations You can browse through all the stations or use the preset function to go immediately to a particular station. • Before operating the tuner from the remote control, press FM/AM to use the remote control for the tuner operations. IMPORTANT: When using the remote control, check to see if its remote control mode selector is set to the correct... -
Page 36: Selecting The Fm Reception Mode
• 2 Press MEMORY ( REC). The channel number position starts flashing on the display window for about 5 seconds. MPEG – LS S RS RESUME TUNED STEREO AUTO MUTING RDS TA NEWS INFO INFO NEWS MUTING AUTO STEREO TUNED 3 Press Number button(s) (1-10, +10) to select a channel number while the channel number position is flashing. -
Page 37: Creating The Realistic Sound Fields
Creating the realistic sound fields You can use the following Surround modes to reproduce a realistic sound field. 7 Dolby Surround • Dolby Pro Logic II • Dolby Digital 7 DTS Digital Surround 7 DAP modes 7 All Channel Stereo 7 Dolby Surround Dolby Pro Logic II* Dolby Pro Logic II has newly developed multichannel... -
Page 38: Dap Modes
7 DAP (Digital Acoustic Processor) modes DAP modes have been designed to create important acoustic surround elements. The sound heard in a live club, dance club, hall or pavilion consists of direct sound and indirect sound—early reflections and reflections from behind. Direct sounds reach the listener directly without any reflection. -
Page 39: Selecting The Surround Mode
Creating the realistic sound fields IMPORTANT: When using the remote control, check to see if its remote control mode selector is set to the correct position: To operate this system, set it to “AUDIO/TV/VCR.” Selecting the surround mode The system is so set up in its initial state that it automatically selects the optimal surround mode for each input signal (AUTO SURROUND MODE). -
Page 40: Using Dap Modes And All Channel Stereo
5 Adjust the speaker output levels (–10 dB to +10 dB). Adjust the center speaker and rear speaker levels comparing to the sound from the front speakers. • To adjust the center speaker level, press CENTER +/–. • To adjust the left rear speaker level, press REAR-L +/–. •... -
Page 41: Advanced Operations
SUPER AUDIO • Before operating the DVD player from the remote control, press DVD to use the remote control for the disc operations. • Turn on your TV, and select the correct input mode on the TV. • If “... -
Page 42: Basic Operation Through The On-Screen Bar
Select this to play back tracks in your desired order. See page 49. Select this to play back tracks in random order. See page 49. Basic operation through the on- screen bar EX.: When selecting the repeat mode: TV RETURN FM MODE 100+ SCREEN... -
Page 43: Locating A Desired Scene From The Disc Menu
Advanced operations Locating a desired scene from the disc menu Using the disc menu, you can start playing a title, chapter, or track you specify. Locating a desired scene from the DVD menu DVD discs generally have their own menus which show the disc contents. -
Page 44: Selecting A View Angle Of Dvd
Selecting a view angle of DVD While playing back a DVD containing multi-view angles, you can enjoy the same scene at different angles. Selecting a view angle Using the direct button: AUDIO FM/AM VCR 1 DECODE AUDIO ANGLE SUBTITLE ANGLE button RETURN DIGEST ZOOM... -
Page 45: Showing All View Angles On The Tv
Advanced operations Showing all view angles on the TV AUDIO FM/AM VCR 1 AUDIO ANGLE SUBTITLE DECODE ANGLE button RETURN DIGEST ZOOM PROGRESSIVE TOP MENU MENU ZOOM – SOUND – CONTROL SUBWOOFER EFFECT – CENTER TEST – SLEEP REAR-L – SETTING REAR-R TV RETURN... -
Page 46: Selecting The Audio Language
Using the on-screen bar: TV RETURN FM MODE 100+ SCREEN AUDIO/ TV/VCR ON SCREEN CATV/DBS button ENTER SURROUND CHOICE MODE 7 During playback 1 Press ON SCREEN twice. The on-screen bar appears on the TV screen. 2 Press Cursor 3/2 to move the on-screen bar, then press ENTER. -
Page 47: Selecting The Audio Channel
Advanced operations Using the on-screen bar: TV RETURN FM MODE 100+ SCREEN AUDIO/ TV/VCR ON SCREEN CATV/DBS button ENTER SURROUND CHOICE MODE 7 During playback 1 Press ON SCREEN twice. The on-screen bar appears on the TV. 2 Press Cursor 3/2 to move the on-screen bar, then press ENTER. -
Page 48: Playing From A Specified Position On A Disc
Using the on-screen bar: TV RETURN FM MODE 100+ SCREEN AUDIO/ TV/VCR ON SCREEN CATV/DBS button ENTER SURROUND CHOICE MODE 7 During playback 1 Press ON SCREEN twice. The on-screen bar appears on the TV. 2 Press Cursor 3/2 to move the on-screen bar, then press ENTER. -
Page 49: Locating A Desired Position By Specifying The Time
Advanced operations Locating a desired position by specifying the time You can start playing at your desired position by specifying the elapsed playing time from the beginning of the current title (for DVD Video), or from the beginning of the disc (for Video CD/SVCD/Audio CD). -
Page 50: Special Picture Playback
• While a DVD is stopped: The opening scene of each title appears on the TV screen . • During DVD playback: The opening scene of each chapter in the current title appears on the TV screen. • When a Video CD or SVCD is loaded: The opening scene of each track appears on the TV screen. -
Page 51: Playing Back In Slow-Motion
Advanced operations To return to the normal screen Press and hold STROBE (PAUSE) for more than 1 second. NOTES: • If you press and hold STROBE (PAUSE) for more than 1 second during playback, 9 still pictures also appear but they advance in normal playback speed with a time delay. -
Page 52: Changing The Vfp Setting
Changing the VFP setting The VFP (Video Fine Processor) function enables you to adjust the picture character according to the type of programming, picture tone or personal preferences. Before you start, remember... There is a time limit in doing the following steps. If the setting is canceled before you finish, start from step 1 again. -
Page 53: Changing The Track Order
Advanced operations Changing the track order You can play tracks on a Video CD, SVCD or Audio CD in the desired order or in random order. Playing back in the desired order You can play up to 99 tracks in desired order. •... -
Page 54: Repeat Playback
Repeat playback You can repeat playback of the current title or chapter (for DVD Video) or track (for Video CD/SVCD/Audio CD). You can also repeat playback of a desired part. Repeating a current title, chapter, or all tracks TV RETURN FM MODE 100+ SCREEN... -
Page 55: Mp3 Disc Playback
MP3 disc playback This system can play MP3 files recorded on a CD-R or CD-RW (MP3 disc). • Before performing the operation in this section from the remote control, press DVD to use the remote control for the MP3 disc operations. •... - Page 56 Operations through the MP3 control display You can search and play the desired groups and tracks through the MP3 control display. 7 MP3 control display Track number indication* Current group Group number Elapsed playing time of the current track indication** MP3 CONTROL Time : 00:00:14 Group : 01 / 03...
-
Page 57: Jpeg Disc Playback
JPEG disc playback This system can play JPEG files such as the digital photographs recorded on a CD-R and CD-RW (JPEG disc). • Before performing the operation in this section from the remote control, press DVD to use the remote control for the JPEG disc operations. - Page 58 7 To stop the slide-show playback completely Press STOP (or 7 on the center unit) The JPEG control display appears on the TV screen. • For how to operate through the JPEG control display, see “Operations through the JPEG control display.” NOTES: •...
-
Page 59: Setting Dvd Preferences
Setting DVD preferences You can adjust the initial setting of DVD player according to your preference or needs through the choice menus shown on the TV screen. Before performing the operations in this section, press DVD on the remote control to change the source to DVD. -
Page 60: Basic Procedure Through The Choice Menus
Basic procedure through the choice menus TV RETURN FM MODE 100+ SCREEN AUDIO/ TV/VCR CATV/DBS ENTER SURROUND CHOICE MODE CHOICE button 1 Press CHOICE. The LANGUAGE menu appears on the TV. LANGUAGE MENU LANGUAGE ENGLISH AUDIO LANGUAGE ENGLISH SUBTITLE ON SCREEN LANGUAGE ENGLISH SELECT TO SELECT. -
Page 61: Language Menu
Setting DVD preferences LANGUAGE menu NOTE: You can select “MENU LANGUAGE,” “AUDIO LANGUAGE,” and “SUBTITLE” only while playback is stopped. Items MENU LANGUAGE Some DVDs have their own menus in multiple languages. • Select the initial language ENGLISH, SPANISH, FRENCH, CHINESE, GERMAN, ITALIAN, JAPANESE, and shown in the menus. -
Page 62: Picture Menu
PICTURE menu Items MONITOR TYPE • 16:9 NORMAL (Wide television conversion) You can select the monitor type Select this when the aspect ratio of your TV is fixed to 16:9 to match your TV when you play (wide TV). DVDs recorded in the picture’s The system automatically adjusts the screen width of the output height/width ratio of 16:9. -
Page 63: Audio Menu
Setting DVD preferences AUDIO menu Items L –21 to L –1 “ CENTER “ R –1 to R –21 (by 1 step) L/R BALANCE Adjust the balance between the • CENTER left front speaker and right front The outputs of the left and right front speakers are identical. speaker. -
Page 64: Spk. Setting Menu
SPK. SETTING menu Items SIZE Enters the SIZE sub-menu (the speaker size setting menu). (See below.) LEVEL Enters the LEVEL sub-menu (the speaker level setting menu). (See page 61.) DISTANCE Enters the DISTANCE sub-menu (the speaker distance setting menu). (See page 61.) CROSS OVER* •... -
Page 65: Level Menu
Setting DVD preferences LEVEL menu NOTE: When “NONE” is selected for the center speaker or rear speakers in the SIZE menu, you cannot enter the LEVEL menu. (See page 60.) Items CENTER SPEAKER* LEFT REAR SPEAKER* RIGHT REAR SPEAKER* Within the range from –10 dB to +10 dB. (by 1 dB step) SUB WOOFER Adjust the output level of those speakers. -
Page 66: Others Menu
OTHERS menu NOTE: You can select “PARENTAL LOCK” only while playback is stopped. Items RESUME • ON You can activate or deactivate Select this to activate this function. the resume playback function. • OFF Select this to deactivate. ON SCREEN GUIDE •... -
Page 67: Restricting Playback By Parental Lock
Setting DVD preferences Restricting playback by Parental Lock Using this function, you can restrict playback of a DVD containing violent scenes and those not suitable for your family members. Nobody can play such a disc unless this function is canceled. •... -
Page 68: Changing The Setting Of Parental Lock
Changing the setting of Parental Lock From the remote control ONLY: – CONTROL SUBWOOFER EFFECT – CENTER TEST – SLEEP REAR-L – SETTING REAR-R TV RETURN FM MODE 100+ SCREEN AUDIO/ TV/VCR CATV/DBS ENTER SURROUND CHOICE MODE CHOICE button 1 Press CHOICE, then press Cursor 3/2 to display the OTHERS menu. -
Page 69: Country/Area Codes List For Parental Lock
Setting DVD preferences Country/Area codes list for Parental Lock Andorra United Arab Emirates Afghanistan Antigua and Barbuda Anguilla Albania Armenia Netherlands Antilles Angola Antarctica Argentina American Samoa Austria Australia Aruba Azerbaijan Bosnia and Herzegovina Barbados Bangladesh Belgium Burkina Faso Bulgaria Bahrain Burundi Benin... -
Page 70: Setting The System Through The Display Window
Setting the system through the display window You can adjust the sound and speaker settings of this system through the display window. • You can adjust the sound setting of front speakers (“BAL,” “BASS,” and “TREBLE”) for each source. • The adjustments of the speaker size, speaker distance, “LFE ATT,” “CROSS,” and “D. COMP” take effect for all sources. IMPORTANT: When using the remote control, check to see if its remote control mode selector is set to the... -
Page 71: Av Compu Link Remote Control System
AV COMPU LINK remote control system The AV COMPU LINK remote control system allows you to operate JVC TVs through the center unit. To use this remote control system, follow the diagrams and procedure explained here. • The AV COMPU LINK setting is performed in the OTHERS menu of the choice menus. See page 62 for operations. - Page 72 NOTES: • There may be no description about connections to a DVD player in the instruction manual of a TV or VCR. However, a TV or VCR with AV COMPU LINK II, AV COMPU LINK III, or AV COMPU LINK EX jack can be connected to the center unit.
-
Page 73: Operating Other Manufacturers' Video Equipment
Operating other manufacturers’ video equipment By changing the remote control signals from preset ones to the other manufacturers’, you can use the remote control supplied for this system to operate other manufacturers’ VCRs, CATV converters, DBS tuners, and TVs. (For TVs, see page 20.) •... -
Page 74: Using The Remote Control For Vcr
Using the remote control for VCR AUDIO FM/AM VCR 1 AUDIO ANGLE SUBTITLE DECODE button RETURN DIGEST ZOOM PROGRESSIVE TOP MENU MENU ZOOM – SOUND – CONTROL SUBWOOFER EFFECT – CENTER TEST Number buttons – SLEEP REAR-L – SETTING REAR-R VCR CONTROL TV RETURN FM MODE... -
Page 75: Maintenance
Maintenance To get the best performance of the system, keep your discs and mechanism clean. General Notes In general, you will have the best performance by keeping your discs, and the mechanism clean. • Store discs in their cases, and keep them in cabinets or on shelves. -
Page 76: Troubleshooting
Troubleshooting Use this chart to help you solve daily operational problems. If there is any problem you cannot solve, contact your JVC service center. PROBLEM Power does not come on. Power is not supplied to the powered subwoofer. The remote control does not work. - Page 77 Troubleshooting PROBLEM Sound from one front speaker only. No sound from the center and/or rear speakers. The system does not work correctly. No picture is displayed on the TV screen. No picture is displayed on the TV screen, the picture is blurred, or the picture is divided into two parts.
- Page 78 PROBLEM A disc cannot be played. Not MP3 files but JPEG files are played. The MP3 control display appears on the TV screen, but any operation cannot be performed. A disc cannot be played. Not JPEG files but MP3 files are played.
-
Page 79: Glossary
Glossary Aspect ratio The ratio of vertical and horizontal sizes of a displayed image. The horizontal vs. vertical ratio of conventional TVs is 4:3, and that of wide-screens is 16:9. Chapter Refers to individual chapters included in a title. Composite video signal Refers to video signal comprised of three kinds of signals combined: an image signal made up of luminance and chrominance signals using the frequency multiplication... -
Page 80: Specifications
Specifications 7 Center unit (XV-THV70) Audio section Total Harmonic Distortion 0.02 % NOTE: This value is measured at System cord CONNECTOR for reference. Audio input sensitivity/Impedance (at 1 kHz) Analog input: AUX IN : 290 mV/47 k Digital input*: DIGITAL IN (OPTICAL): –21 dBm to –15 dBm (660 nm ±30 nm) * Corresponding to Linear PCM, Dolby Digital, and DTS... - Page 81 Specifications 7 Subwoofer (SP-PWV70) Amplifier section Front/Center/Rear: 30 W per channel, RMS at total harmonic distortion. Subwoofer: 140 W, RMS at 4 Hz, with 10 % total harmonic distortion. Speaker: 20 cm Bass-reflex, Magnetically Shielded AC 230 V Ó, 50 Hz...
- Page 82 VICTOR COMPANY OF JAPAN, LIMITED 0602TMMMDWJEM...
Need help?
Do you have a question about the SP-PWV70 and is the answer not in the manual?
Questions and answers