Table of Contents
Advertisement
Advertisement
Table of Contents

Subscribe to Our Youtube Channel
Related Manuals for Duplo DB-200


Summary of Contents for Duplo DB-200
- Page 1 PERFECT BINDER DB-200 OPERATION MANUAL Duplo USA Corp. June, 2000 LED Rev. 1.3...
-
Page 3: Table Of Contents
Table of Contents Safety Notes ........................... 1 In case of THERMOSTAT FAILURE ..................1 In case of EMERGENCY......................1 General Information........................2 Main Assemblies ......................... 2 Specification ..........................2 Accessories ..........................2 Adhesive ............................2 Installation............................. 3 Control Panel..........................4 Operation Procedures........................ -
Page 4: Safety Notes
Application temperature: 293 °F (145 °C) to 338 °F (170 °C) Working Glue Viscosity: 1,500 to 2,600 CPS Warning: Duplo USA is not responsible for the quality of the binding that is produced by the non-suggested glues. In case of THERMOSTAT FAILURE : DB-250 has implemented the secondary thermostat to protect the glue tank temperature over 392 °F (200 °C). -
Page 5: General Information
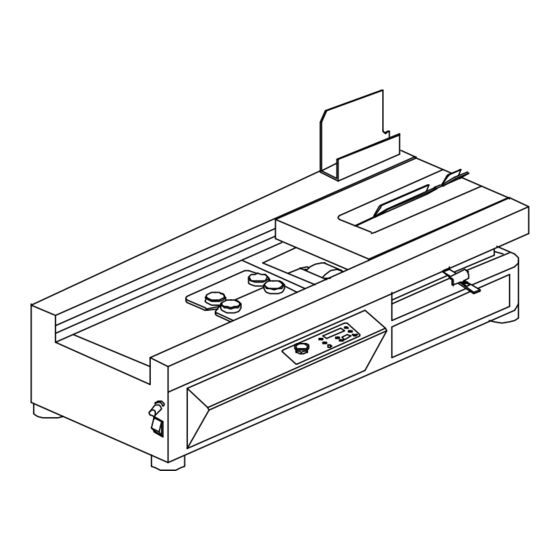
General Information Main Assemblies (1) Nipping Station (2) Glue Tank (3) Notching Station (4) Clamp Station (5) Control Panel (6) Nipping Pressure Control Specification Model DB-250 Perfect Binder Maximum Book Size 12.6” x 15.75” ( 320mm x 400mm ) Minimum Book Size 3.15”... -
Page 6: Installation
Installation Note: You must remove the three red shipping brackets before installing your DB-250. The procedures for installation: Remove the red shipping bracket located on the left side of the clamp station as shown. Then reinstall the screws in clamp station. Remove two red shipping brackets that are located around the nipping station as shown. -
Page 7: Control Panel
Control Panel Name Description LED Display / Example EMERGENCY Stop all the actions of the machine. “STOP” (flashing) Except when “HOT” shows on the LED DISPLAY. STAND BY / Temporarily lowers the temperature STBY00 of glue tank so it won’t burn the glue when the machine is not operated. -
Page 8: Operation Procedures
Operation Procedures (A) STARTUP : Turn ON the power switch of DB-250 as shown. ( where “I” for ON; “O” for OFF ) The heater of DB-250 will automatically heat the glue to the preset working temperature and display the status of the heating processes. •... -
Page 9: (B) Manual Mode
(B) MANUAL MODE : After the “STARTUP” procedures, the DB-250 will automatically set itself MANUAL operation and flashing "LOAD BOOK" display. Note that the “NOTCH” LED is ON. (1) Press the “OPEN” button and place the book block inside the clamps. Be sure to follow the label instructions on the clamp to load the book block to the RIGHT of the red line, then slide the book block to the far LEFT of... - Page 10 After the first notching process, the clamp station will remain to the left side of DB-250 and the LED display of the control panel will display and flash "LOAD COVER". Center the cover sheet and adjust the side guide: Measure the width of the book plus half the thickness of the spine.
-
Page 11: (C) Auto Mode
(C) AUTO MODE : Note: All books done in this mode must be same thickness. In the MANUAL mode, make one book. Centering the cover to the centered point and adjust the side guide. Press “FUNCTION” button to switch to “AUTO”... - Page 12 Place the cover sheet onto the nipping station when the display flashing "LOAD COVER". The clamp station will automatically move back to the position above the nipping station and start the binding process for the book block and cover sheet. Note: If you accidentally remove or drop the cover sheet during the clamping station return to...
-
Page 13: (D) Padding Mode
(D) PADDING MODE: “PAD” is one of the DB-250 operations that apply to special binding applications such as binding without cover sheet. Press “FUNCTION” button to switch to “PAD” operation. The “PAD” LED will be lit and display flashing "LOAD PAD" as shown. Note: The “NOTCH”... -
Page 14: (E) Standby Mode
(2) Having moved to the left position of DB- 250, the clamp station will automatically move back to the right position and display "BIND". (3) Wait for a few seconds until the LED display of control panel displays “PUSH OPEN” as shown. Then press the “OPEN”... -
Page 15: (F) Glue Level Adjustment
(F) GLUE LEVEL ADJUSTMENT : The glue level may require adjustment when the thickness of the book or pad varies. Use the following book spine illustrations for guidelines. • Increasing the holt-melt glue when Hollow middle Round • Decreasing hot-melt glue when Too much glue on both sides Nail head •... -
Page 16: (G) Nipping Pressure Control
(G) NIPPING PRESSURE CONTROL : The nipping pressure control knob is located on the left-side of the machine (next to the power switch). It allows you to adjust the nipping pressure based on the thickness of the books and the quality of the book spine. -
Page 17: Maintenance
Note that it’s not necessary to drain the glue frequently if the machine is used constantly under normal working conditions. However, in case the glue has been left unused for a long period of time with the unit in the “ON” position, and the quality is found to be unacceptable, use the glue replacement procedures or call your authorized dealer. -
Page 18: Error Display
Name Default Time Range Description 4 sec. 2.0 - 10 sec. Nipping time. 1 sec. 0.5 - 5 sec. Auto mode: After loading the cover, the delay time before clamp station returns. 2 sec. 1.0 - 5 sec. Auto mode: Clamp closing time for the book.
Need help?
Do you have a question about the DB-200 and is the answer not in the manual?
Questions and answers