Miele HM 21-140 Operating Instructions Manual
Rotary iron
Hide thumbs
Also See for HM 21-140:
- Operating instructions manual (32 pages) ,
- Operating instructions manual (22 pages) ,
- Operating instructions manual (36 pages)

Related Manuals for Miele HM 21-140


Summary of Contents for Miele HM 21-140
-
Page 1: Operating Instructions
Operating instructions Rotary iron HM 21-140 To prevent accidents and machine damage en - US, CA read these instructions before M.-Nr. 07 660 861 installation or use. -
Page 2: Table Of Contents
Contents Important Safety Instructions ..............3 Guide to the rotary iron . -
Page 3: Important Safety Instructions
"tripping" the circuit breaker to the unit. using this appliance for the first time. They contain important information about the safety, use and Use only genuine Miele parts. Use of non-Miele parts may impair performance and void any guaran- maintenance of the appliance. Please read them tees and product liability claims. -
Page 4: Guide To The Rotary Iron
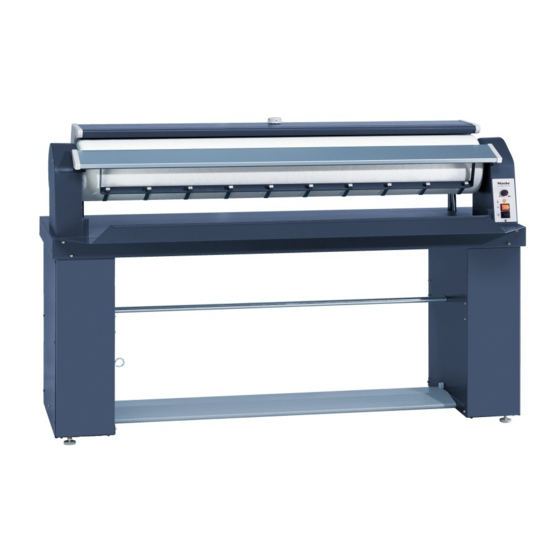
Guide to the rotary iron a Heater plate with finger guard g Laundry wipe off unit b Roller h 4 height adjustable feet c Temperature selector i Foot pedal switch d Feed board j Emergency release (power failure) e Control panel k Ironing table f Laundry compartment... - Page 5 Guide to the rotary iron a Roller speed selector b % "Heating" indicator c On/Off button To turn the rotary iron on and off. The indicator lights when the machine is turned on. d h "Start" button To start ironing. The heater plate lowers to the roller and the roller turns.
- Page 6 Guide to the rotary iron Roller speed selector Finger guard The roller speed can be increased by turning the se- lector clockwise and decreased by turning it counter- clockwise. Temperature selector The finger guard is a safety feature that should be checked each time the rotary iron is used.
- Page 7 Guide to the rotary iron Foot pedal switch Coin mechanism 1 = Coin slot Switch position 1 (inactive) Ironing After inserting a coin or token the preprogrammed Switch position 2 Steaming running time is displayed. Switch position 3 Lifting the heater plate 2 = Coin return button 3 = Coin return 4 = Running time display...
-
Page 8: Use
Correct dampness Ironing tips For best results, the residual moisture of the laundry – To avoid creasing stop the roller, pull the item back should be 25%. slightly and smooth out. If necessary, dampen again with a wet cloth or spray bottle. Laundry which contains more than 50% synthetic –... -
Page 9: Turning The Rotary Iron On
Turning the rotary iron on ^ Select the desired temperature with the temperatu- re selector. ^ Plug the machine in and press the 0 - I (On/Off) button. The On/Off indicator lights. Rotary iron with coin mechanism The running time display lights. ^ Insert coins or token. -
Page 10: Testing The Finger Guard
Testing the finger guard The finger guard is a safety feature and should be checked before each use of the rotary iron. ^ Press the h "Start" button. The heater plate lowers and the roller turns. ^ Lift the finger guard. The roller stops and the heater plate rises off the rol- ler. -
Page 11: Ironing
Ironing Rotary iron with coin mechanism At the end of the pre-programmed running time the heater plate raises and the roller stops turning. After ironing ^ Insert the prepared laundry by feeding it over the feed board. ^ Smooth the items during ironing from the middle to the edges. -
Page 12: Frequently Asked Questions
Frequently asked questions Power failure Protecting the roller and iron cover – During breaks and after ironing the heater plate In the event of a power failure, pull the emer- should be raised. The roller and the iron cover du- gency release lever up. -
Page 13: Cleaning And Care
(yellowing nor- be obtained from Miele. mal). See the "Miele Ironing Handbook" for further informati- ^ While still damp the ironing cover should be "iro- ned" back on to a moving, heated roller (ß setting) with the heater plate in the ironing position. -
Page 14: After Sales Service
After sales service In the event of a problem, please contact the Miele Technical Service Department at the phone number on the back of this booklet. When contacting Technical Service please quote the model and serial number of the machine. These can be found on the silver data plate. -
Page 15: Guide To The Data Plate Symbols
Guide to the data plate symbols 1 Model 2 Serial number 3 Item number 4 Material number 5 Voltage / Frequency 6 Control breaker 7 Motor 8 Drum data* 9 Drum diameter / Drum depth* 10 Spin speed* 11 Drum volume / Dry laundry weight* 12 Kinetic energy* 13 Acceleration time* 14 Deceleration time*... -
Page 17: Installation Instructions
Installation Instructions... -
Page 18: Installation Site
Installation instructions Duct for venting steam The rotary iron should be installed by a Miele trai- Regard the specifications for exhaust air, air intake ned installer. and ventilation cross-sections. The on-site exhaust air duct must not lead into a chimney used for gas, coal or oil heating. It must also Do not operate the rotary iron in a room where be separate from any dryer exhaust air duct. -
Page 19: Electrical Connection
Installation instructions Electrical connection All electrical work must be performed by a qualified service technician in accordance with all applicable codes and standards. ^ Regard the data plate, wiring diagram, conversion and installation plan. The wiring diagram is located under the cover of the right side column. -
Page 20: Help To Protect The Environment
Help to protect the environment Disposal of the packing materials Disposal of an old appliance The packing materials protect the appliance during Old appliances may contain materials that can be re- shipping. They have been designed to be biodegra- cycled. Please contact your local recycling center dable and recyclable. - Page 24 Alteration rights reserved / 5209 M.-Nr. 07 660 861 / 00...
Need help?
Do you have a question about the HM 21-140 and is the answer not in the manual?
Questions and answers