
Related Manuals for Miele HM1680D


Summary of Contents for Miele HM1680D
- Page 1 Operating Instructions Rotary Iron HM 16-80 en - US To prevent accidents and machine damage read these instructions before installation or use. M.-Nr. 10 232 672...
-
Page 2: Table Of Contents
Contents IMPORTANT SAFETY INSTRUCTIONS....... . . 4 Guide to the Rotary Iron ..........7 Moving and folding the appliance . - Page 3 Contents Cleaning and care ..........28 Cleaning the water reservoir .
-
Page 4: Important Safety Instructions
Technical and electrical safety Read the operating instructions Installation, repair and maintenance carefully before using this appliance work should be performed by a Miele for the first time. They contain authorized service technician in important information about the safe accordance with national and local... - Page 5 Please contact the grounding system. It is imperative that nearest Miele Dealer or Miele Technical this basic safety requirement be met. If Service with specific requirements. there is any doubt, have the electrical system of the house checked by a qualified electrician.
- Page 6 Accessories should only be used if Do not use distilled water. It will approved by Miele. If other parts are cause pitting corrosion of the water used, warranty, performance and reservoir.
-
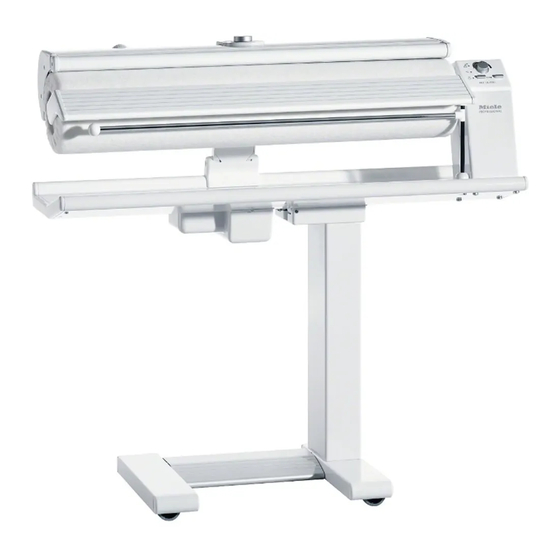
Page 7: Guide To The Rotary Iron
Guide to the Rotary Iron a Temperature selector h Laundry rod b Emergency release i Feed board c Control panel j Roller d Release catch k Heater plate e Power cord l Finger guard f Foot pedal switch m Water reservoir with cap g Ironing table... - Page 8 Guide to the Rotary Iron Control panel e Steam indicator Q a Roller speed selector b On/Off indicator I-0 f Temperature indicator c On/Off button I-0 g Water empty indicator a d Steam switch Q...
-
Page 9: Moving And Folding The Appliance
Moving and folding the appliance Transport strut Do not remove the transport strut until the rotary iron has been placed onto the four rollers. ^ Pull out the transport strut. Keep the strut in a safe place. It will need to be attached each time you transport the appliance. - Page 10 Moving and folding the appliance The rotary iron sits on 4 rollers. ^ Hold the ironing table and release the catch, located on the right-hand side ^ Hold the iron by the ironing table and at the back, underneath the ironing push or pull to move it.
-
Page 11: Before Using For The First Time
Before using for the first time Power cord The power cord is wound behind the ironing table. ^ Unwind the cord. Do not insert the plug into the electrical socket yet. - Page 12 Before using for the first time ^ The adhesive film supplied with iron A dust cover is placed on the roller for protection during shipping. can now be placed around the temperature selector. ^ First remove the feed board by lifting ^ Adhere the sticker (included) to the it out of the right hand holder, then temperature control as shown above.
-
Page 13: Preparing The Work Area
Before using for the first time Preparing the work area Preparing the laundry When positioning the rotary iron, make Proper preparation of the laundry is sure it is level. This will ensure even essential for good results. steam production and keep the Before ironing, laundry should be: appliance from rolling sideways. -
Page 14: Testing The Finger Guard
Before using for the first time Testing the finger guard Pulling into shape and smoothing The finger guard is a safety feature, ^ Pull the dampened laundry into and should be checked every time shape as usual. the rotary iron is used. ^ Smooth out any ribbons, straps, ^ With the iron turned on, press the foot seams, and hems. -
Page 15: Steam Setting
Steam setting For ironing dry or nearly dry laundry Only ever fill the water reservoir to items, the steam setting can be used. the lower edge of the spout. Ironing with and without steam ^ To prevent water from spilling over If the laundry items are already damp, when you close the roller down, be use the iron without steam. -
Page 16: Emptying The Water Reservoir
Steam setting Emptying the water reservoir Do not attempt to empty the water reservoir unless the roller and water are both cool. Always empty the reservoir once you have finished ironing. This will help prevent damage to the reservoir from damage caused by standing exposure to such elements in the water as chlorine, calcium, and copper. -
Page 17: Ironing
Ironing Turning on and off Selecting the ironing temperature (operation without steam) The temperature selector is used to set the ironing temperature. The temperature range is marked by dots on the ring around the temperature selector. These correspond with the international fabric care symbols for ironing. -
Page 18: Selecting The Ironing Temperature (Operation With Steam)
Ironing Turning the steam setting ON and OFF Before turning on the steam setting, you will need to turn the temperature selector to the ßßß setting. ^ Use the Q button for "Steam" to turn this setting on and off. Turning on ^ Press the Q button. -
Page 19: Selecting The Roller Speed
Ironing Selecting the roller speed Ironing There are 5 roller speed settings, from The ironing process is controlled by the low (approximately 6.5 ft/min.[2 m/min]) foot pedal, which has three operating to high 15 ft/min. [4.5 m/min]). positions: A lower roller speed makes it easier to iron complicated articles, such as shirts and blouses. -
Page 20: Positioning The Laundry
Ironing Positioning the laundry Removing the feed board ^ Arrange the laundry items on the The feed board can be removed when feed board so that they are straight, shaped garments are being ironed, and smooth them out by hand. e.g. -
Page 21: After Ironing
Ironing After ironing Tips ^ Turn the appliance off. – To avoid creasing: Stop the roller, pull the item back ^ Turn off the Q switch for "Steam". towards you slightly, and smooth it ^ Turn the temperature selector to I . out by hand. -
Page 22: Power Failure
Ironing Power failure To free a trapped item: In the event of a power failure, pull the emergency release lever up. If there is a power failure while the iron is in use, the heater play will stay pressed onto the roller. The item being ironed will be held there, and can become scorched. -
Page 23: Ironing Tips
Ironing Tips Towels, dishcloths, handkerchiefs, napkins, etc. ^ Lay the item with the straight grain of the fabric to the feed board. This will prevent it from losing its shape and will be easier to fold. Pass handkerchiefs diagonally through the rotary iron and, if necessary, fold them and then iron again. -
Page 24: Duvet Covers
Ironing Tips Duvet covers Pillowcases ^ Lay the pillowcase on the feeder plate, position under the heater plate and iron in one step. ^ If the open end has buttons, only pass it through the rotary iron if the buttons are heat resistant. If the duvet cover has buttons at the open end, iron the buttons first. -
Page 25: Shirts
Ironing Tips Shirts ^ Then turn down the collar and press lightly, holding taut. ^ Remove the feed board to iron shirts. 1. Shoulder yoke 3. Front sides ^ Lay the button hole front on the left ^ Arrange the yoke, collar first, on the hand end of the roller with the side roller and smooth out. - Page 26 Ironing Tips 4. Back 5. Cuffs and sleeves ^ First iron both sides of the cuff on the ^ Start at the side seam. Pull the shirt left edge of the roller. Fold over the roller as far as the arm hole. double-cuffs with one button hole Smooth it out.
-
Page 27: Smock-Type Aprons
Ironing Tips Smock-type aprons Steam-pressing pants ^ Iron smocks as you would a shirt. ^ Lay each pant leg separately on the roller. Let the upper part hang down over the left edge of the roller. Aprons with ties ^ Iron the ties one by one up to the bib, then over the bib and up to the waistband. -
Page 28: Cleaning And Care
Cleaning and care Cleaning the water reservoir Turn the iron off and unplug it If the steam nozzles seem to be from the outlet before performing producing less steam, this may mean any maintenance work. there are lime deposits in the water reservoir, caused by hard water. -
Page 29: Ironing Cover
(140°F [60°C]). If the cover looks worn and used, it can be easily replaced. Ironing covers are available at your Miele dealer or Miele. Replacing the ironing cover ^ Unwind the old ironing cover. The ironing cover should only be changed when the appliance is cold. - Page 30 Cleaning and care ^ Turn the roller by hand in the ^ Hold the corners of the cotton direction you iron (see arrow) until the padding, pull taut, and lay it taught retaining slot is at the bottom. over the heater plate. ^ Turn the rotary iron on.
- Page 31 Cleaning and care Once the roller has completed 3 or 4 revolutions and the end of the ironing cover is under the heater plate: ^ Turn the rotary iron off while keeping the foot pedal pressed down. The ironing cover is held firmly in place with the heater plate which is still lowered.
-
Page 32: Frequently Asked Questions
Frequently asked questions Repairs should only be carried out by an authorized technician in accordance with local and national safety regulations. Unauthorized repairs could cause injury or appliance damage. The manufacturer cannot be held responsible for unauthorized work. The rotary iron does not turn on. Possible fault Solution The rotary iron has no power. - Page 33 Frequently asked questions No steam is being produced. The indicator light Q for "Steam" goes out while ironing. Possible fault Solution Set the temperature selector to ßßß and The iron temperature is too low for steam production. wait until the display light comes on. No steam is being produced.
-
Page 34: After Sales Service
After sales service In the event of a fault which you cannot easily fix yourself, please contact the Miele Technical Service Department at the address on the back of this booklet. When contacting the Technical Service Department, please quote the model... -
Page 35: Electrical Connection
Electrical connection The appliance is supplied with a power cord and NEMA 6-20 P plug ready for Do not modify the machine connection to a 2AC 208-240V 60 Hz power cord or plug, the machine is power supply (see data plate). approved for US and CDN. -
Page 36: Technical Data
Technical data Height " (folded 41 ") [95.9 (folded 105.2) cm] Width " (folded 19 ") [98.5 (folded 50) cm] Depth 15" [38 cm] Weight 86 lbs (39 kg) Water reservoir capacity 1 ½ pints (800 ml) Voltage see data plate Rated load see data plate Minimum fuse rating... -
Page 37: Help Protect Our Environment
Help protect our environment Disposal of packing materials Disposal of an old appliance The cardboard box and packing Old appliances contain materials that materials are biodegradable and can be recycled. Please contact your recyclable. Please recycle. local recycling authority about the possibility of recycling these materials. - Page 40 U.S.A. Miele, Inc. National Headquarters 9 Independence Way Princeton, NJ 08540 www.mieleusa.com Customer Support Phone: 888-99-MIELE (64353) info@mieleusa.com International Headquarters Miele & Cie. KG Carl-Miele-Straße 29 33332 Gütersloh Germany All rights reserved / 47.21 M.-Nr. 10 232 672 / 02...
Need help?
Do you have a question about the HM1680D and is the answer not in the manual?
Questions and answers