
Related Manuals for Miele HM 5316


Summary of Contents for Miele HM 5316
- Page 1 Operating instructions Rotary ironer HM 5316 en - GB To avoid the risk of accidents or damage to the machine it is essential to read these instructions before installing, M.-Nr. 06 017 102 commissioning and using it for the first time.
- Page 2 M.-Nr. 06 017 102...
-
Page 3: Table Of Contents
Guarantee ..............19 The rotary ironer must be installed and commissioned by a Miele service technician or by a Miele authorised Service Dealer. -
Page 4: Warning And Safety Instructions
Unauthorised repairs could be dangerous. accessible in the rare event of textiles Faulty components must only be igniting. exchanged for Miele original spare parts. Only when these parts are fitted can the Accessories safety standards of the machine be Accessory parts may only be fitted when guaranteed. - Page 5 Warning and safety instructions Notes on the use of this machine – This ironer must be operated at all times in accordance with the legal requirements of the Health and Safety Acts. – Please allow only trained persons, thoroughly familiar with the ironer, to work at the feed-in.
-
Page 6: Caring For The Environment
Please do not therefore dispose of it with your general waste. Please dispose of it at your local community waste collection / recycling centre, or contact Miele for advice. Please ensure that it presents no danger to children whilst awaiting disposal. M.-Nr. 06 017 102... -
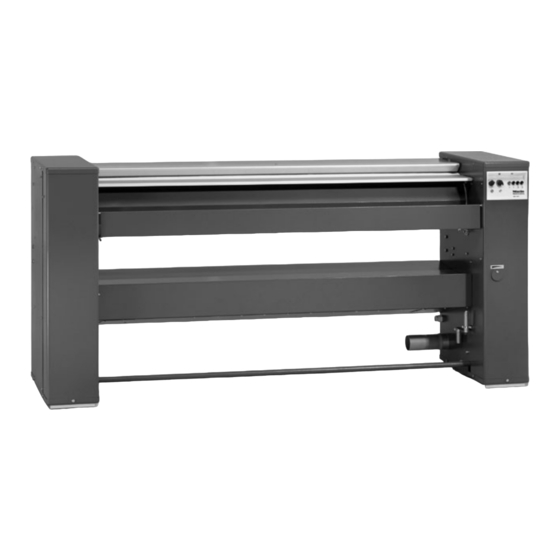
Page 7: Guide To The Machine
Guide to the machine 1 Heater plate with finger guard 9 Foot control 2 Roller 3 Feed-in table 4 Operating controls 5 Laundry box 6 Hinged cover plate 7 Emergency crank handle 8 Ironing table 1st foot control position: 10 Vent connector Press setting, with stationary roller. -
Page 8: Description Of The Operating Controls
Guide to the machine Description of the operating controls 0 button Roller speed selector Off: The roller speed is increased by turning the When this button is pressed in, the ironer is speed selector clockwise and decreased by switched off. turning it anti-clockwise. -
Page 9: Safety Features
Guide to the machine If there is a power cut whilst ironing Safety features To protect laundry and the ironer cloth in the event of a power cut, the heater plate needs to be disengaged from the roller using the crank handle. -
Page 10: Sorting The Laundry
Sorting the laundry Condition of linen Metal and plastic buckles and very bulky buttons should not be passed through the For a good finish the ideal residual moisture ironer. level needs to be about 25 %. Rinsing the laundry using hot water in the final rinse helps to reduce the residual Warning moisture level and the residual heat in the... -
Page 11: Operation
Operation ^ Switch on the on-site mains switch. The roller will stop. To stop pressing release the foot control. ^ Switch the machine on by pressing the ^ To feed thicker items into the ironer, press "On" I button. the foot control down to the 2nd foot ^ Press the O button. -
Page 12: Coin-Operated Machines
Coin-operated machines Read the operating instructions supplied with the coin box. ^ Insert a coin or token. ^ Switch the machine on by pressing the "On" I button. ^ Press the O. ^ Select the temperature according to the type of fabric. ^ Use the speed selector to select the speed of the roller, When the "Heating"... -
Page 13: Important Notes
Important notes Protecting the roller motor and cover In pauses between ironing and when you have finished ironing, disengage the heater plate. This helps prolong the life of the roller cover and protects the motor. It is very important to avoid running the ironer without passing laundry through it. -
Page 14: Cleaning And Care
The heater plate should always be waxed after it has been cleaned. Do not use abrasive cleaning agents or abrasive cleaning cloths. See the Miele Ironing Handbook for more details. Direction of feed ^ To apply wax with the wax cloth, place... -
Page 15: Roller Cover
Roller cover This should only be carried out by a Miele Before removing the roller cover (for service technician. cleaning or replacement), the machine must be switched off. Allow the heater plate to cool down, and remove the feed-in table. -
Page 16: Explanation Of Symbols On The Data Plate
Explanation of symbols on the data plate 1 Model 2 Serial number 3 Article number 4 Material number 5 Voltage/Frequency 6 Mains fuse rating 7 Drive motor 8 Drum data* 9 Drum diameter/Drum depth* 10 Spin speed* 11 Drum volume/laundry dry weight* 12 Kinetic energy* 13 Run-up time* 14 Braking time*... -
Page 17: Notes For The Installer
To ensure optimum flow, the ducting should The rotary ironer must be commissioned be laid with as few bends as possible and all by a Miele authorised service technician. connections and joins should be airtight. The connection point for the exhaust ducting... -
Page 18: Electrical Connection
Electrical connection Electrical connection Connection should be made via a suitable isolator which complies with local and This machine conforms to IEC 335-1 and national safety regulations and which is IEC 335-2-44. easily accesible for disconnecting the machine from the electricity supply. The electrical connection may only be Provision must be made on site to switch off carried out by a suitably qualified technician... -
Page 19: Guarantee
Guarantee Please contact your Miele Sales Office for details concerning guarantee terms and conditions. See the back cover for contact details. M.-Nr. 06 017 102... - Page 20 M.-Nr. 06 017 102 / 00 Alteration rights reserved/5009...
Need help?
Do you have a question about the HM 5316 and is the answer not in the manual?
Questions and answers