
Related Manuals for NightWatcher NW1201X


Summary of Contents for NightWatcher NW1201X
- Page 1 Motion tracking sensor led light Installation & operating manual NIGHTWATCHER surveillance pro nw1201X Model no:...
- Page 2 Table of contents 1. Contents of package 2. Nightwatcher Surveillance Pro L.E.D 3. Installation 4. Programming your Surveillance Pro 5. Set the date and time of Surveillance Pro 6. Viewing video 7. Technical Specifications 8. General Information and Safety Contents of packaging...
-
Page 3: Specifications
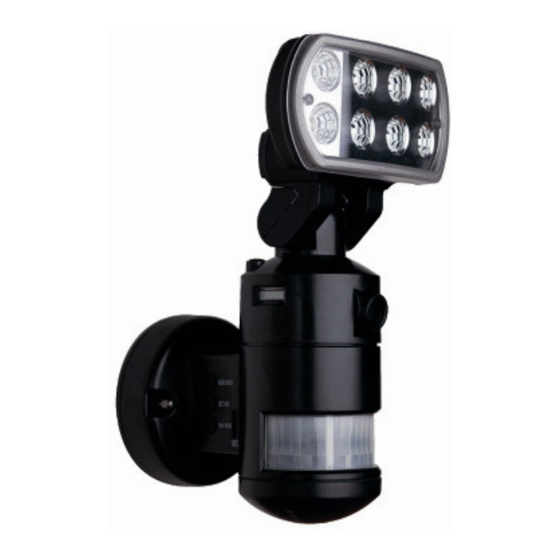
INTRODUCTION Congratulations on the purchase of your new Nightwatcher Security Light. Before installation of the unit, please read the operating instructions and safeguards carefully. It is important that you read and follow the instructions in the manual, even if you feel you are familiar with this type of product. - Page 4 OVERVIEW RESET OFF/REC TIME/DATE SET Camera 3 motion sensors Mode push-button Mode LED Indicator (hidden inside) Speaker LED indicator Waterproofed cover AUDIO MODE SET/REC PLAY/ERASE Side view Right 70 Left 70 Camera adjustable down 25° ° ° °...
- Page 5 Step 1. Insert/remove Micro SD card (see fig. 1): When the Surveillance Pro is powered, press the push-button on the bottom of the unit for 3 seconds to stop the light turning before attempting to insert or remove the Micro SD card. To resume operation, push the push-button again.
- Page 6 Detection range: 10M x 210° ° ° ° (see fig. 3) Fig. 3 Installing your UNIT onto a surface. (See fig. 4 & fig. 5) 1. Place plastic masonry plugs into desired surface aligning holes as shown below. Using an electric screwdriver, fasten mounting plate directly to surface using screws E.
- Page 7 Fig. 5 Please allow 1 minute warm-up time after switching on. * Push the RESET button after switching on. Remove plastic lens cover from camera and the tape after installation. (See fig. 6) Fig. 6 Step 3. Adjusting the Settings (see fig.
- Page 8 Camera LED for indicating the function status of the unit by different color LED lights. 1) Red: Micro SD card (part no.②) is not inserted into the Micro SD slot or the system is malfunctioning. 2) Green: The unit is recording. 3) LED off: stand by Micro SD card is inserted into the slot), when OFF/REC button is pressed.
- Page 9 Play/Erase : allows you to listen to and erase messages (see fig. 10) If you have only recorded 1 message, push the button one time to listen to recorded Message 1. If you wish to erase it, press the PLAY/ERASE button and hold it for 3 seconds.
- Page 10 Step 6. Viewing video 1. Viewing image by computer through a card reader (see fig. 12) Open the waterproofed cover on the NW Surveillance Pro. Press OFF/REC button and remove Micro SD card from the slot. Put the Micro SD card into adapter then insert this adapter into card reader. Connect PC and card reader by USB cable (not included) and open any media player to view the video.
- Page 11 FAQ (Frequently Asked Questions) Section Q. How many pictures does the SD card hold? A: The size in bytes of each 20-second video clip will vary depending on the amount of brightness, color, and movement in each video clip. The clips typically vary from 2MB to 8MB. SD Card File Size Qty of File(approx.)
-
Page 12: Product Warranty
PRODUCT WARRANTY 1 YEAR REPLACEMENT WARRANTY THIS WARRANTY FORM SHOULD BE Your Nightwatcher Security Light is covered for a RETAINED BY THE CUSTOMER AT ALL Period of 12 months from your TIMES. Date of Purchase. WARNING The Warranty covers faulty parts or workmanship.
Need help?
Do you have a question about the NW1201X and is the answer not in the manual?
Questions and answers