Table of Contents
Advertisement
Advertisement
Table of Contents

Related Manuals for Energizer eZG7250


Summary of Contents for Energizer eZG7250
- Page 2 ©2014 Energizer Power Equipment. All Rights Reserved. Licensed by Energizer Corporation, United States of America. EZG7250-06.2013-01...
-
Page 3: Let's Get Started
Let's get started. You're excited to power up, so we'll keep this brief! series... - Page 4 Remember to register! Take a minute to register this product online at www.energizergenerators.com. This will allow you to request warranty support in the future. This manual will show you how to use the great features that sets the eZG7250 apart from the crowd.
- Page 5 Call us at 1-887-528-3772 if you have any questions This user guide covers the safety, operation and maintenance procedures for the eZG7250. All information in this publication is based on the latest product information available at the time of print. Visit www.energizergenerators.com for user guide updates and...
-
Page 6: Warranty Information
Warranty Information Warranty support, operation assistance and product support is provided by Midland International Inc., a licensed manufacturer of En- ergizer Power Equipment. Please contact us directly for any warranty service questions. 1-877-528-3772 www.energizergenerators.com... - Page 7 series...
-
Page 8: Chapter 1 - Safety First
Chapter 1 — Safety First Playing it safe when working with power equipment is always a good idea. Here are some important precautions to make sure you stay safe. 1.1 Safety while Operating Your Generator • Always perform an oil, fuel and air filter check before starting the engine. •... -
Page 9: Understanding Ac Safety
• Run the generator on a level surface. Tilting the generator may result in fuel spills. • Know how to stop the generator quickly and understand operation of all the controls. Never permit anyone to operate the generator without proper instructions. -
Page 10: Other Safety Tips
• Turn off the engine before performing any maintenance. Otherwise it can cause severe personal injury or death. • Allow the generator set to cool down before performing any maintenance. • Always wear safety glasses when cleaning the generator set with air. •... -
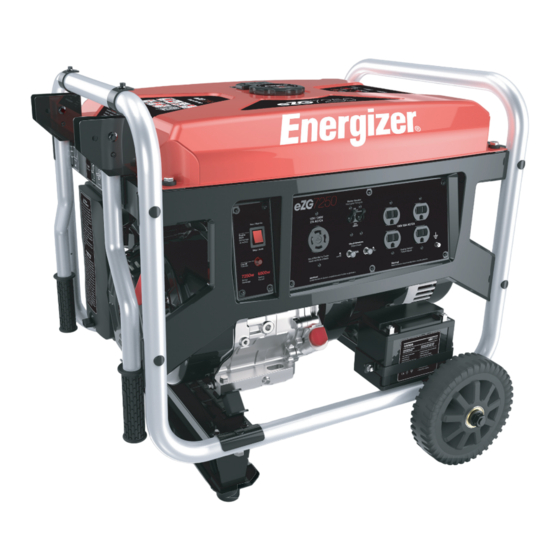
Page 11: Chapter 2 - Learn About Your Generator
Chapter 2 — Learn About Your Generator This section will show you how to identify key parts of your generator. Going over the terminology below will make sure we're on the same page. 2.1 Identification of Components series... - Page 12 AC Receptacle: CSA Certified or cUL Listed Type:L14-30R Mounting: Secured to control panel by screws and nuts with mounting metal bracket. Remarks: Provided with 0.5 mm epoxy fiberglass board underneath receptacle to ensure 12.7mm. Electrical spacing between bare live parts and the control panel, overall 13 mm by 60 mm. Note: The following markings appear adjacent to the receptacle: "MAX.13 A."...
-
Page 13: Make Sure You Have Everything
Energizer and other marks, including graphics, are trademarks of Energizer and are used under license by Midland Power Inc. L’Energizer et les autres marques, y compris les illustrations, sont des marques de commerce d’Energizer et sont utilisées sous licence par Midland Power Inc. - Page 14 2.3 Mounting Instructions for eZG7250 (Refer to Figure Below) 1. Attach the handle bars to the middle of the generator frame where specified in the figure below. Tighten the bolts (14) and nuts (7) to the upper frame of the generator.
- Page 15 series...
-
Page 17: Checking The Engine Oil Level
Chapter 3 — Setting Up Your eZG7250 Generator Setup should be done everytime you start up your generator, these quick checks will ensure you get the most out of your generator. Exhaust gas contains poisonous carbon monoxide. Never run the generator in an enclosed area. - Page 18 3.2 Checking the Engine Fuel Level 1. Check the fuel level by reading the gauge or removing the fuel tank cap to visually check the level. 2. Refuel if level is too low. Tighten the fuel tank cap securely after refilling (Refer to Figure below) Gasoline is highly flammable and explosive under certain conditions.
-
Page 19: Check The Air Filter
3.3 Check the Air Filter 1. Loosen the knob and remove the air filter cover. Remove the air filter element and observe for cleanliness. 2. Clean the air filter element with soap and water or solvent. Squeeze dry and then soak in clean engine oil. 3. -
Page 20: Electric Start Battery Connection
2. Connect the black cabel with the negative terminal of the battery. ensure the connection is secured by using the fastener at the battery terminal Be sure to connect the Electric Start Battery to the EZG7250 Generator set before operation. failure to do so wil cause the Output Display to function improperly. -
Page 21: Starting Your Generator
Chapter 4 — Using Your eZG7250 Generator DANGER- CARBON MONOXIDE Using a generator indoors WILL KILL YOU IN MINUTES Generator exhaust contains high levels of carbon monoxide (CO), a poisonous gas you cannot see or smell. If you can smell the generator exhaust you are breathing CO. - Page 22 1. Rotate the fuel valve lever to ON position (Vertical position). This is located on the left side of your generator, it is attached to the bottom of the fuel tank. If the engine is cold: push the choke lever into the on/closed position.
- Page 23 4.2 Using the EZG7250 with your Appliances After starting the eZG7250 you can connect your devices to it. If you want to use the 120V outlets, be sure to move the "Voltage Switch" is in the right position. Before starting make sure that you know what you are able to power with your Genera- tor.
-
Page 24: Stopping Your Generator
4.4 Stopping Your Generator 1. Turn off all of the connected devices. Let your generator run for a few minutes to cool down. 2. Stop the generator by pressing and holding the engine switch in the "off" position until the generator stops. -
Page 25: Maintenance Schedule
Chapter 5 — Maintaining Your eZG7250 Generator Proper maintenance ensures safe, economical and trouble-free operation. Improper maintenance may cause the generator to malfunction and can lead to serious injuries. Contact Energizer Power Customer Support if you have any maintenance questions. 5.1 Maintenance Schedule EVERY... -
Page 26: Cleaning The Air Filter
3. Check for dirt and debris and clean as necessary. 4. Check the engine oil level and add oil as necessary. Do not use gasoline or low flash point solvents for cleaning. They are flammable and could explode under certain conditions. 5.3 Cleaning The Air-Filter Using gasoline or other flammable solvents can cause a fire or explosion. -
Page 27: Changing The Engine Oil
5.4 - Changing the Engine Oil Used motor oil can cause skin irritations if left in long-tern contact with skin. Wash hands thoroughly with soap and water after handling oil. Do not dispose of used oil in drains or on soil. Local service shops provide environmentally-friendly disposal methods. -
Page 28: Replacing And Cleaning The Spark Plug
5.5 - Replacing and Cleaning the Spark Plug Do not rinse spark plug in water. Follow guidelines and be careful not to overtighten the spark plug. Tighten ½ turn when installing a new spark plug. Tighten ¼ turn when re-installing an old spark plug. 1. -
Page 29: Handling And Storage
- Handling and Storage Handling 1. Turn off the engine switch and the fuel valve when transporting the generator set. 2. Do not touch engine until the engine has cooled down. 3. Keep the generator at a level position in order to prevent spillage. Storage Before storing the generator set for an extended period: 1. -
Page 30: Draining The Carburetor
Draining the Carburetor 1. Turn OFF the engine. Let Cool. Turn the fuel valve ON. 2. Position a container under the carburetor drain screw. Loosen the drain screw. 3. Allow fuel to drain completely drain and re-tighten the drain screw. Disconnecting the Electric Start Battery 1. -
Page 31: Troubleshooting
6.0 Troubleshooting Common issues can be fixed by following the instructions in this guide. If the unit will not function after following these instructions, contact technical support before attempt- ing to use or repair the product. ISSUE CAUSE ACTION Engine oil is too heavy Replace with recommended oil Engine cranks slowly... -
Page 32: Chapter 7- Specifications
Chapter 7- Specifications EZG7250 Rated frequency (Hz) 60Hz Rated AC Output Power (W) 6500W Max AC Output Power (W) 7250W 1-Phase Rated AC Voltage (V) 120V/240V Power Factor 11.97 HP, Single Cylinder, forced air cooling, 4-stroke, Type Displacement (cm 420cc... -
Page 33: Chapter 8- Wiring Diagram
Chapter 8- Wiring Diagram series... -
Page 34: Chapter 9 - Learn About Your Warranty
This limited warranty is valid for residential or recreational applications only and only when the generator receives all necessary preventative maintenance as described in the Energizer Generators User Guide. The repair or replacement of a generator will take place within a reason- able period of time during normal business hours. - Page 35 EXCLUSIONS NOT COVERED BY THIS LIMITED WARRANTY 1. Normal engine/alternator wear 2. Damage caused by lack of maintenance as described in the Energizer User Guides, or negligence by using improper or impure motor oil, coolant, or fuel 3. Damage caused by accidents, improper installation or storage;...
- Page 36 EMISSION CONTROL SYSTEM WARRANTY PARTS: SYSTEMS COVERED IN PARTS DESCRIPTION WARRANTY Carburetor assembly (includes starting enrichment system), En- Fuel Metering gine temperature sensor, Engine control module, Fuel regulator, Intake manifold Fuel Tank, Fuel Cap, Fuel Hoses, Vapor Hoses, Carbon Canis- Evaporative ter, Canister Mounting Brackets, Fuel Strainer, Fuel cock, Fuel Pump, Fuel Hose Joint, Canister Purge Hose Joint...
-
Page 37: Warranty Claim Procedure
Warranty service, operation assistance and product support is provided by Energizer. Contact us at the following numbers. -
Page 39: Warranty Registration Instructions
Warranty Registration Instructions: Ownership must be registered with Energizer Power Equipment in order to ensure continued warranty and service support. Please fill out the registration card below and mail it along with a copy of your receipt, and the original UPC barcode from your product packaging. The store, date of purchase and product purchase should be clearly visible on the receipt copy. - Page 41 Ownership and Warranty Transfer Instructions: Changes in ownership must be registered with Energizer Power Equipment in order to ensure continued warranty and service support. Warranty support cannot be provided without registration (from original date of purchase and after transfer of ownership) This transfer form must be completed on or before the date that ownership change takes effect.
- Page 42 Enjoy! Be sure to check energizergenerators.com monthly for updates regarding your generator.
- Page 43 series series...
Need help?
Do you have a question about the eZG7250 and is the answer not in the manual?
Questions and answers