Table of Contents
Advertisement
Advertisement
Table of Contents

Subscribe to Our Youtube Channel
Related Manuals for Energizer eZV3200P


Summary of Contents for Energizer eZV3200P
- Page 1 SERIES USER GUIDE...
- Page 2 The engine exhaust from this product contains chemicals known to cause cancer, birth defects or other reproductive harm. ©2018 Energizer. Energizer and certain graphic designs are trademarks of Energizer Brands, LLC and related subsidiaries and are used under license by Midland Power Inc. EZV3200_UG_EN_2018-01-17...
- Page 3 Thanks for choosing the EZV Series! You're excited to power up, so we'll keep this brief. Let's get started!
- Page 4 THIS PRODUCT MEETS ALL CERTIFICATION REQUIREMENTS FROM: 263521...
- Page 5 This user guide covers the safety, operation and maintenance procedures for the eZV3200P and eZV3200RV. All information in this publication is based on the latest product information available at the time of print.
-
Page 6: Warranty Information
Product registration is required for all product support and warranty coverage. Warranty support, operation assistance and product support is provided by Midland Power Inc., a licensed manufacturer of Energizer Generators. Please contact us directly for any warranty ® service questions. - Page 7 TABLE OF CONTENTS 1. Safety 2. Learn About Your Generator Component Identification Control Panel Control Functions Make Sure You Have Everything 3. Pre-Operation Check Check the Oil Level Check the Fuel Level Connect the Battery Prepare the Air Cleaner 4. Starting the Engine Starting Your Generator 5.
-
Page 8: Safety
1. SAFETY DANGER! USING A GENERATOR INDOORS CAN KILL YOU IN MINUTES. GENERATOR EXHAUST CONTAINS CARBON MONOXIDE. THIS IS A POISON THAT YOU CANNOT SEE OR SMELL. NEVER USE INSIDE A HOME OR GARAGE. THE ENGINE EXHAUST FROM THIS PRODUCT CONTAINS CHEMICALS KNOWN TO CAUSE CANCER, BIRTH DEFECTS OR OTHER REPRODUCTIVE HARM. - Page 9 the engine and fuel system and will void the manufacturer’s warranty. When refueling the generator, keep it away from cigarettes, open flames, smoke and/or sparks. Place the generator at least 3 feet away from buildings or other equipment during operation. ...
-
Page 10: Maintenance Safety
Always stop the generator set before removing the oil filler cap. 1.4 RUNNING GENERATORS IN PARALLEL WARNING! Only connect in parallel with an Energizer EZV3200P or EZV2000P with ® the approved parallel cable (sold separately). Attempting to connect other brands or models will void your warranty and could cause bodily injury. -
Page 11: Other Safety Tips
Lubricate all exposed metal parts regularly. See chapter 7.1 for maintenance schedule. 1.5 OTHER SAFETY TIPS WARNING! To avoid breathing in poisonous carbon monoxide from the exhaust gases, adequate ventilation should be provided if the generator set is running in a partially enclosed space. -
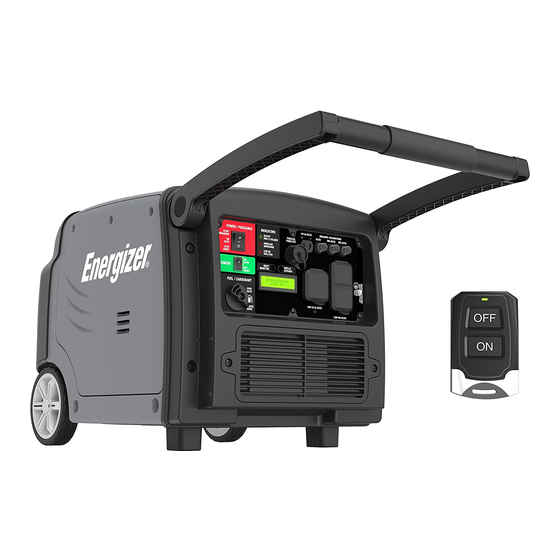
Page 12: Learn About Your Generator
2. LEARN ABOUT YOUR GENERATOR This section will show you how to identify key parts of your generator. Going over the terminology below will make sure we’re on the same page. 2.1 COMPONENT IDENTIFICATION Fuel Gauge Fuel Cap Folding Handle Recoil Grip Control Panel Battery... -
Page 13: Control Panel
2.2 CONTROL PANEL Output Indicator DC Outlet Overload Indicator Low Oil Indicator Circuit Parallel Breakers Electric Start Socket EcoMode Reset 120V 23.3A Ground Twistlock L5-30R Fuel Display Mode 120V 20A Knob Outlets Output Indicator DC Outlet Overload Indicator Low Oil Indicator Circuit 3.1A Breakers... -
Page 14: Control Functions
2.3 CONTROL FUNCTIONS AC Circuit Breakers While the generator is running, the breakers should be put in the ON position. If the current has exceeded its limits it will automatically pop out to the OFF position. Reduce the electrical load on the generator and push the button back to the ON position. -
Page 15: Power Switch
Low Oil Indicator Light The oil alert system is designed to prevent engine damage caused by an insufficient amount of oil in the crankcase. Before the oil level in the crankcase reaches an unsafe limit, the oil alert system will automatically shut down the engine (the power switch remains in the ON position). -
Page 16: Make Sure You Have Everything
2.4 MAKE SURE YOU HAVE EVERYTHING Make sure your generator has everything listed in the table below. Part Name Quantity Inverter Generator User Guide Spark Plug Wrench - Sleeve Spark Plug Wrench - Bar Multi Screwdriver DC Charging Cable Oil Transfer Tool 3. - Page 17 NOTE SAE 10W-30 or Synthetic 5W-30 is recommended for general use. DO NOT OVERFILL. Effective Viscosity Range of Engine Oils 15W-50 Synthetic 5W-30 10W-30 5W-30 0°C °C 32°F °F NOTE Do not tilt the generator when adding engine oil. This could result in overfilling and damage to the engine.
-
Page 18: Check The Fuel Level
3.2 CHECK THE FUEL LEVEL NOTE Use of gasoline with an ethanol content greater than 10% can damage the engine and the fuel system and will void the manufacturer’s warranty. Only use unleaded gasoline (Octane 91 or higher). ... -
Page 19: Connect The Battery
3.3 CONNECT THE BATTERY Fuel Gauge Fuel Capacity WARNING! 2 gal. / 7.4L BATTERIES PRODUCE EXPLOSIVE GASES. KEEP SPARKS, FLAMES AND CIGARETTES AWAY FROM THE BATTERY AT ALL TIMES. TO PREVENT THE POSSIBILITY OF CREATING A SPARK WHILE USING THE BATTERY, CONNECT CHARGING CABLES TO BATTERY TERMINALS FIRST, THEN TO THE GENERATOR. -
Page 20: Prepare The Air Cleaner
3.4 PREPARE THE AIR CLEANER Clean and oil the air filter before your first use. Check the maintenance section for a complete cleaning guide. Cover Screws Air Filter Maintenance Panel Air Filter Air Filter Cover Unscrew and remove the air filter maintenance panel. Unscrew the air filter cover and remove the filter. -
Page 21: Starting The Engine
4. STARTING THE ENGINE DANGER! CARBON MONOXIDE USING A GENERATOR INDOORS WILL KILL YOU IN MINUTES. GENERATOR EXHAUST CONTAINS HIGH LEVELS OF CARBON MONOXIDE (CO), A POISONOUS GAS YOU CANNOT SEE OR SMELL. IF YOU CAN SMELL THE GENERATOR EXHAUST YOU ARE BREATHING CO. EVEN IF YOU CANNOT SMELL THE EXHAUST, YOU COULD BE BREATHING CO. -
Page 22: Starting Your Generator
4.1 STARTING YOUR GENERATOR WARNING! BEFORE USING THE GENERATOR, A GROUND WIRE MUST BE CONNECTED TO THE GROUND TERMINAL. THE GROUND TERMINAL IS LOCATED ON THE FRONT PANEL. BEFORE USING THE GROUND TERMINAL CONSULT A QUALIFIED ELECTRICIAN. NOTE Ensure all connected appliances are turned off. ... - Page 23 OPEN B) Electric Start OPEN START OPEN START Open the fuel valve by turning the fuel knob to the OPEN position. OPEN Press and hold the START button for 2 seconds or until unit starts. C) Manual Recoil Start OPEN STOP CLOSED Open the fuel valve by turning the fuel knob to the OPEN position.
-
Page 24: Carburetor Modification For High Altitude Operation
Carburetor Modification for High Altitude Operation At high altitudes, the standard carburetor air-fuel mixture will be too rich. Fuel consumption will increase and performance will decrease. A very rich mixture will also foul the spark plug and cause hard starting. ... -
Page 25: Generator Use
5. GENERATOR USE WARNING! Do not connect directly to the building’s electrical system. Doing so may result in electrical shocks, fire, and backfeeding the grid. Connections for standby power to a building’s electrical system must be done by a qualified electrician and must comply with all applicable laws and electrical codes. -
Page 26: Dc Applications
5.2 DC APPLICATIONS The DC receptacle may be used for charging 12V batteries only. In DC operation, turn EcoMode OFF. NOTE The DC receptacle can be used while the AC power is in use. If used at the same time, be sure not to exceed the total power for AC and DC. (AC: 2800W, DC: 5A) ... -
Page 27: Ac Applications
5.3 AC APPLICATIONS OUTPUT SURCHARGE OVERLOAD PRET A UTILISER LOW OIL HUILE BAS Start engine and make sure output indicator light (READY TO USE) is on. Confirm all electrical appliances are switched off, and connect the appliance plugs to the generator receptacle. Turn on the appliances. -
Page 28: Ac Parallel Operation
•••• •• •• •• •• •• •••• •• •• •• •• •• •••• •• •• •• •• •• •••• •• •• •• •• •• 5.4 AC PARALLEL OPERATION •••• •• •• •• •• •• •••• •• •• •• •• •• ••... -
Page 29: Stopping The Engine
6. STOPPING THE ENGINE STOP CLOSED Switch off the connected electrical appliances. Turn the power switch to the STOP position or press the OFF button on the remote control. Turn the fuel shutoff to the CLOSED position. NOTE Make sure the fuel switch is in the CLOSED position when stopping, transporting, and storing the generator. -
Page 30: Maintenance
7. MAINTENANCE Proper maintenance keeps your generator in the best operating condition by ensuring safe, economical and trouble-free operation. Only use genuine parts and recommended fluids to replace the worn components. Improper maintenance may cause the generator to malfunction and can lead to serious injury. Contact customer support if you have any maintenance questions. -
Page 31: Maintenance Schedule
7.1 MAINTENANCE SCHEDULE Maintain the generator according to the maintenance schedule below. NOTE Service more frequently when used in dusty areas. These items should be serviced by an authorized service center, unless you have the proper tools and are mechanically proficient. Refer to manual for service procedures. -
Page 32: Emission Control System
EMISSION CONTROL SYSTEM Emission Source Exhaust gas contains carbon monoxide, nitrogen oxides (NOx) and hydrocarbons. It is very important to control the emissions of NOx and hydrocarbons as they are a major contributor to air pollution. Carbon monoxide is a poisonous gas. The emission of fuel vapors is a source of pollution as well. - Page 33 Replacement parts and accessories The parts making up the emission control system in your product’s engine have been specifically approved and certified by the regulatory agencies. You can trust that the replacement parts supplied by customer service have been manufactured to the same production standard as the original parts.
-
Page 34: Changing The Oil
7.2 CHANGING THE OIL WARNING! USED MOTOR OIL CAN CAUSE SKIN IRRITATIONS IF LEFT IN LONG-TERM CONTACT WITH SKIN. THOROUGHLY WASH OFF USED OIL AS SOON AS POSSIBLE WITH SOAP AND WATER. DO NOT DISPOSE OF USED OIL IN DRAINS OR ON SOIL. LOCAL SERVICE SHOPS PROVIDE ENVIRONMENTALLY-FRIENDLY DISPOSAL METHODS. - Page 35 Max Fill Level Oil Transfer Tool Oil Cap and Dipstick Oil Capacity 18 . Oz. / 0.55L Effective Viscosity Range of Engine Oils 15W-50 Synthetic 5W-30 10W-30 5W-30 0°C °C 32°F °F NOTE Do not tilt the generator when adding engine oil. This could result in overfilling and damage to the engine.
-
Page 36: Cleaning The Air Filter
7.3 CLEANING THE AIR FILTER WARNING! USING GASOLINE OR OTHER FLAMMABLE SOLVENTS CAN CAUSE A FIRE OR EXPLOSION. DO NOT OPERATE THIS PRODUCT WITHOUT AN AIR FILTER. A dirty air filter will restrict air flow into the carburetor. Clean and maintain the air filter regularly, especially in dusty areas. -
Page 37: Spark Plug Service
Remove the foam filter. If the foam element is dirty, clean it in warm soapy water, rinse, and allow it to dry thoroughly, or clean in non-flammable solvent and allow to dry. Dip the foam element in clean engine oil, then squeeze out all excess oil. -
Page 38: Spark Arrestor Maintenance
to 1/4 turn with spanner. Reinstall the spark plug cap. Reinstall the spark plug maintenance cover. NOTE The spark plug must be securely tightened or it could cause the spark plug to heat up, enough to damage the engine. ... -
Page 39: Replacing The Battery
7.6 REPLACING THE BATTERY Loosen the screws of the battery maintenance cover, remove the cover. Unhook the battery belt. Remove the black cable from the battery negative (-) terminal, and then remove the red cable from the battery positive (+) terminal. Remove the battery from battery tray, and replace with a new one. -
Page 40: Fuel Filter Maintenance
•••• •• •• •• •• •• •• •• •• •••• •• •• •• •• •• •••• •• •• •• •• •• •••• •• •• •• •• •• 7.7 FUEL FILTER MAINTENANCE •••• •• •• •• •• •• •••• •• •• ••... -
Page 41: Transportation & Storage
8. TRANSPORTATION & STORAGE Draining the Fuel Tank Turn OFF the engine. Remove the fuel cap and the debris screen underneath the fuel cap. Empty the fuel tank using a siphon and an approved gasoline container. Loosen the carburetor drain bolt to discharge all gasoline from inside of the carburetor. - Page 42 Storage Gasoline can oxidize in as little as 30 days, causing gum and varnish to build up in fuel system components. Storage Duration Preparation Required Less than 1 Month No storage preparation required, simply store as is. 1 Month to 1 Year ...
-
Page 43: Troubleshooting
9. TROUBLESHOOTING If the engine does not start: Is there fuel in the tank? Refill the fuel tank. Turn the fuel switch to OPEN. Is the fuel switch OPEN? Turn the power switch to RUN. Is the power switch in RUN? Is there enough oil in the engine? Add the recommended oil. - Page 44 If appliances do not operate: Is the output indicator light ON? Is the overload indicator light ON? Contact an authorized dealer Check the electrical Contact an authorized appliance for any fault dealer Stop the engine and then replace or repair the appliance Restart the engine DC receptacle without any electricity: Repair or replace the appliance.
-
Page 45: Technical Specifications
10. TECHNICAL SPECIFICATIONS SPECIFICATIONS PARAMETERS Type 4-stroke, overhead valve, single cylinders, forced-air cooling Engine Displacement 208cc Bore* Stroke 70.0mm*54.0mm Compression Ratio 8.5:1 Rated Power 4.0kW/3600min-1 Ignition System Full transistor Spark Plug BP7ES (NGK) Spark Plug Gap 0.024- 0.028 in. (0.6-0.7mm) Start System Remote, Electric, and Recoil Start Fuel Type... -
Page 46: Wiring Diagram
11. WIRING DIAGRAM Ignition Module Connector INVERTER BOOSTER PLATE ACTUATOR... -
Page 47: Appendix
12. APPENDIX The standard condition of rated power output: Altitude: 0m Ambient temperature: 77°F (25°C) Relative humidity: 30% Factor of Environment Correction: Altitude (m) Ambient Temperature°F (°C) 77 (25) 86 (30) 95 (35) 104 (40) 113 (45) 0.98 0.96 0.93 0.90 0.93 0.91... -
Page 48: Limited Warranty
13. LIMITED WARRANTY Toll Free: 1-877-528-3772 E-mail: support@energizergenerators.com Online: www.energizergenerators.com Energizer Generator products are distributed by: Midland Power Inc. 376 Magnetic Drive, Toronto, ON M3J 2C4, Canada This product is warranted to be free of defects in material and workmanship for three years from date of purchase. - Page 49 Exclusions Not Covered by this Limited Warranty Normal engine/alternator wear Damage caused by lack of maintenance as described in the Energizer User Guides, or negligence by using improper or impure motor oil, coolant, or fuel Damage caused by accidents, improper installation or storage;...
- Page 50 Batteries Batteries supplied with any generator product should be considered a bonus item and not covered by warranty. Batteries can be damaged by shock, shorting terminals, heat, acid spillage and a number of other factors that cannot be controlled after they have left our facility. It is the customer’s responsibility to take great care when handling a battery so no spillage of acid will occur and cause corrosion;...
- Page 51 Emission Control System Warranty Parts: This list applies to parts supplied by Midland Power Inc. and does not cover parts supplied by the equipment manufacturer. Please see the original equipment manufacturer’s emissions warranty for non-Midland Power Inc. parts. Consumable parts are covered up to a maximum of 30 days. SYSTEMS COVERED PARTS IN WARRANTY...
-
Page 52: Customer Service
Warranty Claim Procedure Warranty service must be performed by one of our authorized service dealers. Do not return your product where purchased. If you feel your generator is malfunctioning due to a defect or misuse, simply contact our customer support center for technical advice, a warranty claim or general information. - Page 53 Enjoy! Be sure to check energizergenerators.com for updates regarding your generator.
Need help?
Do you have a question about the eZV3200P and is the answer not in the manual?
Questions and answers