
Related Manuals for Saeco AMBRA SUP 015VR


Summary of Contents for Saeco AMBRA SUP 015VR
- Page 1 Vending Machine model AMBRA Type SUP 015VR WARNING: This instruction manual is intended exclusively for specialized personnel.
-
Page 2: Table Of Contents
English TABLE OF CONTENTS 8 - USE OF THE VENDING MACHINE .... 23 MAIN PARTS ..........3 8.1 Machine status ......... 23 Off and electrically insulated ..... 23 1 - INTRODUCTION TO THE MANUAL .... 4 On ............23 1.1 Foreword ........... 4 Energy saving .......... -
Page 3: Main Parts
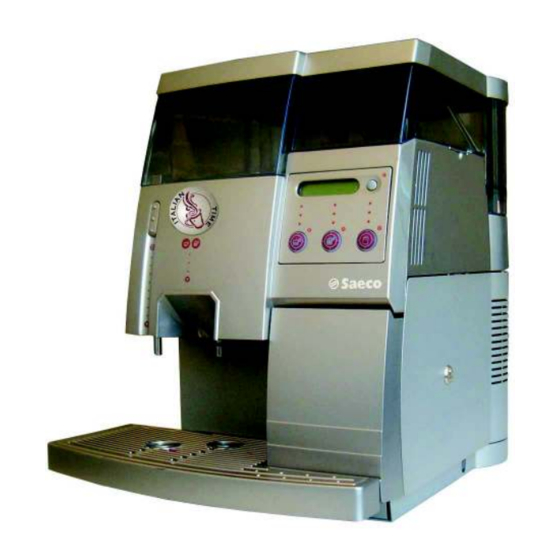
English MAIN PARTS Fig. 1 Dump box Water level gauge Brew group Drip Tray (inside water tank) Dregs drawer Grill drip tray Coffee bean hopper Safety microswitch Main switch Coffee bean hopper cover Cover with lock (rear side of the machine) (under the cover with lock) Cover lock plate Power cord... -
Page 4: Introduction To The Manual
AMBRA machine. 2 - GENERAL INFORMATION Always refer to this manual before performing any opera- tion. Manufacturer: Saeco International Group S.p.A. Via Panigali, 39 - 40041 GAGGIO MONTANO (Bo) Italy Foreword This machine is an automatic coffee and hot water dispenser This manual must be preserved with care and must accom- with programmable dosing of all beverages. -
Page 5: Machine Identification
English Machine identification The machine is identified by the model and serial numbers outlined on the specific plate (Fig. 2). The plate also contains the following specifications: name of Manufacturer CE marking machine model serial number manufacturing year technical specifications Power supply voltage (V) Power supply frequency (Hz) Power consumption (W) -
Page 6: Handling And Storage
3. amendments) and CE Marking Directive 93/68/EEC, SAECO Vending has drawn up a technical file of the AMBRA vending machine held at its plants. The following regulations were taken into account during the design phase: 100 mm. -
Page 7: Operators Requirements
English Cleaning Before cleaning the machine, turn the main switch off and disconnect the power supply. Wait until the machine is cold. Do not soak the machine in water! Do not disassemble the machine or perform any operation on the internal compo- nents of the machine. -
Page 8: Controls Description
English Dispensing mode 5 - CONTROLS DESCRIPTION In this normal running mode, the following operations can be performed by pressing the keys as indicated in figure 6: Important Keys Dispensing programmed beverages The dispensing keys of the machine are programmed with pre-set values. -
Page 9: Installation
English the maximum angle of inclination of the supporting 6 - INSTALLATION surface must not exceed 2° Warning The presence of nearby magnetic fields or electric devices Electric connection generating interference may cause malfunctioning in the electronic control of the machine. Warning This operation must be performed by the maintenance techni- Important... -
Page 10: Settings
English To exit the settings menu press C (Esc). The machine is in 7 - SETTINGS standard running mode. This chapter illustrates how to set up or modify the machine programmable parameters. Menu selection The chapter should therefore be read carefully, to fully un- derstand the correct sequence of operations to be performed. - Page 11 English 5: Key 4 C (Esc) PAYMENT SYSTEM 6: Key 1 E (Ent) Espresso Coffee Warning Note the new password because, if it is lost, it will not be possible to access the programming menu. Vending FunctionsFunzioni per il Vending Ambra is equipped with a menu for managing coffee brewing.
- Page 12 English AUDIT RESET Functions CREDIT MANAGEMENT -> Ambra is equipped with a system that records sales and collections from the last reset that has been performed by the manager. General menu for the total display of: TOTAL COINS -> AUDIT SINCE RESET-> Number of coins inserted: Value of coins inserted: 0.00 COIN 1...
- Page 13 English SALES SALES BY S. COFFEE CREDIT CARD [CARD] MANAGEMENT - > General menu to display the brewing of coffee using the key: COFFEE [CARD] 0.00 Number of sales made: Value of sales made: General menu to display the dispensing of hot water using WATER [CARD] the key: 0.00...
- Page 14 English SALES CREDIT MANAGEMENT - > The counter indicates the excess collected “TOTAL TOTAL OVERPAY -> OVERPAY” with regard to the value of the dispensed 0.00 products. Function that allows the zeroing of all partial counters. RESET COUNTER -> AUDIT INIT Functions Ambra is equipped with a system that records sales and collections from the first machine start-up.
- Page 15 English TOTAL AUDIT RECHARGE SINCE RESET General menu to display the sales made (beverage dispensing): SALES -> 0.00 Number of sales made: Value of sales made: General menu to display the sales made (beverage dispensing) using the key: SALES BY CARD-> 0.00 Number of sales made: Value of sales made: General menu to display the brewing of espresso coffee using...
-
Page 16: Language Selection
English SALES SALES AUDIT BY F_PRICE SINCE RESET General menu to display the sales made (beverage dispensing) SALES BY F_CARD -> using FREE VEND cards: 0.00 Number of sales made: Value of sales made: General menu to display the brewing of espresso coffee using S. - Page 17 English LANGUAGE AUDIT SINCE INIT Coffee temperature setting Ambra allows you to precisely regulate the temperature of TEMP. COFFEE the coffee. MEDIUM This setting allows satisfying various user requirements. The TEMP. COFFEE standard definition is TEMP. COFFEE MEDIUM. MAXIMUM TEMP. COFFEE HIGH TEMP.
- Page 18 English PREGRINDING AUDIT Counter display function SINCE INIT This functions allows you to enable/disable the display of the total counter by pressing the C key (Esc) on the control panel. SHOW COUNTERS This function allows you to display the total dispensing without having to enter into the programming menu.
-
Page 19: Payment Systems
English TIMER Payment Systems The machine has software that manages the payment systems commonly available on the market. This software is active PAYMENT SYSTEM -> only if the Coiner Box is correctly installed. This menu enables or disables the coin acceptance system. COIN VALIDATOR ->... - Page 20 English TIMER COIN VALIDATOR This menu sets all the operation parameters of the MDB MDB READER -> reader. This menu enables or disables the card acceptance system. ACTIVE If it is deactivated, it remains permanently locked and will not accept product payments by card. ACTIVE ACTIVE This menu sets the maximum credit allowed by the card.
- Page 21 English TIMER MDB READER MAXIMUM RECHARGE This menu activates or deactivates the possibility of dispensing FREE VEND with free cards (FREE CARD). If the function is active, it will be possible to acquire products FREE VEND with free cards (used for services reasons). FREEVEND This menu sets the vending prices of the single products.
- Page 22 English TIMER PRESELECTION This menu sets the overpay time: time limit beyond which the amount present in the machine is cancelled and saved in the OVERPAY TIME control data as “Overpay Value”. Value Range: 0 - 255 seconds (0 = Deactivated) It may be used only when the credit is inserted by means of the coiner and behaves in the following way: Multivend deactivated: the credit inserted and not used...
-
Page 23: Use Of The Vending Machine
English Bean hopper empty 8 - USE OF THE VENDING MACHINE When the bean hopper is empty, the coffee grinder stops and the display reads: Important Read this manual in full before using the machine so as to “COF. BEANS EMPTY “... -
Page 24: First Switching On
English First Switching on Filling the water tank Remove the water tank and place it under a water faucet. Filling the bean hopper Fill the tank (Fig. 9) with tap water. Pour coffee beans in the hopper (Fig. 7). Put the water tank back in place. Fig. -
Page 25: Water Circuit Filling
English After fixing the plate the cover must be placed on the water and bean hoppers before using the machine (Fig. 11). Important Prime the circuit before starting the machine for the first time, following a long period of inactivity, if the water tank has been fully emptied or if the pump has malfunctioned. -
Page 26: Coffee Blends
English Beverage dispensing Adjusting the coffee dispenser The coffee dispenser is adjustable according to the cup size. For short cups, position the dispenser as shown in figure 15. Fig. 14 Warning Grinding adjustments must be performed only when the grinder is on. -
Page 27: Adjusting The Cup Filling Level
English Adjusting the cup filling level Hot water dispensing With this machine the quantity of coffee dispensed can be Hot water is dispensed thanks to a circuit that guarantees adjusted according to the cup used. that the water is tastefree and at the right temperature to prepare tea and soups. -
Page 28: Messages And Special Warnings
English When setting the desired quantity, the following message 9 - MAINTENANCE appears on the display: “HOT WATER “ “PROGR. QUANTITY “ Foreword Place the glass or cup under the hot water spout (ref. 7 - Fig. 1) and press the hot water selection key. Water is dis- pensed automatically. -
Page 29: Cleaning And Maintenance
English Cleaning and maintenance Maintenance operations must be performed at least once a year and include testing the condition of the machine and the conformity of the electric system. Water tank/ Drip tray/ Dump box/ Brew group / Machine To keep the dispensing outlet and brew group (ref. 18 - Fig. 1) clean, the Dump box should be emptied daily, according to needs (Fig. -
Page 30: Brew Group
English Fig. 23 Wash the dispensing channel (Fig. 24) and rinse carefully Fig. 25 with hot water. Remove the brew group by turning the lock lever in a vertical position as indicated in fig (26) then remove the group by tilting it (Fig. -
Page 31: Coffee Grinder
English Fig. 30 Fig. 27 Important Remove the dregs drawer for cleaning (Fig. 28). If the brew group is not inserted correctly, the display reads: “INSERT GROUP “ Coffee cannot be brewed. The machine is not working. Place the Dump box back in (ref. 1 - Fig. 1). Coffee grinder Warning Never put water inside the grinder, to avoid irreparable... -
Page 32: 10- Inactivity
English The container can then be cleaned (Fig. 32). Warning The diposal of the vending machine or of a part of it must be carried out with full respect of the environment and according to local laws in force. 12 - TROUBLESHOOTING In case of faults or damage possibly after a fall, immediately unplug the machine. -
Page 33: 14- General Maintenance
English 14 - GENERAL MAINTENANCE To keep the machine in good working conditions cleaning and maintenance procedures should be performed according to the instructions in the table below. Operations to be performed At each supply After 5 supplies After10 supplies Emptying and cleaning the Dump box Emptying and cleaning the drip tray Emptying and cleaning the water tank... - Page 34 English NOTE...
- Page 35 English NOTE...