SATO TH208 Quick Manual
Hide thumbs
Also See for TH208:
- Quick manual (32 pages) ,
- Quick start manual (4 pages) ,
- Manual (70 pages)

Related Manuals for SATO TH208


Summary of Contents for SATO TH208
- Page 1 Quick Guide For printer model: TH208 PN: Q02544000 Read this Quick Guide before and during usage of the above product. Keep this document handy for future reference.
- Page 2 FCC WARNING You are cautioned that changes or modifications not expressly approved by the party responsible for compliance could void your authority to operate the equip- ment. This device complies with Part 15 of the FCC Rules. Operation is subject to the following two conditions: (1) this device may not cause harmful interference, and (2) this device must accept any interference received, including interfer- ence that may cause undesired operation.
-
Page 3: Safety Precautions
• Do not use other than the accidentally drinking it. If the specified voltage. Doing so fluid is drunk, immediately could result in fire or electric consult with a physician. shock. Version 1. April 2009 Q02544000 ©2009 SATO CORPORATION... - Page 4 Safety Precautions Warning Battery Pack • Never try to take apart the battery pack or modify it in any way such as with a solder iron. • Never expose the battery to direct flame, throw it into fire, or take any actions that may lead to shorting. •...
- Page 5 Caution Replacing the Battery Pack Use only the specified battery pack. • When replacing the battery pack, make sure to install the pack in the correct orientation. Incorrectly • replacing the battery creates the danger of explosion, injury or damage to surrounding areas. Replacing a small-size rechargeable battery (Lithium ion battery) •...
-
Page 6: Precautions For Installation And Handling
Precautions for Installation and Handling Printer operation can be affected by the printer environment. Refer to the following instructions for installation and handling of TH208. Select a Safe Location Place the printer on a surface that is flat and Keep the printer out of high temperature and level. -
Page 7: Table Of Contents
Table of Contents Safety Precautions Precautions for Installation and Handling Names of Parts Preparing for First-time Operation Turning on the Power Basic Specifications... - Page 8 Checking Accessories Make sure that you have received all of the following items in the package. If there are any accessories missing, contact your nearest dealer or the store where you purchased the printer. Leaflet (Global warranty) Quick Guide AC power cord AC adapter About the Box Please retain both the box in which the printer was packed and the cushioning...
-
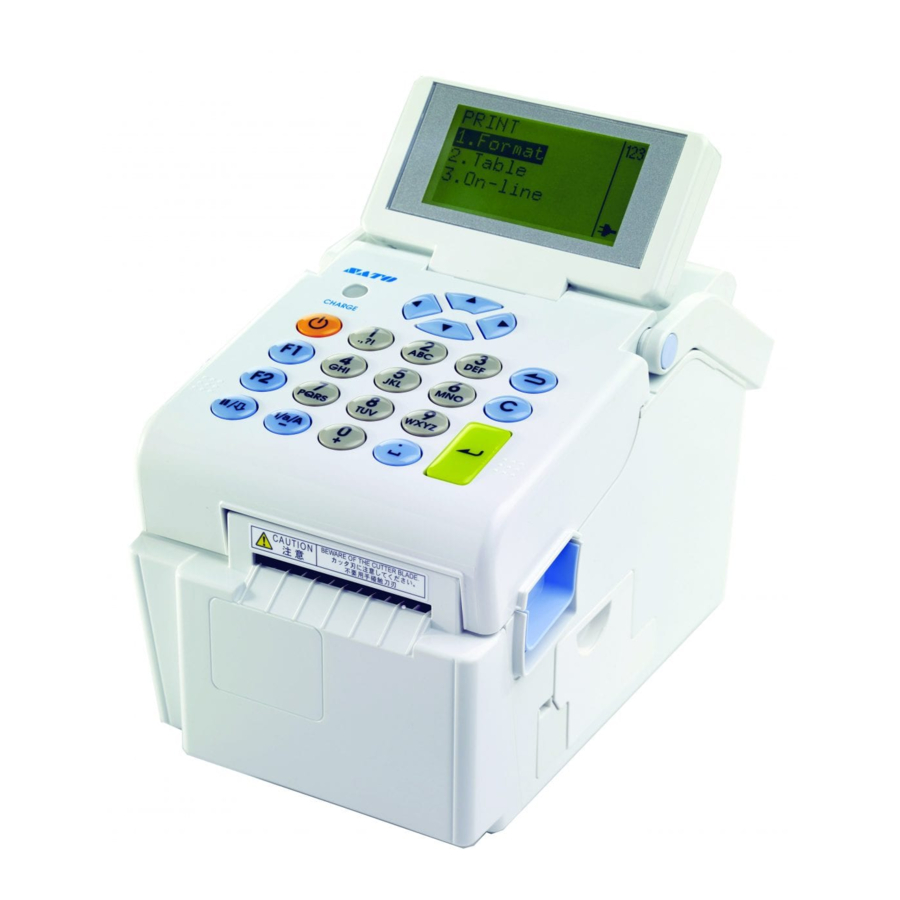
Page 9: Names Of Parts
Names of Parts ▲ Printer Unit (Unit Exterior) LCD Display Charge LED Top cover Handle Operation key Label discharge outlet Battery cover Backing paper discharge outlet (For Dispenser mode) Cover open/close latch Scanner connector cover ▲ Back (USB Interface) DC input power terminal (Power connector) USB connector ▲... - Page 10 Names of Parts When Top Cover Is Opened Dispensing sensor Print head Print head cover Paper holder Paper holder slide guide Platen roller Dispenser plate Dispenser frame Cutter Type (Optional) Cutter type for linerless label Cutter type Cutter unit Cutter unit for linerless label * There is no difference in the unit exterior between standard type and non-cutter type for linerless label.
-
Page 11: Operation Panel
▲ Operation Panel Arrow keys Use these keys to CHARGE LED lights while move the cursor. charging the battery. POWER button Menu/Page up Delete Ten keypad Entering alphanumeric Enter characters and symbols Function keys Pause/Feed Input mode Space/Symbol Function keys POWER button Power ON: Hold down for 1 second. -
Page 12: Preparing For First-Time Operation
Preparing for First-time Operation Charging the Battery Pack • Charging by installing the battery pack in the battery charger (optional) Install the battery pack in the battery charger (optional) and charge it. The optional battery charger set provided for this printer is specific to this printer. Do not use it for other electric equipment. -
Page 13: Charging Time
Note When the CHARGE lamp is not lit, check that the battery pack is installed • securely. The battery may not be charged when not securely installed. When a charged battery pack is installed, the CHARGE lamp first lights red, •... -
Page 14: Installing And Removing The Battery Pack
Preparing for First-time Operation Installing and Removing the Battery Pack 1. Open the battery cover. 2. Insert the battery pack, then close the battery cover. Insert the battery pack with the terminal side toward the printer. Terminal side Battery pack 3. -
Page 15: Using Ac Adapter
Using AC Adapter Install the supplied AC adapter on the printer for use. The AC adapter set provided for this printer is specific to this printer. Do not use it for other electric equipment. Use only power supplies listed in the Basic Specifications. 1. -
Page 16: Turning On The Power
Turning On the Power Power Setting Plug the DC power cord of the AC adapter into the printer and turn on the power. 1. Connect the AC power cord to the AC adapter. AC adapter AC power cord 2. Connect the printer adapter AC power outlet. - Page 17 3. Press the POWER button on the operation panel of the unit. The LCD display is lit when the printer is turned on. POWER button 4. Hold down the POWER button for more than 3 seconds to turn off the printer. When the power is off, the LCD display turns off.
-
Page 18: Basic Specifications
50 to 100mm/sec (2 to 4 inches/sec) * Printing speed differs depending on paper type and usage environment. Paper type/Paper shape Roll paper (Winding face-in/face-out) Recommended use of paper manufactured or specified by SATO. Paper thickness 140 to 190µm (0.14 to 0.19mm/0.005 to 0.007") Label size Continuous type [Die cut label] Pitch: 16 to 156mm/0.6 to 6.1"... - Page 19 132(W) x 194(D) x 147 (H) (mm) (5.1"W x 7.6"D x 5.7"H) Weight Approximately 1.7kg (Approximately 3.7lbs) AC adapter Power specifications Manufacturer: SATO Corporation Model name: PAH7020 Input power voltage: AC100V to AC240V ±10% (Full range) Frequency: 50/60 Hz Power consumption Input power voltage conditions: AC 100V At peak: 64.0VA/42.5W (at 30% printing ratio)
- Page 20 POP2 48 x 68 (numeric, comma, currency marks) POP3 26 x 56 (numeric, comma, currency marks) Support subscript (numeric only): X1, X2, X3 Resident True Type fonts Sato Sans, Sato Serif Printing direction Characters: 0°, 90°, 180°, 270° (Characters/Barcode) Barcode: Parallel 1 (0°), Parallel 2 (180°), Serial 1 (90°), Serial 2 (270°)
Need help?
Do you have a question about the TH208 and is the answer not in the manual?
Questions and answers