Table of Contents
Advertisement
Quick Links
Advertisement
Table of Contents

Related Manuals for Delta Tau 5XX-603869-XUXX


Summary of Contents for Delta Tau 5XX-603869-XUXX
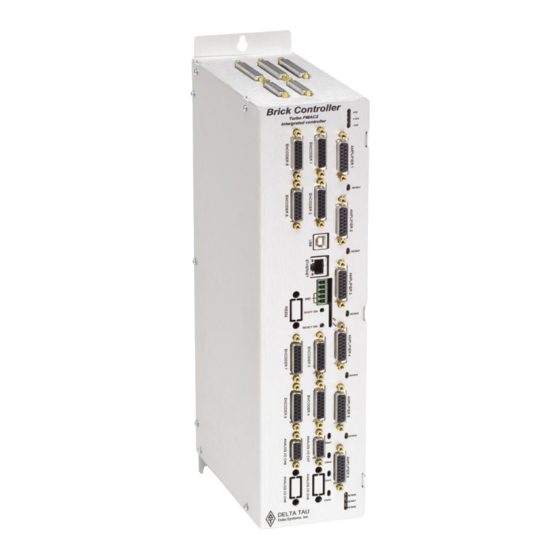
- Page 1 USER MANUAL Brick Controller Programmable Multi-Axis Controller 5XX-603869-XUXX December 14, 2012 Single Source Machine Control Power // Flexibility // Ease of Use 21314 Lassen Street Chatsworth, CA 91311 // Tel. (818) 998-2095 Fax. (818) 998-7807 // www.deltatau.com...
-
Page 2: Operating Conditions
© 2011 Delta Tau Data Systems, Inc. All rights reserved. This document is furnished for the customers of Delta Tau Data Systems, Inc. Other uses are unauthorized without written permission of Delta Tau Data Systems, Inc. Information contained in this manual may be updated from time-to-time due to product improvements, etc., and may not conform in... -
Page 3: Safety Instructions
Brick Controller User Manual Safety Instructions Qualified personnel must transport, assemble, install, and maintain this equipment. Properly qualified personnel are persons who are familiar with the transport, assembly, installation, and operation of equipment. The qualified personnel must know and observe the following standards and regulations: IEC364resp.CENELEC HD 384 or DIN VDE 0100 IEC report 664 or DIN VDE 0110 National regulations for safety and accident prevention or VBG 4... -
Page 4: Revision History
Brick Controller User Manual REVISION HISTORY REVISION DESCRIPTION DATE CHANGE APPROVED MANUAL CREATION 05/02/07 X15 WATCHDOG DESCRIPTION, P. 10 10/31/08 TB1 CURRENT REQUIREMENTS, P. 11 ADDED AUXILIARY BOARD INFO IN APPENDIX A 07/24/09 CORRECTED M5061 ENTRY, P. 27 09/29/09 MANUAL REFORMATTING. ADDED MORE TECHNICAL INFO. 11/7/11 E.G. -
Page 5: Table Of Contents
Brick Controller User Manual Table of Contents INTRODUCTION ........................8 Documentation ..........................8 Downloadable Turbo PMAC Script .....................9 SPECIFICATIONS ......................... 10 Part Number ..........................10 Options ............................. 11 Environmental Specifications ....................12 RECEIVING AND UNPACKING ..................13 Use of Equipment ........................13 MOUNTING ........................... - Page 6 Brick Controller User Manual X1-X8: Encoder Feedback, SSI ....................52 Configuring SSI ........................52 SSI Control Registers Setup Example ..................56 X1-X8: Encoder Feedback, EnDat 2.1/2.2 ................. 58 Configuring EnDat ....................... 58 EnDat Control Registers Setup Example ................62 X1-X8: Encoder Feedback, BiSS C/B ..................64 Configuring BiSS ........................
- Page 7 Brick Controller User Manual About the Digital Inputs and Outputs .................. 120 Wiring the Digital Inputs and Outputs ................121 General Purpose I/Os (J6) Suggested M-Variables ............. 122 General Purpose I/Os Additional (J7) Suggested M-Variables..........122 General Purpose I/Os Additional (J8) Suggested M-Variables..........123 J9: Handwheel Analog I/O ......................
- Page 8 Brick Controller User Manual Configuration Example 2: Brick - Geo MACRO Drive ............160 Brick – Brick MACRO I/O Data Transfer ................168 Transferring the Digital (Discrete) Input and Outputs ............169 Transferring the X9-X12 Analog Inputs/Outputs ..............174 Transferring the J9 Analog Inputs ..................176 MACRO Limits and Flags, Homing ..................
-
Page 9: Introduction
PMAC User Manual are essential for proper use, motor setup, and configuration of the Brick Controller. It is highly recommended to always refer to the latest revision of the manuals found on Delta Tau’s website, under Support>documentation>Manuals: Delta Tau Manuals Link... -
Page 10: Downloadable Turbo Pmac Script
Brick Controller User Manual Downloadable Turbo PMAC Script Some code examples require the user to input specific information pertaining to their system hardware. When user information is required, a commentary ending with –User Input is inserted. Caution This manual contains downloadable code samples in Turbo PMAC script. These examples can be copied and pasted into the editor area in the Pewin32pro2. -
Page 11: Specifications
Brick Controller User Manual SPECIFICATIONS Part Number Brick Controller Model Number Definition CPU Options - Turbo PMAC 2 Processor Number of Axes Axes 1 to 4 Options BCA-BB- DD-EFG-HHHI0 BCA- -CDD-EFG-HHHI0 -BB-CDD-EFG-HHHI0 C0: 80Mhz, 8Kx24 Internal, 256Kx24SRAM, 1MB Flash F: Filtered-PWM analog output on Channels 1-4, 12-bit resolution (Default) (default) Four Axes (Default) -
Page 12: Options
Brick Controller User Manual Options CPU Options 80MHz Turbo PMAC2 CPU (standard) 8Kx24 internal memory, 256Kx24 SRAM , 1MB flash memory 80MHz Turbo PMAC2 CPU 8Kx24 internal memory, 1Mx24 SRAM, 4M flash memory 240MHz Turbo PMAC2 CPU 192Kx24 internal memory, 1Mx24 SRAM, 4M flash memory Encoder Feedback ... -
Page 13: Environmental Specifications
Brick Controller User Manual Environmental Specifications Description Specifications Operating Temperature 0 to 45°C Storage Temperature -25°C to +70°C Humidity 10% to 90% non-condensing Operating Altitude ~3300 Feet (1000 m) Air Flow Clearances ~3 inches (76.2mm) above and below unit for air flow Operating Environment Pollution Degree 2 or equivalent Specifications... -
Page 14: Receiving And Unpacking
Brick Controller User Manual RECEIVING AND UNPACKING Delta Tau products are thoroughly tested at the factory and carefully packaged for shipment. When the Brick Controller is received, there are several things to be done immediately: Observe the condition of the shipping container and report any damage immediately to the commercial carrier that delivered the drive. -
Page 15: Mounting
Brick Controller User Manual MOUNTING The location of the Brick Controller is important. Installation should be in an area that is protected from direct sunlight, corrosives, harmful gases or liquids, dust, metallic particles, and other contaminants. Exposure to these can reduce the operating life and degrade performance of the drive. Several other factors should be carefully evaluated when selecting a location for installation: ... -
Page 16: Connector Locations
Brick Controller User Manual Connector Locations Top View Encoder #1 Encoder #5 AMP 1 General Encoder #2 Purpose I/O Encoder #6 AMP 2 Limits MACRO & Flags Ethernet AMP 3 Abort & WD RS232 Encoder #3 AMP 4 Encoder #7 AMP 7 Encoder #4 Encoder #8... -
Page 17: Mounting Dimensions
Brick Controller User Manual Mounting Dimensions For both BC4-xx-xxx-xxx-xxxxx and BC8-xx-xxx-xxx-xxxxx: Width Depth Height 3.50 inches (88.90 mm) 7.20 inches (182.88 mm) 15.00 inches (381 mm) 14.65" 15.00" (372.11 mm) (381.00 mm) 2.50" (63.50 mm) 3x M4 13.5" (342.90 mm) 7.20"... -
Page 18: Connections And Software Setup
+24VDC RET Common Logic power return - Power Supply Return Phoenix PCB Edge Connector Phoenix part #: ZEC 1,5/ 3-ST-5,0 C2 R1,3 (18883051) Delta Tau part #: 014-188305-001 (For Internal Use) +24VDC +24 VDC Power Supply Connections And Software Setup... -
Page 19: Enc Pwr (Alternate Encoder Power)
Brick Controller User Manual +5V ENC PWR (Alternate Encoder Power) Typically, feedback devices are powered up through the X1-X8 connectors on the Brick Controller using the internal +5VDC power supply. In some cases, feedback devices consume power excessively and risk of surpassing the internal power supply limitation. -
Page 20: Wiring The Alternate (+5V) Encoder Power
Brick Controller User Manual Wiring the Alternate (+5V) Encoder Power Pin# Symbol Description Note 5VEXT Input 5V from external power supply 5VINT Output Tie to pin#1 to use internal power supply Common Mating Connector: Adam-Tech part number 25CH-E-03 Pins part number 25CTE-R Crimping tool: Molex EDP #11-01-0208 Only two of the three available pins should be used at one time. -
Page 21: Functionality, Safety Measures
Brick Controller User Manual Functionality, Safety Measures There are a couple of safety and functionality measures to take into account when an external encoder power supply is utilized: Power sequence: encoders versus controller/drive It is highly recommended to power up the encoders before applying power to the Brick Controller ... -
Page 22: X1-X8: Encoder Feedback, Digital A Quad B
Brick Controller User Manual X1-X8: Encoder Feedback, Digital A Quad B X1-X8: D-sub DA-15F Mating: D-sub DA-15M Pin# Symbol Function Description CHA+ Input Encoder A+ CHB+ Input Encoder B+ CHC+ / AENA+ Input Encoder Index+ / Stepper amp enable + ENCPWR Output Encoder Power 5V... - Page 23 Brick Controller User Manual Channel A Channel B Typically, these signals are 5V TTL/CMOS level whether they are single-ended or differential. Differential signals can enhance noise immunity by providing common mode noise rejection. Modern design standards virtually mandate their use in industrial systems. Differential Quadrature Encoder Wiring Single-Ended Quadrature Encoder Wiring Encoder shield (solder to shell)
-
Page 24: Setting Up Quadrature Encoders
Brick Controller User Manual Setting up Quadrature Encoders Digital Quadrature Encoders use the 1/T incremental entry in the encoder conversion table. Position and velocity pointers should, by default, be valid and in most cases no software setup is required, activating (Ixx00=1) the corresponding channel is sufficient to see encoder counts in the position window when the motor/encoder shaft is moved by hand. -
Page 25: Encoder Loss Detection, Quadrature
Brick Controller User Manual Encoder Loss Detection, Quadrature Designed for use with differential line-driver outputs (encoders), the encoder loss circuitry monitors each quadrature input pair with an exclusive-or XOR gate. In normal operation mode, the two quadrature inputs should be in opposite logical states – that is one high and one low – yielding a true output from the XOR gate. - Page 26 Brick Controller User Manual Encoder Loss Example PLC: A 4-axis Brick Controller is setup to kill all motors upon the detection of one or more encoder loss. In addition, it does not allow enabling any of the motors when an encoder loss condition has been encountered: #define Mtr1AmpEna M139...
-
Page 27: Step And Direction Pfm Output (To External Stepper Amplifier)
Brick Controller User Manual Step and Direction PFM Output (To External Stepper Amplifier) The Brick Controller has the capability of generating step and direction (Pulse Frequency Modulation) output signals to external stepper amplifiers. These signals are accessible at the encoder connectors. The step and direction outputs are RS422 compatible and could be connected in either differential or single- ended configuration for 5V (input signal) amplifiers. -
Page 28: X1-X8: Encoder Feedback, Sinusoidal
Brick Controller User Manual X1-X8: Encoder Feedback, Sinusoidal X1-X8: D-sub DA-15F Mating: D-sub DA-15M Pin # Symbol Function Notes Sin+ Input Sine+ Cos+ Input Cosine+ CHC+ Input Index+ EncPwr Output Encoder Power 5 Volts CHU+ In/Out U Hall CHW+ In/Out W Hall 2.5 Volts Output... -
Page 29: Setting Up Sinusoidal Encoders
Brick Controller User Manual Setting up Sinusoidal Encoders The Sinusoidal position feedback is set up through the Encoder Conversion Table (ECT) as a high resolution interpolation entry. Encoder Conversion Table Setup Example, Channel 1 1. Conversion Type: High res. interpolator, PMAC2 Style 2. -
Page 30: Counts Per User Units
Brick Controller User Manual The equivalent Turbo PMAC script code for 8-channel entries // Channel 1 I8000=$FF8000 ; High resolution interpolator I8001=$078B00 ; A/D converter address I8002=$000000 ; Bias Term and Entry result // Channel 2 I8003=$FF8008 ; High resolution interpolator I8004=$078B02 ;... -
Page 31: Encoder Count Error (Mxx18)
Brick Controller User Manual Encoder Count Error (Mxx18) The Brick Controller has an encoder count error detection feature. If both the A and B channels of the quadrature encoder change state at the decode circuitry (post-filter) in the same hardware sampling clock (SCLK) cycle, an unrecoverable error to the counter value will result (lost counts). -
Page 32: Encoder Loss Detection, Sinusoidal
Brick Controller User Manual Encoder Loss Detection, Sinusoidal The Encoder Loss circuitry uses the internal differential quadrature counts. It monitors each quadrature pair with an exclusive-or XOR gate. In normal operation mode, the two quadrature signals are in opposite logical states – that is one high and one low – yielding a true output from the XOR gate. Channel Address Channel... -
Page 33: X1-X8: Encoder Feedback, Resolver
Brick Controller User Manual X1-X8: Encoder Feedback, Resolver X1-X8: D-sub DA-15F Mating: D-sub DA-15M Pin # Symbol Function Notes Sin+ Input Sine+ Cos+ Input Cosine+ CHC+ Input Index+ EncPwr Output Encoder Power 5 Volts 2.5 Volts Output Reference Power 2.5 volts Sin- Input Sine-... -
Page 34: Resolver Excitation Magnitude
Brick Controller User Manual Resolver Excitation Magnitude Revolvers’ excitation magnitude is a global setting used for all available Resolver channels. It has 15 possible settings: #define ResExcMag M8000 ; Resolver Excitation Magnitude MACRO definition ResExcMag->Y:$78B11,0,4 ; Resolver Excitation Magnitude register Excitation Peak-Peak Excitation... - Page 35 Brick Controller User Manual Resolver Data Registers The Resolver raw data is found in the Resolver Data registers Channel Register Channel Register Y:$78B00 Y:$78B08 Y:$78B02 Y:$78B0A Y:$78B04 Y:$78B0C Y:$78B06 Y:$78B0E Encoder Conversion Table Processing A dedicated 3-line Encoder Conversion Table entry is used for Resolver feedback. Due to the noisy nature of Resolvers, implementing a tracking filter to the result is highly recommended.
- Page 36 Brick Controller User Manual Calculating The Tracking Filter Gains The tracking filter gains are system dependent, and need to be fine-tuned. This can be done by gathering and plotting filtered versus unfiltered data while moving the motor shaft manually. Best case scenario is super-imposing the filtered data on top of the unfiltered with minimum ripple and overshoot.
- Page 37 Brick Controller User Manual I8042=$000000 ; SIN/COS Bias word I8043=$D8352B ; Tracking filter from conversion location $352B I8044=$400 ; Maximum change in counts/cycle I8045=$80000 ; Proportional gain I8046=$0 ; Reserved setup word I8047=$1 ; Integral gain // Channel 7 I8048=$F78B0C ;...
- Page 38 Brick Controller User Manual Resolver Power-On PLC Example Setting up a resolver with 10V excitation magnitude and 10 KHz excitation frequency: // Clock Settings: 10KHz Phase & Servo I7100=5895 ; Servo IC1 I7101=0 I7102=0 I6800=5895 ; MACRO IC0 I6801=0 I6802=0 I7000=5895 ;...
-
Page 39: X1-X8: Encoder Feedback, Hiperface
Brick Controller User Manual X1-X8: Encoder Feedback, HiperFace The majority of HiperFace devices requires 7-12VDC power. This has to be supplied externally and NOT wired into the brick unit. Pins#4 and #12 are unused in this case, leave floating. Caution X1-X8: D-sub DA-15F Mating: D-Sub DA-15M Pin #... -
Page 40: Setting Up Hiperface On-Going Position
Brick Controller User Manual Setting up HiperFace On-Going Position The HiperFace on-going position is set up through the Encoder Conversion Table as a high resolution interpolation entry Encoder Conversion Table Setup Example, Channel 1 1. Conversion Type: High res. interpolator, PMAC2 Style 2. -
Page 41: Counts Per Revolution
Brick Controller User Manual And the equivalent Turbo PMAC code for setting up all 8 channels: // Channel 1 I8000=$FF8000 ; High resolution interpolator entry, $78000 I8001=$078B00 ; A/D converter address, $78B00 I8002=$000000 ; Bias Term and Entry result at $3503 // Channel 2 I8003=$FF8008 ;... -
Page 42: Setting Up Hiperface Absolute Power-On Position
Brick Controller User Manual Setting up HiperFace Absolute Power-On Position Setting up the absolute position read with HiperFace requires the programming of two essential control registers: Global Control Registers Channel Control Registers The resulting data is found in: ... - Page 43 Brick Controller User Manual Global Control Registers X:$78BnF (default value: $812004) where n=2 for axes 1-4 n=3 for axes 5-8 Global Control Register Axes 1-4 X:$78B2F Axes 5-8 X:$78B3F The Global Control register is used to program the serial encoder interface clock frequency SER_Clock and configure the serial encoder interface trigger clock.
- Page 44 Reserved Reserved and always reads zero. This bit field is normally used to define the encoder address Encoder transmitted with each command. Delta Tau does not support [07:00] 0xFF address multiple encoders per channel; a value of $FF sends a general broadcast.
- Page 45 Brick Controller User Manual HiperFace Data Registers The HiperFace absolute power-on data is conveyed into 4 memory locations; Serial Encoder Data A, B, C, and D. The Serial Encoder Data A register holds the 24 bits of the encoder position data. If the data exceeds the 24 available bits in this register, the upper overflow bits are LSB justified and readable in the Serial Encoder Data B, which also holds status and error bits.
-
Page 46: Setting Up Hiperface Encoders Example
Brick Controller User Manual Setting up HiperFace Encoders Example An 8-axis Brick Controller is connected to eight HiperFace encoders, serial data is programmed to 9600 (M=129, N=2) baud rate for all eight channels: =0 Rising Edge =1 Falling Edge =0 Trigger on Phase $4 for Typically =0 =1 Trigger on Servo... - Page 47 Brick Controller User Manual The Global and Channel Control registers have to be initialized on power-up. Following, is an example PLC showing the initialization of all eight channels: //=========================== NOTES ABOUT THIS PLC EXAMPLE ================================// // This PLC example utilizes: - M5990 through M5999 - Coordinate system 1 Timer 1 // Make sure that current and/or future configurations do not create conflicts with // these parameters.
- Page 48 Brick Controller User Manual Channels 1 through 4 are driving HiperFace encoders with 12-bit (4096) single-turn resolution and 12- bit (4096) multi-turn resolution for a total number of data bits of 24 (12+12). The entire data stream is held in the HiperFace serial data A register: HiperFace Data A Register HiperFace Data A Register [23:0]...
- Page 49 Brick Controller User Manual #define Ch4STRes P7006 #define Ch4MTRes P7007 #define Ch5STRes P7008 #define Ch5MTRes P7009 #define Ch6STRes P7010 #define Ch6MTRes P7011 #define Ch7STRes P7012 #define Ch7MTRes P7013 #define Ch8STRes P7014 #define Ch8MTRes P7015 Ch1STRes=12 Ch1MTRes=12 ; Ch1 Multi Turn and Single Turn Resolutions --User Input Ch2STRes=12 Ch2MTRes=12 ;...
- Page 50 Brick Controller User Manual STData=0 MTData=0 If (STRes!>24) ; Single Turn Res<=24 //===========SINGLE TURN DATA===========// Two2STDec=exp(STRes*ln(2)) Two2STHex=Two2STDec-1 STData=SerialRegA&Two2STHex //===========MULTI TURN DATA============// Two2MTDec=exp(MTRes*ln(2)) Two2MTHex=Two2MTDec-1 If (MTRes=0) LowerMTBits=0 UpperMTBits=0 Two2MTDec=0 Two2MTHex=0 MTData=0 Else LowerMTBits=24-STRes STTemp1=exp(LowerMTBits*ln(2)) STTemp2=0 UpperMTBits=MTRes-LowerMTBits MTTemp1=exp(LowerMTBits*ln(2)) MTTemp2=exp(UpperMTBits*ln(2)) Temp1=(SerialRegA/Two2STDec)&(MTTemp1-1) Temp2=SerialRegB&(MTTemp2-1) MTData=Temp2*STTemp1+Temp1 EndIf Else ;...
-
Page 51: Encoder Count Error (Mxx18), Hiperface
Brick Controller User Manual Encoder Count Error (Mxx18), HiperFace The Brick Controller has an encoder count error detection feature. If both the A and B channels of the quadrature encoder change state at the decode circuitry (post-filter) in the same hardware sampling clock (SCLK) cycle, an unrecoverable error to the counter value will result (lost counts). - Page 52 Brick Controller User Manual Encoder Loss Example PLC: A 4-axis Brick controller is setup to kill all motors upon detection of one or more encoder loss. In addition, it does not allow enabling any of the motors when an encoder is in a loss condition: #define Mtr1AmpEna M139 ;...
-
Page 53: X1-X8: Encoder Feedback, Ssi
Brick Controller User Manual X1-X8: Encoder Feedback, SSI X1-X8: D-sub DA-15F Mating: D-sub DA-15M Pin # Symbol Function Notes EncPwr Output Encoder Power 5 Volts only Data- Input Data- packet Clock- Output Serial Encoder Clock- Common Common Ground Clock+ Output Serial Encoder Clock+ Data+ Input... - Page 54 Brick Controller User Manual Global Control Registers X:$78BnF (Default value: $630002) where: n=2 for axes 1-4 n=3 for axes 5-8 Global Control Register Axes 1-4 X:$78B2F Axes 5-8 X:$78B3F The Global Control register is used to program the serial encoder interface clock frequency SER_Clock and configure the serial encoder interface trigger clock.
- Page 55 Brick Controller User Manual Channel Control Registers X:$78Bn0, X:$78Bn4, X:$78Bn8, X:$78BnC where: n=2 for axes 1-4 n=3 for axes 5-8 Channel 1 X:$78B20 Channel 5 X:$78B30 Channel 2 X:$78B24 Channel 6 X:$78B34 Channel 3 X:$78B28 Channel 7 X:$78B38 Channel 4 X:$78B2C Channel 8 X:$78B3C Each channel has its own Serial Encoder Command Control Register defining functionality parameters.
- Page 56 Brick Controller User Manual SSI Data Registers The SSI data is conveyed into 4 memory locations; Serial Encoder Data A, B, C, and D. The Serial Encoder Data A register holds the 24 bits of the encoder position data. If the data exceeds the 24 available bits in this register, the upper overflow bits are LSB justified and readable in the Serial Encoder Data B, which also holds the parity error flag.
-
Page 57: Ssi Control Registers Setup Example
Brick Controller User Manual SSI Control Registers Setup Example Channel 1 is driving a 25-bit (13-bit Singleturn, 12-bit Multiturn) SSI encoder. The encoder outputs binary data with no parity, and requires a 1 MHz serial clock. Global Control Register The Global Control register is a 24-bit hexadecimal word which is set up as follows: =0 Rising Edge =1 Falling Edge =0 Trigger on Phase... - Page 58 Brick Controller User Manual Field Value Notes Channel Control Word Parity Type Hex 0x00 Trigger Mode Continuous trigger (typical) Trigger Enable Enable $001419 Gray / Binary Binary Data Ready / Senc Mode =1 Enable serial driver Protocol Bits Hex 0x19 Control Registers Power-On PLC The global and channel control words have to be executed once on power-up: //=========================== NOTES ABOUT THIS PLC EXAMPLE ================================//...
-
Page 59: X1-X8: Encoder Feedback, Endat 2.1/2.2
Brick Controller User Manual X1-X8: Encoder Feedback, EnDat 2.1/2.2 X1-X8: D-sub DA-15F Mating: D-Sub DA-15M Pin # Symbol Function Notes EncPwr Output Encoder Power 5 Volts Data- Input Data- packet Clock- Output Serial Encoder Clock- Common Common Ground Clock+ Output Serial Encoder Clock+ Data+ Input... - Page 60 Brick Controller User Manual Global Control Registers X:$78BnF (default value: $002003) where n=2 for axes 1-4 n=3 for axes 5-8 Global Control Register Axes 1-4 X:$78B2F Axes 5-8 X:$78B3F The Global Control register is used to program the serial encoder interface clock frequency. SENC_CLK is the serial data clock transmitted from the Brick to the encoder.
- Page 61 Brick Controller User Manual Channel Control Registers X:$78Bn0, X:$78Bn4, X:$78Bn8, X:$78BnC where: n=2 for axes 1-4 n=3 for axes 5-8 Channel 1 X:$78B20 Channel 5 X:$78B30 Channel 2 X:$78B24 Channel 6 X:$78B34 Channel 3 X:$78B28 Channel 7 X:$78B38 Channel 4 X:$78B2C Channel 8 X:$78B3C Each channel has its own Serial Encoder Command Control Register defining functionality parameters.
- Page 62 Brick Controller User Manual EnDat Data Registers The EnDat data is conveyed into 4 memory locations; EnDat Data A, B, C, and D. The EnDat Data A register holds the 24 bits of the encoder position data. If the data exceeds the 24 available bits in this register, the upper overflow bits are LSB justified and readable in the EnDat Data B register, which also holds error flags.
-
Page 63: Endat Control Registers Setup Example
Brick Controller User Manual EnDat Control Registers Setup Example Channel 1 is driving a 37-bit (25-bit Singleturn, 12-bit Multiturn) EnDat 2.2 encoder. The encoder requires a 4 MHz serial clock. Global Control Register The Global Control register is a 24-bit hexadecimal word which is set up as follows: =0 Rising Edge =1 Falling Edge =0 Trigger on Phase... - Page 64 Brick Controller User Manual Field Value Notes Channel Control Word Command code =$38 Hex 0x38 for EnDat 2.2 only Trigger Mode Continuous trigger (typical) Trigger Enable Enable $381425 Data Ready / Senc Mode =1 Enable serial driver Protocol Bits Hex 0x25 Control Registers Power-On PLC The Global and Channel Control words have to be executed once on power-up //=========================== NOTES ABOUT THIS PLC EXAMPLE ================================//...
-
Page 65: X1-X8: Encoder Feedback, Biss C/B
Brick Controller User Manual X1-X8: Encoder Feedback, BiSS C/B X1-X8: D-sub DA-15F Mating: D-Sub DA-15M Pin # Symbol Function Notes EncPwr Output Encoder Power 5 Volts Data- Input/Output Data- packet, SLO- Clock- Output Serial Encoder Clock-, MO- Common Common Ground Clock+ Output Serial Encoder Clock+ , MO+... - Page 66 Brick Controller User Manual Global Control Registers X:$78BnF (default value: $18000B) where n=2 for axes 1-4 n=3 for axes 5-8 Global Control Register Axes 1-4 X:$78B2F Axes 5-8 X:$78B3F The Global Control register is used to program the serial encoder interface clock frequency SER_Clock and configure the serial encoder interface trigger clock.
- Page 67 Brick Controller User Manual Channel Control Registers X:$78Bn0, X:$78Bn4, X:$78Bn8, X:$78BnC where: n=2 for axes 1-4 n=3 for axes 5-8 Channel 1 X:$78B20 Channel 5 X:$78B30 Channel 2 X:$78B24 Channel 6 X:$78B34 Channel 3 X:$78B28 Channel 7 X:$78B38 Channel 4 X:$78B2C Channel 8 X:$78B3C Each channel has its own Serial Encoder Command Control Register defining functionality parameters.
- Page 68 Brick Controller User Manual This write-only bit is used to enable the output drivers for SENC_MODE the SENC_SDO, SENC_CLK, SENC_ENA pins for each respective channel. [09] Reserved Reserved and always reads zero. This bit field is used to define the number of status bits in the encoder data.
-
Page 69: Biss Control Registers Setup Example
Brick Controller User Manual BiSS Control Registers Setup Example Channel 1 is driving an 18-bit Renishaw resolute BiSS-C encoder. The encoder requires a 1 MHz serial clock, and has 2 status bits. Global Control Register The Global Control register is a 24-bit hexadecimal word which is set up as follows: =0 Rising Edge =1 Falling Edge =0 Trigger on Phase... - Page 70 Brick Controller User Manual Field Value Notes Channel Control Word CRC Mask Hex 0x21 typical for Renishaw BiSS Type for BiSS-C Trigger Mode Continuous trigger (typical) Trigger Enable Enable $211492 Data Ready / Senc Mode =1 Enable serial driver Status Bits Binary 010 Protocol Bits Binary 010010...
-
Page 71: Setting Up Ssi | Endat | Biss
This technique processes the data for position similarly to Technique 1. Some applications may require deviating from the suggested setup methods (e.g. extremely high resolution and speed requirements). Contact Delta Tau for assistance with these special cases. Note Connections And Software Setup... -
Page 72: Setup Summary
Brick Controller User Manual Setup Summary Encoder Conversion Table Processing: Process Technique 1 Technique 2 Technique 3 ECT for From serial register A, From serial register A, From serial register A, Position 5-bit shift no shift 5-bit shift ST is the Singleturn resolution (in bits) for rotary encoders. Similarly, this would be the protocol resolution (in bits) for linear scales. -
Page 73: Technique 1 Example
Brick Controller User Manual Technique 1 Example Channel 1 is driving a 25-bit (13-bit Singleturn, 12-bit Multiturn) rotary serial encoder, or a linear scale with similar protocol resolution (13 bits, 1 micron). Encoder Conversion Table - for position (Technique 1) ... - Page 74 Brick Controller User Manual Counts Per User Units (Technique 1) With technique 1, the user should expect to see 2 counts per revolution for rotary encoders, and 1/Resolution counts per user unit for linear scales in the motor position window. Examples: 25-bit rotary encoder (13-bit Singleturn): 2 = 8,192 cts/rev...
- Page 75 Brick Controller User Manual In this mode, PMAC reads and reports 18 bits from the first serial data register: Serial Data Register B Serial Data Register A (Ch1 Y:$78B21) (Ch1 Y:$78B20) 18 bits With this setting of Ixx80=2, the actual position is reported automatically on Power-up. Otherwise, a #1$* command is necessary to read and report the absolute position.
-
Page 76: Technique 2 Example
Brick Controller User Manual Technique 2 Example Channel 1 is driving a 37-bit (25-bit Singleturn, 12-bit Multiturn) rotary serial encoder, or a linear scale with similar protocol resolution (25 bits, 10 nanometer). Encoder Conversion Table – for position (Technique 2) ... - Page 77 Brick Controller User Manual At this point, you should be able to move the motor/encoder shaft by hand and see ‘motor’ counts in the position window Note Counts Per User Units (Technique 2) ST-5 With technique 2, the user should expect to see 2 /32 counts per revolution for rotary encoders, and 1/(32*Resolution) counts per user unit for linear scales in the motor position window.
- Page 78 Brick Controller User Manual Absolute Power-On Position Read (Technique 2) With technique 2, the absolute power-on position can be read directly from the serial data registers. But, proper scaling (5-bit right shift, in a PLC) is required to conform to the unshifted on-going position. Example 1: Channel 1 driving a 37-bit (25-bit single turn, 12-bit multi-turn) rotary serial encoder: I180=0 ;...
- Page 79 Brick Controller User Manual With absolute serial encoders (no multi-turn data), the power-on position format is set up for unsigned operation. Note The upper two fields in Ixx95 are the only relevant ones. Bits 0 through 15 are reserved and should always be set to 0. Note Power-On Position scaling PLC example (for technique 2) M162->D:$00008B...
-
Page 80: Technique 3 Example
Brick Controller User Manual Technique 3 Example Channel 1 is driving a 32-bit (20-bit Singleturn, 12-bit Multiturn) rotary serial encoder, or a linear scale with similar protocol resolution (20 bits, 0.1 micron). Encoder Conversion Table - for position (Technique 3) ... - Page 81 Brick Controller User Manual At this point, you should be able to move the motor/encoder shaft by hand and see ‘motor’ counts in the position window. Note Counts Per User Units (Technique 3) With technique 3, the user should expect to see 2 counts per revolution for rotary encoders, and 1/Resolution counts per user unit for linear scales in the motor position window.
- Page 82 Brick Controller User Manual Absolute Power-On Position Read (Technique 3) With Technique 3, the absolute power-on read can be performed using PMAC’s automatic settings (Ixx80, Ixx10 and Ixx95). Example 1: Channel 1 driving a 32-bit (20-bit single turn, 12-bit multi-turn) rotary serial encoder: I180=2 ;...
- Page 83 Brick Controller User Manual With absolute serial encoders (no multi-turn data), the power-on position format is set up for unsigned operation. Note The upper two fields in Ixx95 are the only relevant ones. Bits 0 through 15 are reserved and should always be set to 0. Note Some serial encoders use an external (not from the Brick) source for power.
-
Page 84: X1-X8: Encoder Feedback, Yaskawa Sigma Ii & Iii
Brick Controller User Manual X1-X8: Encoder Feedback, Yaskawa Sigma II & III X1-X8: D-sub DA-15F Mating: D-sub DA-15M Pin # Symbol Function Notes EncPwr Output Encoder Power 5 Volts Input Serial Data In Common Common Ground Output Serial Data Out Use an encoder cable with high quality shield. - Page 85 Brick Controller User Manual Molex 2.00 mm (.079") Pitch Serial I/O Connector, Receptacle Kit, Wire-to-Wire. Part Number: 0542800609 Pin # Function Wire Color code +5VDC BLACK BAT+ Orange BAT- Orange/Black (Orange/White) Blue Blue/Black (Blue/White) All Yaskawa Sigma II & Sigma III protocols, whether incremental or absolute and regardless of the resolution, are supported.
- Page 86 Brick Controller User Manual Global Control Registers X:$78BnF (default value: $002003) where n=2 for axes 1-4 n=3 for axes 5-8 Global Control Register Axes 1-4 X:$78B2F Axes 5-8 X:$78B3F With the Yaskawa option, the Global Control Register is pre-set and need not be changed.
- Page 87 Brick Controller User Manual Channel Control Registers X:$78Bn0, X:$78Bn4, X:$78Bn8, X:$78BnC where: n=2 for axes 1-4 n=3 for axes 5-8 Channel 1 X:$78B20 Channel 5 X:$78B20 Channel 2 X:$78B24 Channel 6 X:$78B34 Channel 3 X:$78B28 Channel 7 X:$78B38 Channel 4 X:$78B2C Channel 8 X:$78B3C Bits 10, 12, and 13 are the only fields to be configured in the Channel Control Registers with the Yaskawa option.
- Page 88 Brick Controller User Manual Yaskawa Feedback Channel Control Power-On Example PLC (Motors 1-8) This code statement can be added to your existing initialization PLC. End Gat Del Gat Close Open PLC 1 clear CMD"WX:$78B20,$1400" CMD"WX:$78B24,$1400" CMD"WX:$78B28,$1400" CMD"WX:$78B2C,$1400" CMD"WX:$78B30,$1400" CMD"WX:$78B34,$1400" CMD"WX:$78B38,$1400" CMD"WX:$78B3C,$1400"...
-
Page 89: Yaskawa Sigma Ii 16-Bit Absolute Encoder
Brick Controller User Manual Yaskawa Sigma II 16-Bit Absolute Encoder Y:$78B21 Y:$78B20 [23-12] [11-0] [23-20] [19-4] [3:0] Multi-Turn Position Absolute Single Turn Data (16-bits) (16-bits) Yaskawa Data Registers Channel 1 Y:$78B20 Channel 5 Y:$78B30 Channel 2 Y:$78B24 Channel 6 Y:$78B34 Channel 3 Y:$78B28 Channel 7... - Page 90 Brick Controller User Manual I8007=$020004 ; Width and Bias, total of 32-bits LSB starting at bit#4 I8008=$278B30 ; Entry 5 Unfiltered parallel pos of location Y:$78B30 I8009=$020004 ; Width and Bias, total of 32-bits LSB starting at bit#4 I8010=$278B34 ; Entry 6 Unfiltered parallel pos of location Y:$78B34 I8011=$020004 ;...
- Page 91 Brick Controller User Manual Absolute Power-On Position Read (Yaskawa 16-bit) Channel 1 example PLC, 16-bit Absolute Sigma II Encoder End Gat Del Gat Close #define STD0_15 M7000 ; Single-turn Data 0-15 (16-bits) #define MTD0_3 M7001 ; Multi-Turn Data 0-3 (4-bits) #define MTD4_15 M7002 ;...
-
Page 92: Yaskawa Sigma Ii 17-Bit Absolute Encoder
Brick Controller User Manual Yaskawa Sigma II 17-Bit Absolute Encoder Y:$78B21 Y:$78B20 [23-13] [12-0] [23-21] [20-4] [3:0] Multi-Turn Position Absolute Single Turn Data (16-bits) (17-bits) Yaskawa Data Registers Channel 1 Y:$78B20 Channel 5 Y:$78B30 Channel 2 Y:$78B24 Channel 6 Y:$78B34 Channel 3 Y:$78B28 Channel 7... - Page 93 Brick Controller User Manual Encoder Conversion Table Setup (Motors 1-8) The ECT automatic entry is equivalent to: I8000=$278B20 ; Entry 1 Unfiltered parallel pos of location Y:$78B20 I8001=$021004 ; Width and Bias, total of 33-bits LSB starting at bit#4 I8002=$278B24 ;...
- Page 94 Brick Controller User Manual Absolute Power-On Position Read (Yaskawa 17-bit) Channel 1 example PLC, 17-bit Absolute Sigma II Encoder End Gat Del Gat Close #define FirstWord M7000 ; Yaskawa Data Register1, 1st word #define SecondWord M7001 ; Yaskawa Data Register1, 2nd word #define STD0_16 M7002 ;...
-
Page 95: Yaskawa Sigma Iii 20-Bit Absolute Encoder
Brick Controller User Manual Yaskawa Sigma III 20-Bit Absolute Encoder Y:$78B21 Y:$78B20 [23-16] [15-0] [23-4] [3:0] Multi-Turn Position Absolute Single Turn Data (16-bits) (20-bits) Yaskawa Data Registers Channel 1 Y:$78B20 Channel 5 Y:$78B30 Channel 2 Y:$78B24 Channel 6 Y:$78B34 Channel 3 Y:$78B28 Channel 7 Y:$78B38... -
Page 96: Encoder Conversion Table Setup
Brick Controller User Manual Encoder Conversion Table Setup (Motors 1-8) The ECT automatic entry is equivalent to: I8000=$278B20 ; Entry 1 Unfiltered parallel pos of location Y:$78B20 I8001=$024004 ; Width and Bias, total of 36-bits LSB starting at bit#4 I8002=$278B24 ;... - Page 97 Brick Controller User Manual Absolute Power-On Position Read (Yaskawa 20-bit) Channel 1 example PLC, 20-bit Absolute Sigma III Encoder End Gat Del Gat Close #define FirstWord M1000 ; Yaskawa Data Register1, 1st word #define SecondWord M1001 ; Yaskawa Data Register1, 2nd word #define STD0_19 M1002 ;...
-
Page 98: Yaskawa Sigma Ii 13-Bit Incremental Encoder
Brick Controller User Manual Yaskawa Sigma II 13-Bit Incremental Encoder Y:$78B21 Y:$78B20 [23-11] [10-0] [22-11] [10:4] Incremental Position in Incremental Compensation Single Turn (11-bits) (13-bits) Yaskawa Data Registers Channel 1 Y:$78B20 Channel 5 Y:$78B30 Channel 2 Y:$78B24 Channel 6 Y:$78B34 Channel 3 Y:$78B28 Channel 7 Y:$78B38 Channel 4 Y:$78B2C Channel 8 Y:$78B3C... - Page 99 Brick Controller User Manual Encoder Conversion Table Setup (Motors 1-8) The ECT automatic entry is equivalent to: I8000=$278B20 ; Entry 1 Unfiltered parallel pos of location Y:$78B20 I8001=$00D006 ; Width and Bias, total of 13-bits LSB starting at bit#6 I8002=$278B24 ;...
-
Page 100: Yaskawa Sigma Ii 17-Bit Incremental Encoder
Brick Controller User Manual Yaskawa Sigma II 17-Bit Incremental Encoder Y:$78B21 Y:$78B20 [23-11] [10-0] [22-6] [5:4] Incremental Position in Incremental Compensation Single Turn (11-bits) (17-bits) Yaskawa Data Registers Channel 1 Y:$78B20 Channel 5 Y:$78B30 Channel 2 Y:$78B24 Channel 6 Y:$78B34 Channel 3 Y:$78B28 Channel 7 Y:$78B38 Channel 4 Y:$78B2C Channel 8 Y:$78B3C... - Page 101 Brick Controller User Manual Encoder Conversion Table Setup (Motors 1-8) The ECT automatic entry is equivalent to: I8000=$278B20 ; Entry 1 Unfiltered parallel pos of location Y:$78B20 I8001=$011006 ; Width and Bias, total of 17-bits LSB starting at bit#6 I8002=$278B24 ;...
-
Page 102: Yaskawa Incremental Encoder Alarm Codes
Brick Controller User Manual Yaskawa Incremental Encoder Alarm Codes Yaskawa Incremental encoder Alarm Registers Channel 1 Y:$78B22,8,8 Channel 5 Y:$78B32,8,8 Channel 2 Y:$78B26,8,8 Channel 6 Y:$78B36,8,8 Channel 3 Y:$78B2A,8,8 Channel 7 Y:$78B3A,8,8 Channel 4 Y:$78B2E,8,8 Channel 8 Y:$78B3E,8,8 Alarm Clear Bit# Error Name Type Notes... -
Page 103: Homing With Yaskawa Incremental Encoders
Brick Controller User Manual Homing with Yaskawa Incremental Encoders Hardware capture is not available with serial data encoders, software capture (Ixx97=1) is required. Setting Ixx97 to 1 tells Turbo PMAC to use the register whose address is specified by Ixx03 for the trigger position. -
Page 104: X9-X10: Analog Inputs/Outputs
Brick Controller User Manual X9-X10: Analog Inputs/Outputs X9-X10: D-Sub DE-9F Mating: D-Sub DE-9M Pin # Symbol Function Notes AGND Ground Analog Ground ADC+ Input 16-bit Analog Input, channel 5/6+ DAC+ Output 12-bit filtered PWM analog output, channel 5/6+ BR-NC Output Brake 5-6 / Relay Normally Closed AMPFLT Input... -
Page 105: Setting Up The Analog (Adc) Inputs
Brick Controller User Manual Setting up the Analog (ADC) Inputs Differential Analog Input Signal Single Ended Analog Input Signal AGND AGND ADC+ ADC+ ±10VDC ADC- Input Signal ±10VDC Input Signal For single-ended connections, tie the negative ADC pin to ground. Note The analog inputs use the ADS8321... -
Page 106: Setting Up The Dac Outputs
Brick Controller User Manual Setting up the DAC Outputs Differential DAC Output Signal Single Ended DAC Output Signal AGND AGND DAC+ DAC+ Analog DAC- Device Analog Device The analog outputs on X9 through X12 are (12-bit) filtered PWM signals, therefore a PWM frequency in the range of 30-36 KHz and a PWM deadtime of zero are suggested for a good quality analog output signal (minimized ripple). - Page 107 SERVO I10=1863964 I7104=0 Deadtime Note that n=4 in this case For Help with clock settings, use the Delta Tau Calculator: DT Calculator Forum Link Analog Outputs Suggested M-Variables: // De-activate Motors 5-8 to write directly to the analog outputs I500,4,100=0 ;...
-
Page 108: Setting Up The General Purpose Relay, Brake
Brick Controller User Manual Setting up the General Purpose Relay, Brake This option provides either a general purpose relay (which can be toggled in software) OR a dedicated brake relay output tied to its’ corresponding channel amplifier-enable line. This option is built to order and is jumper configurable at the factory (E6, E7, E8 and E9). - Page 109 Brick Controller User Manual High True Brake Output Sourcing Sinking DC Power Supply DC Power Supply 12-24VDC 12-24V BRAKE BRAKE RET Logic device / Logic device / Brake Brake BRAKE RET BRAKE Low True Brake Output Sourcing Sinking DC Power Supply DC Power Supply 12-24VDC 12-24V...
-
Page 110: Setting Up The External Amplifier Fault Input
Brick Controller User Manual Setting up the External Amplifier Fault Input The amplifier fault signal is a bidirectional single-ended input. Its’ minus end is tied internally to the brake/relay common (pin #8) which dictates how the amplifier fault input should be connected. If the amplifier fault signal is not used, it can be treated and used as a general purpose +12~24V input by setting bit 20 of Ixx24 to 1. -
Page 111: X13: Usb 2.0 Connector
Controller. A crossover cable is required if you are going directly to the Brick controller from the PC Ethernet card, and not through a hub. Delta Tau strongly recommends the use of RJ45 CAT5e or better shielded cable. Newer network cards have the Auto-MDIX feature that eliminates the need for crossover cabling by performing an internal crossover when a straight cable is detected during the auto-negotiation process. -
Page 112: X15: Watchdog & Abort (Tb2)
Brick Controller User Manual X15: Watchdog & ABORT (TB2) X15 has two essential functions: A 24VDC Abort Input (mandatory for normal operation) which can be used in various applications to halt motion when necessary (i.e. opening machine door, replacing tool). ... -
Page 113: Wiring The Watchdog (Wd) Output
Brick Controller User Manual The hardware Abort input functionality differs slightly from the software global Abort (^A) command. The following table summarizes the differences: Motor(s) Status Software Global Abort Hardware Abort Trigger Before Abort Action ^A Action Action (Removing 24VDC) Killed Closes the position-loop on No Action is taken. -
Page 114: J4: Limits, Flags, Equ [Axis 1- 4]
Brick Controller User Manual J4: Limits, Flags, EQU [Axis 1- 4] J4 is used to wire axis/channels 1 through 4 over travel limit switches, home and user flags, and EQU output. The limits and flags can be ordered either 5V or 12-24V. The EQU output is always 5V. Per axis/channel, there are 2 limit inputs, 2 flag inputs, and 1 EQU output: - Positive limit. -
Page 115: J5: Limits, Flags, Equ [Axis 5- 8]
Input Home Flag 8 BEQU8 Output Compare Output EQU 8, TTL (5V) level For Delta Tau’s internal use: For 5V flags: Install RP89, RP93, RP97 and RP101 1Kohm Sip, 8-pin, four independent Resistors. For 12-24Vflags: Empty bank (Default). Note Connections And Software Setup... -
Page 116: Wiring The Limits And Flags
Brick Controller User Manual Wiring the Limits and Flags The Brick Controller allows the use of sinking or sourcing limits and flags. The opto-isolator IC used is a PS2705-4NEC-ND quad phototransistor output type. This IC allows the current to flow from return to flag (sinking) or from flag to return (sourcing). -
Page 117: Limits And Flags [Axis 1- 4] Suggested M-Variables
Brick Controller User Manual Limits and Flags [Axis 1- 4] Suggested M-Variables M115->X:$078000,19 ; User 1 flag input status M116->X:$078000,9 ; EQU1, ENC1 compare output value M120->X:$078000,16 ; Home flag 1 input status M121->X:$078000,17 ; Positive Limit 1 flag input status M122->X:$078000,18 ;... -
Page 118: J6: General Purpose Inputs/Outputs
Brick Controller User Manual J6: General Purpose Inputs/Outputs J6 is used to wire general purpose digital Inputs (1-16) and Outputs (1-8) to the Brick Controller. J6: D-sub DC-37F Mating: D-sub DC-37M Pin # Symbol Function Description GPI1 Input Input 1 GPI3 Input Input 3... -
Page 119: J7: Additional General Purpose Inputs/Outputs
Brick Controller User Manual J7: Additional General Purpose Inputs/Outputs J7 is used to wire general purpose digital Inputs (17-32) and Outputs (9-16) to the Brick Controller. J7: D-sub DC-37F Mating: D-sub DC-37M Pin # Symbol Function Description GPI17 Input Input 17 GPI19 Input Input 19... -
Page 120: J8: Additional General Purpose Inputs/Outputs
Brick Controller User Manual J8: Additional General Purpose Inputs/Outputs J8 is used to wire general purpose digital Inputs (33-48) and Outputs (17-24) to the Brick Controller. J7: D-sub DC-37F Mating: D-sub DC-37M Pin # Symbol Function Description GPI33 Input Input 33 GPI35 Input Input 35... -
Page 121: About The Digital Inputs And Outputs
Brick Controller User Manual About the Digital Inputs and Outputs All general purpose inputs and outputs are optically isolated. They operate in the 12–24 VDC range, and can be wired to be either sinking or sourcing. Inputs The inputs use the PS2505L-1NEC photocoupler. -
Page 122: Wiring The Digital Inputs And Outputs
Brick Controller User Manual Wiring the Digital Inputs and Outputs Sourcing Inputs Sinking Inputs Sourcing Outputs Sinking Outputs 12 - 24 VDC 12 - 24 VDC Power supply Power supply INPUT 1 / 17/33 INPUT 1/17/33 INPUT 2 / 18/34 INPUT 2/18/34 INPUT 3 / 19/35 INPUT 3/19/35... -
Page 123: General Purpose I/Os (J6) Suggested M-Variables
Brick Controller User Manual General Purpose I/Os (J6) Suggested M-Variables // Inputs: M1->Y:$78800,0,1 ; Input 01 J6 Pin#1 M2->Y:$78800,1,1 ; Input 02 J6 Pin#20 M3->Y:$78800,2,1 ; Input 03 J6 Pin#2 M4->Y:$78800,3,1 ; Input 04 J6 Pin#21 M5->Y:$78800,4,1 ; Input 05 J6 Pin#3 M6->Y:$78800,5,1 ;... -
Page 124: General Purpose I/Os Additional (J8) Suggested M-Variables
Brick Controller User Manual General Purpose I/Os Additional (J8) Suggested M-Variables // Inputs: M49->Y:$78A00,0,1 ; Input 33 J8 Pin#1 M50->Y:$78A00,1,1 ; Input 34 J8 Pin#20 M51->Y:$78A00,2,1 ; Input 35 J8 Pint#2 M52->Y:$78A00,3,1 ; Input 36 J8 Pin#21 M53->Y:$78A00,4,1 ; Input 37 J8 Pin#3 M54->Y:$78A00,5,1 ;... -
Page 125: J9: Handwheel Analog I/O
Brick Controller User Manual J9: Handwheel Analog I/O J9 is used to wire the additional analog inputs, handwheel encoder, analog output, and PFM output. J9: D-sub DB-25F Mating: D-sub DB-25M Pin # Symbol Function Notes AIN1 Input Analog Input #1 AIN3 Input Analog Input #3... -
Page 126: Setting Up The Analog Inputs (J9)
Brick Controller User Manual Setting up the Analog Inputs (J9) ±10VDC Input Signals The ANA (J9) port provides eight AGND ADC1 multiplexed 12-bit single-ended analog AGND ADC2 inputs (AIN1-AIN8) using the traditional PMAC Option 12. AGND ADC3 AGND ADC4 AGND ADC5 These analog inputs can be used either in unipolar mode in the 0V to +10V range, or... - Page 127 Brick Controller User Manual J9 Analog Inputs Suggested M-Variables Bipolar Mode (Signed) Unipolar Mode (Unsigned) M6991->Y:$003400,12,12,S ; ADC1 M6991->Y:$003400,12,12,U ; ADC1 M6992->Y:$003402,12,12,S ; ADC2 M6992->Y:$003402,12,12,U ; ADC2 M6993->Y:$003404,12,12,S ; ADC3 M6993->Y:$003404,12,12,U ; ADC3 M6994->Y:$003406,12,12,S ; ADC4 M6994->Y:$003406,12,12,U ; ADC4 M6995->Y:$003408,12,12,S ; ADC5 M6995->Y:$003408,12,12,U ;...
-
Page 128: Setting Up The Analog Output (J9)
Brick Controller User Manual Setting up the Analog Output (J9) Differential Output Single-Ended Output Analog DAC+ Analog Device Device DAC- The analog output out of J9 is a (12-bit) filtered PWM signal, therefore a PWM frequency in the range of 30-36 KHz and a PWM deadtime of zero are suggested for a good quality analog output signal (minimum ripple). - Page 129 Brick Controller User Manual For assistance with clock settings, use the Delta Tau Calculator: DT Calculator Forum Link J9 Analog Output Suggested M-Variable // I/O 10 & 11 Mode (PWM) M7001->Y:$78404,10,1 M7002->Y:$78404,11,1 M7001=0 ; =0 PWM, =1 PFM M7002=0 ; =0 PWM, =1 PFM // Analog Output M-variable M7000->Y:$78412,8,16,S...
-
Page 130: Setting Up Pulse And Direction Output Pfm (J9)
DEVICE/ DEVICE/ DIR- DIR- AMPLIFIER AMPLIFIER Using the Delta Tau Calculator or referring to the Turbo Software Reference Manual, the desired maximum PFM Frequency and pulse width can be chosen. DT Calculator Forum Link Step2 Step1 Results Step 1: Choose Max PFM clock by changing the PFM clock divider. Click on calculate to see results. - Page 131 Brick Controller User Manual The calculated Ixx69 specifies the maximum command output value which corresponds to the maximum PFM Frequency: I6826=3 ; MACRO IC Channel 2 Output Mode Select. C PFM M8000->Y:$7841C,8,16,S ; Supplementary Channel 2* Output C Command Value ;...
-
Page 132: Setting Up The Handwheel Port (J9)
Brick Controller User Manual Setting up the Handwheel Port (J9) A quadrature encoder type device is normally brought into the handwheel port; it can be wired and used in either single-ended or differential mode. The encoder power is not provided for this device, it must be brought in externally. -
Page 133: Serial Port (Rs232)
Brick Controller User Manual Serial Port (RS232) An optional serial RS-232 communication port is available on the Brick Controllers. This port can be used as a primary communication mean or employed as a secondary port that allows simultaneous communication. RS-232: D-Sub DE-9F Mating: D-Sub DE-9M Pin# Symbol Function... -
Page 134: Amp1-Amp8: Amplifier Connection
Brick Controller User Manual AMP1-AMP8: Amplifier Connection AMP1-AMP8: D-sub DA-15F Mating: D-Sub DA-15M Pin # Schematic Symbol Function Notes DACA+ Output DAC A output + DACB+ Output DAC B output + AE_NC+ Output Amplifier Enable Relay Normally Close AE_NO+ Output Amplifier Enable Relay Normally Open AFAULT- (COM) Common... -
Page 135: Wiring The Dac Output
Brick Controller User Manual Wiring the DAC Output Single Ended DAC Output Differential DAC Output DAC+ DAC+ Analog Analog DAC- Device Device Sinusoidal DAC Output DACA+ DACA- Sine-Wave DACB+ Amplifier DACB- Connections And Software Setup... -
Page 136: Wiring The Amplifier Enable And Fault Signals
Brick Controller User Manual Wiring the Amplifier Enable and Fault Signals The amplifier enable output signal can be either: High true using the normally open contact (pin #4) Low true using the normally closed contact (pin #3) Also, it can be either sourcing or sinking depending on the wiring scheme. The following table summarizes the amplifier enable contact relays’... - Page 137 Brick Controller User Manual High True Amplifier Enable Output Sourcing Sinking AMP ENA 12-24V AMP ENA AE COM Power Power AMP FLT Supply COM Supply 12-24V AMP FLT AE COM Low True Amplifier Enable Output Sourcing Sinking AMP ENA AMP ENA AE COM 12-24V Power...
-
Page 138: Drive-Motor Setup
Brick Controller User Manual DRIVE-MOTOR SETUP The Brick Controller supports three types of outputs: Analog ±10V 12-bit Filtered PWM Analog ±10V 18-bit True DAC Pulse Frequency Modulation (PFM) The following chart summarizes the steps to implement for setting up a motor properly with the Brick Controller: Encoder / Motor wiring Factory Default Reset $$$***, Save, $$$... -
Page 139: Filtered Pwm Output (Analog ±10V)
Brick Controller User Manual Filtered PWM Output (Analog ±10V) In this mode, the ±10V analog output is obtained by passing the digital PWM signal through a 10 KHz low pass filter. This technique, although not as performing as a true digital to analog converter, is more than adequate for most servo applications. -
Page 140: Clock Settings, Output Mode, Command Limit
Brick Controller User Manual Clock Settings, Output Mode, Command Limit Most commonly used and suggested clock settings in this mode allowing a good compromise are a 30 KHz PWM Frequency, 10 KHz Phase, and 2.5 KHZ Servo. DT Calculator Link I7100 = 981 ;... -
Page 141: I2T Protection: Ixx57, Ixx58
Brick Controller User Manual I2T Protection: Ixx57, Ixx58 I2T is a software thermal model (PMAC internal calculation) used to protect motor and drive from exceeding current specifications. For a safe setup, the lower limit of continuous and peak current specifications between the motor and drive should be selected. Example: A Brick Controller driving a torque-mode amplifier that has a gain of 3 amperes/volt and a continuous current rating of 10 amperes, with a motor rated to 12 amperes continuous. - Page 142 Brick Controller User Manual The open-loop test is usually Unsatisfactory Open Loop Test Result performed on an unloaded motor. The open loop command output is adjustable, start off with a conservative 1 to 2 percent command output (i.e. #nO2) value and increment gradually until you see a satisfactory result.
-
Page 143: Position-Loop Pid Gains: Ixx30
Brick Controller User Manual Position-Loop PID Gains: Ixx30…Ixx39 The position-loop tuning is done as in any Turbo PMAC PID-Loop setup. The PMACTuningPro2 automatic or interactive utility can be used to fine-tune the PID-Loop. Satisfactory Step and Parabolic move responses would look like: Position Step Move Position Parabolic Move At this point of the setup, the motor(s) is ready to accept Jog... -
Page 144: True Dac Output (±10V)
Brick Controller User Manual True DAC Output (±10V) Clock Settings, Output Mode Default Clock settings are suitable for most applications. Output mode is set to DAC. I7100 = 6527 ; Servo IC 1 PWM Frequency 4.5 KHz, Max Phase Frequency 9 KHz I7101 ;... -
Page 145: I2T Protection: Ixx57, Ixx58
Brick Controller User Manual I2T Protection: Ixx57, Ixx58 I2T is a software thermal model (PMAC internal calculation) used to protect motor and drive from exceeding current specifications. For a safe setup, the lower limit of continuous and peak current specifications between the motor and drive should be selected. Example: A Brick Controller driving a torque-mode amplifier that has a gain of 3 amperes/volt and a continuous current rating of 10 amperes, with a motor rated to 12 amperes continuous. - Page 146 Brick Controller User Manual The open-loop test is usually performed Unsatisfactory Open Loop Test Result on an unloaded motor. The open loop command output is adjustable, start off with a conservative 1 to 2 percent command output (i.e. #nO2) value and increment gradually until you see a satisfactory result.
-
Page 147: Position-Loop Pid Gains: Ixx30
Brick Controller User Manual Position-Loop PID Gains: Ixx30…Ixx39 The position-loop tuning is done as in any Turbo PMAC PID-Loop setup. The PMACTuningPro2 automatic or interactive utility can be used to fine-tune the PID-Loop. Satisfactory Step and Parabolic move responses would look like: Position Step Move Position Parabolic Move At this point of the setup, the motor(s) is ready to accept Jog... -
Page 148: Pulse And Direction Output (Pfm)
Brick Controller User Manual Pulse and Direction Output (PFM) The Pulse and direction (Pulse Frequency Modulation) output pins are located on the encoder (X1-X8) connectors. The stepper drive specifications dictate the choice of the maximum PFM clock frequency, and pulse width. DT Calculator Forum Link Step 1: Choose Max PFM clock by changing the PFM clock divider. -
Page 149: Pfm Setup Example
Brick Controller User Manual PFM Setup Example // Encoder Conversion Table, for channels 1-4 I8000=$C78000 ; Entry 1 incremental encoder, no extension I8001=$C78008 ; Entry 2 incremental encoder, no extension I8002=$C78010 ; Entry 3 incremental encoder, no extension I8003=$C78018 ; Entry 4 incremental encoder, no extension // Encoder Conversion Table, for channels 5-8 I8004=$C78100 ;... -
Page 150: Issuing Open-Loop Commands
Brick Controller User Manual Issuing Open-Loop Commands Activating the motor channel should be sufficient at this point to allow open loop commands. Note that an open loop command of zero magnitude (#nO0) will result in a zero frequency output, and an open loop command of 100 (#nO100) will result in the maximum calculated frequency output. - Page 151 Brick Controller User Manual Implementing PID gains, Ixx30..Ixx35 In PFM mode, the PID Gains can be determined using the following empirical equations: 660000 Ixx30 Ixx08 CLock [MHz] Ixx31 Ixx32 6660 Servo Freq. [KHz] Ixx3 ..Ixx35 // Channels 1-4 PID Gains (with default clock settings): I130,4,100=11190...
-
Page 152: Macro Connectivity
MACRO stands for Motion and Control Ring Optical. It is a high bandwidth non-proprietary digital interface industrialized by Delta Tau Data Systems for distributed multi-axis systems. MACRO can be connected using either fiber optic or twisted copper pair RJ45 cables. The RJ45 electrical interface can extend to up to 30 meters (or about 100 feet), and the fiber optic interface can extend to up to 3 kilometers (or about 2 miles). -
Page 153: Macro Configuration Examples
Brick Controller User Manual MACRO Configuration Examples The Brick Controller with its’ MACRO interface supports a wide variety of MACRO ring formations. The following common MACRO configurations are described in detail: Configuration MACRO Ring Controller MACRO Ring Configuration Example (Master) Slave(s) Type Brick Controller... -
Page 154: Review: Macro Nodes And Addressing
Brick Controller User Manual Review: MACRO Nodes and Addressing Each MACRO IC consists of 16 nodes: 2 auxiliary, 8 servo and 6 I/O nodes: Auxiliary nodes are reserved for master/slave setting and internal firmware use Servo nodes are used for motor control carrying feedback, commands, and flag information ... -
Page 155: Review: Macro Auxiliary Commands
Brick Controller User Manual Review: MACRO Auxiliary Commands In MACRO Auxiliary mode (Brick - Brick), master and slave data exchange (i.e. reads, writes) can be done using Macro Auxiliary MX commands. For simplicity, the following examples describe syntax commands intended to communicate with a slave unit associated with node 0. -
Page 156: Configuration Example 1: Brick - Brick
Brick Controller User Manual Configuration Example 1: Brick - Brick MACRO Ring Master MACRO Ring Slave The following example describes the necessary steps for setting up a MACRO ring comprised of an 8- axis Brick Controller as a master and another 8-axis Brick Controller as a slave. Alternately, it is possible to have 2 x 4-axis Brick Controllers as slaves. - Page 157 Brick Controller User Manual 8. MACRO ring settings I80, I81 and I82 enable the ring error check function. I85 specifies a station number which the slave unit is assigned to (e.g. multiple slave stations). I6840 specifies whether this is a master or a slave. ...
-
Page 158: Setting Up The Master
Brick Controller User Manual Setting up the Master 1. Establish communication to the master using USB, Ethernet, or Serial. 2. Consider starting from factory default settings. This can be done by issuing a $$$*** followed by a Save, and a reset $$$. 3. - Page 159 Brick Controller User Manual 9. Position And Velocity Pointers If all local motors have digital quadrature encoders (1-line ECT entries), and no other entries are used in the Encoder Conversion Table then the position (Ixx03) and Velocity (Ixx04) pointers of the MACRO motors are valid by default (set by firmware) and need not be changed: MACRO MACRO...
- Page 160 Brick Controller User Manual Servo Node Addresses MACRO Register MACRO Address Register Motor # Address Motor # motor motor 5 or 9 $78420 Servo Node 0 9 or 13 $78430 Servo Node 8 6 or 10 $78424 Servo Node 1 10 or 14 $78434 Servo Node 9...
-
Page 161: Configuration Example 2: Brick - Geo Macro Drive
Brick Controller User Manual Configuration Example 2: Brick - Geo MACRO Drive This configuration example discusses the Geo MACRO Drive necessary steps for setting up a MACRO ring with (slave #4) an 8-axis Brick Controller as a master and up to 4 x dual axes Geo MACRO drives as slaves. - Page 162 Brick Controller User Manual The following steps are guidelines for setting up one Geo Macro Drive slave: 1. Establish communication to the Brick Controller using USB, Ethernet, or Serial. 2. Consider starting from factory default settings. This can be done by issuing a $$$*** followed by a Save, and a reset ($$$). 3.
- Page 163 Brick Controller User Manual 8. If the Geo MACRO Drive has been configured prior to this setup, then it may have been assigned a station number and/or may have some enabled nodes. You would need to know what the station number is in order to perform ASCII communication, or which nodes are enabled in order to issue MS commands.
- Page 164 Brick Controller User Manual 16. Activating MACRO Motors Variable I4900 reports how many servo ICs is the Brick Controller populated with. Knowing that each Servo IC services 4 axes, querying I4900 will reveal how many local channels are occupied and thus the number of the 1 available motor on the Macro Ring: If I4900...
- Page 165 Brick Controller User Manual Servo Node Addresses MACRO Register MACRO Address Register Motor # Address Motor # motor motor 5 or 9 $78420 Servo Node 0 9 or 13 $78430 Servo Node 8 6 or 10 $78424 Servo Node 1 10 or 14 $78434 Servo Node 9...
- Page 166 Brick Controller User Manual 18. Typical MACRO motor settings The motor command output address Ixx02 is initiated by default in the firmware MACRO MACRO Motor # Ixx02 Register Motor # Ixx02 Register motor motor 5 or 9 9 or 13 $078420 $078430 Servo Node 0...
- Page 167 Brick Controller User Manual The current feedback mask Ixx84 should be set to $FFF000. Commutation Cycle Size Ixx70 = {Number of pair poles} Ixx71 = {Number of counts per revolution * 32} I2T Settings (example for motor #9): I15=0 ;...
- Page 168 Brick Controller User Manual 20. Motor Phasing, Open-Loop Test Motor phasing is performed in the same manner as it would be for any digitally commutated motor. The following is a satisfactory open loop test: An erratic or inverted saw tooth response is typically (with quadrature, or sinusoidal encoders) an indication of reversed encoder direction –with respect to the output command- The encoder decode parameter MS{node},I910 can then be changed from 7 to 3 or vice versa.
-
Page 169: Brick - Brick Macro I/O Data Transfer
Brick Controller User Manual Brick – Brick MACRO I/O Data Transfer This section describes the handling of inputs and outputs data transfer over the MACRO ring. That is transferring I/O data from the Brick slave to the Brick master. A Brick Controller, used as a MACRO slave, can be populated with up to: ... -
Page 170: Transferring The Digital (Discrete) Input And Outputs
Brick Controller User Manual Transferring the Digital (Discrete) Input and Outputs A Brick Controller can be populated with up to 48 digital inputs and 24 digital outputs (connectors J6, J7, and J8) for a total of 72 I/O points (bits) mapped as follows: Inputs Address Connector... - Page 171 Brick Controller User Manual The proposed transfer mechanism establishes the reading of inputs and writing to outputs through bitwise assignments (single-bit definitions) from the master side. Outputs: At the master side, the user would write the desired outputs’ state (using the bitwise definitions) to pre-defined open memory registers which are copied, using a PLC code, into the 24-bit register of MACRO I/O node 2.
- Page 172 Brick Controller User Manual Slave Digital I/Os Transfer Example I6841=I6841|$000004 ; Make sure that I/O node 2 is active // Digital Outputs #define OutByte1 M7000 ; 1st Byte of Outputs J6 #define OutByte2 M7001 ; 2nd Byte of Outputs J7 #define OutByte3 M7002 ;...
- Page 173 Brick Controller User Manual Master Digital I/Os Transfer Example I6841=I6841|$000004 ; Make sure that I/O node 2 is active // Open Memory Registers #define OpenReg16Y M7000 ; Open memory register 16, Y-word #define OpenReg16X M7001 ; Open memory register 16, X-word #define OpenReg15Y M7002 ;...
- Page 174 Brick Controller User Manual #define Output14 M7114 Output14->Y:$10FF,13,1 ; Output 14 #define Output15 M7115 Output15->Y:$10FF,14,1 ; Output 15 #define Output16 M7116 Output16->Y:$10FF,15,1 ; Output 16 // Bitwise Outputs (J8) #define Output17 M7117 Output17->Y:$10FF,16,1 ; Output 17 #define Output18 M7118 Output18->Y:$10FF,17,1 ; Output 18 #define Output19 M7119 Output19->Y:$10FF,18,1 ;...
-
Page 175: Transferring The X9-X12 Analog Inputs/Outputs
Brick Controller User Manual Transferring the X9-X12 Analog Inputs/Outputs A Brick Controller MACRO slave can be populated with up to: 4 x 16-bit analog inputs (connectors X9 through X12) 4 x 12-bit filtered PWM ±10V analog outputs (connectors X9 through X12) These inputs and outputs are typically mapped using suggested or pre-defined M-Variables at the following addresses: Analog Inputs, connectors X9-X12... - Page 176 Brick Controller User Manual Slave Settings I6841=I6841|$3300 ; Enable servo nodes 8,9,12,13 I544=$078433 ; MacroIC0 Node 8 Command Address. PWM Mode For ADC Transfer I644=$078437 ; MacroIC0 Node 9 Command Address. PWM Mode For ADC Transfer I744=$07843B ; MacroIC0 Node12 Command Address. PWM Mode For ADC Transfer I844=$07843F ;...
-
Page 177: Transferring The J9 Analog Inputs
Brick Controller User Manual Transferring the J9 Analog Inputs A Brick Controller MACRO slave with option 12 offers 8 x 12-bit analog inputs on connector J9. These inputs and outputs are typically mapped using suggested or pre-defined M-Variables at the following addresses: Analog Inputs, connector J9 M6991->Y:$003400,12,12,S ;... -
Page 178: Macro Limits And Flags, Homing
Brick Controller User Manual MACRO Limits and Flags, Homing Limits and Flags MACRO Motors’ Limits and Flags are automatically copied by the Firmware. They can be accessed from the Ring Controller using the MACRO Suggested M-Variables. In a Brick – Brick MACRO configuration, the over-travel limits should be disabled on the slave side (Ixx24=Ixx24|$20001). -
Page 179: Macro Suggested M-Variables
Brick Controller User Manual MACRO Suggested M-Variables // Macro IC 0 Node 0 Flag Registers M150->X:$003440,0,24 ; Macro IC 0 Node 0 flag status M151->Y:$003440,0,24 ; Macro IC 0 Node 0 flag command M153->X:$003440,20,4 ; Macro IC 0 Node 0 TUVW flags M154->Y:$003440,14,1 ;... - Page 180 Brick Controller User Manual // Macro IC 0 Node 9 Flag Registers M650->X:$003449,0,24 ; Macro IC 0 Node 9 flag status register M651->Y:$003449,0,24 ; Macro IC 0 Node 9 flag command register M653->X:$003449,20,4 ; Macro IC 0 Node 9 TUVW flags M654->Y:$003449,14,1 ;...
-
Page 181: Absolute Position Reporting Over Macro
Brick Controller User Manual Absolute Position Reporting over MACRO Writing to the motor actual position (Mxx62) should only be done when the motor is killed. Caution The Brick Controller supports a wide variety of absolute encoders. When used as a MACRO slave, the simplest way to report the absolute position to the master (ring controller) is to use the MACRO auxiliary communication (read/write). -
Page 182: Troubleshooting
Top assembly last ship date (e.g. if it has ever been back for repair) This page is strictly for identification purposes. Some information may not be meaningful to the user and pertains to Delta Tau’s internal use only. Note... -
Page 183: Boot Switch Sw (Firmware Reload) - Write-Protect Disable
Reloading communication boot and firmware These functions are accessible through the Configure Ethernet 100 BaseT utility found in the Windows Start menu under PMAC Executive Pro2 Suite > Delta Tau Common > Configure Ethernet 100 BaseT: This utility only works with USB communication. -
Page 184: Reloading Pmac Firmware
Brick Controller User Manual Reloading PMAC firmware The following steps ensure proper firmware reload/upgrade. Step1: Power up the unit while holding the BOOT SW switch down. Step2: Release the BOOT SW switch approximately 2-3 seconds after power-up. Step3: Launch the Pewin32Pro2. Run the PMAC Devices window under Setup >... - Page 185 Brick Controller User Manual Step4: The download utility will prompt for a .BIN file. MAKE SURE you open the correct file. The PMAC firmware file for Brick Controller MUST ALWAYS be TURBO2.BIN. Note Step4: Wait until download is finished, and click done. Step5: Close all PMAC applications (i.e.
-
Page 186: Changing Ip Address, Gateway Ip, Gateway Mask
Brick Controller User Manual Changing IP Address, Gateway IP, Gateway Mask In order to change any of these addresses, the BOOT SW switch has to be held down prior to pressing the corresponding Store button. The following steps ensure proper configuration: Step1: Change the desired address field Step2: Hold the BOOT SW switch down Step3: Press on the corresponding Store button... -
Page 187: Enabling Modbus
MAC ID of the Brick unit. This is found in the lower left hand side of the Ethernet 100 Base T utility. Upon purchase of the ModBus Option, a .BIN file is obtained from Delta Tau for this purpose. -
Page 188: Reloading Boot And Communication Firmware
Brick Controller User Manual Reloading Boot and Communication Firmware The boot and firmware .IIC files are required for this procedure. They are normally obtained directly from Delta Tau, or downloaded from the PMAC forum Webpage. The following steps ensure proper... -
Page 189: Reset Switch Sw (Factory Reset)
Brick Controller User Manual Reset Switch SW (Factory Reset) This momentary switch button is used to reset the Brick Controller back to factory default settings, global reset. Issuing a SAVE after power up (with the reset switch held down) will permanently erase any user configured parameters. -
Page 190: Appendix A
Brick Controller User Manual APPENDIX A DB- Connector Spacing Specifications X1-8: DB-15 Connectors for encoder feedback 3.115±.05 1.541±.015 X9-12: DB-9 Connectors for Analog I/O 2.45±.05 1.213+.015 Screw Lock Size for all DB-connectors .235 .126 #4-40 FEMALE SCREWLOCK LOCKWASHER QTY 2 per connector QTY 2 per connector Steel, Zinc Plated Clear Chromate... -
Page 191: Schematics
Brick Controller User Manual APPENDIX B Schematics AMP1-AMP8: Amplifier Fault / Amplifier Enable diagrams Appendix B... -
Page 192: J6 And J7: General Purpose I/O
Brick Controller User Manual J6 and J7: General Purpose I/O Inputs Opto Gnd Plane RP152 RP153 GPIN01 ACI1A GPIN02 ACI1B GPIN03 ACI2A GPIN04 ACI2B 1.2KSIP8I 1.2KSIP8I ACI3A MMBZ5V6ALT1 MMBZ5V6ALT1 MMBZ5V6ALT1 MMBZ5V6ALT1 ACI3B ACI4A ACI4B MMBZ33VALT1 MMBZ33VALT1 PS2705-4 RP154 2.2KSIP8I C230 C233 .1uf .1uf... - Page 193 Brick Controller User Manual Outputs: J6 & J7 (603793 – 109 and earlier) Outputs: J6 & J7 (603793 – 10A and later) Appendix B...
-
Page 194: J4: Limit Inputs For Axis 1-4
Brick Controller User Manual J4: Limit Inputs for Axis 1-4 U 39 R P3 7 U SER1 PLIM1 MLIM1 H OME1 FL_ RT1 4 .7KSIP8 I R P3 8 4 .7KSIP8 I R P3 9 PS2 7 05 - 4 x 1KSIP8 I ( IN SOC KET) C 16 0... -
Page 195: J5: Limit Inputs For Axis 5-8
Brick Controller User Manual J5: Limit Inputs for Axis 5-8 U 59 R P8 7 U SER5 PLIM5 MLIM5 H OME5 FL_ RT5 4 .7KSIP8 I R P8 8 4 .7KSIP8 I R P8 9 PS2 7 05 - 4 x 1KSIP8 I ( IN SOC KET) C 20 0... -
Page 196: Appendix C
Brick Controller User Manual APPENDIX C Absolute Serial Encoders Limitation with Turbo PMAC The following is a summary of certain limitations which could be encountered with higher resolution absolute serial encoders, and a description of related registers with respect to the proposed setup techniques. - Page 197 Brick Controller User Manual Maximum “Actual” Open-Loop Velocity In open-loop mode, the actual velocity register is limited by the Encoder Conversion Table to 24 bits. Furthermore, it requires two samples (servo cycles) to compute the velocity. Therefore, the maximum value which the actual velocity register can withhold is: When performing an open-loop move/test with higher resolution serial encoders, care must be taken not to exceed this threshold.
- Page 198 Brick Controller User Manual Maximum “Commanded” Closed-Loop Velocity In closed-loop mode, the commanded (desired) velocity register is limited to: In terms of motor counts per millisecond, the maximum commanded velocity will be the same with or without shifting but since the number of counts per revolution “unshifted” is 32 times less, then the maximum programmable velocity is 32 times greater.
Need help?
Do you have a question about the 5XX-603869-XUXX and is the answer not in the manual?
Questions and answers