Table of Contents
Advertisement
Owner's Manual
True RMS Multimeter with IR Thermometer
Model No. 82024
CAUTION: Read, understand and
follow Safety Rules and Operating
Instructions in this manual before
using this product.
Sears Brands Management Corporation, Hoffman Estates, IL 60179 U.S.A.
www.craftsman.com
Safety
Operation
Maintenance
Español
122112
Advertisement
Table of Contents

Related Manuals for Craftsman 82024


Summary of Contents for Craftsman 82024
- Page 1 Owner's Manual True RMS Multimeter with IR Thermometer Model No. 82024 Safety CAUTION: Read, understand and Operation follow Safety Rules and Operating Maintenance Instructions in this manual before using this product. Español Sears Brands Management Corporation, Hoffman Estates, IL 60179 U.S.A.
-
Page 2: Table Of Contents
A defective product will be replaced free of charge. For warranty coverage details to obtain free replacement, visit the web site: www.craftsman.com This warranty is void if this product is ever used while providing commercial services or if rented to another person. -
Page 3: Safety Instructions
SAFETY INSTRUCTIONS This meter has been designed for safe use, but must be operated with caution. The rules listed below must be carefully followed for safe operation. NEVER apply voltage or current to the meter that exceeds the specified maximum: Input Protection Limits Function Maximum Input... -
Page 4: Safety Symbols
SAFETY SYMBOLS This symbol adjacent to another symbol, terminal or operating device indicates that the operator must refer to an explanation in the Operating Instructions to avoid personal injury or damage to the meter. This WARNING symbol indicates a potentially hazardous situation, which if not WARNING avoided, could result in death or serious injury. -
Page 5: Control And Jacks
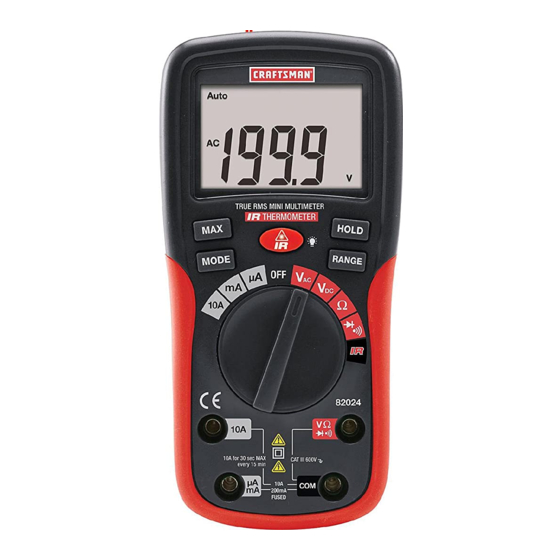
CONTROLS AND JACKS 1. IR Thermometer 2. Laser Pointer 3. 2000 count LCD 4. MAX button 5. MODE button 6. FUNCTION switch 7. mA, µA and 10A input jacks 8. IR Thermometer button 9. HOLD button 10. RANGE button 11. Positive input jack 12. -
Page 6: Specifications
SPECIFICATIONS Function Range Resolution Accuracy (0.8% reading + 6 digits) DC Voltage 200 mV 0.1 mV 0.001V (0.5% reading + 2 digits) 0.01V 200V 0.1V (0.8% reading + 2 digits) 600V AC Voltage 200 mV 0.1 mV (50/60Hz) 0.001V (1.5% reading + 6 digits) 0.01V 200V 0.1V... - Page 7 Function Range Resolution Accuracy 200 0.1 (0.8% reading + 5 digits) Resistance 2 k 0.001 k (0.8% reading + 2 digits) 20 k 0.01 k 200 k 0.1 k 2 M 0.001 M (2.5% reading + 8 digits) 20 M...
-
Page 8: Battery Anf Fuse Replacement
BATTERY AND FUSE REPLACEMENT WARNING: To avoid electric shock, disconnect the test leads from any source of voltage before removing the battery cover. 1. Turn power off and disconnect the test leads from the meter. 2. Open the rear battery/fuse compartment by removing the Phillips head screw on the lower rear of the meter. -
Page 9: Operating Instructions
OPERATING INSTRUCTIONS WARNING: Risk of electrocution. High-voltage circuits, both AC and DC, are extremely dangerous and should be measured with great care. 1. ALWAYS turn the function switch to the OFF position when the meter is not in use. 2. If “OL” appears in the display during a measurement, the value exceeds the range you have selected. -
Page 10: Ac/Dc Voltage Measurements
AC/DC VOLTAGE MEASUREMENTS CAUTION: Do not measure DC voltages if a motor on the circuit is being switched ON or OFF. Large voltage surges may occur that can damage the meter. 1. Rotate the function switch to the V or V position. -
Page 11: Continuity Check
CONTINUITY CHECK WARNING: To avoid electric shock, never measure continuity on circuits or wires that have a voltage potential. 1. Rotate the function switch to the position. 2. Insert the black lead banana plug into the negative COM jack. Insert the red test lead banana plug into the positive jack. -
Page 12: Ir Temperature Measurements
NON-CONTACT INFRARED TEMPERATURE MEASUREMENTS Rotate the function switch to the IR position. The upper right four digit temperature display will switch on. Press the MODE button to select °F or °C. Aim the infrared sensor (top of meter) at the surface to be measured. Press and Hold the IRT button to turn on the IR thermometer and laser pointer. -
Page 13: Maintenance
MAINTENANCE WARNING: To avoid electric shock, disconnect the test leads from any source of voltage before removing the back cover or the battery cover. WARNING: To avoid electric shock, do not operate your meter until the battery cover is in place and fastened securely.
Need help?
Do you have a question about the 82024 and is the answer not in the manual?
Questions and answers