Signode BXT2 Operation Manual
Battery-hand tool for plastic strapping
Hide thumbs
Also See for BXT2:
- Operation, parts and safety manual (16 pages) ,
- Maintenance manual (33 pages) ,
- Operating instructions manual (36 pages)
Table of Contents
Advertisement
OPERATION, PARTS AND
SAFETY
MANUAL
MANUAL DE OPERACIÓN, PARTES
Y
SEGURIDAD
BXT2
BATTERY-HAND TOOL FOR PLASTIC STRAPPING
APARATO PORTÁTIL CON ACUMULADOR PARA
FLEJADO CON CINTA PLÁSTICA
READ ALL INSTRUCTIONS BEFORE OPERATING THIS SIGNODE PRODUCT
LEA CUIDADOSAMENTE ESTE INSTRUCTIVO ANTES DE UTILIZAR EL APARATO
SIGNODE
•
3610
W. LAKE AVENUE • GLENVIEW,
ILLINOIS
60025 U.S.A.
07.09
Advertisement
Table of Contents

Related Manuals for Signode BXT2


Summary of Contents for Signode BXT2
- Page 1 SEGURIDAD BXT2 BATTERY-HAND TOOL FOR PLASTIC STRAPPING APARATO PORTÁTIL CON ACUMULADOR PARA FLEJADO CON CINTA PLÁSTICA READ ALL INSTRUCTIONS BEFORE OPERATING THIS SIGNODE PRODUCT LEA CUIDADOSAMENTE ESTE INSTRUCTIVO ANTES DE UTILIZAR EL APARATO SIGNODE • 3610 W. LAKE AVENUE • GLENVIEW, ILLINOIS 60025 U.S.A.
-
Page 2: 3610 W. Lake Avenue, Short Instructions
SHORT INSTRUCTIONS The most important points in brief! Charging battery / Cargar acumulador / Akku laden Insert battery / Inserte acumulador / Akku einsetzen red / rojo / rot Error / Defecto / Fehler green / verde / grün 1st charge > 5 hr / Recharging approx. 20–40 min. 1. - Page 3 INSTRUCCIÓNES BÁSICAS KURZANLEITUNG ¡La mayoría de los aspectos! Das Wichtigste in Kürze! Battery charge / Carga de la batería / Akku-Ladezustand Operating panel / Panel del operación / Bedienpanel ➟ Recharge ✓ ✓ ➟ Recargar ➟ Aufl aden green / verde / grün red / rojo / rot Mode of operation / Modo operativo / Betriebsart ➟...
-
Page 4: Table Of Contents
DECLARATION OF CONFORMITY We take sole responsibility for declaring that the tool BXT2 to which this declaration refers is in full conformi- ty with the current requirements of the guidelines laid down by the council on 22th June 1998 (98/37/ECC), “Machine Guidelines“. -
Page 5: Technische Daten
Los abajo fi rmantes declaramos, asumiendo nuestra Wir erklären in alleiniger Verantwortung, dass das sola responsabilidad, que el equipo al que se refi ere Gerät BXT2, auf welches sich diese Erklärung bezieht, esta declaración corresponde a los lineamientos técni- mit den geltenden Bestimmungen der Richtlinie des cos vigentes, establecidos por el consejo del 22 de Rates vom 22. - Page 6 SIGNODE BXT2 TECHNICAL DATA Weight 3.9 kg (8.6 lbs.) (incl. battery) Dimensions Length 370 mm (14.5“) Width 138 mm (5.4“) Height 148 mm (5.8“) Strap tension (0) 900–2500 N (200–560 lbs.) Soft: 400–1500 N (88–335 lbs.) Tension speed 220 mm/s (8.6“/s)
-
Page 7: Información Técnica
SIGNODE BXT2 INFORMACIÓN TÉCNICA TECHNISCHE DATEN Peso 3,9 kg(incluye acumul.) Gewicht 3,9 kg (inkl. Akku) Dimensiones Largo 370 mm Abmessungen Länge 370 mm Ancho 138 mm Breite 138 mm Alto 148 mm Höhe 148 mm Tensión (0) 900–2500 N Spannkraft (0) 900–2500 N... -
Page 8: General Information
SIGNODE BXT2 GENERAL INFROMATION These operating instructions are intended to simplify fa- WARNING miliarisation with the strapping tool and its proper use for the intended purpose. The operating instructions contain ATENCIÓN important information concerning the safe, proper and effi cient use of the strapping tool. -
Page 9: Generalidades
SIGNODE BXT2 GENERALIDADES ALLGEMEINES Este instructivo de operación está destinado a facilitar Diese Betriebsanleitung soll das Kennenlernen des Ge- el conocimiento del aparato y su correcta utilización rätes und den bestimmungsgemässen Einsatz erleich- conforme a las disposiciones. El instructivo de operación tern. -
Page 10: Safety Instructions
SIGNODE BXT2 WARNING SAFETY INSTRUCTIONS ATENCIÓN Inform yourself! Read the operating instructions carefully. Preventive and corrective maintenance on the tool may only be carried out by trained personnel. Protect yourself! When operating the tool, wear eye, face and hand pro- tection (cut-proof gloves). -
Page 11: Disposiciones De Seguridad
SIGNODE BXT2 DISPOSICIONES DE SEGURIDAD SICHERHEITSVORSCHRIFTEN ¡Infórmese! Informieren Sie sich! Lea cuidadosamente este instructivo antes de utilizar el Vor dem Gebrauch des Gerätes die Betriebsanleitung aparato. sorgfältig lesen. El aparato sólo deberá recibir mantenimiento y ser repa- Das Gerät darf nur von ausgebildetem Personal gewartet rado por personal cualifi... -
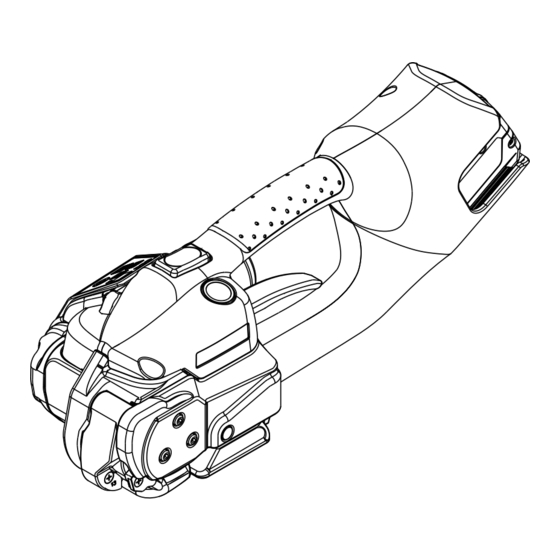
Page 12: Description
SIGNODE BXT2 DESCRIPTION 4.1 CONSTRUCTION 1 Operating panel 2 Tension button „Strap tensioning/welding“ (Fully-Auto) AUTO + / - 3 Handle MAN. AUTO SOFT MAN. 4 Battery, 14.4 V + / - SOFT 5 Rocker lever 6 Welding button „Welding/cutting“ (manual) -
Page 13: Descripción
SIGNODE BXT2 DESCRIPCIÓN BESCHREIBUNG 4.1 CONSTRUCCIÓN 4.1 AUFBAU 1 Panel de operación 1 Bedienpanel 2 Tecla de tensado “tensado de fl eje/soldadura“ 2 Spanntaste „Band Spannen/Schweissen“ (Vollautom.) (todo automatico) 3 Traggriff 3 Asa portadora 4 Akku, 14,4 V 4 Acumulador, 14,4 V... -
Page 14: Operating Instructions
SIGNODE BXT2 ORERATING INSTRUCTIONS 5.1 CHARGING THE BATTERY – Connect battery charger AL 1860 CV (4/2) to mains supply. – Insert battery 14.4 V (4/1) into battery charger slot. The charging process and error functions are indicated by a green (4/3) and a red light (4/4). -
Page 15: Operación
SIGNODE BXT2 OPERACIÓN BEDIENUNG 5.1 CARGADO DEL ACUMULADOR 5.1 AKKU AUFLADEN – Conectar el cargador AL 1860 CV (4/2) a la red – Ladegerät AL 1860 CV (4/2) an Netzspannung eléctrica. anschliessen. – Colocar acumulador (14,4 V) (4/1) en el enchufe de –... - Page 16 SIGNODE BXT2 – Take the tool in the right hand and lift the rocker lever (6/1) towards the handle. – Slide the straps, one on top of the other, into the tool up to the stop. The strap lead is now approximately 5 cm (2“) beyond the tool.
- Page 17 SIGNODE BXT2 – Tome el aparato con la mano derecha y tire la pa- – Gerät mit der rechten Hand fassen und Wippenhebel lanca basculante (6/1) contra el asa portadora. (6/1) gegen den Traggriff ziehen. – Las cintas sobrepuestas deberán ser insertadas –...
-
Page 18: Checking The Seal
SIGNODE BXT2 5.3 CHECKING THE SEAL – Check appearance of seal (see fi g. 9) regularly. If the straps are poorly welded, check the welding time setting (refer to chapter 5.8). 1 Good seal (the complete surface is cleanly welded without excess material being forced out sideways). -
Page 19: Inspección De Soldadura
SIGNODE BXT2 5.3 INSPECCIÓN DE SOLDADURA 5.3 VERSCHLUSSKONTROLLE – Revise siempre el aspecto de la soldadura (ver fi g. – Verschluss regelmässig auf sein Aussehen überprüfen 9). Si la calidad del soldado no es satisfacto- (siehe Fig. 9). Bei schlecht geschweissten Bändern: ria: Revise el tiempo de soldadura (ver capítulo... -
Page 20: Setting Strap Tension
SIGNODE BXT2 5.6 SETTING STRAP TENSION – Press the „Function“ button (12/1) briefl y. ➟ – Press the „Strap tension“ button (12/2) until the fl ashing digital display (12/3) shows the required strap + / - tension. Wait two seconds until the new setting is saved. -
Page 21: Ajuste De Grado De Tensado
SIGNODE BXT2 5.6 AJUSTE DE GRADO DE TENSADO 5.6 SPANNKRAFT EINSTELLEN – Oprima brevemente la tecla “Función” (12/1). – Drucktaste „Funktion“ (12/1) einmal kurz betätigen. – Oprima la tecla “Tensión de fl eje” (12/2) hasta que el – Drucktaste „Spannkraft“ (12/2) mehrmals betätigen, indicador digital parpadeante (12/3) muestre la tensión... -
Page 22: Special Functions
SIGNODE BXT2 – Remove three cylinder screws (16/2). – Lift the rocker lever towards the handle, remove cylin- der screw (16/4) together with the strap stop rear 13 mm (16/3). – Remove cover (16/1). – Remove oval head screw (16/7) and remove strap guide rear 13 mm (16/6) from lever. -
Page 23: Funciones Especiales
SIGNODE BXT2 – Afl oje los tres tornillos cilíndricos (16/2). – Drei Zylinderschrauben (16/2) lösen. – Lleve la palanca basculante hacia el asa, extraiga el – Wippenhebel gegen den Traggriff ziehen, Zylinder- tornillo cilíndrico (16/4) junto con el tope de cinta schraube (16/4) lösen und Anschlag hinten 13 mm... -
Page 24: Preventive And Corrective Maintenance
SIGNODE BXT2 PREVENTIVE/CORRECTIVE MAINTENANCE 7.1 CLEANING/REPLACING TENSION WHEEL Removal – Remove battery from tool. – Remove four cylinder screws (19/4) and remove strap stop rear (19/5) and cover (19/3). – Remove tension wheel (19/1) carefully. Remove ball bearing (19/2) from tension wheel. -
Page 25: Mantenimiento Y Servicio
SIGNODE BXT2 MANTENIMIENTO Y SERVICIO WARTUNG UND INSTANDSETZUNG 7.1 LIMPIEZA/REEMPLAZO DE RUEDA TENSORA 7.1 SPANNRAD REINIGEN/ERSETZEN Desmontaje Ausbau – Extraiga el acumulador del aparato. – Akku aus Gerät ziehen. – Extraiga los cuatro tornillos cilíndricos (19/4), y quite el – Vier Zylinderschrauben (19/4) lösen, Anschlag hinten tope de cinta trasero (19/5) y la cubierta (19/3). -
Page 26: Trouble Shooting
SIGNODE BXT2 7.4 TROUBLE SHOOTING If a malfunction occurs, the digital display blinks and displays error “E” followed by the error number. FAULT / AVERÍA / STÖRUNG FAULT: Rocker lever was operated before the cooling-down period had elapsed. ACTION: – Operate the rocker lever only when the cooling-down period has elapsed.. -
Page 27: Eliminación De Averías
SIGNODE BXT2 7.4 ELIMINACIÓN DE AVERÍAS 7.4 BEHEBEN VON STÖRUNGEN Si ocurriera alguna anomalía, el indicador digital par- Tritt ein Fehler auf, blinkt die Segment-Anzeige und zeigt padeará desplegando “E” (Error) seguido del número einen Fehler „E“ an, gefolgt von der Fehlernummer. - Page 34 SIGNODE BXT2 NOTIZEN 07.09...
- Page 35 SIGNODE BXT2 NOTES NOTES 07.09...
- Page 36 (60) day warranty. This warranty will be extended to compensate for the time the tool is in Signode’s possession for warranty repairs.
Need help?
Do you have a question about the BXT2 and is the answer not in the manual?
Questions and answers