
Related Manuals for Acroprint ES700


Summary of Contents for Acroprint ES700
- Page 1 ELECTRONIC TIME RECORDER 5640 Departure Drive Raleigh, NC 27616 www. acroprint. com (800) 334-7190 06-0297-000 Rev. B...
-
Page 2: Table Of Contents
Service Manual CONTENTS 1. OUTLINE......................1- 1 2. BLOCK DIAGRAM..................2- 1 3- 1 3. DISASSEMBLY AND REASSEMBLY OF BASIC PARTS......3- 1. Exploded View..................3- 2 3- 2. Tools Required..................3- 3 3- 3. Disassembly..................... 3- 3 3- 4. Reassembly....................3- 7 4. -
Page 3: Front View
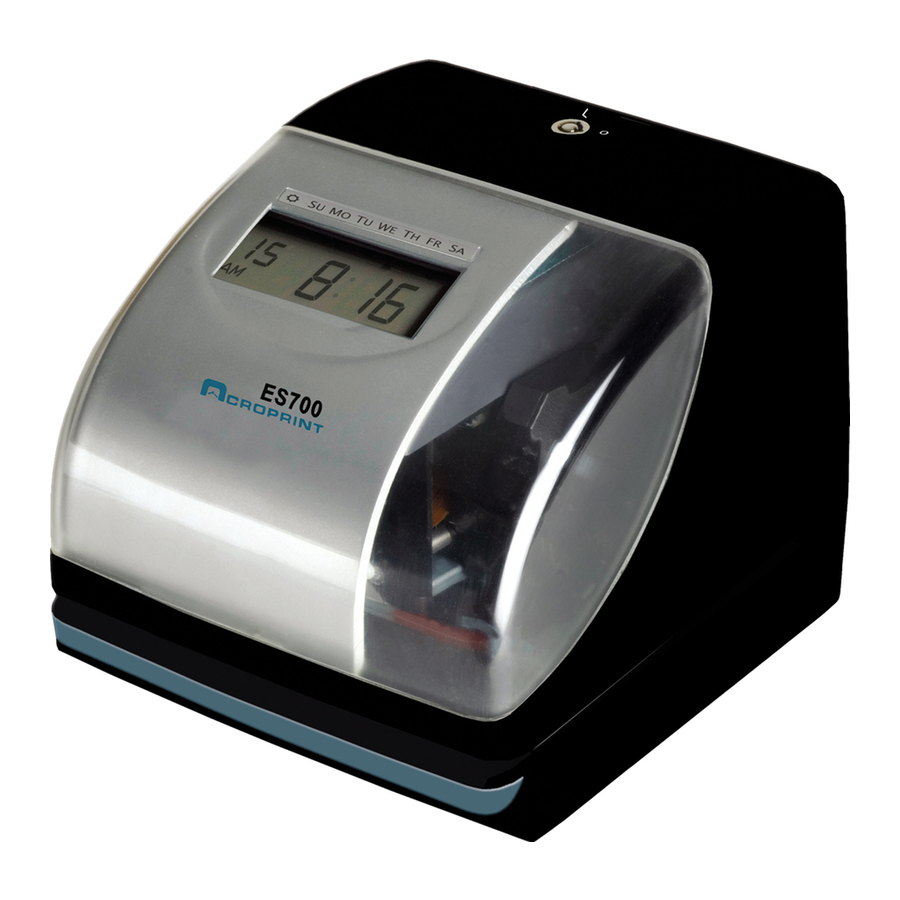
1. OUTLINE Be careful to avoid electric shock when repairing this unit. <Front view> <Cover off> Ink Ribbon Ass'y Cover Key hole Display Display Setting switch Key Top Print Head <Print position adjuster> The print position from the card edge is adjustable by pressing and sliding the print position <Back view>... - Page 4 2. BLOCK DIAGRAM...
-
Page 5: Disassembly And Reassembly Of Basic Parts
3. DISASSEMBLY AND REASSEMBLY OF BASIC PARTS CONTENTS 3-1. Exploded View ..............3-2 3-2. Tools Required ..............3-3 3-3. Disassembly ............... 3-3 3-4. Reassembly ................ 3-7... -
Page 6: Exploded View
3-1. Exploded View Cover B P/N Q7152-2184 Lock Lever P/N Q7152-2084 Indicator Plate P/N Q7152-2010 Top Enclosure P/N Q7152-2001 AC Adapter Ass'y Selection Label P/N Q7152-5210A P/NQ7152-2042 Mechanism Block Control PCB Ass'y P/N Q7150-5001A Printer Cover P/N Q7152-2002 LCD Panel P/N Q7150-5505 Paper Rack P/N Q7152-2070... -
Page 7: Tools Required
3-2. Tools Required Tools required : 1. No. 2 or #2 Phillips screwdriver 2. Miniature screwdriver 3-3. Disassembly Disassemble the parts in the following order : (1) Top Enclosure (2) Printer Cover (3) Control PCB Ass'y (1)—(2) (4) LCD Panel (1)—(2)—(3) (5) Mechanism Block (1)—(2)—(3)—(4) - Page 8 (2) Removing the Printer Cover 1. Remove the AC Adapter Ass'y cord. 2. Remove two screws k holding the Printer Cover. [Screw k : P.H.T. Screw (BT) 3x8 : 2 pieces] Printer Cover P/N Q7152-2002 AC Adapter Ass'y P/N Q7152-5210A 2.
- Page 9 (3) Removing the Control PCB Ass'y 1. Remove two screws k holding the Control PCB Ass'y. [Screw k : P.H.T. Screw (BT) 3x8 : 2 pieces] 2. Remove the Control PCB Ass'y from the Printer Cover hooks by rotating it. Printer Cover P/N Q7152-2002 Control PCB Ass'y...
- Page 10 (5) Removing the Mechanism Block 1. Insert the miniature screwdriver in the hole of the Bottom Enclosure back side, and release the two hooks holding the Paper Rack . Paper Rack P/N Q7152-2070 Hook Bottom Enclosure P/N Q7152-2003 Hole 2. Lift the front edges of the Paper Rack, and pull it out. Paper Rack P/N Q7152-2070...
-
Page 11: Reassembly
3. Remove the Key Top. 4. Release harness connecting with Switch PCB Ass'y from the hook. 5. Open the hook and release fixing of Switch PCB Ass'y. Switch PCB Ass'y Hook P/N Q7150-5007A Key Top P/N Q7152-2510 Hook 6. Remove two screws m holding the Mechanism Block. [Screw m : P.H. - Page 12 4. DISASSEMBLY AND REASSEMBLY OF MECHANISM CONTENTS 4-1. Exploded View, Oiling Instruction Diagram ....... 4- 2 4-2. Tools, Oils and Detergent Required ..........4- 3 4-3. Disassembly ................. 4- 4 4-4. Reassembly ................... 4-12...
-
Page 13: Exploded View, Oiling Instruction Diagram
4-1. Exploded View, Oiling Instruction Diagram Mid Gear P/N Q0100-1137 Cam Gear P/N Q0100-1554-1 Motor Ass'y P/N Q7150-1014A Bearing P/N Q0100-1035 Carrier Sub Plate P/N Q7000-1466 Platen Gear P/N Q7150-1082 Base Plate Ass'y P/N Q7150-1040A Bearing P/N Q0100-1035 Clutch Gear Carrier Spring P/N Q7000-1548 Cam B... -
Page 14: Tools, Oils And Detergent Required
4-2. Tools, Oils, and Detergent Required Tools required : 1. No. 2 or #2 Phillips screwdriver 2. No. 1 or #1 Phillips screwdriver 3. Standard blade type screwdriver with a tip thickness of 1mm or less 4. Tweezers (for small parts) Oils required : 1. -
Page 15: Disassembly
4-3. Disassembly Disassemble the parts in the following order : (1) Ink Ribbon Ass'y (2) Head Holding Plate (1) (2) Print Head (3) Platen Cover (4) Platen Gear (3) (4) Cam Gear Mid Gear Base Plate Ass'y Spacer (5) Bearing (1) (2) (3) (4) (5) Guide Shaft Carrier Ass'y... - Page 16 (1) Removing the Ink Ribbon Ass'y 1. Hold the handle of the Ink Ribbon Ass'y and remove it by pulling sideways. Ink Ribbon Ass'y P/N Q7014-1310A Handle (2) Removing the Head Holding Plate and Print Head 1. Put the Head Holding Plate in the direction of arrow A with a screwdriver or tweezers and remove it. 2.
- Page 17 (3) Removing the Platen Cover 1. Remove two screws c holding the Platen Cover and move the Sensor Block in the direction shown by arrow A so as to slide the Platen Cover in the direction shown by arrow B for removal. [Screw c : P.H.T.
- Page 18 (5) Removing the Bearing (this side), Guide Shaft, Carrier Ass'y, Carrier Spring, Carrier Sub Plate, Ribbon Driving Wheel, Clutch Gear, and Ribbon Driving Shaft. 1. Remove one screw c holding the Bearing (this side). [Screw c : P.H.T. Screw (BT) 3x6 : 1 piece] 2.
- Page 19 (6) Removing the Lead Screw Shaft, Cam, Cam B, Tractor Shaft Spring, and Bearing 1. Pull out the Lead Screw Shaft from the Cam B 2. Remove the Cam, Cam B, and Tractor Shaft Spring. 3. Remove one screw c holding the Bearing. [Screw c : P.H.T.
- Page 20 (8) Removing the Motor Ass'y 1. Remove two screws b holding the Motor Ass'y. [Screw b : P.H. Screw M2.6x5 : 2 pieces] Motor Ass'y P/N Q7150-1014A Base Plate Ass'y P/N Q7150-1040A (9) Removing the Sheet 1. Remove the Sheet. Sheet P/N Q7150-1842-1...
- Page 21 (10) Removing the Platen Ass'y, Cam Shaft, Platen Gear B, Cam C, Platen Plate, and Platen Plate Spring 1. Remove the Platen Ass'y by releasing the hook of the Platen Plate. *Do not peel off the tapes adhering the Platen Ass'y. 2.
- Page 22 (11) Removing the Sensor Block, Sensor Lever, and Switch PCB Ass'y 1. Move the Sensor Block in the direction shown by arrow A and remove it from the Platen Cover while pulling it upward. 2. Remove the Sensor Lever with tweezers 3.
-
Page 23: Reassembly
4- 4. Reassembly Reassembly of parts is performed by reversing the disassembly procedure. Note the following points : (1) Properly lubricate all parts that require lubrication. (2) Bundle harnesses firmly and accurately enough to avoid interference with gears (3) Lastly install the Platen Gear B as follows (See the drawing): •... -
Page 24: Troubleshooting
5. TROUBLESHOOTING CONTENTS 5-1. No Operation................... 5-2. No Display on the LCD Panel............5-3. Setting Switch Malfunctioning............5-4. Motor Operation Failure..............5-5. No Printing ..................5-6. How to locate Problems from the Error Codes....... -
Page 25: No Operation
5-1. No Operation • Digits are not displayed on the LCD. No operation • Unable to print. Check the AC Adapter Ass'y output voltage level. (See "Voltage Check.") Normal? AC Adapter Ass'y failure. Turn the power off and detach the outer jacket. Check the 5V and 10V voltage levels. -
Page 26: No Display On The Lcd Panel
5-2. No Display on the LCD Panel Nothing is displayed • Nothing appears on the screen. on the LCD Panel. • There is only a partial display on the screen, or the screen flickers. Note: Pressing the reset switch causes the settings, including the time Perform the function test to check the LCD Panel. -
Page 27: Setting Switch Malfunctioning
5-3. Setting Switch Malfunctioning Unable to input with the setting switches. Perform the function test to check key switches. Note: Pressing the reset switch causes the settings, including the time See "Inspection Sheet" and calendar settings, to be initialized. • Key switch failure Normal? •... -
Page 28: Motor Operation Failure
5-4. Motor Operation Failure • Motor does not run at all. Motor does not run. • Motor runs abnormally. Plug the AC Adapter Ass'y into the outlet. Note: Pressing the reset switch causes the settings, including the time Press the reset switch. and calendar settings, to be initialized. -
Page 29: No Printing
5-5. No Printing • Motor runs. If the motor does not run, see "4 Motor Operation Failure." Unable to print • Card does not print. • Abnormal printout (chipped dots, etc.) Is the Ink Ribbon Ass'y Set the Ink Ribbon Ass'y properly. set properly ? Turn the power off and detach the outer jacket. -
Page 30: How To Locate Problems From The Error Codes
5-6. How to locate Problems from the Error Codes • Built-in memory is not retained during power failure. E-01 • Anomaly of built-in memory data Note: Pressing the reset switch causes the settings, including the time Press reset switch, and calendar settings, to be initialized. disconnect the power for 2 to 3 minutes, and then turn on the power. - Page 31 E-38 • There are anomalies in the CR motor or the CR encoder. Insert the time card. Does the CR motor See "4. Motor Operation Failure." run? Eliminate causes. Does • Are there any anomalies in the CR-system the Carrier Ass'y move Mechanism, such as Cam, Carrier smoothly? or Ink Ribbon Ass'y?
- Page 32 6. MEASUREMENT CONTENTS 6-1. Voltage Check ..............6-2. Motor Operation Check ............6-3. Print Head Resistance Measurement ........
-
Page 33: Voltage Check
6-1. Voltage Check • AC Adapter Ass'y Measure the voltage at the AC Adapter Ass'y plug. Measuring point Target voltage Measuring conditions Inside metal 17.6VAC ± 15% AC Adapter Ass'y plugged in. Outside metal • Control PCB Ass'y Use test pin land TP2, 3, and 5 to measure voltage. Measuring point Target voltage Measuring conditions... -
Page 34: Print Head Resistance Measurement
6-3. Print Head Resistance Measurement Measure the Print Head resistance at the terminals with the FPC harness inserted to the CN4. Note: If the Print Head resistance is smaller than Measuring point Target resistance the value shown on the left, there is a Open possibility that the Print Head pin driver 2.35 ±... -
Page 35: Control Circuit Operation
7. CONTROL CIRCUIT OPERATION CONTENTS 7- 1. Control Circuit ..............7- 2 7- 2. Block Diagram of Circuits ..........7- 2 7- 3. CPU ................. 7- 3 7- 4. Port List ................7- 3 7- 5. Operation Mode .............. 7- 4 7- 6. -
Page 36: Control Circuit
7-1. Control Circuit The control circuit consists of the following: Control PCB Ass'y • CPU • LCD • Setting switch • Reset switch • Sensor circuit • Encoder circuit • CR motor driver circuit • Print Head pin driver circuit •... -
Page 37: Cpu
7-3. CPU • 4-bit single-chip microcomputer µPD753108GC(NEC product) • Equipped with 8,192 x 8 bit ROM and 512 x 4bit RAM • Main system clock is a 4.19 MHz ceramic oscillator. Subsystem clock is a 32.768 kHz crystal oscillator. Equipped with LCD controller/driver. 7-4. -
Page 38: Operation Mode
7-5. Operation Mode Operation mode and functions are as follows: Operation state Normal operation Power failure operation All functions operation Time update Memory retention only AC power CPU state Operation mode Halt mode (clock) (4.19 MHz) (32.768 kHz) PWF (P00) When a power failure causes the output voltage of the 10V-regulator IC to drop below about 7V, PWF(P00) is set to "L."... -
Page 39: Lcd
7-6. LCD • LCD specifications Operating voltage 5V Lighting method Reflective type Viewing direction 6:00 Operating method 1/4 duty, 1/3 bias,128 Hz • Pin table SEGn Pin No. COM1 COM2 COM3 COM4 SEG1 SEG2 SEG3 COM3 COM4 SEG4 SEG5 SEG6 COM2 SEG7 SEG8... -
Page 40: Switch
7-7. Switch The switch state is input the port below. Switch state: L ..ON, H ..OFF PS(P01): Paper Sensor Detects presence of a card. Normally "off". When a card is put in, it pushed a sensor lever, it turn a sensor to "on". PB(P02): Key Top For manual printing. -
Page 41: Motor
7-10. Motor The CR motor CCW to cause the Cam to rotate, allowing the Print Head to move. The motor operation mode is controlled by CR0 (P30) and CR 1 (P31). Operation mode Stand-by Brake 7-11. Print Head A pin will impact when PIN1-9 (P20, P80-83, P90-93) is set to "H". The record is printed when the Print Head is moving to the front. -
Page 42: Power Supply Circuit
8. POWER SUPPLY CIRCUIT (on Control PCB Ass'y) 1. 14-19Vac is provided from AC Adapter Ass'y to the connector CN6. 2. 14-19Vac is provided to DB1 after removing noise due to FB1 and FB2. And being rectified by DB1 and smoothed by C16 and C17 and is provided to regulator P3 that regulates into 10Vdc. -
Page 43: Inspection Sheet
9. INSPECTION SHEET Inspection Item Inspection Method Inspection Standard Turn On • Insert the AC Adapter Ass'y to the AC power outlet. • Press the reset switch. • Make sure initial operation was made and the display indicates the time at 12:00 a.m. LCD Check •... - Page 44 Inspection Item Inspection Method Inspection Standard • Press the SELECT switch and move CHANGE position TIME. Switch Check • Press the CHANGE switch when 6:00 is shown. • Make sure a readout on seconds advances. ** 6:00 - ** gives a readout on seconds. •...
-
Page 45: Error Code List
10. ERROR CODE LIST Error Symptoms Remedies E-00 CPU does not function properly. 1. Press the reset switch and check the CPU for proper operation. Program is corrupted or CPU is broken. E-01 Memory retention is not possible. 1. Make sure the Lithium Battery is properly installed. 2. -
Page 46: Connector Pin Assignment
11. CONNECTOR PIN ASSIGNMENT Control PCB Ass'y (1) CN1 (LCD Panel ( 7150-5505)) Pin No. Signal Name Function Pin No. Signal Name Function COM 4 COMMON4 SEG10 SEGMENT10 COM 3 COMMON3 SEG9 SEGMENT9 COM 2 COMMON2 SEG8 SEGMENT8 COM 1 COMMON1 SEG7 SEGMENT7... - Page 47 (4) CN4 (Print Head ( 7000-8000)) Pin No. Signal Name Function Connection to head PIN6 frame PIN4 pin from top (PIN6) PIN8 pin from top (PIN4) PIN2 pin from top (PIN8) PIN9 pin from top (PIN2) Bottom pin (PIN9) Common (10V) PIN7 Common (10V) PIN1...
- Page 48 12. CIRCUIT DIAGRAM Control PCB Circuit Diagram (1/3) 12-1...
- Page 49 Control PCB Circuit Diagram (2/3) 12-2...
- Page 50 Control PCB Circuit Diagram (3/3) 12-3...
- Page 51 Switch PCB Circuit Diagram 12-4...
- Page 52 13. PARTS LIST CONTENTS 13-1. Overall Exploded View ............... 13-2 13-2. Mechanism ................... 13-3 13-3. Control PCB Ass'y............... 13-4 13-4. Packing Material ................. 13-5 13-5. Lubricant ..................13-5 Note 1 : The ordering unit of part with the mark "#" is 10 pieces or sets. (e.g.
- Page 53 PARTS LIST 1. Overall Exploded View ' TY MANUFACTURER REF.NO. DESCRIPTION MODEL PART NUMBER UNIT Control PCB Ass'y 7150-5001A Mechanism 7150-4000 Switch PCB Ass'y 7150-5007A Sensor Harness B Unit 7150-5165U LCD Panel 7150-5505 AC Adapter Ass'y 7152-5210A Top Enclosure 7152-2001 Cover B 7152-2184 Indicator Plate...
-
Page 54: Parts List
PARTS LIST 2. Mechanism ' TY MANUFACTURER REF.NO. DESCRIPTION MODEL PART NUMBER UNIT Base Plate Ass'y 7150-1040A Base Plate 7150-1040 Reduction Shaft 7150-1002 Motor Ass'y 7150-1014A Motor 0001-1014 Connector Harness Ass'y 7000-5163A Motor Pinion 0100-1080 Carrier Ass'y 7150-1160A Carrier 7000-1160-2 Carrier Roller 7150-1192 Carrier Spring... - Page 55 PARTS LIST 3.Control PCB Ass'y ' TY MANUFACTURER REF.NO. DESCRIPTION MODEL PART NUMBER UNIT BATT1 Lithum Battery CR2450TVB 84093-4222 C1-5, 8-10, Chip Ceramic Cap. 0.1uF/50V 84094-7150 14,18,21 Chip Ceramic Cap. 47pF/50V 84094-7007 C11,12 Chip Ceramic Cap. 2200pF/50V 84094-7050 Al.Elec.Cap. 6800uF/16V 84093-2920 C15,19 Chip Al.Cap.
- Page 56 PARTS LIST 4.Packing Material ' TY MANUFACTURER REF.NO. DESCRIPTION MODEL PART NUMBER UNIT Packing Box 7152-6110 Pad A 7152-6105 Pad B 7152-6106 Manual 7152-6120 Ribbon Caution Sheet 7000-6154-1 Wall Folding Sheet 7000-6322-1 Oval Head Screw 3.5x25 84001-3371 Lock Lever 7152-2084 Subsidiary Pad 7150-6531 AC Adapter Pad...
- Page 57 5640 Departure Drive Raleigh, NC 27616 www. acroprint. com (800) 334-7190...
Need help?
Do you have a question about the ES700 and is the answer not in the manual?
Questions and answers