Sun Microsystems Sun SPARC Enterprise T5120 Service Manual
Hide thumbs
Also See for Sun SPARC Enterprise T5120:
- User manual (42 pages) ,
- Installation and service manual (170 pages) ,
- Product notes (14 pages)

Related Manuals for Sun Microsystems Sun SPARC Enterprise T5120


Summary of Contents for Sun Microsystems Sun SPARC Enterprise T5120
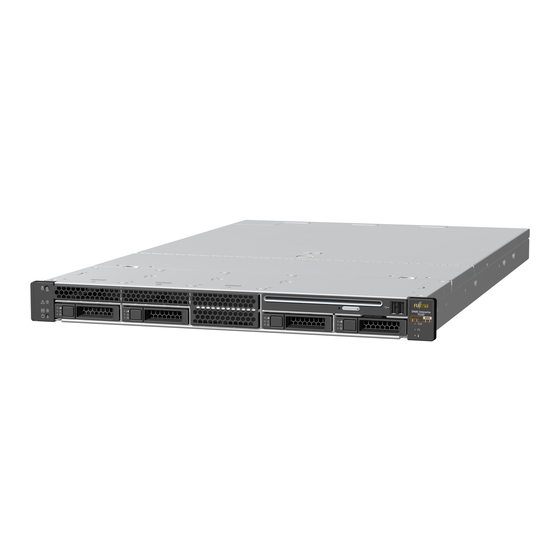
- Page 1 Sun SPARC Enterprise ® T5120 and T5220 Servers Service Manual Sun Microsystems, Inc. www.sun.com Part No. 820-2181-13 July 2009, Revision A Submit comments about this document by clicking the Feedback[+] link at: http://docs.sun.com...
- Page 2 Fujitsu Limited or Sun Microsystems, Inc., or any affiliate of either of them.
- Page 3 , OpenBoot™, SunVTS™, Sun Fire™, SunSolve , CoolThreads™, et J2EE™ sont des marques de fabrique ou des marques déposées de Sun Microsystems, Inc. , ou ses filiales aux Etats-Unis et dans d’autres pays. Fujitsu et le logo Fujitsu sont des marques déposées de Fujitsu Limited.
-
Page 5: Table Of Contents
Internal System Cables for Sun SPARC Enterprise T5120 Servers 4 Internal System Cables for Sun SPARC Enterprise T5220 Servers 5 Front Panel Controls and Indicators on Sun SPARC Enterprise T5120 Servers Rear Panel Components and Indicators on Sun SPARC Enterprise T5120... - Page 6 POST Output Quick Reference 42 Managing Faults Using the PSH Feature 43 Solaris PSH Feature Overview 44 PSH-Detected Fault Console Message 45 ▼ Identify PSH-Detected Faults With fmdump 45 Sun SPARC Enterprise T5120 and T5220 Servers Service Manual • July 2009...
- Page 7 ▼ Clear PSH-Detected Faults 47 Viewing Solaris OS Messages 48 ▼ Check the Message Buffer 49 ▼ View the System Message Log Files 49 Managing Components With Automatic System Recovery Commands 50 ASR Overview 50 ▼ Display System Components 51 ▼...
- Page 8 When Replacing Faulty FB-DIMMs 95 FB-DIMM Configuration Reference 96 Servicing the Air Duct 100 ▼ Remove the Air Duct 100 ▼ Install the Air Duct 101 Servicing PCIe/XAUI Risers 102 viii Sun SPARC Enterprise T5120 and T5220 Servers Service Manual • July 2009...
- Page 9 Install the Motherboard Assembly 120 Servicing Fan Modules 123 Fan Module Overview 123 Fan Module Configurations for Sun SPARC Enterprise T5120 Servers (4- and 8-Disk Capable) 124 Fan Module Configurations for Sun SPARC Enterprise T5220 Servers (8- and 16-Disk Capable) 124 Fan Module Status LEDs 125 ▼...
- Page 10 Remove the Hard Drive Backplane 152 ▼ Install the Hard Drive Backplane 154 Servicing Front Control Panel Light Pipe Assemblies 156 Front Control Panel Light Pipe Assemblies Overview 157 Sun SPARC Enterprise T5120 and T5220 Servers Service Manual • July 2009...
- Page 11 ▼ Remove the Front Control Panel Light Pipe Assemblies 157 ▼ Install the Front Control Panel Light Pipe Assemblies 158 Servicing Power Distribution Boards 160 Power Distribution Board Overview 160 ▼ Remove the Power Distribution Board 161 ▼ Install the Power Distribution Board 163 Servicing Power Supply Backplanes (Sun SPARC Enterprise T5220 Servers) Power Supply Backplane Overview 168 ▼...
- Page 12 Internal Cables for Onboard SAS Controller Cards in Sun SPARC Enterprise T5220 Servers 202 HDD Data Cable Routing for SAS RAID Controller Cards in Sun SPARC Enterprise T5220 Servers 206 Index 209 Sun SPARC Enterprise T5120 and T5220 Servers Service Manual • July 2009...
-
Page 13: Preface
Preface This service manual is for experienced system engineers with training in servicing ® Sun SPARC Enterprise T5120 and T5220 servers. The manual contains detailed instructions for troubleshoooting, repairing, and upgrading server components. To use the information in this document, you must have experience working with advanced server technology. -
Page 14: Related Documentation
Getting Started Sun SPARC Enterprise T5120 Server Getting Started Guide 820-4417 Printed Ships with system Getting Started Sun SPARC Enterprise T5120 Server Getting Started Guide (DC) 820-5838 Printed Ships with system Overview Sun SPARC Enterprise T5120 and T5220 Servers Overview... -
Page 15: Sun Welcomes Your Comments
Sun SPARC Enterprise T5120 and T5220 Servers Service 820-2181 PDF Online Manual HTML Safety Sun SPARC Enterprise T5120 and T5220 Servers Safety and 820-2182 PDF Online Compliance Manual Remote Sun Integrated Lights Out Manager (ILOM) 3.0 Supplement for 820-6683 PDF... - Page 16 Sun SPARC Enterprise T5120 and T5220 Servers Service Manual, part number 820-2181-13. Sun SPARC Enterprise T5120 and T5220 Servers Service Manual • July 2009...
-
Page 17: Identifying Server Components
Identifying Server Components These topics identify key components of the Sun SPARC Enterprise T5120 and T5220 servers, including major boards and internal system cables, as well as front and rear panel features. “Infrastructure Boards in Sun SPARC Enterprise T5120 Servers” on page 2 ■... -
Page 18: Infrastructure Boards In Sun Sparc Enterprise T5120 Servers
Infrastructure Boards in Sun SPARC Enterprise T5120 Servers Sun SPARC Enterprise T5120 servers are based on a 1U chassis family. The following table provides a summary of the circuit boards used in these servers. Board Description Motherboard This board includes two CMP modules, slots for 16 FB-DIMM, memory control subsystems, and all service processor (ILOM) logic. -
Page 19: Infrastructure Boards In Sun Sparc Enterprise T5220 Servers
This board carries 12V power from the power Enterprise T5220 Servers only) supplies to the power distribution board over a pair of bus bars. In Sun SPARC Enterprise T5120 servers, the power supplies connect directly to the power distribution board. Paddle card... -
Page 20: Internal System Cables For Sun Sparc Enterprise T5120 Servers
This cable carries data and control signals between the motherboard and the hard drive backplane. Related Information “Identifying FRUs in SPARC Enterprise T5120 Servers” on page 181 ■ Sun SPARC Enterprise T5120 and T5220 Servers Service Manual • July 2009... -
Page 21: Internal System Cables For Sun Sparc Enterprise T5220 Servers
“Identifying FRUs in Sun SPARC Enterprise T5220 Servers” on page 195 ■ Front Panel Controls and Indicators on Sun SPARC Enterprise T5120 Servers The following figure shows the layout of the T5120 server front panel, including the power and system locator buttons and the various status and fault LEDs. - Page 22 Figure Legend Locator LED and button Hard Drive map Service Required LED Power Supply Service Required LED Power OK LED Overtemp LED Power button Fan Module Service Required LED Sun SPARC Enterprise T5120 and T5220 Servers Service Manual • July 2009...
- Page 23 The following table provides descriptions of these controls and indicators. Front Panel Controls and Indicators (Sun SPARC Enterprise T5120 and T5220 Servers) TABLE: LED or Button Icon or Label Description Locator LED The Locator LED can be turned on to identify a particular system. When on, it and button blinks rabidly.
-
Page 24: Rear Panel Components And Indicators On Sun Sparc Enterprise T5120 Servers
The following figure shows the layout of the connectors associated with the system I/O ports, PCIe ports, 10 Gbit Ethernet (XAUI) ports (if equipped) and power supplies on the rear panel of Sun SPARC Enterprise T5120 servers. It also shows the locations of the rear panel LEDs. -
Page 25: Front Panel Controls And Indicators On Sun Sparc Enterprise T5220 Servers
The following table provides descriptions of the LEDs located on the rear panel. Rear Panel LED Indicators (Sun SPARC Enterprise T5120 and T5220 Servers) TABLE: LED or Button Icon or Label Description Locator LED The Locator LED can be turned on to identify a particular system. When on, it and button blinks rabidly. - Page 26 Figure Legend Locator LED and button Power Supply Service Required LED Service Required LED Overtemp LED Power OK LED Fan Module Service Required LED Power button Hard Drive map Sun SPARC Enterprise T5120 and T5220 Servers Service Manual • July 2009...
- Page 27 The following table provides descriptions of these controls and indicators. Front Panel Controls and Indicators (Sun SPARC Enterprise T5120 and T5220 Servers) TABLE: LED or Button Icon or Label Description Locator LED The Locator LED can be turned on to identify a particular system. When on, it and button blinks rabidly.
-
Page 28: Rear Panel Components And Indicators On Sun Sparc Enterprise T5220 Servers
Serial management port PCIe/XAUI 0 Network management port PCIe 4 Gigabit Ethernet ports (0, 1, 2, 3) PCIe/XAUI 1 USB ports (0, 1) PCIe 5 DB-9 serial port Sun SPARC Enterprise T5120 and T5220 Servers Service Manual • July 2009... - Page 29 The following table provides descriptions of the LEDs located on the rear panel. LED Indicators on the Sun SPARC Enterprise T5220 Server Rear Panel TABLE: LED or Button Icon or Label Description Locator LED The Locator LED can be turned on to identify a particular system. When on, it and button blinks rabidly.
-
Page 30: Status Leds For Ethernet Ports And Network Management Port
• On or blinking – The link is operating as a 100-Mbps connection. • Off – The link is operating as a 10-Mbps connection.. Related Information “LED Overview” on page 21 ■ Sun SPARC Enterprise T5120 and T5220 Servers Service Manual • July 2009... -
Page 31: Detecting And Managing Faults
Detecting and Managing Faults These topics explain how to use various diagnostic tools to monitor server status and troubleshoot faults in the server. “Diagnostic Tools Overview” on page 15 ■ “Detecting Faults With ILOM” on page 22 ■ “Detecting Faults With POST” on page 34 ■... -
Page 32: Service Processor Interfaces
CMT servers. The ALOM CMT compatibility shell prompt looks like this: sc> Note – Unless indicated otherwise, all examples of interaction with the service processor are depicted with ILOM shell commands. Sun SPARC Enterprise T5120 and T5220 Servers Service Manual • July 2009... -
Page 33: Diagnostics Tools Quick Reference
Multiple service processor accounts can be active concurrently. A user can issue ILOM shell commands while logged in under one account and, at the same time, issue ALOM CMT shell commands while operating in another account. Related Information “Diagnostics Tools Quick Reference” on page 17 ■... - Page 34 Diagnostics Flowchart FIGURE: Sun SPARC Enterprise T5120 and T5220 Servers Service Manual • July 2009...
- Page 35 The following table provides brief descriptions of the troubleshooting actions shown in the flowchart. It also provides links to topics with additional information on each diagnostic action. Diagnostic Flowchart Reference Table TABLE: Diagnostic Action Possible Outcome Additional Information Check Power OK The Power OK LED is located on the front and rear of •...
- Page 36 In rare cases a problem might require additional troubleshooting. If you are unable to (Flowchart item 9) determine the cause of the problem, contact your service representative for support. Sun SPARC Enterprise T5120 and T5220 Servers Service Manual • July 2009...
-
Page 37: Led Overview
LED Overview The server provides the following groups of LEDs: Front panel system LEDs ■ Rear panel system LEDs ■ Hard drive LEDs ■ Power supply LEDs ■ Fan module LEDs ■ Rear panel Ethernet port LEDs ■ FB-DIMM Locate LEDs ■... -
Page 38: Detecting Faults With Ilom
“ILOM Troubleshooting Overview” on page 23 ■ “Service-Related ILOM Command Summary” on page 26 ■ Related Information .“POST Overview” on page 35 ■ “ILOM Properties that Affect POST Behavior” on page 35 ■ Sun SPARC Enterprise T5120 and T5220 Servers Service Manual • July 2009... -
Page 39: Ilom Troubleshooting Overview
ILOM Troubleshooting Overview ILOM enables you to remotely run diagnostics such as power-on self-test (POST), that would otherwise require physical proximity to the server’s serial port. You can also configure ILOM to send email alerts of hardware failures, hardware warnings, and other events related to the server or to ILOM. -
Page 40: Methods For Connecting To The Service Processor
Note – Refer to the Sun Integrated Lights Out Manager (ILOM) 3.0 Supplement for Sun SPARC Enterprise T5120 and T5220 Servers for instructions on configuring and connecting to ILOM. Sun SPARC Enterprise T5120 and T5220 Servers Service Manual • July 2009... -
Page 41: How To Switch From The System Console To The Service Processor
How to Switch From the System Console to the Service Processor The following example shows the character sequence (hash-period) used to change from the system console to the service processor: ok #. How to Switch From the Service Processor to the System Console The following example showiest ILOM command for changing from the service processor to the system console:... -
Page 42: Service-Related Ilom Command Summary
• -b lines displays n lines from the beginning of the buffer. • -v displays the entire buffer. • boot|run specifies the log to display (run is the default log). Sun SPARC Enterprise T5120 and T5220 Servers Service Manual • July 2009... - Page 43 Service-Related Commands (Continued) TABLE: ILOM Command ALOM CMT Command Description set /HOST/bootmode property= bootmode [normal] [reset_nvram] Controls the host server OpenBoot value [config=configname] [bootscript= PROM firmware method of booting. string] [where property is state, config, or script] powercycle [-f] Performs a poweroff followed by stop /SYS;...
- Page 44 [-v] Displays information about the show /HOST operating state of the host system, the system serial number, and whether the hardware is providing service. Sun SPARC Enterprise T5120 and T5220 Servers Service Manual • July 2009...
-
Page 45: Faults Displayed By Show Faulty
Related Information “Managing Components With Automatic System Recovery Commands” on ■ page 50 Faults Displayed by show faulty The ILOM show faulty command will display the following kinds of fault information. Environmental faults ■ Invalid configurations ■ Faults detected during POST session ■... -
Page 46: Example Of Show Faulty Output When No Fault Is Present
| Dec 14 23:01:32 /SP/faultmgmt/0/ | timestamp | Dec 14 23:01:32 faults/0 faults/0 /SP/faultmgmt/0/ | sp_detected_fault | /SYS/MB/CMP0/BR1/CH0/D0 faults/0 | Forced fail(POST) Example of show faulty Output for Faults Detected by Sun SPARC Enterprise T5120 and T5220 Servers Service Manual • July 2009... -
Page 47: Technology
PSH Technology -> show faulty Target | Property | Value --------------------+------------------------+------------------------------- /SP/faultmgmt/0 | fru | /SYS/MB/CMP0/BR0/CH1/D0 /SP/faultmgmt/0 | timestamp | Dec 14 22:43:59 /SP/faultmgmt/0/ | sunw-msg-id | SUN4V-8000-DX faults/0 /SP/faultmgmt/0/ | uuid | 3aa7c854-9667-e176-efe5-e487e520 faults/0 | 7a8a /SP/faultmgmt/0/ | timestamp | Dec 14 22:43:59 faults/0 Related Information... -
Page 48: Display Fru Information With The Show Command
The default shell for the service processor is the ILOM shell. You can use the ALOM CMT compatibility shell to emulate the ALOM CMT interface that was supported on an earlier generation of CMT servers. Sun SPARC Enterprise T5120 and T5220 Servers Service Manual • July 2009... - Page 49 Daemons ready Integrated Lights Out Manager Version 2.0.0.0 Copyright 2007 Sun Microsystems, Inc. All rights reserved. Use is subject to license terms Warning: password is set to factory default. 2. Create a new user (in this example, the new user name is admin), setting the account role to Administrator and the CLI mode to alom.
-
Page 50: Detecting Faults With Post
“POST Overview” on page 35 ■ “ILOM Properties that Affect POST Behavior” on page 35 ■ “Examples of POST Management” on page 37 ■ “POST Output Quick Reference” on page 42 ■ Sun SPARC Enterprise T5120 and T5220 Servers Service Manual • July 2009... -
Page 51: Post Overview
POST Overview Power-on self-test (POST) is a group of PROM-based tests that run when the server is powered on or when it is reset. POST checks the basic integrity of the critical hardware components in the server (CMP, memory, and I/O subsystem). If POST detects a faulty component, the component is disabled automatically. - Page 52 POST output displays all test and informational normal messages. POST displays all test, informational, and some debugging messages. The following flowchart is a graphic illustration of the same set of ILOM set command variables. Sun SPARC Enterprise T5120 and T5220 Servers Service Manual • July 2009...
-
Page 53: Examples Of Post Management
Flowchart of ILOM Properties Used to Manage POST Operations FIGURE: Examples of POST Management This topic shows examples of the ILOM set command being used to configure POST behavior. The examples illustrate only a subset of the ILOM properties that can be used to control POST operations. -
Page 54: Keyswitch_State Set To Normal
Related Information “ILOM Properties that Affect POST Behavior” on page 35 ■ “Run POST in Maximum Mode” on page 39 ■ “Clear POST-Detected Faults” on page 41 ■ Sun SPARC Enterprise T5120 and T5220 Servers Service Manual • July 2009... -
Page 55: Run Post In Maximum Mode
▼ Run POST in Maximum Mode POST can be helpful when used as a first-stage diagnostic tool. When a fault’s symptoms are unclear, you can run POST in maximum mode to generate extensive status information on all the key system components. 1. - Page 56 | fru | /SYS/MB/CMP0/BR1/CH0/D0 /SP/faultmgmt/0 | timestamp | Dec 21 16:40:56 /SP/faultmgmt/0/ | timestamp | Dec 21 16:40:56 faults/0 /SP/faultmgmt/0/ | sp_detected_fault | /SYS/MB/CMP0/BR1/CH0/D0 faults/0 | Forced fail(POST) Sun SPARC Enterprise T5120 and T5220 Servers Service Manual • July 2009...
-
Page 57: Clear Post-Detected Faults
Note – The system can boot and run using memory that was not disabled. Related Information “Clear POST-Detected Faults” on page 41 ■ “Examples of POST Management” on page 37 ■ “POST Output Quick Reference” on page 42 ■ ▼ Clear POST-Detected Faults In most cases, when POST detects a faulty component, POST logs the fault and automatically takes the failed component out of operation by placing the component in the ASR blacklist. -
Page 58: Post Output Quick Reference
In this syntax, c = the core number, s = the strand number. Warning messages use the following syntax: WARNING: message Informational messages use the following syntax: INFO: message Sun SPARC Enterprise T5120 and T5220 Servers Service Manual • July 2009... -
Page 59: Managing Faults Using The Psh Feature
The following example. POST reports a memory error at FB-DIMM location /SYS/MB/CMP0/BR1/CH0/D0. The error was detected by POST running on core 7, strand 2. 7:2> 7:2>ERROR: TEST = Data Bitwalk 7:2>H/W under test = /SYS/MB/CMP0/BR1/CH0/D0 7:2>Repair Instructions: Replace items in order listed by 'H/W under test' above. -
Page 60: Solaris Psh Feature Overview
EVENT-TIME: Wed Sep 14 10:09:46 EDT 2005 PLATFORM: SUNW,system_name, CSN: -, HOSTNAME: wgs48-37 SOURCE: cpumem-diagnosis, REV: 1.5 EVENT-ID: f92e9fbe-735e-c218-cf87-9e1720a28004 DESC: The number of errors associated with this memory module has exceeded Sun SPARC Enterprise T5120 and T5220 Servers Service Manual • July 2009... -
Page 61: Identify Psh-Detected Faults With Fmdump
acceptable levels. Refer to http://sun.com/msg/SUN4V-8000-DX for more information. AUTO-RESPONSE: Pages of memory associated with this memory module are being removed from service as errors are reported. IMPACT: Total system memory capacity will be reduced as pages are retired. REC-ACTION: Schedule a repair procedure to replace the affected memory module. Use fmdump -v -u <EVENT_ID>... - Page 62 Major Description The number of errors associated with this CPU has exceeded acceptable levels. Automated Response The fault manager will attempt to remove the affected CPU from service. Sun SPARC Enterprise T5120 and T5220 Servers Service Manual • July 2009...
-
Page 63: Clear Psh-Detected Faults
Impact System performance may be affected. Suggested Action for System Administrator Schedule a repair procedure to replace the affected CPU, the identity of which can be determined using fmdump -v -u <EVENT_ID>. Details The Message ID: SUN4V-8000-JA indicates diagnosis has determined that a CPU is faulty. -
Page 64: Viewing Solaris Os Messages
The error logging daemon, syslogd, automatically records various system warnings, errors, and faults in message files. These messages can alert you to system problems such as a device that is about to fail. Sun SPARC Enterprise T5120 and T5220 Servers Service Manual • July 2009... -
Page 65: View The System Message Log Files
The /var/adm directory contains several message files. The most recent messages are in the /var/adm/messages file. After a period of time (usually every week), a new messages file is automatically created. The original contents of the messages file are rotated to a file named messages.1. Over a period of time, the messages are further rotated to messages.2 and messages.3, and then deleted. - Page 66 “Disable System Components” on page 52 ■ “Enable System Components” on page 53 ■ ▼ Display System Components The show components command displays the system components (asrkeys) and reports their status. Sun SPARC Enterprise T5120 and T5220 Servers Service Manual • July 2009...
-
Page 67: Display System Components
● At the -> prompt, enter the show components command. In the following example, PCIE3 is shown as disabled. -> show components Target | Property | Value --------------------+------------------------+------------------------------- /SYS/MB/RISER0/ | component_state | Enabled PCIE0 /SYS/MB/RISER0/ | component_state | Disabled PCIE3 /SYS/MB/RISER1/ | component_state | Enabled... -
Page 68: Disable System Components
Related Information “View the System Message Log Files” on page 49 ■ “Display System Components” on page 51 ■ “Disable System Components” on page 52 ■ Sun SPARC Enterprise T5120 and T5220 Servers Service Manual • July 2009... -
Page 69: Enable System Components
Detecting Faults Using SunVTS Software This topic explains in general terms how to use SunVTS software to exercise system components. For detailed instructions on using SunVTS software, see the latest version of the SunVTS Software User’s Guide and any associated Release Notes. “Run the SunVTS Software”... -
Page 70: Run The Sunvts Software
Click on the name of the test to select and customize individual tests. Note – Use the System Excerciser – High Stress Mode to test system operations. Use the Component Stress – High setting for the highest stress possible. Sun SPARC Enterprise T5120 and T5220 Servers Service Manual • July 2009... - Page 71 6. Click the Start button to start the test process. Status and error messages appear in the test messages area located across the bottom of the window. You can stop testing at any time by clicking the Stop button Status and error messages appear in the test messages area spread across the bottom of the window.
- Page 72 Sun SPARC Enterprise T5120 and T5220 Servers Service Manual • July 2009...
-
Page 73: Preparing To Service The System
Preparing to Service the System These topics describe how to prepare the Sun SPARC Enterprise T5120 and T5220 servers for servicing. “General Safety Information” on page 57 ■ “Essential Tools” on page 59 ■ “Removing Power From the System” on page 60 ■... -
Page 74: Electrostatic Discharge Safety Measures
Note – An antistatic wrist strap is no longer included in the accessory kit for the Sun SPARC Enterprise T5120 and T5220 servers. However, antistatic wrist straps are still included with options. Sun SPARC Enterprise T5120 and T5220 Servers Service Manual • July 2009... -
Page 75: Antistatic Mat
Antistatic Mat Place ESD-sensitive components such as motherboards, memory, and other PCBs on an antistatic mat. Essential Tools The following tools should be available for most service operations: Antistatic wrist strap ■ Antistatic mat ■ No. 1 Phillips screwdriver ■ No. -
Page 76: Removing Power From The System
You can use the service processor to perform a graceful shutdown of the server, and to ensure that all of your data is saved and the server is ready for restart. Sun SPARC Enterprise T5120 and T5220 Servers Service Manual • July 2009... - Page 77 Depending on the type of problem, you might want to view server status or log files. You also might want to run diagnostics before you shut down the server. Refer to the Sun SPARC Enterprise T5120 and T5220 Servers Administration Guide for log file information.
-
Page 78: Power Off The Server (Power Button - Graceful)
These topics explain how to position the system so you can access the components that need servicing. “Extend the Server to the Maintenance Position” on page 63 ■ “Remove the Server From the Rack” on page 64 ■ Sun SPARC Enterprise T5120 and T5220 Servers Service Manual • July 2009... -
Page 79: Extend The Server To The Maintenance Position
▼ Extend the Server to the Maintenance Position The following components can be serviced with the server in the maintenance position: Hard drives ■ Fan modules ■ Power supplies ■ DVD/USB module ■ Fan power boards ■ FB-DIMMs ■ PCIe/XAUI cards ■... -
Page 80: Remove The Server From The Rack
Paddle card ■ Disk cage ■ Hard drive backplane ■ Front panel light-pipe assemblies ■ Caution – If necessary, use two people to dismount and carry the chassis. Sun SPARC Enterprise T5120 and T5220 Servers Service Manual • July 2009... - Page 81 1. Disconnect all the cables and power cords from the server. 2. Extend the server to the maintenance position. “Power Off the Server (Service Processor Command)” on page 3. Press the metal lever that is located on the inner side of the rail to disconnect the cable management arm (CMA) from the rail assembly, as shown in the following figure.
-
Page 82: Accessing Internal Components
“Perform Electrostatic Discharge Prevention Measures” on page 67 ■ “Remove the Top Cover” on page 67 ■ Sun SPARC Enterprise T5120 and T5220 Servers Service Manual • July 2009... -
Page 83: Perform Electrostatic Discharge Prevention Measures
2. Press the top cover release button and slide the top cover to the rear about a 0.5 inch (12.7 mm). The following figure shows the release button in a Sun SPARC Enterprise T5120 server. The top cover release button in a Sun SPARC Enterprise T5220 server is similar. - Page 84 Removing the Top Cover FIGURE: 3. Remove the top cover. Lift up and remove the cover. Related Information “Install the Top Cover” on page 175 ■ Sun SPARC Enterprise T5120 and T5220 Servers Service Manual • July 2009...
-
Page 85: Servicing Hard Drives
■ Hard Drive Servicing Overview Hard drives in Sun SPARC Enterprise T5120 and T5220 servers are capable of being removed and installed while the server is running. This feature, referred to as being hot-pluggable, depends on how the hard drives are configured. -
Page 86: Hard Drive Leds
Note – The OK/Activity LED has slightly different behavior for SSDs than for disk-based drives. This difference is described in the table that follows the figure. Hard Drive LEDs FIGURE: Sun SPARC Enterprise T5120 and T5220 Servers Service Manual • July 2009... -
Page 87: Remove A Hard Drive
The following table explains how to interpret the hard drive status LEDs. Status LEDs for Hard Drives TABLE: Color Description Ready to Blue Indicates that a hard drive can be removed during a Remove hot-plug operation. Service Amber Indicates that the hard drive is has experienced a Required fault condition. - Page 88 This LED will help you identify which drive is unconfigured and can be removed. 4. On the drive you plan to remove, push the hard drive release button to open the latch. Sun SPARC Enterprise T5120 and T5220 Servers Service Manual • July 2009...
-
Page 89: Install A Hard Drive
Locating the Hard Drive Release Button and Latch FIGURE: Caution – The latch is not an ejector. Do not bend the latch too far to the right. Doing so can damage the latch 5. Grasp the latch and pull the drive out of the drive slot. Related Information “Install a Hard Drive”... - Page 90 Note – Sun SPARC Enterprise T5120 servers might have up to seven blank panels covering unoccupied drive slots. Sun SPARC Enterprise T5220 servers might have as many as fifteen blank panels covering unoccupied hard drive slots. 2. Align the replacement drive to the drive slot.
- Page 91 4. At the Solaris prompt, type the cfgadm -al command. This will list all drives in the device tree, including drives that are not configured. # cfgadm -al This command should identify the Ap_id for the hard drive you plan to remove, as shown below.
- Page 92 ■ “Four-Drive Capable Backplane Configuration Reference” on page 77 ■ “Eight-Drive Capable Backplane Configuration Reference” on page 78 ■ “Sixteen-Drive Capable Backplane Configuration Reference” on page 79 ■ Sun SPARC Enterprise T5120 and T5220 Servers Service Manual • July 2009...
-
Page 93: Four-Drive Capable Backplane Configuration Reference
Four-Drive Capable Backplane Configuration Reference The following table shows the physical hard drive locations in a four-drive capable backplane. Physical Drive Locations in a Four-Drive Capable Backplane TABLE: HDD0 HDD1 HDD2 HDD3 The following table matches the FRU names and the default OpenBoot PROM/Solaris drive pathnames with the physical drive locations in a four-drive capable backplane. -
Page 94: Eight-Drive Capable Backplane Configuration Reference
“Install a Hard Drive” on page 73 ■ “Remove a Hard Drive” on page 71 ■ “Four-Drive Capable Backplane Configuration Reference” on page 77 ■ “Sixteen-Drive Capable Backplane Configuration Reference” on page 79 ■ Sun SPARC Enterprise T5120 and T5220 Servers Service Manual • July 2009... -
Page 95: Sixteen-Drive Capable Backplane Configuration Reference
Sixteen-Drive Capable Backplane Configuration Reference The first table below identifies the hard drive slot numbering in a sixteen-disk capable backplane. The second table matches the FRU names and the default OpenBoot PROM/Solaris drive pathnames with the physical drive locations. Physical Drive Locations in a Sixteen-Disk Capable Backplane TABLE: HDD3 HDD7... - Page 96 “Install a Hard Drive” on page 73 ■ “Remove a Hard Drive” on page 71 ■ “Four-Drive Capable Backplane Configuration Reference” on page 77 ■ “Eight-Drive Capable Backplane Configuration Reference” on page 78 ■ Sun SPARC Enterprise T5120 and T5220 Servers Service Manual • July 2009...
-
Page 97: Servicing Motherboard Components
Servicing Motherboard Components These topics explain how to replace the motherboard and its components in the Sun SPARC Enterprise T5120 and Sun SPARC Enterprise T5220 servers. “Servicing FB-DIMMs” on page 81 ■ “Servicing the Air Duct” on page 100 ■ “Servicing PCIe/XAUI Risers”... -
Page 98: Memory Fault Handling Overview
“PSH-Detected Fault Console Message” on page 45 ■ “Identify Faulty FB-DIMMs Using the show faulty Command” on page 83 ■ “Identify Faulty FB-DIMMs Using the FB-DIMM Fault Locator Button” on page 83 ■ Sun SPARC Enterprise T5120 and T5220 Servers Service Manual • July 2009... -
Page 99: Identify Faulty Fb-Dimms Using The Show Faulty Command
▼ Identify Faulty FB-DIMMs Using the show faulty Command The ILOM show faulty command displays current system faults, including FB-DIMM failures. ● Enter show faulty at the -> prompt. -> show faulty Target | Property | Value --------------------+------------------------+------------------------------- /SP/faultmgmt/0 | fru | /SYS/MB/CMP0/BR1/CH0/D0 /SP/faultmgmt/0 | timestamp... - Page 100 FB-DIMM Fault Locator Button on the Motherboard FIGURE: 6. Note the FB-DIMM next to the illuminated LED. 7. Ensure that all other FB-DIMMs are seated correctly in their slots. Sun SPARC Enterprise T5120 and T5220 Servers Service Manual • July 2009...
-
Page 101: Remove Fb-Dimms
“Disconnect Power Cords From the Server” on page 3. Remove the top cover. “Remove the Top Cover” on page 4. (Sun SPARC Enterprise T5120 server, 8-drive capable) Disconnect and stow the hard drive data cable: a. Unplug the hard drive data cable from J6401 on the motherboard. - Page 102 Caution – FB-DIMMs and heat sinks on the motherboard may be hot. 8. Grasp the top corners of the faulty FB-DIMM and lift it out of its slot. Sun SPARC Enterprise T5120 and T5220 Servers Service Manual • July 2009...
-
Page 103: Install Replacement Fb-Dimms
9. Place the FB-DIMM on an antistatic mat. 10. Repeat Step 7 through Step 9 for any other FB-DIMMs you intend to remove. 11. If you do not plan to install replacement FB-DIMMs at this time, install filler panels in the empty slots. Related Information “Install Replacement FB-DIMMs”... - Page 104 12. Slide the server into the rack. “Reinstall the Server in the Rack” on page 176. 13. Connect the power cords. .“Connect Power Cords to the Server” on page 178. Sun SPARC Enterprise T5120 and T5220 Servers Service Manual • July 2009...
-
Page 105: Verify Successful Replacement Of Faulty Fb-Dimms
Note – As soon as the power cords are connected, standby power is applied. Depending on how the firmware is configured, the system might boot at this time. Related Information “Remove FB-DIMMs” on page 85 ■ “Verify Successful Replacement of Faulty FB-DIMMs” on page 89 ■... - Page 106 If faults are reported, refer to the diagnostics instructions described in “ILOM Troubleshooting Overview” on page 23 for guidance in troubleshooting the fault. 5. Switch to the ILOM command shell. Sun SPARC Enterprise T5120 and T5220 Servers Service Manual • July 2009...
-
Page 107: Upgrade Memory Configuration With Additional Fb-Dimms
6. Run the show faulty command. -> show faulty Target | Property | Value --------------------+------------------------+------------------------------- /SP/faultmgmt/0 | fru | /SYS/MB/CMP0/BR0/CH1/D0 /SP/faultmgmt/0 | timestamp | Dec 14 22:43:59 /SP/faultmgmt/0/ | sunw-msg-id | SUN4V-8000-DX faults/0 /SP/faultmgmt/0/ | uuid | 3aa7c854-9667-e176-efe5-e487e520 faults/0 | 7a8a /SP/faultmgmt/0/ | timestamp | Dec 14 22:43:59... - Page 108 Align the FB-DIMM notch with the key in the connector. This alignment ensures that the FB-DIMM is oriented correctly. 7. Push the FB-DIMM into the connector until the ejector tabs lock the FB-DIMM in place. Installing FB-DIMMs FIGURE: Sun SPARC Enterprise T5120 and T5220 Servers Service Manual • July 2009...
- Page 109 Note – If the FB-DIMM does not easily seat into the connector, it may not have the correct orientation. If the orientation is reversed, damage to the FB-DIMM might occur. 8. Repeat Step 5 through Step 7 until all FB-DIMMs are installed. 9.
- Page 110 “Remove FB-DIMMs” on page 85 ■ “Install Replacement FB-DIMMs” on page 87 ■ “Verify Successful Replacement of Faulty FB-DIMMs” on page 89 ■ “FB-DIMM Configuration Guidelines” on page 95 ■ Sun SPARC Enterprise T5120 and T5220 Servers Service Manual • July 2009...
-
Page 111: Fb-Dimm Configuration Guidelines
FB-DIMM Configuration Guidelines Use the guidelines described in this topic when installing, upgrading, or replacing FB-DIMMs: There are a total of 16 slots that support industry-standard FB-DIMMs. ■ Supported FB-DIMM capacities are 1 GByte, 2 GByte, 4 GByte, and 8 GByte. ■... -
Page 112: Fb-Dimm Configuration Reference
FB-DIMM Configuration Reference The following figure illustrates the physical arrangement of FB-DIMM slots on the motherboard. Sun SPARC Enterprise T5120 and T5220 Servers Service Manual • July 2009... - Page 113 FB-DIMM Slot Layout on the Motherboard FIGURE: Figure Legend Branch 3 FB-DIMM slots Branch 2 FB-DIMM slots Branch 0 FB-DIMM slots Branch 1 FB-DIMM slots FB-DIMM fault locator button Note: Pressing the fault locator button causes the LED next to any faulty FB-DIMM to turn on. For Each FB-DIMM slot: BR = Branch, CH = Channel, D = DIMM Servicing Motherboard Components...
- Page 114 J1501 /SYS/MB/CMP0/BR1/CH0/D1 Channel 1 J1601 /SYS/MB/CMP0/BR1/CH1/D0 J1701 /SYS/MB/CMP0/BR1/CH1/D1 The following figure shows the order in which FB-DIMM slots must be used for the three level of FB-DIMM quantities. Sun SPARC Enterprise T5120 and T5220 Servers Service Manual • July 2009...
- Page 115 Slot Use Map for Quantities of 4, 8, and 16 FB-DIMMs FIGURE: Figure Legend 4 FB-DIMM configuration 8 FB-DIMM configuration 16 FB-DIMM configuration Servicing Motherboard Components...
-
Page 116: Servicing The Air Duct
1. Slide the system out of the rack. “Extend the Server to the Maintenance Position” on page 2. Remove the top cover. “Remove the Top Cover” on page 67 Sun SPARC Enterprise T5120 and T5220 Servers Service Manual • July 2009... -
Page 117: Install The Air Duct
3. (Sun SPARC Enterprise T5120 server; 8 drive-capable) Disconnect and stow the hard drive data cable. a. Unplug the hard drive data cable from J6401 on the motherboard. b. Remove the hard drive data cable from its seat on the CPU air duct. -
Page 118: Servicing Pcie/Xaui Risers
You must remove all three PCIe/XAUI risers when servicing the motherboard. ▼ Remove a PCIe/XAUI Riser 1. Power off the server. “Removing Power From the System” on page Sun SPARC Enterprise T5120 and T5220 Servers Service Manual • July 2009... - Page 119 Slide the PCI cross beam back to remove it from the chassis. Two mushroom standoffs secure the removable cross beam to the back of the system. Removing the PCIe/XAUI Riser (Sun SPARC Enterprise T5120 Server) FIGURE: Servicing Motherboard Components...
-
Page 120: Install A Pcie/Xaui Riser
3. Tighten the captive screw to secure the riser to the motherboard. Note – Ensure that PCIe filler panels are installed in all empty PCIe/XAUI slots. Sun SPARC Enterprise T5120 and T5220 Servers Service Manual • July 2009... - Page 121 Installing the PCIe/XAUI Riser (Sun SPARC Enterprise T5120) FIGURE: Installing the PCIe/XAUI Riser (Sun SPARC Enterprise T5220) FIGURE: 4. Install the PCI cross beam. Slide the cross beam forward over the PCIe/XAUI risers. Ensure that the cross beam is engaged with the standoffs on either side of the chassis rear panel PCI cross beam.
-
Page 122: Remove A Pcie Or Xaui Card
6. Place the PCIe/XAUI card on an antistatic mat. 7. If you are not replacing the PCIe/XAUI card, install a PCIe/XAUI filler panel. Sun SPARC Enterprise T5120: PCIe filler panels are located in the removable ■ PCI cross beam. Press the filler panel into the cross beam from the rear. -
Page 123: Install A Pcie Or Xaui Card
“Remove a PCIe/XAUI Riser” on page 102. 5. Remove the PCI filler panel. Sun SPARC Enterprise T5120 servers: PCIe filler panels are located in the ■ removable PCI cross beam. Press the filler panel in from the rear until it snaps into place, as shown in the following figure. - Page 124 Sun SPARC Enterprise T5220 servers: PCIe filler panels are located on the riser ■ board assembly. Press the filler panel in from the rear until it snaps into place as shown in the following figure. Sun SPARC Enterprise T5120 and T5220 Servers Service Manual • July 2009...
- Page 125 Installing a PCIe Card (Sun SPARC Enterprise T5220) FIGURE: 6. Insert the PCIe/XAUI card into the correct slot on the riser board. 7. Replace the PCIe/XAUI riser. “Install a PCIe/XAUI Riser” on page 104. 8. Install the top cover. “Install the Top Cover” on page 175.
-
Page 126: Pcie/Xaui Card Configuration Reference For Sun Sparc Enterprise T5120 Servers
XAUI expansion card /SYS/MB/RISER0/XAUI0 PCIe 1 or x8 PCIe operating at x4 /SYS/MB/RISER1/PCIE1 † XAUI 1 XAUI expansion card /SYS/MB/RISER1/XAUI1 PCIe 2 x16 PCIe operating at x8 /SYS/MB/RISER2/PCIE2 Sun SPARC Enterprise T5120 and T5220 Servers Service Manual • July 2009... -
Page 127: Pcie And Xaui Card Reference For Sun Sparc Enterprise T5220 Servers
* Slots 0 and 1 are shared PCIe/XAUI slots. You can only install one or the other type of card. † Slots 0 and 1 are shared PCIe/XAUI slots. You can only install one or the other type of card. PCIe and XAUI Card Reference for Sun SPARC Enterprise T5220 Servers The following table shows the physical PCIe/XAUI slot locations on the Sun SPARC... -
Page 128: Servicing The Battery
If the server fails to maintain the proper time when it is powered off and not connected to a network, replace the battery. The following figure shows the battery location on the Sun SPARC Enterprise T5120. The Sun SPARC Enterprise T5220 is in a similar location. -
Page 129: Remove A Battery
Battery Location (Sun SPARC Enterprise T5120 Server Shown) FIGURE: Related Information “Remove a Battery” on page 113 ■ “Install a Battery” on page 114 ■ ▼ Remove a Battery 1. Remove PCIe/XAUI riser 2. “Remove a PCIe/XAUI Riser” on page 102. -
Page 130: Install A Battery
SCC module from the faulty motherboard and to the new motherboard. “Remove the Motherboard Assembly” on page 118 “Install the Motherboard Assembly” on page 120 for additional information. Sun SPARC Enterprise T5120 and T5220 Servers Service Manual • July 2009... -
Page 131: Remove A Faulty Scc Module
Replacing a faulty SCC module -- When replacing a faulty SCC module, you ■ must obtain the host ID, MAC addresses, and ILOM configuration settings stored in the SCC module you are replacing. This will enable you to configure them into new SCC module. -
Page 132: Install A New Scc Module
8. Power on the server. “Power On the Server Using the poweron Command” on page 179 “Power On the Server Using the Front Panel Power Button” on page 180. Sun SPARC Enterprise T5120 and T5220 Servers Service Manual • July 2009... -
Page 133: Servicing The Motherboard Assembly
9. If the previous SCC module had modified ILOM configuration variables and you recorded them, configure the new SCC module with those values. Related Information “SCC Module Overview” on page 114 ■ “Remove a Faulty SCC Module” on page 115 ■... -
Page 134: Remove The Motherboard Assembly
“Remove the Top Cover” on page 8. Remove the air duct. “Remove the Air Duct” on page 100. 9. Remove all PCIe/XAUI riser assemblies. “Remove a PCIe/XAUI Riser” on page 102. Sun SPARC Enterprise T5120 and T5220 Servers Service Manual • July 2009... - Page 135 Note – Make note of the location of expansion cards in PCIe/XAUI risers 0 and 1. 10. Disconnect the motherboard-to-power distribution board ribbon cable. 11. Disconnect the hard drive data cables: a. Press the latching mechanism on the connector to release the cable plug. If you have difficulty releasing the cable plug, first push the plug slightly into the connector, then press the latching mechanism.
-
Page 136: Install The Motherboard Assembly
When you install the motherboard, ensure that you position the board as far forward in the chassis as possible. 2. Position the motherboard so that its screw holes align with the chassis standoffs. Sun SPARC Enterprise T5120 and T5220 Servers Service Manual • July 2009... - Page 137 Installing the Motherboard Assembly (Sun SPARC Enterprise T5120 Server) FIGURE: 3. Using the green handle and the back edge of the motherboard tray, push down firmly and equally while sliding the motherboard to the front of the chassis. Tip – After installing the motherboard into the chassis, ensure that the motherboard is correctly seated by gently lifting up on the handles.
- Page 138 “Power On the Server Using the poweron Command” on page 179 “Power On the Server Using the Front Panel Power Button” on page 180. Related Information “Remove the Motherboard Assembly” on page 118 ■ Sun SPARC Enterprise T5120 and T5220 Servers Service Manual • July 2009...
-
Page 139: Servicing Fan Modules
The minimum number of fan modules installed in the server is different for the two server models: Sun SPARC Enterprise T5120 Servers contain at least four fan modules. ■ Sun SPARC Enterprise T5220 Servers contain at least three fan modules. -
Page 140: Fan Module Configurations For Sun Sparc Enterprise T5120 Servers (4- And 8-Disk Capable)
The following table shows the FRU device names for the fan modules in the four hard drive capable Sun SPARC Enterprise T5120 server. Fan Module Locations and FRU Names for Sun SPARC Enterprise T5120 Servers With a 4-Drive TABLE: Capable Backplane... -
Page 141: Fan Module Status Leds
Fan Module Status LEDs Each fan module contains a pair of LEDs, which are visible when you open the fan compartment access door. The following table describes the status LEDs located on the fan modules. Fan Module Status LEDs TABLE: Color Notes Power OK... - Page 142 60 seconds. 3. The faulty fan module is identified with a corresponding fault LED. On Sun SPARC Enterprise T5120 servers, the Fan Fault LEDs are located on the fan board. On Sun SPARC Enterprise T5220 servers, the Fan Fault LEDs are located on the fan modules.
-
Page 143: Install A Fan Module
Removing a Fan Module FIGURE: Related Information “Extend the Server to the Maintenance Position” on page 63 ■ ▼ Install a Fan Module Caution – To ensure proper system cooling, be certain to install the replacement fan module in the same slot from which the faulty fan was removed. 1. - Page 144 Related Information “Extend the Server to the Maintenance Position” on page 63 ■ “Faults Displayed by show faulty” on page 29 ■ Sun SPARC Enterprise T5120 and T5220 Servers Service Manual • July 2009...
-
Page 145: Servicing Power Supplies
The server models that run on DC input power require you to build the input power cable to specific safety guidelines. For instructions on building the DC power cables and the safety guidelines, refer to the Sun SPARC Enterprise T5120 and T5220 Server Installation Guide. - Page 146 Note – If a power supply fails and you do not have a replacement available, leave the failed power supply installed to ensure proper airflow in the server. Related Information “Servicing Power Distribution Boards” on page 160 ■ Sun SPARC Enterprise T5120 and T5220 Servers Service Manual • July 2009...
-
Page 147: Remove A Power Supply
“Servicing Power Supply Backplanes (Sun SPARC Enterprise T5220 Servers)” on ■ page 167 “Remove a Power Supply” on page 131 ■ “Install a Power Supply” on page 134 ■ ▼ Remove a Power Supply Caution – Hazardous voltages are present. To reduce the risk of electric shock and danger to personal health, follow the instructions. - Page 148 Wago connector on the server DC power supply unit. Instead, turn off the power at the circuit breaker on the power source. 5. Grasp the power supply handle and press the release latch. Sun SPARC Enterprise T5120 and T5220 Servers Service Manual • July 2009...
- Page 149 Power Supply Release Handle (Sun SPARC Enterprise T5120 Servers) FIGURE: Power Supply Release Handle (Sun SPARC Enterprise T5220 Servers) FIGURE: 6. Pull the power supply out of the chassis. Servicing Power Supplies...
-
Page 150: Install A Power Supply
1. Align the replacement power supply with the empty power supply chassis bay. 2. Slide the power supply into the bay until it is fully seated. Installing a Power Supply (Sun SPARC Enterprise T5120 Server) FIGURE: Sun SPARC Enterprise T5120 and T5220 Servers Service Manual • July 2009... - Page 151 Installing a Power Supply (Sun SPARC Enterprise T5220 Server) FIGURE: 3. Based on the model of your server (AC or DC), apply power to the power supply in one of the following ways: AC server models – Connect the power cord to the power supply. ■...
-
Page 152: Power Supply Configuration Reference
Power Supply Locations and FRU Names for Sun SPARC Enterprise T5220 TABLE: Servers FRU Names /SYS/PS1 /SYS/PS0 Note – Both tables represent the power supplies with the FRU names displayed by the ILOM show command. Sun SPARC Enterprise T5120 and T5220 Servers Service Manual • July 2009... -
Page 153: Servicing Boards And Components
Servicing Boards and Components These topics explain how to service field-replaceable units (FRUs) in Sun SPARC Enterprise T5120 and T5220 servers. “Important Safety Instructions” on page 137 ■ “Servicing DVD/USB Modules” on page 138 ■ “Servicing Fan Power Boards” on page 143 ■... -
Page 154: Servicing Dvd/Usb Modules
These topics explain how to remove and install DVD/USB modules. “DVD/USB Module Overview” on page 139 ■ “Remove the DVD/USB Module” on page 139 ■ “Install the DVD/USB Module” on page 141 ■ Sun SPARC Enterprise T5120 and T5220 Servers Service Manual • July 2009... -
Page 155: Dvd/Usb Module Overview
The DVD/USB module must be removed from the hard drive cage in order to service the hard drive backplane. DVD/USB Module in a Sun SPARC Enterprise T5120 Server FIGURE: The Hard Drive backplane supports either a SATA DVD or a PATA DVD, depending on when it was manufactured. - Page 156 5. Release the DVD/USB module from the hard drive backplane. Use the finger indentation in the hard drive bay below the DVD/USB module to extend the release tab. Sun SPARC Enterprise T5120 and T5220 Servers Service Manual • July 2009...
-
Page 157: Install The Dvd/Usb Module
Removing the DVD/USB Module (illustrates removal from a SPARC Enterprise FIGURE: T5120 server) 6. Slide the DVD/USB module out of the hard drive cage. 7. Place the module on an antistatic mat. Related Information “Install the DVD/USB Module” on page 141 ■... - Page 158 On the Server Using the Front Panel Power Button” on page 180. Related Information “Remove the DVD/USB Module” on page 139 ■ “Servicing the Hard Drive Backplane” on page 152 ■ Sun SPARC Enterprise T5120 and T5220 Servers Service Manual • July 2009...
-
Page 159: Servicing Fan Power Boards
Servicing Fan Power Boards These topics explain how to remove and install fan power boards. “Fan Power Board Overview” on page 143 ■ “Remove the Fan Power Board” on page 143 ■ “Install the Fan Power Board” on page 145 ■... - Page 160 8. Slide the fan power board to the left to disengage it from the paddle card. 9. Remove the fan power board from the system and place it on an antistatic mat. Sun SPARC Enterprise T5120 and T5220 Servers Service Manual • July 2009...
-
Page 161: Install The Fan Power Board
Related Information “Install the Fan Power Board” on page 145 ■ ▼ Install the Fan Power Board 1. Lower the board into its mushroom standoffs in the chassis floor and slide the board to the right into the paddle card. Installing a Fan Power Board (Illustrates installation in a Sun SPARC Enterprise FIGURE: T5120 server) -
Page 162: Servicing The Hard Drive Cage
“Remove the Front Control Panel Light Pipe Assemblies” on page 157 ■ ▼ Remove the Hard Drive Cage 1. Power off the system. See“Removing Power From the System” on page 60 Sun SPARC Enterprise T5120 and T5220 Servers Service Manual • July 2009... - Page 163 8. If you are servicing the hard drive backplane, remove the DVD/USB module. “Remove the DVD/USB Module” on page 139. 9. (Sun SPARC Enterprise T5120 server, 8-HDD model) Remove the following items: Fans in locations /SYS/FANBD0/FM0 through /SYS/FANBD0/FM3. ■...
- Page 164 Removing a Hard Drive Cage (Illustrating Removal From a Sun SPARC Enterprise T5120 Server) FIGURE: 14. Disconnect the hard drive data cables. a. Press the release button. b. Remove the plug from the connector on the hard drive backplane. See panel 4 in the preceding figure.
-
Page 165: Install The Hard Drive Cage
“Remove the Hard Drive Backplane” on page 152 ■ ▼ Install the Hard Drive Cage Before performing any installation steps, review the proper cable routing and connections. The following topics contain detailed cable routing information. “Internal Cables for Onboard SAS Controller Cards in SPARC Enterprise T5120 ■... - Page 166 Note – If the cables do not reach the hard drive cage, perform this step after Step 3. (Sun SPARC Enterprise T5120 server, 8 disk-capable) Remove fan FM1. Sun SPARC Enterprise T5120 and T5220 Servers Service Manual • July 2009...
- Page 167 6. (Sun SPARC Enterprise T5220 server) Install the fan power boards. “Install the Fan Power Board” on page 145. 7. (Sun SPARC Enterprise T5220 and Sun SPARC Enterprise T5120 8-disk capable servers) Install the fan modules. “Install a Fan Module” on page 127.
-
Page 168: Servicing The Hard Drive Backplane
“Remove the Hard Drive Cage” on page 146. 2. Remove the No. 1 Phillips screws securing the backplane to the hard drive cage. Two screws secure the backplane in the Sun SPARC Enterprise T5120 server. See ■ the first figure below. - Page 169 Four screws secure the backplane in the Sun SPARC Enterprise T5220 server. ■ See the second figure below. Removing a Hard Drive Backplane (Illustrating removal from a Sun SPARC FIGURE: Enterprise T5120 server) Servicing Boards and Components...
-
Page 170: Install The Hard Drive Backplane
1. Slide the backplane under the retention hooks on the hard drive cage. 2. Install the No. 1 Phillips screws that secure the backplane to the hard drive cage. Two screws secure the backplane in the Sun SPARC Enterprise T5120 server. See ■ the first figure below. - Page 171 Installing a Hard Drive Backplane in a Sun SPARC Enterprise T5120 Server FIGURE: Servicing Boards and Components...
-
Page 172: Servicing Front Control Panel Light Pipe Assemblies
“Front Control Panel Light Pipe Assemblies Overview” on page 157 ■ “Remove the Front Control Panel Light Pipe Assemblies” on page 157 ■ “Install the Front Control Panel Light Pipe Assemblies” on page 158 ■ Sun SPARC Enterprise T5120 and T5220 Servers Service Manual • July 2009... -
Page 173: Front Control Panel Light Pipe Assemblies Overview
The following figure illustrates installation of the front control panel light pipe on a Sun SPARC Enterprise T5220 server. Except for minor differences, such as the number of screws, installation is the same for Sun SPARC Enterprise T5120 servers. Servicing Boards and Components... -
Page 174: Install The Front Control Panel Light Pipe Assemblies
Enterprise T5120 server. See the first figure below. Three screws secure the assembly to the hard drive cage in the Sun SPARC ■ Enterprise T5220 server. See the second figure below. Sun SPARC Enterprise T5120 and T5220 Servers Service Manual • July 2009... - Page 175 Installing a Front Control Panel Light Pipe Assembly in a Sun SPARC Enterprise FIGURE: T5220 Server 3. Secure the light pipe assembly with the No. 1 Phillips screws. Two screws secure the assembly to the hard drive cage in the Sun SPARC ■...
-
Page 176: Servicing Power Distribution Boards
Caution – The system supplies power to the power distribution board even when the server is powered off. To avoid personal injury or damage to the server, you must disconnect power cords before servicing the power distribution board. Sun SPARC Enterprise T5120 and T5220 Servers Service Manual • July 2009... -
Page 177: Remove The Power Distribution Board
Grasp the power supply handle and press the release latch. See the following figure. b. Slide the power supply out of the system. Removing a Power Supply From a Sun SPARC Enterprise T5120 Server FIGURE: 4. Disconnect the top cover interlock cable from the power distribution board. - Page 178 See Panel 2 in the previous figure. 7. Remove the No. 2 Phillips screw securing the power distribution board to the chassis. Sun SPARC Enterprise T5120 and T5220 Servers Service Manual • July 2009...
-
Page 179: Install The Power Distribution Board
Removing the Power Distribution Board From a Sun SPARC Enterprise T5120 FIGURE: Server 8. Grasp the bus bar and pull the power distribution board/bus bar assembly to the left, away from the paddle card. 9. Lift the power distribution board/bus bar assembly up and out of the system. - Page 180 Installing a Power Distribution Board in a Sun SPARC Enterprise T5120 Server FIGURE: 3. Install the No. 2 Phillips screw to secure the power distribution board to the chassis. 4. (Sun SPARC Enterprise T5220 server) Attach the four No. 2 Phillips screws securing the power distribution board to the power supply backplane.
- Page 181 6. Connect the top cover interlock cable to the power distribution board. 7. (Sun SPARC Enterprise T5120 server) Install the power supplies. Slide each power supply into its bay until the power supply locks into place.
- Page 182 The following is an example of the command-line dialog used to set the chassis serial number and server part number for a Sun SPARC Enterprise T5120 server. Sun SPARC Enterprise T5120 and T5220 Servers Service Manual • July 2009...
-
Page 183: Servicing Power Supply Backplanes (Sun Sparc Enterprise T5220 Servers)
Caution – When performing the following steps, use special care to enter the correct numbers. Once the power distribution board has been programmed with a chassis serial number or server part number, the number cannot be changed. sc> setsc sc_servicemode true Warning: misuse of this mode may invalidate your warranty. -
Page 184: Power Supply Backplane Overview
The power supply backplane carries 12V power from the power supplies to the power distribution board over a pair of bus bars. Note – Sun SPARC Enterprise T5120 servers do not use a power supply backplane. In these systems, the power supplies connect directly to the power distribution board. - Page 185 Removing a Power Supply From a Sun SPARC Enterprise T5220 Server FIGURE: 3. Remove the power distribution board. “Remove the Power Distribution Board” on page 161. 4. Remove the No. 2 Phillips screw securing the power supply backplane to the power supply bay.
-
Page 186: Install The Power Supply Backplane
3. Install the power distribution board. “Install the Power Distribution Board” on page 163. 4. Install the power supplies. Slide each power supply into its bay until the power supply locks into place. Sun SPARC Enterprise T5120 and T5220 Servers Service Manual • July 2009... -
Page 187: Servicing Paddle Cards
Installing a Power Supply (Illustrating Installation of a Power Supply in a Sun FIGURE: SPARC Enterprise T5220 Server) 5. Install the motherboard assembly. “Install the Motherboard Assembly” on page 120. Related Information “Remove the Power Supply Backplane” on page 168 ■... -
Page 188: Paddle Card Overview
Removing a Paddle Card (Illustrating Removal From a Sun SPARC Enterprise FIGURE: T5120 Server) 5. Slide the paddle card back, away from its connector on the hard drive backplane. Sun SPARC Enterprise T5120 and T5220 Servers Service Manual • July 2009... -
Page 189: Install The Paddle Card
6. Tilt the paddle card away from the side of the chassis and lift the paddle card up and out of the system. 7. Place the paddle card on an antistatic mat. Related Information “Install the Paddle Card” on page 173 ■... - Page 190 Sun SPARC Enterprise T5120 and T5220 Servers Service Manual • July 2009...
-
Page 191: Returning The Server To Operation
Returning the Server to Operation These topics explain how to return Sun SPARC Enterprise T5120 and T5220 servers to operation after you have performed service procedures. “Install the Top Cover” on page 175 ■ “Reinstall the Server in the Rack” on page 176 ■... -
Page 192: Reinstall The Server In The Rack
Caution – The chassis is heavy. To avoid personal injury, use two people to lift it and set it in the rack. 1. Place the ends of the chassis mounting brackets into the slide rails. Sun SPARC Enterprise T5120 and T5220 Servers Service Manual • July 2009... -
Page 193: Return The Server To The Normal Rack Position
Returning the Server to the Rack FIGURE: 2. Slide the server into the rack until the brackets lock into place. The server is now in the extended maintenance position. Related Information “Return the Server to the Normal Rack Position” on page 177 ■... -
Page 194: Connect Power Cords To The Server
Related Information “Reinstall the Server in the Rack” on page 176 ■ ▼ Connect Power Cords to the Server ● Reconnect both power cords to the power supplies. Sun SPARC Enterprise T5120 and T5220 Servers Service Manual • July 2009... -
Page 195: Power On The Server Using The Poweron Command
Note – As soon as the power cords are connected, standby power is applied. Depending on how the firmware is configured, the system might boot at this time. Related Information “Power On the Server Using the poweron Command” on page 179 ■... -
Page 196: Power On The Server Using The Front Panel Power Button
“Power On the Server Using the Front Panel Power Button” on page 180 more information on the Power button. Related Information “Power On the Server Using the poweron Command” on page 179 ■ Sun SPARC Enterprise T5120 and T5220 Servers Service Manual • July 2009... -
Page 197: Identifying Frus In Sparc Enterprise T5120 Servers
Identifying FRUs in SPARC Enterprise T5120 Servers These topics identify and illustrate Field Replaceable Units (FRUs) contained in Sun SPARC Enterprise T5120 servers. “Motherboard Components in T5120 Servers” on page 182 ■ “I/O Components in SPARC Enterprise T5120 Servers” on page 184 ■... -
Page 198: Motherboard Components In T5120 Servers
Motherboard Components in T5120 Servers Motherboard Components (Sun SPARC Enterprise T5120 Servers) FIGURE: Sun SPARC Enterprise T5120 and T5220 Servers Service Manual • July 2009... - Page 199 The following table identifies the components located on the motherboard and points to instructions for servicing them. Motherboard Components (SPARC Enterprise T5120 Servers) TABLE: Item Replacement Instructions Notes FRU Name (If Applicable) PCIe/XAUI risers “Servicing PCIe/XAUI Back panel PCI cross /SYS/MB/RISER0 Risers”...
-
Page 200: I/O Components In Sparc Enterprise T5120 Servers
I/O Components in SPARC Enterprise T5120 Servers I/O Components (Sun SPARC Enterprise T5120 Servers) FIGURE: Sun SPARC Enterprise T5120 and T5220 Servers Service Manual • July 2009... - Page 201 The following table identifies the I/O components in the server and points to instructions for servicing them. I/O Components (Sun SPARC Enterprise T5120 Servers) TABLE: Item Replacement Instructions Notes FRU Name (If Applicable) Top cover “Remove the Top Cover” Removing top cover...
-
Page 202: Power Distribution/Fan Module Components In Sparc Enterprise T5120 Servers
Power Distribution/Fan Module Components in SPARC Enterprise T5120 Servers Power Distribution/Fan Module Components (Sun SPARC Enterprise T5120 Servers) FIGURE: Sun SPARC Enterprise T5120 and T5220 Servers Service Manual • July 2009... - Page 203 The following table identifies the power distribution and fan module components in the server and points to instructions for servicing them. Power Distribution/Fan Module Components (Sun SPARC Enterprise T5120 Servers) TABLE: Item Replacement Instructions Notes FRU Name (If Applicable) Power distribution “Servicing Power...
-
Page 204: Servers
Controller Cards in SPARC Enterprise T5120 Servers There are two SAS controller card options for the Sun SPARC Enterprise T5120 and T5220 servers (both options support RAID). The standard option uses the on-board SAS controller card preinstalled on every server. The second option is a StorageTek SAS RAID Internal Host Bus Adapter (HBA) PCIe card. - Page 205 HDD Cable from Onboard SAS to HDD Backplane (4-Disk Capable Sun SPARC Enterprise T5120 FIGURE: Server) Figure Legend Connector on the motherboard. Hard drive data cable; connects J6401 on the motherboard to J0301 on the hard drive backplane Note - Do not route this cable over the air duct. Instead route it next to the air duct.
- Page 206 Note - Use care in routing the short cable so it does not become caught between the PSU and the top cover. Connectors on hard drive backplane Sun SPARC Enterprise T5120 and T5220 Servers Service Manual • July 2009...
-
Page 207: Hdd Data Cable Routing For Sas Raid Controller Cards In Four-Disk Capable Sparc Enterprise T5120 Servers
Controller Cards in Four-Disk Capable SPARC Enterprise T5120 Servers There are two SAS controller card options for the Sun SPARC Enterprise T5120 and T5220 servers (both options support RAID). The standard option uses the on-board SAS controller card preinstalled on every server. The second option is a StorageTek SAS RAID Internal Host Bus Adapter (HBA) PCIe card. - Page 208 Route the cable through the fan midwall to the hard drive backplane Note – For information about installing PCIe HBA cards, refer to the document, Installing the StorageTek SAS RAID HBA Into the SPARC Enterprise T5120 and T5220 Servers. Sun SPARC Enterprise T5120 and T5220 Servers Service Manual • July 2009...
-
Page 209: Hdd Data Cable Routing For Sas Raid Controller Cards In Eight-Disk Capable Sparc Enterprise T5120 Servers
Controller Cards in Eight-Disk Capable SPARC Enterprise T5120 Servers There are two SAS controller card options for the Sun SPARC Enterprise T5120 and T5220 servers (both options support RAID). The standard option uses the on-board SAS controller card preinstalled on every server. The second option is a StorageTek SAS RAID Internal Host Bus Adapter (HBA) PCIe card. - Page 210 Route the cable through the fan midwall to the hard drive backplane Note – For information about installing PCIe HBA cards, refer to the document, Installing the StorageTek SAS RAID HBA Into the SPARC Enterprise T5120 and T5220 Servers. Sun SPARC Enterprise T5120 and T5220 Servers Service Manual • July 2009...
-
Page 211: Identifying Frus In Sun Sparc Enterprise T5220 Servers
Identifying FRUs in Sun SPARC Enterprise T5220 Servers These topics identify and illustrate Field Replaceable Units (FRUs) contained in Sun SPARC Enterprise T5220 servers. “Motherboard Components in T5220 Servers” on page 196 ■ “I/O Components in Sun SPARC Enterprise T5220 Servers” on page 198 ■... -
Page 212: Motherboard Components In T5220 Servers
Motherboard Components in T5220 Servers Motherboard Components in Sun SPARC Enterprise T5220 Servers FIGURE: Sun SPARC Enterprise T5120 and T5220 Servers Service Manual • July 2009... - Page 213 The following table identifies the components located on the motherboard and points to instructions for servicing them. Motherboard Components (SPARC Enterprise T5220 Servers) TABLE: Item Replacement Instructions Notes FRU Name (If Applicable) Removable back “Servicing PCIe/XAUI Remove this to service panel cross beam Risers”...
-
Page 214: I/O Components In Sun Sparc Enterprise T5220 Servers
I/O Components in Sun SPARC Enterprise T5220 Servers I/O Components (SPARC Enterprise T5220 Servers) FIGURE: Sun SPARC Enterprise T5120 and T5220 Servers Service Manual • July 2009... - Page 215 The following table identifies the I/O components in the server and points to instructions for servicing them. I/O Components (SPARC Enterprise T5220 Servers) TABLE: Item Replacement Instructions Notes FRU Name (If Applicable) Top cover “Remove the Top Cover” Removing top cover if on page 67 the system is running will result in immediate...
-
Page 216: Power Distribution/Fan Module Components In Sun Sparc Enterprise T5220 Servers
Power Distribution/Fan Module Components in Sun SPARC Enterprise T5220 Servers Power Distribution/Fan Module Components (SPARC Enterprise T5220 Servers) FIGURE: Sun SPARC Enterprise T5120 and T5220 Servers Service Manual • July 2009... - Page 217 The following table identifies the power distribution and fan module components in the server and points to instructions for servicing them. Power Distribution/Fan Module Components (SPARC Enterprise T5220 Servers) TABLE: Item Replacement Instructions Notes FRU Name (If Applicable) Paddle card “Servicing Paddle Includes the top cover /SYS/CONNBD...
-
Page 218: Internal Cables For Onboard Sas Controller Cards In Sun Sparc Enterprise T5220 Servers
Controller Cards in Sun SPARC Enterprise T5220 Servers There are two SAS controller card options for the Sun SPARC Enterprise T5120 and T5220 servers (both options support RAID). The standard option uses the on-board SAS controller card preinstalled on every server. The second option is a StorageTek SAS RAID Internal Host Bus Adapter (HBA) PCIe card. - Page 219 Internal Cables for Onboard SAS Controller Cards (Eight-Disk Capable Sun SPARC Enterprise FIGURE: T5220 Servers) Figure Legend Motherboard to PDB ribbon cable; connects J0403 on the PDB to J5201 on the motherboard PDB to PSU backplane cable; connects J0103 on the PSU backplane to J0101 on the PDB. Top cover interlock cable;...
- Page 220 - The longer cable connects to J6401 on the motherboard and to J0301 on the hard drive backplane. Note - Both cables are routed around the air duct, under the chassis center wall and under the fan power boards. Connectors on hard drive backplane Sun SPARC Enterprise T5120 and T5220 Servers Service Manual • July 2009...
- Page 221 Internal Cables for Onboard SAS Controller Cards (Sixteen-Disk Capable Sun SPARC Enterprise FIGURE: T5220 Servers) Figure Legend SAS Connector on motherboard Hard drive data cable; connects J6401 on the motherboard to J0301 on the hard drive backplane Note - The cable is routed around the air duct, under the chassis center wall and under the fan power boards.
-
Page 222: Hdd Data Cable Routing For Sas Raid Controller Cards In Sun Sparc Enterprise T5220 Servers
Controller Cards in Sun SPARC Enterprise T5220 Servers There are two SAS controller card options for the Sun SPARC Enterprise T5120 and T5220 servers (both options support RAID). The standard option uses the on-board SAS controller card preinstalled on every server. The second option is a StorageTek SAS RAID Internal Host Bus Adapter (HBA) PCIe card. - Page 223 HDD Data Cable Routing for SAS RAID Controller Cards in Eight- or Sixteen-Disk Capable Sun FIGURE: SPARC Enterprise T5220 Servers Figure Legend Route both cables between the PCIe slots and FB-DIMMs Route both cables along the power supply midwall Route the 530-4119 cable under the fan midwall and fan boards, to the hard drive backplane Route the 530-3892 cable under the fan midwall and fan boards, to the hard drive backplane Note –...
- Page 224 Sun SPARC Enterprise T5120 and T5220 Servers Service Manual • July 2009...
-
Page 225: Index
Index console command, 26, 39, 94 consolehistory command, 26 about, 16 AC Present (power supply LED), 19, 135 airflow, blocked, 20 DC server models, 132, 135 antistatic wrist strap, 58 diag_level parameter, 36 ASR blacklist, 50 diag_mode parameter, 36 asrkeys (system components), 51 diag_trigger parameter, 36 diag_verbosity parameter, 36 diagnostics... - Page 226 28 POST installing see power-on self-test (POST) PCIe/XAUI riser, 104 power distribution board SCC module, 116 FRU name, 187, 201 Power OK (system LED), 19 power supply latch Sun SPARC Enterprise T5120 and T5220 Servers Service Manual • July 2009...
- Page 227 about, 129 interpreting to diagnose faults, 21, 22 AC Present LED, 19, 135 triggered by ILOM, 23 Fault LED, 21, 131 set command FRU name, 136, 187, 201 and component_state property, 42 Power Supply Fault (system LED) setdate command, 114 interpreting to diagnose faults, 21 setkeyswitch parameter, 27, 93 using to verify successful power supply...
- Page 228 SunVTS, 19 using the show faulty command, 19 Universal Unique Identifier (UUID), 44 USB ports also see DVD/USB module USB ports (front) FRU name, 185, 199 virtual keyswitch, 93 Sun SPARC Enterprise T5120 and T5220 Servers Service Manual • July 2009...
Need help?
Do you have a question about the Sun SPARC Enterprise T5120 and is the answer not in the manual?
Questions and answers