Table of Contents
Advertisement
Advertisement
Table of Contents

Related Manuals for Drive Medical GLADIATOR GT807


Summary of Contents for Drive Medical GLADIATOR GT807
- Page 1 GLADI ATOR GT GT807, GT808 OWNER’S MAN UAL...
-
Page 2: Table Of Contents
TA BLE OF CONTENTS PREFACE AND INTRODUCTION ……..………………………………… SAFETY NOTICE…………………………………………………………..….. 2.1 Before driving 2.2 While driving 2.3 Labeling PARTS INTRODUCTION……………………………………………..………. Parts description OPERATION…………………………………………………………………..4.1 Control panel 4.2 How to operate your scooter BATTERY CHARGING AND CARE……………………………………..5.1 Charging the battery 5.2 Battery INSPECTION AND MAINTENANCE……………………………………..…... -
Page 3: Preface And Introduction
P R E F A C E A N D I N T R O D U C T I O N Please carefully read this owner’s manual before using the vehicle. Improper use of the vehicle could result in harm, injury or traffic accidents. Therefore for maximum pleasure while using the vehicle please read this owner’s manual. -
Page 4: Safety Notice
S A F E T Y N O T I C E 2.1 BEFORE DRIVING The user needs to be familiar with the usage and operation of this vehicle before driving. Therefore, please always keep the following safety notices in mind. The same traffic rules apply to the use of this vehicle as apply to pedestrians For your safety, please therefore follow the rules that apply to pedestrians. - Page 5 S A F E T Y N O T I C E Do not use your vehicle under the circumstances below. On roads with heavy traffic or roads that are muddy, gravelly, bumpy, narrow, snowed over or icy. Keep away from places where you might get the wheels stuck. Do not drive at night or when it is raining, snowing, misty, or windy.
- Page 6 S A F E T Y N O T I C E 7. Check the forward/reverse speed lever works correctly. 8. Make sure the electromagnetic brake works correctly. 9. Make sure it is safe around you before you drive on the street. Engage the 5MPH switch if you are driving on the pavement.
-
Page 7: Labeling
S A F E T Y N O T I C E 2.3 LABELING WARNING Please carefully read all labels on the scooter Do not operate the scooter unless the handle bar is in before driving it. For your future reference, do a lock position. -
Page 8: Parts Introduction
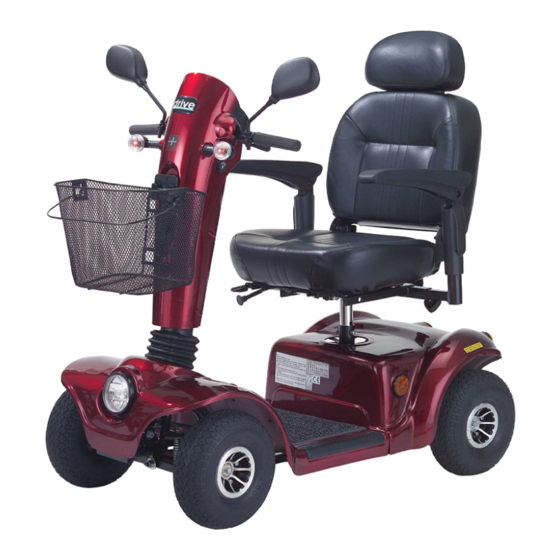
PA R T S I N T R O D U C T I O N 3.1 PARTS DESCRIPTION 1. Speed Dial 2. Indicator Lamp 3. Charger Socket Cover 4. Basket 5. Tiller 6. Tiller Adjust Lever 7. Head Lamp 8. -
Page 9: Operation
O P E R AT I O N 4.1 CONTROL PANEL 1. Speed Dial 2. Horn Button 3. Indicator lamp switch 4. Head light / Rear Light Button 5. Speed Control Lever 6. Battery Indicator 7. Power Switch 8. Emergency lamp switch 4.2 HOW TO OPERATE YOUR SCOOTER Power switch Turn the key to power ON or OFF... - Page 10 O P E R AT I O N Light Button Push the light button to switch the front and rear lights on. Push the button again to turn the lights off. Battery Indicator Battery Indicator When the power switch is turned on the battery indicator will light up with red squares indicating the remaining battery power.
- Page 11 O P E R AT I O N Seat The seat can be turned to 45 degrees or 90 degrees. Pull the seat adjustment lever forward and swivel seat. Release the lever, then continue swiveling the seat until it locks in position. Attention Return the seat to the forward position before driving.
- Page 12 4 . O P E R AT I O N Manual Brake As well as an electromagnetic brake, Squeeze the brake lever to apply the brake and then release the lever to release the brake. The manual brake tightness can be adjusted by the brake cable adjuster near the left hand side wheel.
-
Page 13: Battery Charging And Care
5 . B AT T E R Y C H A R G I N G A N D C A R E 5.1 CHARGING THE BATTERY Follow the procedure below step by step: 1. Turn the power switch to (OFF) 2. -
Page 14: Battery
5 . B AT T E R Y C H A R G I N G A N D C A R E Attention - Please follow the rules below to avoid accidents while charging. Please use the Drive charger only. Precharge the battery to its full capacity every time. You may damage the battery and scooter if you use a charger, which is not to the correct specification. - Page 15 5 . B AT T E R Y C H A R G I N G A N D C A R E 1. Turn the scooter power switch to “OFF”. 2. Remove the seat and dust cover. 3. Remove the shroud and unplug the terminal of the taillight and signal lights. 4.
-
Page 16: Inspection And Maintenance
6 . I N S P E C T I O N A N D M A I N T E N A N C E 6.1 INSPECTION Clean the scooter with a damp cloth and dust down approximately once a week to preserve the appearance of the scooter. -
Page 17: Storage
6 . I N S P E C T I O N A N D M A I N T E N A N C E Suggestion Ask for help from your scooter dealer to inspect or replace the fuse, since the tiller shroud has to be removed first before you can replace the fuse. -
Page 18: Trouble Shooting And Specification
• Recharge the batteries. • If problem persists contact your WU’S dealer. S P E C I F I C A T I O N Model Reference GT807, GT808 Dimension 47” x 24” x 44.5” (L x W x H mm) Weight w/ battery 220 lbs. -
Page 19: Warranty
8 . W A R R A N T Y Your Drive brand product is warranted to be free of defects in materials and workmanship as follows: Chair/Scooter frame: Lifetime Electronic Controller and drive train components: 1 year Batteries: 6 months from time of installation This device was built to exacting standards and carefully inspected prior to shipment. - Page 20 DRIVE AUT HORIZED SE RVIC E AGE NT NAME ADDRESS TELEPHONE EMAIL...
- Page 21 Warranty Registr atio n Please type or print. Serial # _______________________________________ Date Purchased ____/____/____ Owner Name ____________________________________________________________ Address _________________________________________________________________ City ____________________________________ State ________ ________ Additional Required Owner Information Please indicate your understanding of your scooter by completing the following information. ________ I have read and fully understand _______...
- Page 22 WARRANTY APPLICATION FORM Name Male Female Date of Birth Year Month Address Model GLADIATOR GT Scooter VIN: Motor Serial No: Key # Date of Purchase Year Month Purchaser Signature...
- Page 23 To ensure the correct after sales service and warranty service support, please write down the vehicle identification number that is attached on the back right-hand side of the frame. Model GT807, GT808 Chassis NO. ………………………………………… Motor serial # Key # …………………………………………...
- Page 24 Drive Medical Design & Manufacturing 99 Seaview Blvd Port Washington, NY 11050 516.998.4600 (Phone) 516.998.4601 (Fax) 877.224.0946 (Toll Free) www.drivemedical.com...
Need help?
Do you have a question about the GLADIATOR GT807 and is the answer not in the manual?
Questions and answers