Table of Contents
Advertisement
Advertisement
Table of Contents

Subscribe to Our Youtube Channel
Related Manuals for Drive Medical S35005GT


Summary of Contents for Drive Medical S35005GT
- Page 1 DAYTONA GT S35005GT S45001GT S35006GT S45002GT OWNER’S MANUAL...
-
Page 2: Table Of Contents
TABLE OF CONTENTS PREFACE AND INTRODUCTION …………………………………3 SAFETY NOTICE……………………………………………………..4 2.1 Before driving 2.2 While driving 2.3 Labeling 2.4 EMI PARTS INTRODUCTION…………………...………………………10 3.1 Parts description OPERATION………………………………………………………….11 4.1 Control panel 4.2 How to operate your scooter 4.3 How to set to freewheel mode DRIVING ON THE ROAD…………………………………………..15 BATTERY CHARGING AND CARE…………………………….17 6.1 Charging the battery... -
Page 3: Preface And Introduction
P R E F A C E A N D I N T R O D U C T I O N Please carefully read this owner’s manual before using the vehicle. Improper use of the vehicle could result in harm, injury or traffic accidents. ♦... -
Page 4: Safety Notice
2 . S A F E T Y N O T I C E 2.1 Before Driving The user needs to be familiar with the usage and operation of this vehicle before driving. The same traffic rules apply to the use of this vehicle as apply to pedestrians ♦... -
Page 5: While Driving
2 . S A F E T Y N O T I C E 2.2 While Driving Please carry out daily inspections. Refer to the section entitled “DAILY CHECKING” Do not move your body out of the vehicle while moving ♦... - Page 6 2 . S A F E T Y N O T I C E Ramps, inclines and drops ♦ Do not drive onto steep ramps greater than the specified gradient. Refer to the section entitled “CLIMBING ANGLE” in “9. SPECIFICATION“ ♦...
-
Page 7: Labeling
2 . S A F E T Y N O T I C E 2.3 Labeling WARNING DRIVE Please carefully read all labels on the scooter Emergency freewheel device. before driving it. For your future reference, Always re-engage the emergency do not remove them. -
Page 8: Emi
S A F E T Y N O T I C E 2.4 EMI This portion of the content will provide the user with basic information that describes the problems with EMI, known sources of EMI, protective measures either to lessen the possibility or exposure or to minimize the degree of exposure, and suggested action should unexpected or erratic movement occur. -
Page 9: Important Information
S A F E T Y N O T I C E 3. Long-range transmitters and transceivers, such as commercial broadcast transmitter (radio and TV broadcast antenna towers) and amateur (HAM) radios; Note: Other types of hand-held devices, such as cordless phones, laptop computers, AM/FM radios, TV sets, CD player, and cassette players, and small appliances, such as electric shavers and hair dryers, so far as we know, are not likely to cause EMI problems to your powered vehicle. -
Page 10: Parts Introduction
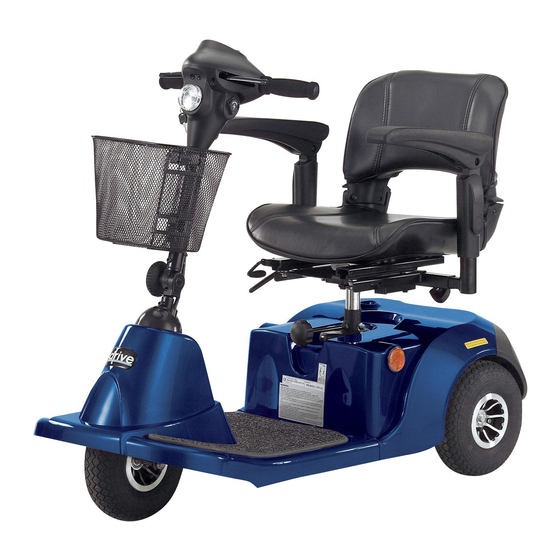
3 . P A R T S I N T R O D U C T I O N 3.1 PARTS DESCRIPTION 1. Speed Dial. 2. Charger Socket Cover. 3. Basket. 4. Tiller Adjust Bolt. 5. Arm Rest. 6. Seat. 7. -
Page 11: Operation
4 . O P E R A T I O N 4.1 CONTROL PANEL 1. Speed Dial 2. Horn Button 3. Forward/Reverse paddle 4. Battery Indicator 5. Key Ignition 6. Power Eye 7. Head Light/Rear Light Button 4.2 HOW TO OPERATE YOUR SCOOTER Key Ignition ♦... -
Page 12: Horn Button
4 . O P E R A T I O N ♦ The paddle allows you to control the speed of the scooter up to a maximum speed determined by the speed Dial. The further the paddle is deflected, the faster the scooter will go. Horn Button Press the horn button to sound the horn. - Page 13 4 . O P E R A T I O N Battery Indicator ♦ The battery indicator on the tiller console uses a color code to indicate the approximate power remaining of you batteries. Green indicates (40 ~100%) capacity, yellow a draining charge(10 ~30%),and red indicates that an immediate recharge is necessary.
-
Page 14: How To Set To Freewheel Mode
4 . O P E R A T I O N 4.3 HOW TO SET TO FREEWHEEL MODE ♦ Engaged mode (Fig. 4.1): Lift the freewheel lever up completely. ♦ Freewheel Mode (Fig 4.2) Push the freewheel lever down completely, the scooter can be moved manually. -
Page 15: Driving On The Road
5 . D R I V I N G O N T H E R O A D Starting and Driving 1. Make sure the seat is installed properly. 2. Make sure the tiller has been secured properly. 3. Fold down the armrests so you can rest your arms on them. 4. - Page 16 5 . D R I V I N G O N T H E R O A D Stopping 1.Release the speed paddle completely. The vehicle will naturally brake and stop. 2.Turn the scooter off at the key ignition. Then pull out the key. F...
-
Page 17: Battery Charging And Care
6 . B A T T E R Y C H A R G I N G A N D C A R E 6.1 CHARGING THE BATTERY Follow the procedure below step by step: 1. Turn the power switch to (OFF) 2. - Page 18 6 . B A T T E R Y C H A R G I N G A N D C A R E & Suggestion 1. Do not disconnect the charger cord if charging is not completed. The battery life will be seriously shortened or decayed if the battery is repeatedly used without being fully charged.
-
Page 19: Charger
6 . B A T T E R Y C H A R G I N G A N D C A R E 6.2 CHARGER Both the chargers red and orange LED will be switched ON during charging. The orange LED will turn green when charging completed. - Page 20 Charging the battery ♦ Using the charger supplied with the scooter, the charging is about 8 hours. 7 . I N S P E C T I O N A N D M A I N T E N A N C E 7.1 DAILY CHECKING Check following items before driving.
-
Page 21: Inspection And Maintenance
7 . I N S P E C T I O N A N D M A I N T E N A N C E 7.2 REGULAR CHECKING RECORD To make sure your scooter is correctly serviced, take it to your dealer for regular maintenance checks. -
Page 22: Battery, Fuse And Tyre
7 . I N S P E C T I O N A N D M A I N T E N A N C E 7.3 BATTERY, FUSE AND TIRE Battery Refer to the section entitled “6.3 BATTERY” in “6. BATTERY CHARGING AND CARE ”. -
Page 23: Maintenance
7 . I N S P E C T I O N A N D M A I N T E N A N C E 7.4 MAINTENANCE ♦ You must maintain the vehicle frequently if you drive on grass, sand, or gravel or in other adverse environments. -
Page 24: Disassembling The Scooter
7 . I N S P E C T I O N A N D M A I N T E N A N C E 7.7 DISASSEMBLING THE SCOOTER The scooter can be disassembled into five pieces, the seat (weight 13.5lbs.),the front section (weight 55lbs), the rear section (weight 44lbs),and batteries (weight 24lbs),without any tools please follow the steps and photographs below: 1. -
Page 25: Assembling The Scooter
7 . I N S P E C T I O N A N D M A I N T E N A N C E 7.8 ASSEMBLING THE SCOOTER & Suggestions The assembly process is essentially the disassembly process in reverse. First study the text and photographs in the disassembly procedure before re-assembling the scooter. -
Page 26: Trouble Shooting
8 . T R O U B L E S H O O T I N G If you have trouble with your scooter you can inspect the following before taking your scooter to the dealer: If you cannot save the problem, contact your dealer for assistance. Problem Symptom Remedy... -
Page 27: Specification
9 . S P E C I F I C A T I O N Model Reference Daytona 3 GT Daytona 4 GT Dimension 47.4" x 22.8" x 40" 49.6" x 22.8" x 44" (L x W x H) Weight(Kg),W/I battery 125 lbs 136 lbs W/O battery... -
Page 28: Warranty
1 0 . W A R R A N T Y Your Drive brand product is warranted to be free of defects in materials and workmanship as follows: Chair/Scooter frame: Lifetime Electronic Controller and drive train components: 1 year Batteries: 6 months from time of installation This device was built to exacting standards and carefully inspected prior to shipment. - Page 29 DRIVE AUTHORIZED SERVICE AGENT NAME ADDRESS TELEPHONE EMAIL...
- Page 30 Warranty Registration Please type or print. Serial # _______________________________________ Date Purchased ____/____/____ Owner Name ____________________________________________________________ Address _________________________________________________________________ City ____________________________________ State ________ ________ Additional Required Owner Information Please indicate your understanding of your scooter by completing the following information. ________ I have read and fully understand _______ Owner’s Manual, especially sections on operating instructions, safety guidelines, maintenance and battery instructions.
- Page 32 Drive Medical Design & Manufacturing 99 Seaview Blvd Port Washington, NY 11050 516.998.4600 (Phone) 516.998.4601 (Fax) 877.224.0946 (Toll Free) www.drivemedical.com...
Need help?
Do you have a question about the S35005GT and is the answer not in the manual?
Questions and answers
I have a drive scout scooter but no key
You can obtain a key for the Drive Medical Scout scooter, part number S35005GT, by purchasing an AlveyTech replacement key. These keys are compatible with various Drive scooters, including the Scout, and are available in sets of 2.
This answer is automatically generated
@Valerie I'm sorry to hear that you've lost the key to your Drive Medical Scout scooter. Fortunately, there are straightforward solutions to resolve this issue. Replacement Key Options You can obtain a replacement key specifically designed for your Drive Medical Scout scooter. These keys are compatible with various versions of Scout. These keys are available for purchase from various retailers. For instance: * **Monster Scooter Parts** offers replacement keys for the Drive Bobcat, Scout DST, and Spitfire Scout models. * **Amazon** provides keys compatible with Drive Medical Scout and Bobcat scooters. * **LivingWell Stores** stocks keys suitable for Drive Medical Scout and Bobcat scooters. These keys are typically priced between \$10 and \$16, depending on the retailer. Alternative Solutions If obtaining a replacement key is not immediately feasible, consider the following options: * **Contact the Manufacturer**: Reach out to Drive Medical's customer support to inquire about obtaining a replacement key or key switch. * **Visit a Local Locksmith**: Some locksmiths can create a new key based on the scooter's ignition switch. * **Replace the Ignition Switch**: If the ignition switch is damaged or you prefer a new key, you can replace the entire ignition switch assembly. This typically includes a new key and wiring harness. Important Considerations **Compatibility**: Ensure that any replacement key or ignition switch is compatible with your specific scooter model. **Security**: If your scooter is used in public spaces or shared environments, consider replacing the ignition switch to enhance security. If you need further assistance or have additional questions, feel free to ask us at info@mobilitymanuals.com