
Related Manuals for Drive Medical Odyssey Mobility Scooter


Summary of Contents for Drive Medical Odyssey Mobility Scooter
- Page 1 OWNERS MANUAL & INSTRUCTIONS 12 Harbor Park Drive, Port Washington, NY 11050 Toll Free: 877-224-0946 • 516-998-4600 Website: www.drivemedical.com...
-
Page 2: Table Of Contents
TABLE OF CONTENTS PREFACE & INTRODUCTION SAFETY NOTICE Before Driving While Driving Labeling PARTS INTRODUCTION Parts Description OPERATION Control Panel How to Operate Your Scooter DRIVING ON THE ROAD BATTERY CHARGING AND CARE Charging The Battery Charger Battery INSPECTION AND MAINTENANCE Inspection Regular Checking Record Battery, Fuse and Tire... -
Page 3: Preface & Introduction
PREFACE AND INTRODUCTION Please carefully read this owner’s manual before using the vehicle. Improper use of the vehicle could result in harm, injury or traffic accidents. Therefore for maximum pleasure while using the vehicle please read this owner’s manual. • This owner’s manual includes operation instructions for every aspect of the vehicle, assembly instructions, as well as instructions for how to deal with possible accidents. -
Page 4: Safety Notice
SAFETY NOTICE Before Driving The user needs to be familiar with the usage and operation of this vehicle before driving. Therefore, please always keep the following safety notices in mind. THE SAME TRAFFIC RULES APPLY TO THE USE OF THIS VEHICLE AS APPLY TO PEDESTRIANS •... -
Page 5: Automatic Power Shut Down
SAFETY NOTICE WHILE DRIVING • Please carry out daily inspections. • Refer to the section entitled “DAILY CHECKING” • Do not move your body out of the vehicle while moving • Such action may cause you to loose balance and risk injury from falling. •... -
Page 6: Starting And Driving
SAFETY NOTICE STARTING AND DRIVING 1. Make sure the seat is installed properly. 2. Make sure the tiller has been secured properly. 3. Fold down the armrests so you can rest your arms on them. 4. Turn the power switch to “ON”. If necessary, turn on the headlights. 5. - Page 7 SAFETY NOTICE STOPPING 1. Release the speed control lever completely. The vehicle will naturally brake and stop. 2. Turn the power switch to (OFF). Then pull out the key. LABELING Please carefully read all labels on the scooter before driving it. For your future reference, do not remove them.
-
Page 8: Emi
SAFETY NOTICE This portion of the content will provide the user with basic information that describes the problems with EMI, known sources of EMI, protective measures either to lessen the possibility or exposure or to minimize the degree of exposure, and suggested action should unexpected or erratic movement occur. -
Page 9: Important Information
SAFETY NOTICE 3. Long-range transmitters and transceivers, such as commercial broadcast transmitter (radio and TV broadcast antenna towers) and amateur (HAM) radios. NOTE: Other types of hand-held devices, such as cordless phones, laptop computers, AM/FM radios, TV sets, CD player, and cassette players, and small appliances, such as electric shavers and hair dryers, so far as we know, are not likely to cause EMI problems to your powered scooter. -
Page 10: Parts Introduction
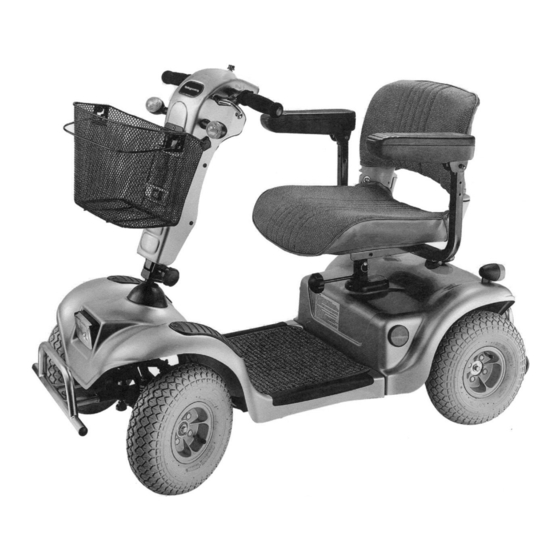
PARTS INTRODUCTION PARTS DESCRIPTION 1. Speed Dial 2. Armrest 3. Front Indicator Lamp 4. Charger Socket Cover 5. Basket 6. Tiller 7. Tiller Adjustment Knob 8. Head Lamp 9. Seat 10. Seat Rotation Lever 11. Hand Brake Lever 12. Side Reflector 13. -
Page 11: Operation
CONTROL PANEL 1. Speed Dial 2. Horn Button 3. Indicator lamp switch 4. Head light / Rear Light Button 5. Speed Control Lever 6. Battery Indicator 7. Power Switch 8. Indoor/Outdoor switch HOW TO OPERATE YOUR SCOOTER Power switch Turn the key to power ON or OFF (ON) : Power is turned on (OFF) : Power is turned off Speed Dial... - Page 12 OPERATION Horn Button Press the horn button to sound the horn. Release the button to stop the horn. Light Button Push the light button to switch the front and rear lights on. Push the button again to turn the lights off. Battery Indicator •...
-
Page 13: Tiller Adjustment
OPERATION BRAKING Electro-magnetic brake: Release the speed control lever completely, and the electromagnetic brake will be activated automatically, and the scooter will stop. WARNING When on a gradient NEVER switch the vehicle to the freewheel mode. The electromagnetic brakes will not be applied. This may result in injury. SEAT •... - Page 14 OPERATION WARNING Please hold the tiller before loosing the tiller adjustment knob. Otherwise a fall from the scooter could occur causing bodily injury and/or damage to scooter. Manual Brake As well as an electromagnetic brake, your scooter has a manual cable brake. Squeeze the brake lever to apply the brake and then release the lever to release the brake.
- Page 15 OPERATING YOUR ODYSSEY STARTING AND DRIVING 1. Make sure the seat is installed properly. 2. Make sure the tiller has been secured properly. 3. Fold down the armrests so you can rest your arms on them. 4. Turn the power switch to “ON”. 5.
- Page 16 OPERATING YOUR ODYSSEY MAIN CIRCUIT BREAKER (RESET BUTTON) When the voltage in your scooter’s batteries becomes low or the scooter is heavily strained because of excessive loads or steep inclines, the main circuit breaker may trip to protect the motor and electronics from damage. The location of the circuit breaker is shown by the arrow on the photograph (left).
-
Page 17: Battery Charging And Care
BATTERY CHARGING AND CARE CHARGING THE BATTERY Follow the procedure below step by step: 1. Turn the power switch to (OFF) 2. Connect the charger’s power cord into the power outlet. 3. Open the charging socket cap on the scooter’s tiller. Then connect the charger’s round plug to the charging socket. -
Page 18: Charger
BATTERY CHARGING AND CARE ATTENTION: Please follow the rules below to avoid accidents while charging. 1. Please use the charger that comes with your scooter only, and recharge the battery to its full capacity every time. You may damage the battery and scooter if you use a charger, which is not to the correct specification. -
Page 19: Cleaning The Battery
BATTERY CHARGING AND CARE BATTERY • Do not expose the battery to temperatures below 50°F or above 122°F when charging or storing the vehicle. Under the above temperature range can cause the battery either to freeze or over heat. This will damage the batteries and shorten their life. •... -
Page 20: Inspection And Maintenance
INSPECTION AND MAINTENANCE DAILY CHECKING Check following items before driving. If your find anything abnormal, contact an authorized dealer for further inspection or advice before using the battery. ITEM HANDLEBAR SPEED CONTROL DIAL SPEED CONTROL LEVER • Does the scooter move when the lever pressed down? MOTOR FREEWHEEL MODE BATTERY INDICATOR... -
Page 21: Regular Checking Record
INSPECTION AND MAINTENANCE REGULAR CHECKING RECORD To make sure your scooter is correctly serviced, take it to your dealer for regular maintenance checks. This should be at intervals of six months after the first inspection after one month. Your dealer may charge a fee for this. SUGGESTION Even if you don’t use the vehicle for a long time it should still be regularly maintained. -
Page 22: Battery, Fuse And Tire
INSPECTION AND MAINTENANCE BATTERY, FUSE AND TIRE BATTERY Refer to the section entitled “BATTERY” in “BATTERY CHARGING AND CARE ”. FUSE If the battery charger is turned on and no LEDs are lit, check the battery charger fuse. SUGGESTION Ask for help from your dealer to inspect or replace the fuse, since the tiller shroud has to be removed first before you can replace the fuse. -
Page 23: Storage
INSPECTION AND MAINTENANCE ATTENTION 1.When tread depth is below 0.5 cm it can easily lead to vehicle slippage, making braking distances longer. Therefore replace the tires as early as possible when they are found to have insufficient tread depth. ATTENTION When conducting maintenance of your vehicle, please turn the power switch to OFF and remove the charger cords. -
Page 24: Disassembly And Assembly
DISASSEMBLY AND ASSEMBLY DISASSEMBLING THE SCOOTER The procedures for assembling and disassembling are very similar for the scooters. The following procedure is to disassemble the scooter for transportation: 1. Switch off the scooter at the key ignition. 2. Unscrew the seat hand wheels and remove seat. -
Page 25: Trouble Shooting & Specification
TROUBLE SHOOTING AND SPECIFICATION TROUBLE SHOOTING AND SPECIFICATION You can inspect the following before taking you scooter to the dealer. PROBLEM SCOOTER WILL NOT SWITCH ON THE SCOOTER SWITCHES ON, BUT THE SCOOTER WILL NOT MOVE. THE SCOOTER APPEARS SLOW THE SEAT TURNS WHEN IN OPERATION THE HANDLEBAR... -
Page 26: Specification
SPECIFICATION MODEL REFERENCE DIMENSION (L X W X H) WEIGHT, WITHBATTERY WITHOUT BATTERY BATTERY CHARGER FRONT TIRE REAR TIRE DRIVING SYSTEM BRAKE SYSTEM CONTROL METHOD MAX. SPEED CLIMBING ANGLE CRUISING RANGE MAX. USER WEIGHT (INCLUDING GOODS) REMARK: Drive reserves the right to modify the specification if necessary. The final specification is subject to the individual scooter you purchase from your dealer. -
Page 27: Limited Warranty
LIMITED WARRANTY Life Time Warranty: Scooter frame We will repair the frame with new or refurbished parts, free of charge, In the USA in the event of defective materials or workmanship. One Year Limited Warranty: • Electronic controller • Drive train components Drive will repair these products with new or refurbished parts, free of charge, in the U.S.A. - Page 28 LIMITED WARRANTY Warranty Exclusions • ABS plastic shrouds • Batteries (batteries are warranted by the battery manufacturer) • Tires and Tubes This warranty is extended only to the original purchaser. Your original receipt will be necessary as proof of purchase before any warranty performance is rendered. This warranty only covers failures due to defects in materials or workmanship which occur during normal use and does not cover damage that occurs in shipment or failures which are caused by products not supplied by Drive or failures resulting from accident,...
-
Page 29: Warranty Registration
Warranty Registration Please type or print Serial#__________________________________________Date Purchased___/___/___ Owner Name ___________________________________________________________ Address _______________________________________________________________ City ______________________________________State ________ Zip ____________ Additional Required Owner Information Please indicate your understanding of your Scooter by completing the following information. _________ I have read and fully understand __________ Owners Manual, especially sections on operating instructions, safety guidelines, maintenance and battery instructions. - Page 30 FIRST HERE FOLD Place Stamp Here 12 Harbor Park Drive Port Washington, NY 11050 FOLD HERE SECOND STAPLE TAPE WITH SEAL...
- Page 31 12 Harbor Park Drive, Port Washington, NY 11050 Toll Free: 877-224-0946 • 516-998-4600 Website: www.drivemedical.com...
Need help?
Do you have a question about the Odyssey Mobility Scooter and is the answer not in the manual?
Questions and answers
is charged and screen bar goes down on flat and then goes blank. Also screen when moving changes. Have no idea what speed I **** doing as well as why the screen mgs are chopping and changing
The screen on a Drive Medical Odyssey Mobility Scooter could go blank and display changing messages while in motion due to battery issues. The battery indicator light may fluctuate when driving on a gradient, which is a normal phenomenon. Additionally, if the battery capacity has significantly reduced over time, it may lead to performance issues. If the issue persists, the user should check the battery charge, ensure proper connections, and contact an authorized Drive dealer if necessary.
This answer is automatically generated
@Nancy Haley Hi! I'm sorry to hear about the issues with your Drive Medical Odyssey scooter's display and speed readings. Let's work through this together to identify potential causes and solutions. Troubleshooting Steps 1. **Check Battery Connections**: Even if the scooter is charged, loose or corroded battery terminals can cause inconsistent power delivery, affecting the display and speed readings. Ensure the battery terminals are clean and securely connected. 2. **Inspect Wiring and Connectors**: Loose or damaged wiring, especially in the "Y" cable that connects the battery to the controller, can lead to erratic display behavior and loss of power. Over time, vibrations can cause these connections to loosen. Check all wiring and connectors for any visible signs of wear or disconnection. 3. **Perform a Reset**: Your scooter may have a reset button located under the seat or on the control panel. Press and hold the reset button for 10 seconds to reboot the system. This can clear minor glitches and restore normal function. 4. **Check for Diagnostic Flash Codes**: Some models display error codes through flashing lights on the control panel. If your scooter has this feature, observe any flash patterns and refer to the owner's manual for interpretation. 5. **Inspect the Throttle and Speed Potentiometer**: A faulty throttle or speed potentiometer can cause erratic speed readings and display issues. Check these components for proper function and calibration. 6. **Monitor Environmental Factors**: Extreme temperatures can affect electronic components. If you're operating the scooter in cold conditions, this might contribute to the issues. Allow the scooter to warm up to room temperature and see if the problem persists. Additional Consideration ***Controller Issues**: A malfunctioning controller can cause various electrical problems, including display and speed inconsistencies. If other troubleshooting steps don't resolve the issue, the controller may need to be inspected or replaced. If you need further assistance or need more details about this issue, feel free to ask us at info@mobilitymanuals.com
Removal of battery
tire wheel removal to install a new tire? Bolts are allen insert What size allen tool is needed?